


Inspectorjack
-
Posts
106 -
Joined
-
Last visited
Content Type
Profiles
Forums
Events
Articles
Marionette
Store
Posts posted by Inspectorjack
-
-
48 minutes ago, JuanP said:
Would you mind sharing the link from the 2021 Online Help, so can we fix the issue? Thanks.
Hello Juan,
I went back through my history and it was actually not 2021 help, it was 2016. I have been searching around and wound up here.
-
13 minutes ago, Wes Gardner said:
Thanks for this tip. It seems the associative points can be determined by the green squares. Yes, I get them on the wall vertices but not on the PIO window objects anywhere. I can move walls and have the Associated dimensions update. Just need to figure out the PIO settings that will allow this as well. Thanks again.
-
Thanks for the replies. Sorry for hijack. I am using 2021 and Associative Dimensions is checked and this does not work me. I'll keep digging.
-
Is there a way to lock dimensions in a VP to the design layer elements? ie: IF I choose to dimension in the VP and find I need to scoooch a window 1/4" for sensibility when I go back to the VP I won't have to RE-dimension the window location?
-
Case in point. VW 2021 help linked me to a 2012 Resource Browser YouTube video this morning! WTH?
-
 1
1
-
-
On 9/21/2020 at 4:55 PM, bentonboyd said:
I am building a screened porch as an addition to the back of my home (a single story home with truss roof system). My roof appears to be built as a raised heel truss with a bottom chord overhang (and these overhangs protrude into my new screened porch area, which will also be built with trusses running the opposite direction. I know cutting trusses is a no-no, but am wondering if the trusses can be modified to have a butt end or stub end (with a wedge or blocking) then the extended gable could be removed such that the exterior wall of my home runs directly up without having to have fascia or a bump out to cover the end of the existing trusses?
Are you saying the raised heels are outboard of the bearing wall?
Modifying the trusses is possible with a prescribed repair of glue, gussets (plywood) and nails. You will most likely need to devise the repair yourself on paper and have it P.E. stamped IMO.
-
Howdy,
Is there a repository of sharing style resources? I am looking for a wall style that uses Zip-R or similar sheathing.
Thanks
Jack
-
it might not apply here but I think there is a firmware patch related to the throttling also.
Personally I wish I could get those specs (well discrete graphics with big RAM) in the 13".
-
Does this info consider the new 16" MBP? Seems like the new 8 core i9, or even the 6 core i7 - either with the Radeon Pro 5550M 8 GB should be pretty powerful.
-
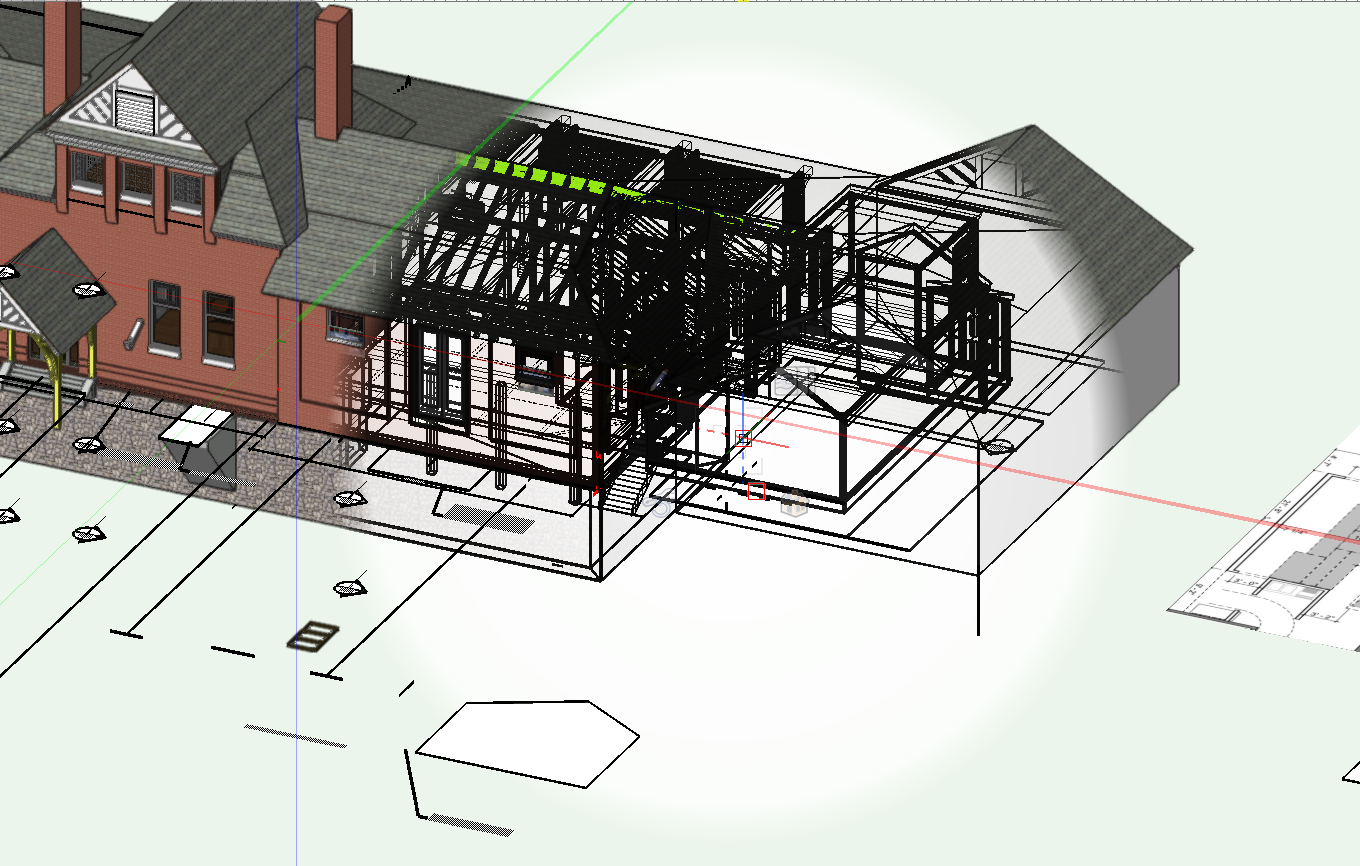
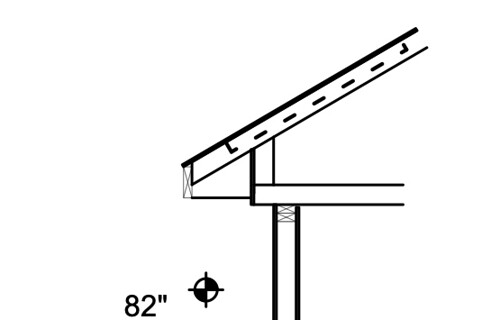
For my latest house my 2nd story will be partly comprised of a bedroom closet and laundry built within living space trusses over the garage.
I'm planning currently to "fake" the walls with the wall tool and model the roof. The walls will have a clipped 45° from ~6' to full height. I guess i can just reshape the walls to match the truss profile
Recommendations for workflow for this?
-
Leica have recently introduced the BLK2Go. https://blk2go.com. Can't find price yet.
My Structure Sensor with Canvas app does make a mesh .obj which can be imported. Haven't manipulated any meshes yet. I think there is some promise considering the relatively low investment.
-
Clip cube top view section viewport at level to capture coffered ceiling with some some 2D annotations for non-captured elements?
-
On 8/7/2019 at 4:50 PM, Rossford said:
Not sure I will attend quite yet to what would be my 3rd Summit. I hope to. Well worthwhile for those who haven't.
I can attest La Costa is a really, really neat venue for the event...….They were a client a few years back and I used to walk around singing that old Steve Martin song, "I can't believe I get paid for doing this!" (or, staying there...….perhaps 50 nights over a few years.)
That's probably not why they chose the venue....but if attendees play golf there, they may take pleasure in knowing the golf courses were redesigned several years ago......partially on Vectorworks (by yours truly) in conjunction with a firm using ACAD for other parts.
Definitely bringing our sticks and plenty of golf balls to lose!
-
I installed 2020 before starting to model this deck. It remains true that once you make a solid subtraction to a framing member it is no longer a framing member PIO. I used extrudes for the stair carriages.
On another note For the life of me I could not get the rails I wanted out of the rail tool (RDI vinyl rails). So I wound up fully modeling them.
-
What process or tool allows modifying a framing member while retaining the plug-in attributes. ie drawing a deck using 2x12s and cutting the member to be stair a carriage?
Is this possible?
-
1
-
-
IMO this is one of the main limitations of the Story setup.
The software should do the hard parts of the math for you via the Story setup diaglog. Thereby if as often is the case you change house elevation during to dig for some reason you can simply make 1 edit that cascades the changes through the model.
I posed this question in one of the model set threads. I try to set my 1st floor Z to anticipated or surveyor designated ELV. Then I do the math for all the layers or stories.
For simplicity the Story setup dialog should allow that method and alternatively allow setting Z to zero but/AND allow you to input a "0" House Z = DTM 604.67 as an example. Further the dialog should maybe allow you to point to the reference DTM file.
Doing it that way might take some of the confusion out.
-
30 minutes ago, mike m oz said:
You need to edit the Rustic Shutter symbol in your file and change the Class of its 3D components to the Class created for the rustic shutters.
Thanks a million Mike. Thats what I needed.
-
1
-
-
Started new template file. Created class for shutters. Gave it a texture. Created a window with rustic shutters. No textures.
-
Thank you for the help guys. I have something buggy going on but I copied mike's window into my file and changed my shutters to his shutter class and I can now change the texture of the rustic shutters. Interestingly even if I change the window's shutter class to a class I created I cannot change the texture AND the graphic control is still dictated by Mike's imported class. Dunno don't care that much at this point. This house will be sided and done soon.
I'll be updating to latest SP or 2020 and check to see if this is resolved for my next house.
-
It seems that my issue is that I am trying to color or texture a "Custom Shutter". Tried on Wes' shutter.test file as well (switch to custom shutter and texture does not apply). As shown I am using the Rustic shutter and I cannot change its attributes it seems without changing the window itself as well.
Opening Wes' shutter.test gives me window classes along with window and trim classes. My own file does not have these classes. Wes did you create these classes or are the generated by the Window tool?
-
5 hours ago, Wes Gardner said:
@Inspectorjack, are you really on V2012? If so, there have been a few changes in the Window/Door PIOs (plug-in objects)...maybe post a window in a file...
Wes
I am in fact running 2019 SP3. This file was created in 2018 if memory serves my correctly.
-
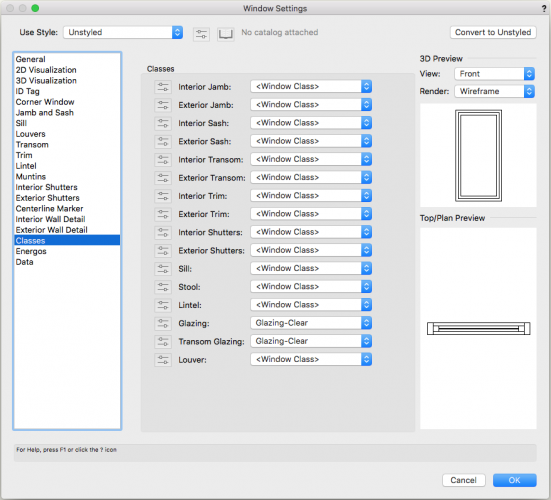
Looking at the Window Tool Settings dialog as posted there by Mike, the only classes that are created by window insertion are Glazing. The other <Window Class> does not appear to exist in my file. I did create a class for the shutters but it has no effect on the already inserted shutters.
-

The windows are VW2019 Windows tool objects. Update Plug-in objects did not seem to work.
In the OIP I can change the Texture such as Arroway Walnut Black getting me close but that changes the window and the shutter at the same time.
Thats the closest I can get to what I want for now,
-
3 hours ago, mike m oz said:
You control the appearance of the different components of the Window object by Classes.
- Create a unique Class for the external or internal shutters, choose the colour you want (or the texture you want) and set the Class properties to Use at creation.
- Then assign that Class to the external or internal shutters in the Window Settings dialog box.
Ok thank very much for this reply. This works for new windows but doesnt seem to allow to set the class for existing window shutters so I guess I have to re-create the windows that have shutters so I can control their graphic attributes?? Seems overly clunky.


Wall Style with Zip-R sheathing?
in Architecture
Posted