All Activity
- Past hour
-
Quite right that the Control Point is going to be based off of the PIO insertion point, and you did exactly the right thing to compensate for that. As a gentle warning, also make sure that your plug-in still works if the user origin doesn't match the internal origin. Nearly every VS function references the internal origin, so things can get screwy especially if you're using a plug-in that's saving coordinates into a text field. In those cases, you will need to use GetOriginInDocUnits to pull the user origin to compensate.
-
Working: def PickTest(): linkedPos = 'Unlinked' bool, objName, objHd, recHd, wallHd = vs.GetCustomObjectInfo() if objName: x, y = vs.GetSymLoc(objHd) pointx = vs.PControlPoint01X + x pointy = vs.PControlPoint01Y + y point = (pointx, pointy) pickHd= '' #FindObjAtPt Process container = vs.Handle() list = vs.FindObjAtPt_Create(container, 1, 0, pointx, pointy, 100) count = vs.FindObjAtPt_GetCount(list) for i in range(count): pickHd = vs.FindObjAtPt_GetObj(list, i) vs.FindObjAtPt_Delete(list) #If a handle was found and if it's Truss if pickHd and vs.GetObjectVariableInt(pickHd, 1165) == 641: if(vs.GetRField(pickHd,'TrussItem','PositionName') != linkedPos): linkedPos=vs.GetRField(pickHd,'TrussItem','PositionName') vs.SetRField(objHd,vs.GetName(recHd),'linkedPos',linkedPos) vs.ResetObject(objHd) vs.Locus(0,0) vs.CreateText(linkedPos) text=vs.LNewObj() vs.SetClassN(text, 'Lighting-Position-'+ str(linkedPos),False) vs.SetPenColorByClass(text) PickTest()
- Today
-
Hello @will2023, I believe you have submitted the file for the tech team to look into. We are working on the file and we will get back to you as soon as possible. Il update this thread with the resolution as well.
-
That did look promising, but looking at the function reference, there is a note of: Looks like VS:FindObjAtPt_Create, VS:FindObjAtPt_GetObj might be an option that supports a radius, which I will try, although the function doesn't seem to trigger intellisense which doesn't seem a good sign.
-
Maybe also look at ForEachObjectAtPoint which allows you to specify a radius rather than needing an absolute point. But I think you are correct about having to pass world coordinates not PIO coordinates.
-
I think part of the problem is that the control point coords are relative to the insertion point of the PIO, whereas I need to give vs.PickObject absolute coordinates. Will continue on this more tonight.
-
I've gotten to this point. If I uncomment point = vs.GetSymLoc(objHd) and comment out point = (vs.PControlPoint01X, vs.PControlPoint01Y) then placing the PIO directly on the truss works fine and the text reclasses it self suitably. But as-is, it reports a valid set of coords but reports no handle. I don't know if it's something to do with the way I'm packing the tuple, but I usually have good results packing and unpacking tuples for x/y points. def PickTest(): #linkedPos = PlinkedPos linkedPos = 'Unlinked' bool, objName, objHd, recHd, wallHd = vs.GetCustomObjectInfo() if objName: #point = vs.GetSymLoc(objHd) point = (vs.PControlPoint01X, vs.PControlPoint01Y) vs.AlrtDialog(f'You picked point x-{vs.PControlPoint01X} y-{vs.PControlPoint01Y}') pickHd= vs.PickObject(point) vs.AlrtDialog(f'Handle is {pickHd}') if pickHd and vs.GetObjectVariableInt(pickHd, 1165) == 641: if(vs.GetRField(pickHd,'TrussItem','PositionName') != linkedPos): linkedPos=vs.GetRField(pickHd,'TrussItem','PositionName') vs.SetRField(objHd,vs.GetName(recHd),'linkedPos',linkedPos) vs.ResetObject(objHd) vs.Locus(0,0) vs.CreateText(linkedPos) text=vs.LNewObj() vs.SetClassN(text, linkedPos,False) vs.SetPenColorByClass(text) PickTest()
-
 Yes I prefer that approach with the surface hatch textures. Some members of our office use the polygons in order to quantify the tile area (into a worksheet). In my opinion, that's the builders job. In this case we even had a separate wall style for the tile, so a texture makes a lot of sense, and I imagine we could pull the quantities from that wall style. Also, we usually just need a generic representation of tile. We show where we think tile should go, but it's usually the homeowner or interior designer who actually designs the tile layout. So we don't fuss too much, but the polygons are forcing us to fuss whenever the design changes. Not to be too fussy, but do you know why the hatch in your Hidden Line rendering is a slightly different pattern than what appears in the Shaded version? Our office has struggled to maintain a consistent pattern between the two render modes. Thanks again. Ed
 -
Update: It was because of the user origin as you suggested. I could fix it easily with this bit of code: custom_origin:= FALSE; GetOrigin(x_origin, y_origin); IF ( x_origin <> 0 ) OR ( y_origin <> 0 ) THEN custom_origin := TRUE; And inside the TempTool Function: IF custom_origin = TRUE THEN BEGIN x := x + x_origin; y := y + y_origin; END;
-
 there is a defringe and matting tool in photoshop, you can specify how many pixels of "fringe" you want to cut off. Doesn't let vw off the hook for not providing alpha transparency export tho.
 -
@Jeff Prince Thank you! Those renderings are now good enough to send to the homeowner for comment. The fact that the one camera was coincident with the wall geometry is a humorous stroke of bad luck. I don't consciously use cameras to set up these views. I navigate to where I want to look using my Space Navigator (more recently called Space Mouse from 3D Connexions), and then choose Create Viewport. Now I see that I can click on Edit Camera from the VP to make adjustments. I appreciate your time and help! Ed
-
Hello @Klisty Renderworks textures might be disabled if the Loading Cineware step of launch takes more than 2 minutes. If you restart Vectorworks do you get textures again?
-

Multi-storey building all in one storey - would this work?
line-weight replied to line-weight's topic in Architecture
Ah right. Yes, this is bringing back memories of things that I found very confusing when I was first trying them out, but I can't now remember exactly the details. Is it something to do with the difference between a "level" and a "level type"? Because in my setup I think I only use "level types" and disregard what happens to levels that are intended to repeat in multiple stories. I think I must have "layerless levels" but where is it that you make the choice between a layerless level and a story level? If it's any help, below are the instructions I wrote myself a few years back for setting up new files. They seem to work. I had to write these for myself because the whole thing is so confusing. Storeys & levels Currently testing: have one ‘general storey’ and all levels assigned to this This means “level” and “level type” are in effect the same thing, because there will only be one instance of each level type New file setup: First step for new file - go to organisation dialogue, stories tab, click “default storey levels” button and delete all Now do same clicking on “level types” button and deleting all This makes clean start so only newly created desired levels are visible. Create a new storey called “general” and assign any relevant layers to it.** Give that storey elevation = 0** Leave Layer Name Prefix/Suffix box as it is - can’t make it blank. Is not relevant if using only one instance of each level type.** **(assuming using one-storey setup) Make a new level: To make a new level, go to organisation dialogue, stories tab. Highlight relevant storey, click “edit” Brings up “edit storey” dialogue, click “new level” Invites choice of an existing “level type” via dropdown, can use an existing type, or choose “new level type” within dropdown Allows naming of new level type Then specify elevation (don’t tick ‘create layer’) *tick “use elevation benchmark” (what does this actually do? Chooses benchmark style to use by default? This doesn’t seem to happen) Will appear in the list of levels in the “edit storey” dialogue, need to add tick against it to make active (must do this before exiting dialogue or it simply disappears!) NB there can only be one instance of “level type” per storey (therefore per file, if all levels assigned to one storey) Change level name: go to organisation dialogue, stories tab, “level types” button Highlight and edit level type name as desired. (NB this changes name of all instances of level type, but there will only be one instance anyway in a one general storey setup) Change a level’s elevation: go to organisation dialogue, stories tab, highlight the storey that the level’s assigned to, press edit button Edit elevation as desired (NB this edits elevation of that instance of the level type. In general storey setup there will only be one instance anyway) Delete a level: Deleting a level type doesn’t delete instances of that level that already exist in the file To delete a level instance, go to organisation palette, stories tab, highlight the storey that the level’s assigned to, press edit button Untick the relevant level Now any objects previously bound to it will show as bound to “[deleted level name] (doesn’t exist)” To completely get rid of a level, need to delete the level type and also any instance of it per storey. (There will only be one instance in a general storey setup) Does deleting levels cause issues? Yes I think it might, does it make things revert to a random layer elevation instead? May be best not to, and prefix active levels with * -
Yes I think the documents work with some kind of secondary origin. Maybe from georeferencing (Probably not a rotation because everything is still displayed with the right angles). I will have to look into that.
-
@CAD Cadet Glad it's working for you, soon it will be much better https://www.vectorworks.net/en-US/public-roadmap !
-
 TheBonden joined the community
 -
hi i'm looking for some different parts for my bright plan stairville led bar 240/8 rgb dmx 30° BeamZ Panther 25 LED Spot MovingHead Stairville LED PAR 56 black 151 LEDs RGB GENI COLOR BLASTER 250 Wide Hard Edge Dichroic Beams with 10 Dichroic Colors + White
-

Multi-storey building all in one storey - would this work?
Tom W. replied to line-weight's topic in Architecture
No I meant 'story layers' (or 'layer levels'?) as designated by the stacked layers icon in the stories preview pane: I was thinking that your set-up according to those earlier screenshots seemed to include story levels only ('layerless levels') + no story layers. But in your new post I can see from the Design Layer tab that you have layers which are 'within' or 'assigned' to a story (as you say) + yet they don't show up as story layers in the Stories tab... So assigning a design layer to a story via the drop-down in the 'Story' column of the Design Layers tab gives objects on those layers access to the story levels right? But that's different to a 'story layer' created within the story settings + designated with the stacked layers symbol? This is what I've got in my file: So I've got four 'story layers' plus 23 'normal' layers, none of which have I 'attached' to the story yet... In the notes I made ages ago when I first looked at stories it says that each story must contain at least one story layer but that doesn't seem to be the case in your set-up?
-
Oh it worked, not sure if I was hitting or not. I finally completed what I carefully and could not get this. I did before so easily. Thank you for your help!!! I am now going to set dpi on viewports to print better for pdf (smaller sizes) any tips please send my way. I have saved clip of video to edit sheet and change to 300 dpi. Any other good tips.
-
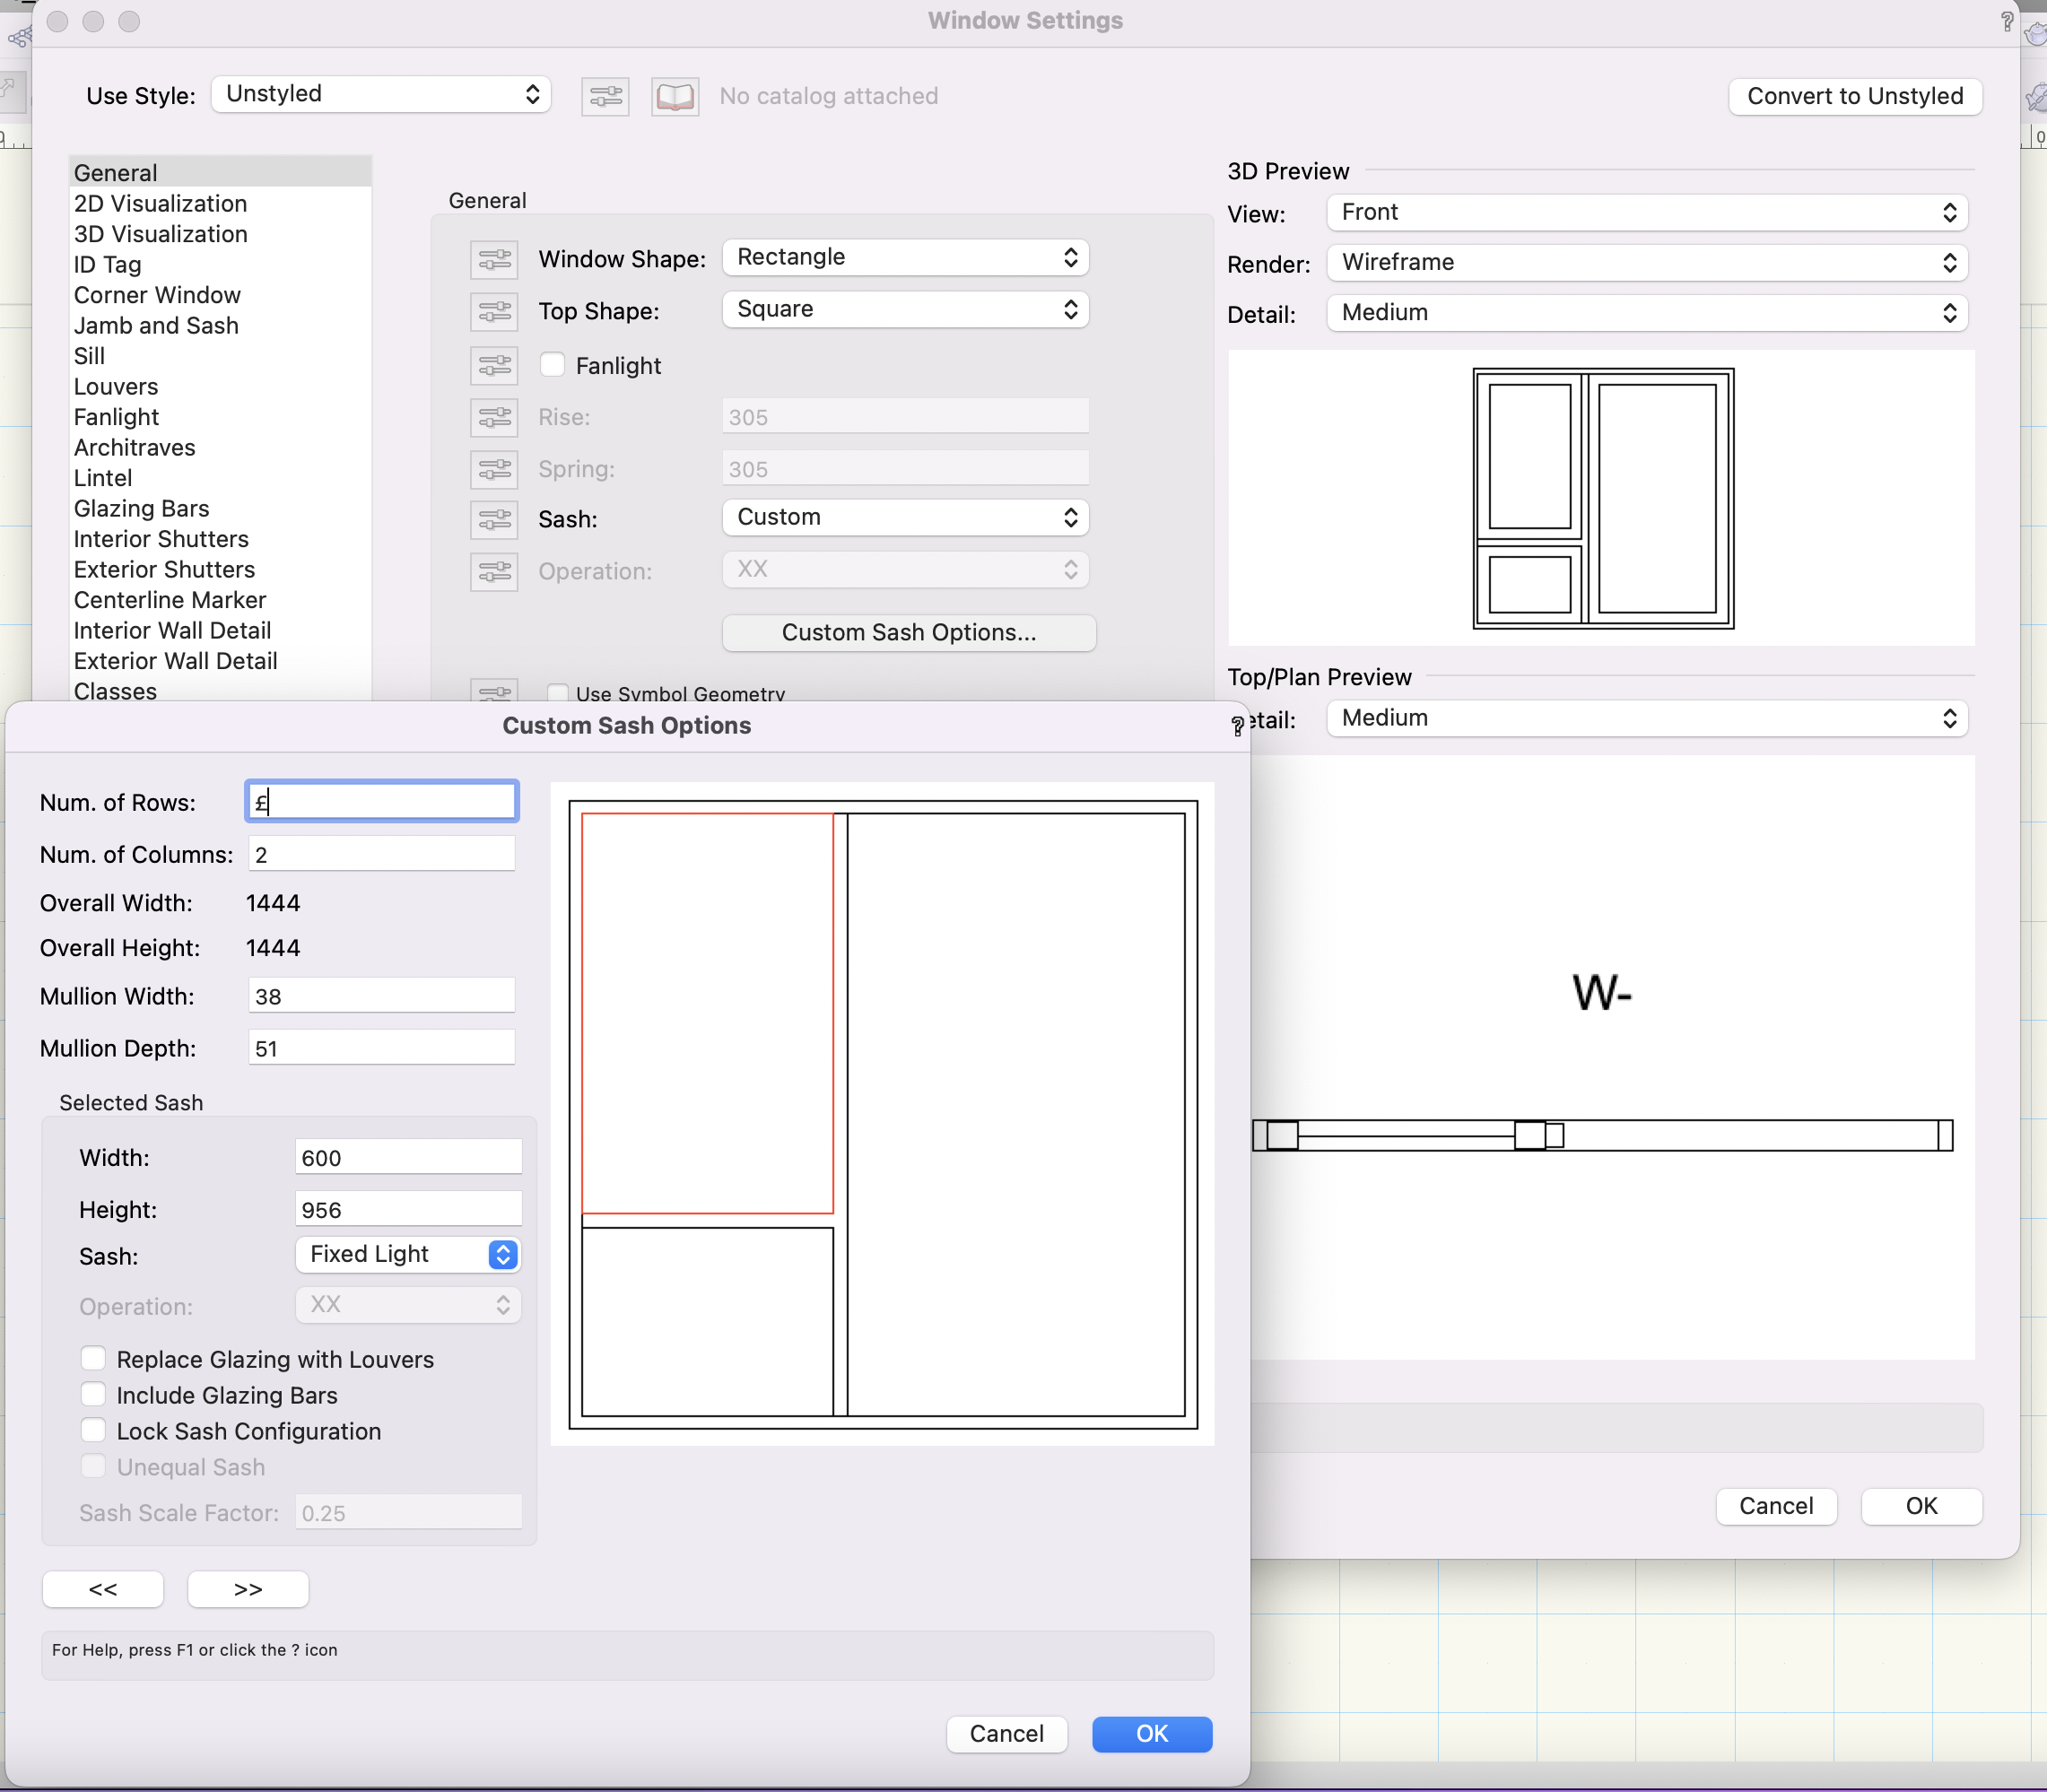
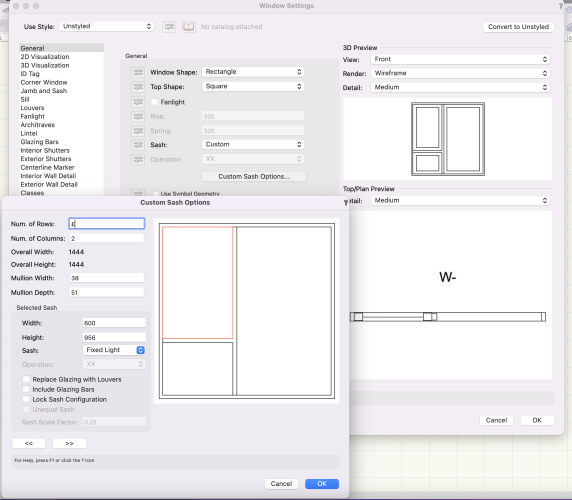
Thank you so much all, especially @JuanCarlos Ive been able to model custom windows today, even a new one I hadn't realised I could do with this same method. Thank you so much for the top tip! Happily modelling again now and no longer procrastinating around modelling what were awkward windows!
-

macOS 14.4 Compatibility Issues with Vectorworks
SJAllyn commented on JuanP's article in Tech Bulletins
That’s outstanding news, I hope that gets released very soon. -
That looks to all be correct. Last thing to check is that you are in a top/plan view not a top view. If so I would contact support.
-
Multi-storey building all in one storey - would this work?
line-weight replied to line-weight's topic in Architecture
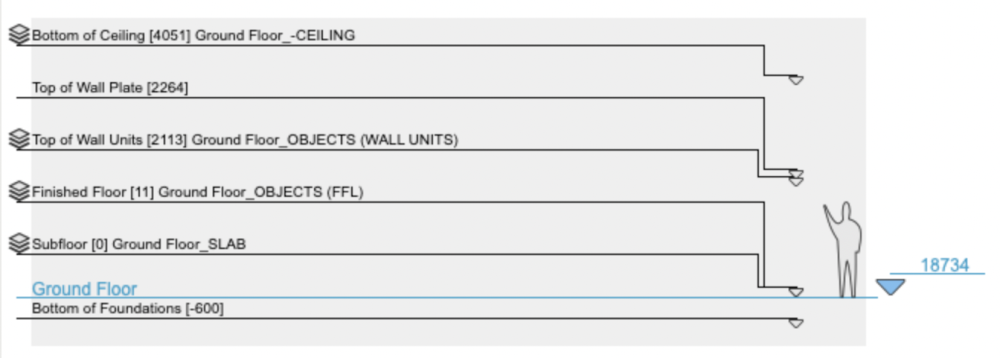
By way of illustration, here are the design layer & storey level setups for drawing I'm currently working on. NB this slightly contradicts what I said above about all DLs having zero elevation. The first floor layers are given the elevation of the first floor FFL. That's for "historical reasons" and if setting the file up from fresh I'd probably not do that. This particular project involves some planning restrictions that mean a demolished and re-constructed bit of the building has to replicate the existing. Storey levels (and associated benchmarks) have been quite useful in keeping control of this, because I can show various reference levels on the "as existing" and "as proposed" elevations and sections and make sure everything is in the right place. (In fact I am just embarking on the rather painful process of making some slightly complicated setting-out drawings on this basis. Part of the reason you have got an extensive answer to your question is that it provides a convenient procrastination activity.)
-
Multi-storey building all in one storey - would this work?
line-weight replied to line-weight's topic in Architecture
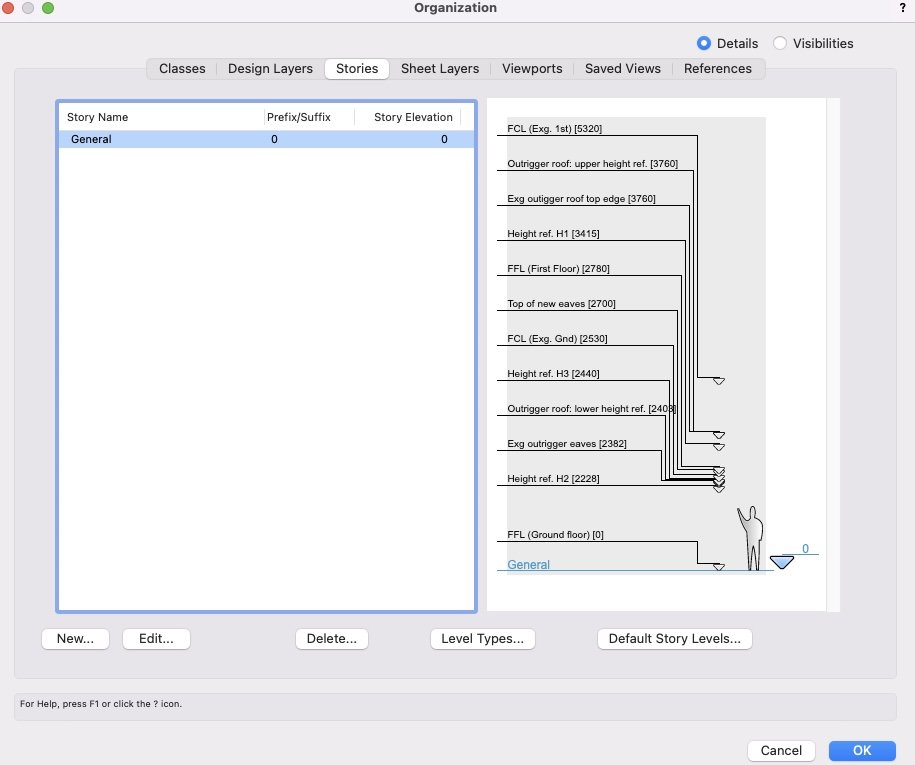
@Tom W. when you say "storey layers" do you mean "storey levels"? My setup is that I have one storey - and any design layers containing geometry that wants to take advantage of storey levels are contained within that storey. (Possibly I could just put all design layers in that storey - I don't think that would cause anything bad to happen) A typical list of design layers for me is foundations, ground floor (existing), ground floor (proposed), first floor (existing), first floor (propsed), roof, external landscaping, etc etc. I'd just put all of these in the VW "storey". For my purposes I don't use it as a storey, just a container to allow me to access "storey levels". Then I set up my various "storey levels". As you can see from the screenshots they are typically things like FFLs, FCLs, structural setting-out levels, and anything else that might be useful. I use those storey levels mainly for the elevation benchmarks that I use quite liberally on section viewports. I do also sometimes use them for binding things like wall components to. But note that you can still use design layer elevations to bind relative to (in addition to storey levels). So if I understand correctly what you've done, then no I don't think you needed to do anything other than set up a "storey", put your design layers into* that storey, then set up whatever storey levels you like. Then where you have objects already bounded relative to layer elevations, you could jsut leave them as-is, or choose to switch to binding them to storey levels instead, if more convenient. As I probably said somewhere up the thread, I quite like giving all of my design layers an elevation of zero (for ease of copy and paste-in-place) in which case when I want to bind things relative to an upper floor level, I use the appropriate storey level. But this system would not be efficient for projects with multiple repeating storeys. The other limitation (compared to layer elevations) is that not all objects can have their elevation linked to a storey level. I wish they could be - would make things like setting the height of lightswitches on a first floor a bit smoother. *never quite sure what the right terminology is: is a design layer "within" a storey or just assigned to a storey? Probably doesn't matter but I remember when I first was trying to get my head around storeys it took a while to understand their relationship to design layers. -
 Celina joined the community
 -
I HATE the Component Edit Window. Every time I edit a symbol, the thing appears. I never use it. Have NEVER used. Probably will never use it. I have command keys that are much faster. It SHOULD be anchored to the tool bar at the top of a window, unfortunately it obtrusively floats around. Is there a way to disable it completely? There's no information in Vectorworks 2024 Help. Thanks
-
Do you have "Display planar objects" turned on for the viewport? If so, deselect it in the Object Info palette and see if that corrects it.