All Activity
- Past hour
-
I tried making a quick plug in object that will do someone very close to what you are trying to do. Really interesting problem. Does this get close? Random Tile.vso
-
So, I followed the video above, which was very helpful, but I still have some issues. 1. The top part and the ladder will connect correctly, but they will not join to be the same system object. 2. I can't do Insert drop between a regular truss and the top or the ladder Any help will be appreciated
-
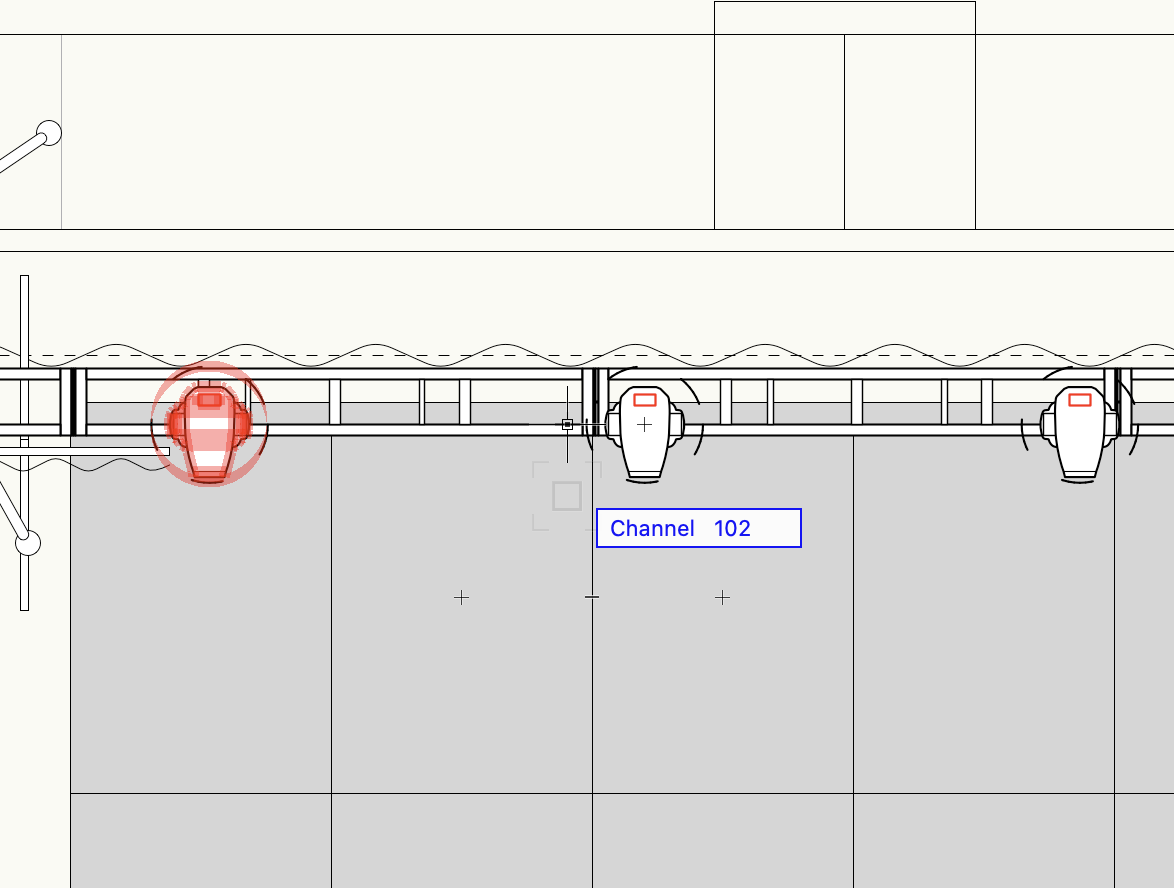
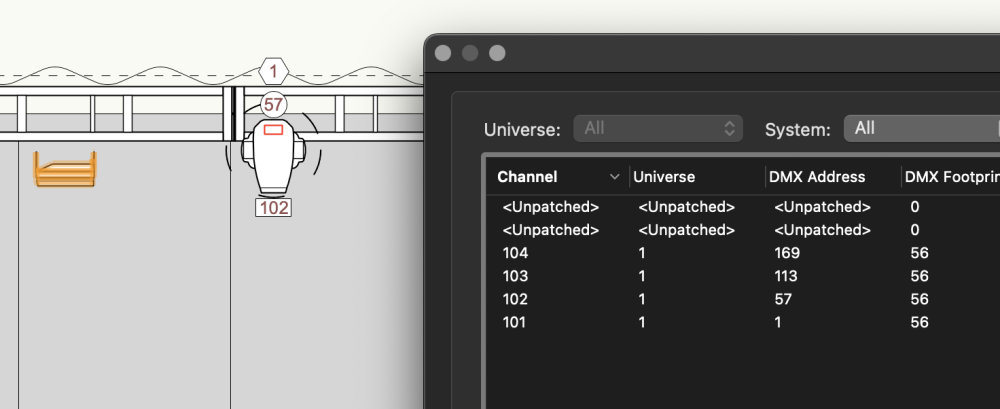
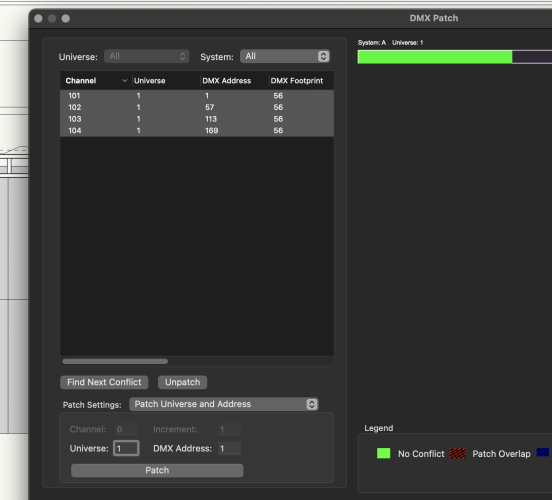
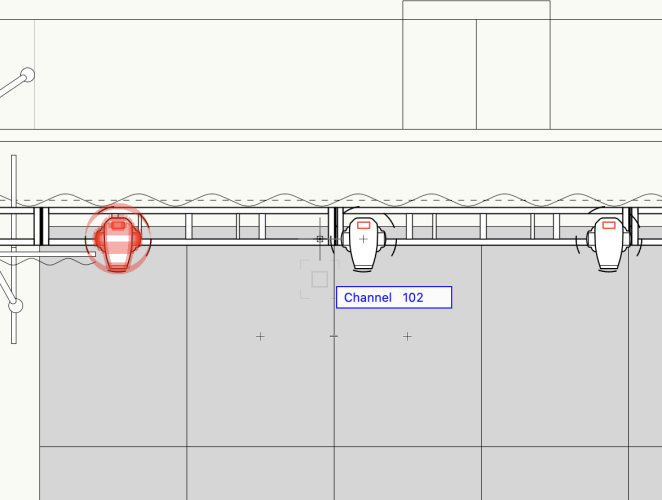
Please could someone explain why VW is patching two fixtures at a time? This is driving me crazy. I even opened a blank document to see if I had pressed a wrong button somewhere. I just don't understand why these things happen. Like I place my fixtures left to right, number the fixtures from the spotlight numbering tab, patch them in the patch tab. Assign a label to them and VW decides, "no I'm to completely radomise the order for you, then I will reverse the order in the DMX patch, now I am going to add two fixtures for everyone you've patched." It is so random. I am 63, been draughting, designing and operating shows for years, never have I been so frustrated with a piece of software. (Well, maybe a High End Data Flash or a Colour Call scroller) As always, thank you to anyone that can help, Iain
-
post a VWX file of your fence.
-

Problem with controlling wall texture by class in VW 2024
Jeff Prince replied to EliM's question in Troubleshooting
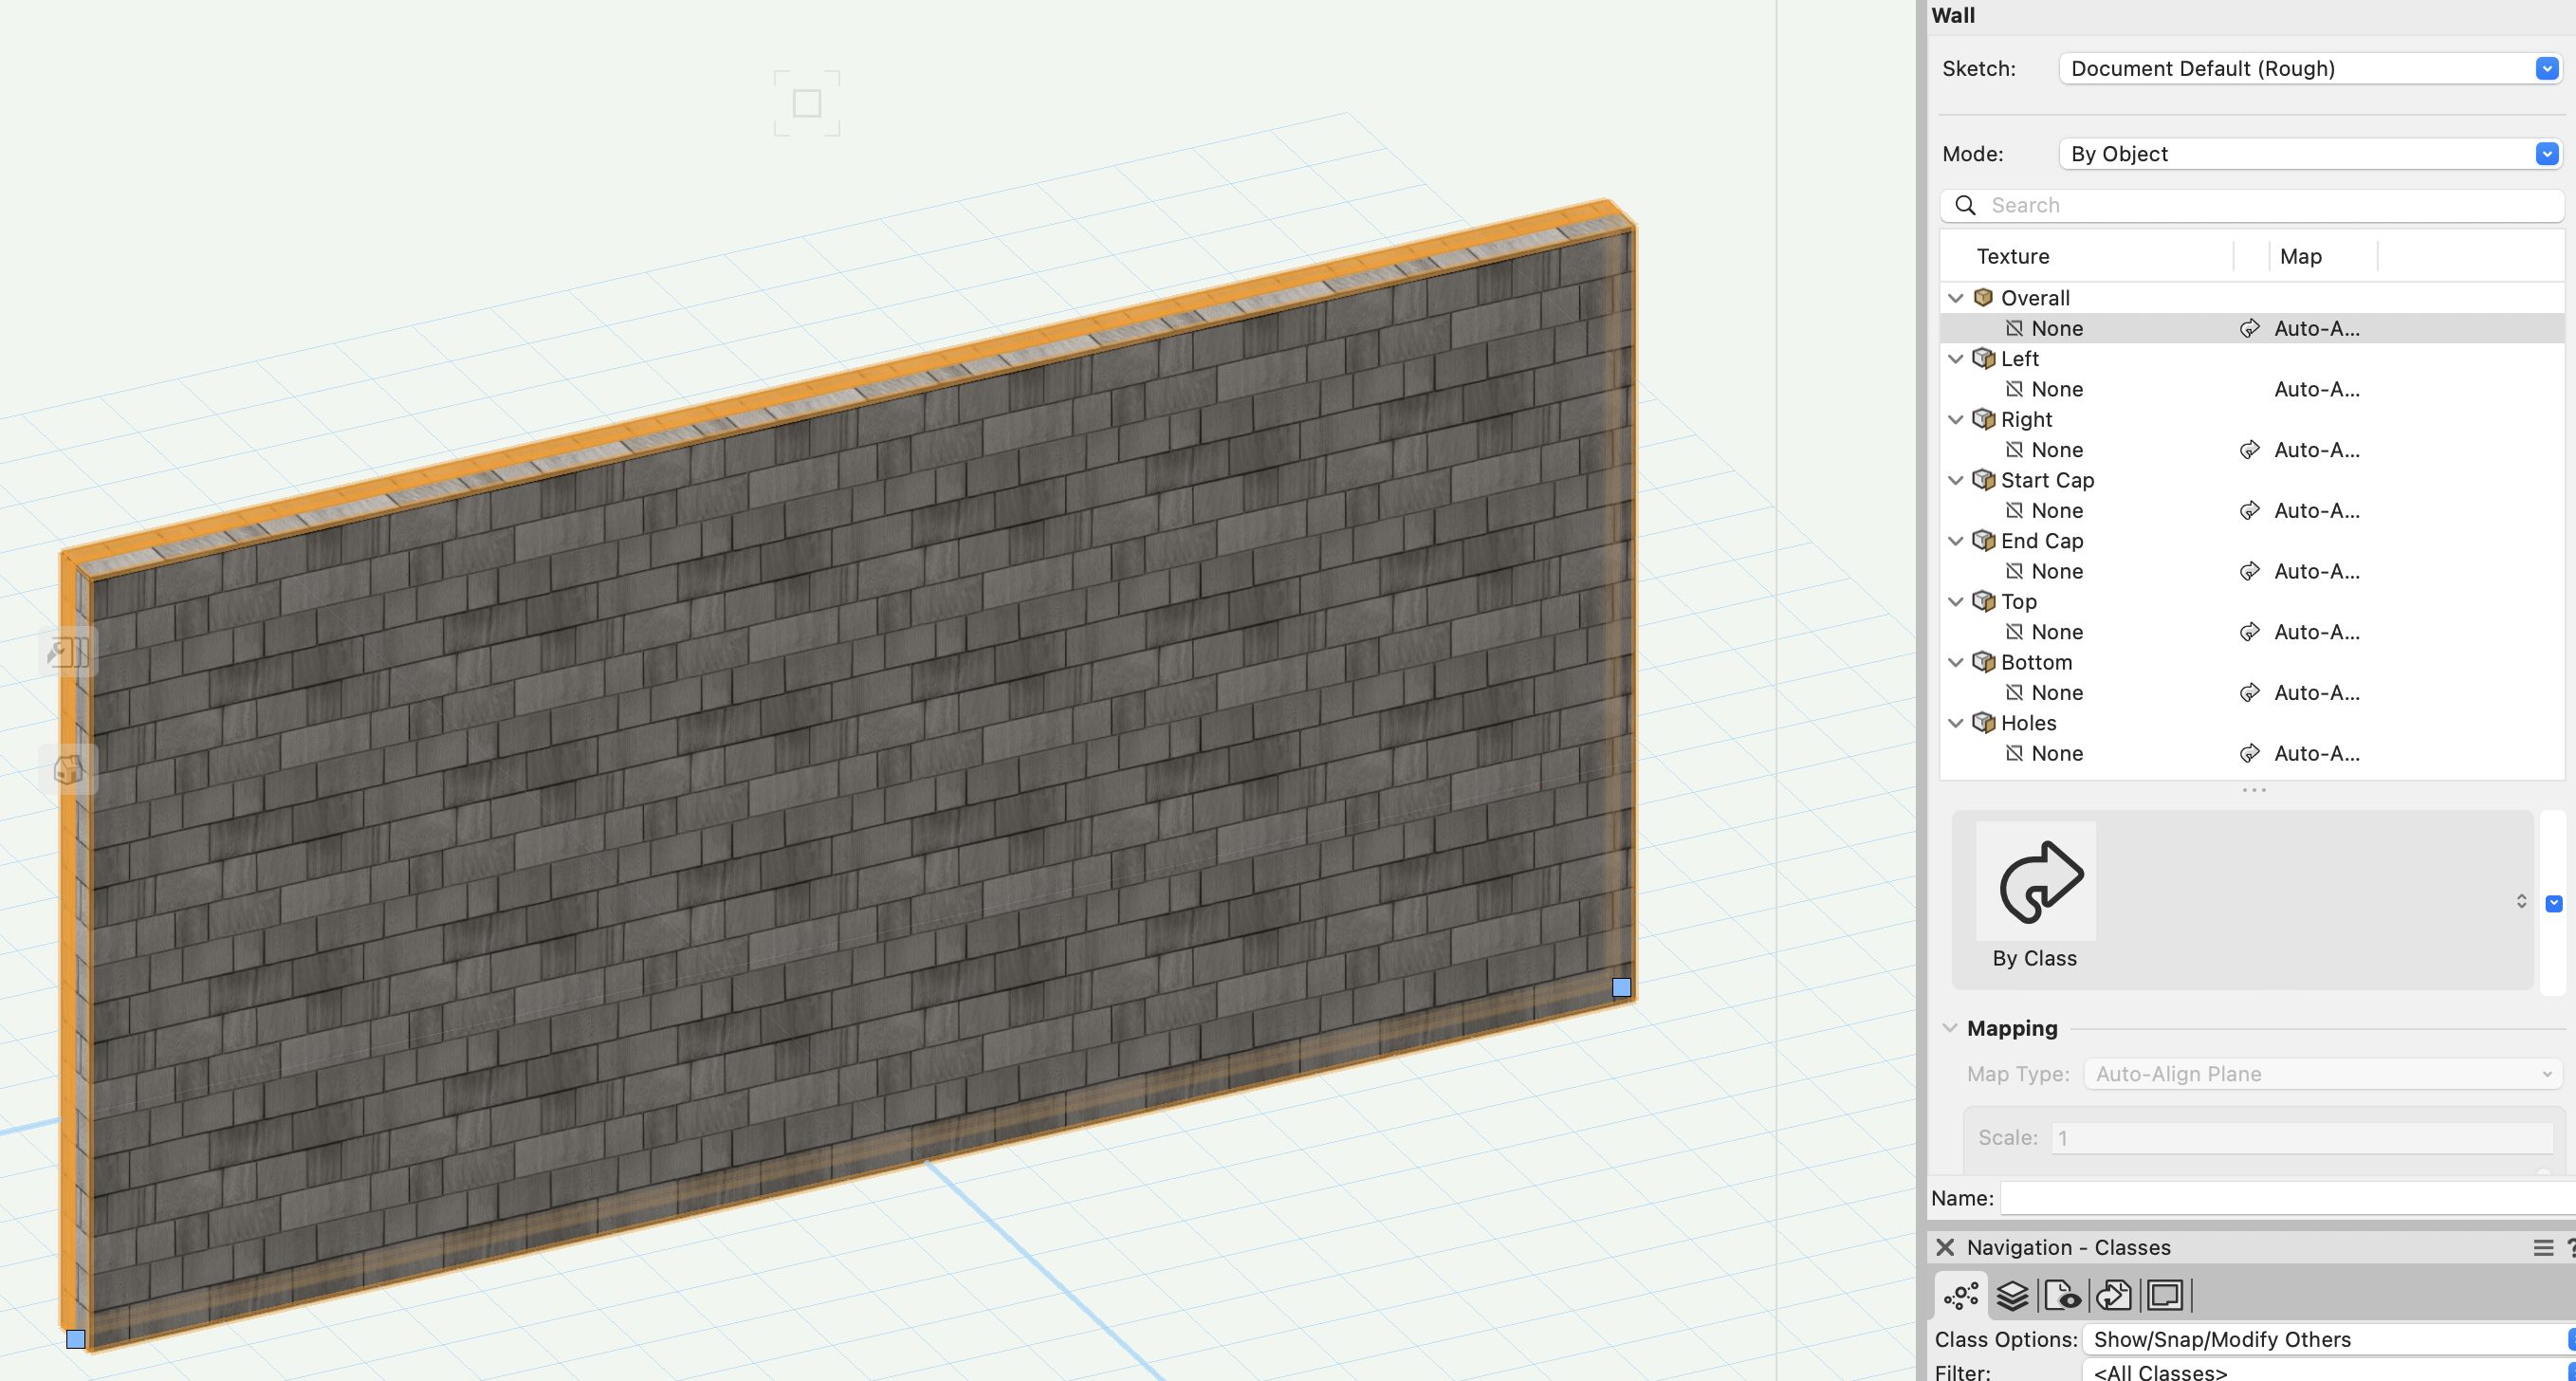
No. You are not using the tool as intended. If you are using simple one component walls, I could see using a by class texturing methodology to move quickly during a concept phase. However, you aren't doing that, you are using complex wall styles with many components. So, you should render them "by component" and set your textures within the component settings (in my opinion). If you have a building that has multiple exterior finishes, doing them "by class" could become very cumbersome compared to managing this all with Wall Styles, and perhaps materials if you were so inclined. -
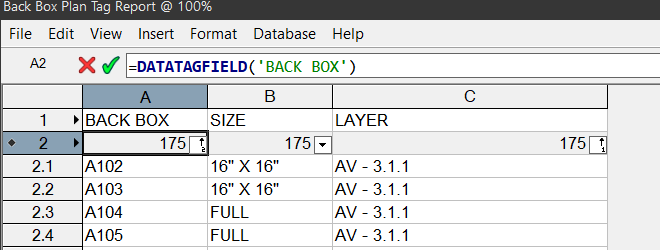
Learning about them will be a very good investment of time. There is some good information about Data Tags on Vectorworks University. Essentially, they are fully customizable tags which can get their value from different object attributes, records, and even static information. You have the ability to easily change their layout, graphic appearance, and information to include. It really feels like the direction the entire software is going and it's safe to assume built-in tagging based on an object style will die off. Attached is an example of the Data Tags for plants that shipped with 2023. Plants-DataTags vs old Tags.vwx
-
 gus g3a joined the community
 -

Single Face Texture Tool still does not work
MGuilfoile replied to MGuilfoile's question in Troubleshooting
To Jcogdell, no, as I expected, the "reset all plug-ins" did nothing. The only thing that works is the following: 1. Open an Untitled document 2. Go to the extrusion (note: I have only tested this on extrusions with no "history," such as fillets) 3. Double-click on to get down to the original 2D profile 4. Copy and paste into the aforementioned Untitled document 5. Perform the same extrude as was done in the original file, but now in the Untitled file 6. The Texture Face tool now works as it should. - Today
-
 DannS joined the community
 -

Problem with controlling wall texture by class in VW 2024
line-weight replied to EliM's question in Troubleshooting
This doesn't answer your question and may not be a helpful comment, but is there a reason you control texture by the class of the wall object rather than the classes of the wall's components? Most walls have a different texture each side - presumably you don't want the shingles appearing on your internal wall surfaces. -

Worksheet Function in Data Visualization
Tom W. replied to garrettohler's topic in General Discussion
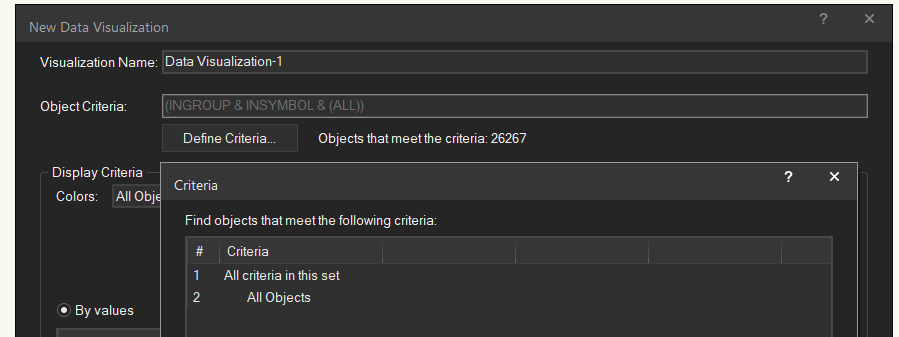
You can attach a Record to a Data Tag then use the 'Link to Data Source' function in the tag to send data that the tag is picking up from the associated object to a Record field which then allows you to colour the tag using Data Vis. If that makes sense... And if I've understood what you want to do correctly... -
I would like to create a data visualization that overrides the color of a tag based on the information displayed in a data tag field, as the tags have no other link to the objects for them to be visually overridden. There does not seem to be an option that allows you to utilize worksheet functions for a data visualization.
-
 Prolinedg5 joined the community
 -
For a perimeter fence like the one you've shown I find the easiest way is to go to sketchup warehouse where someone has modelled all of the Zaun panels, choose the one I want, download, then convert each of the wires into a tiny extruded square (cuts down on drawing time and practically invisible difference). This then becomes a symbol infill for a fence.
-
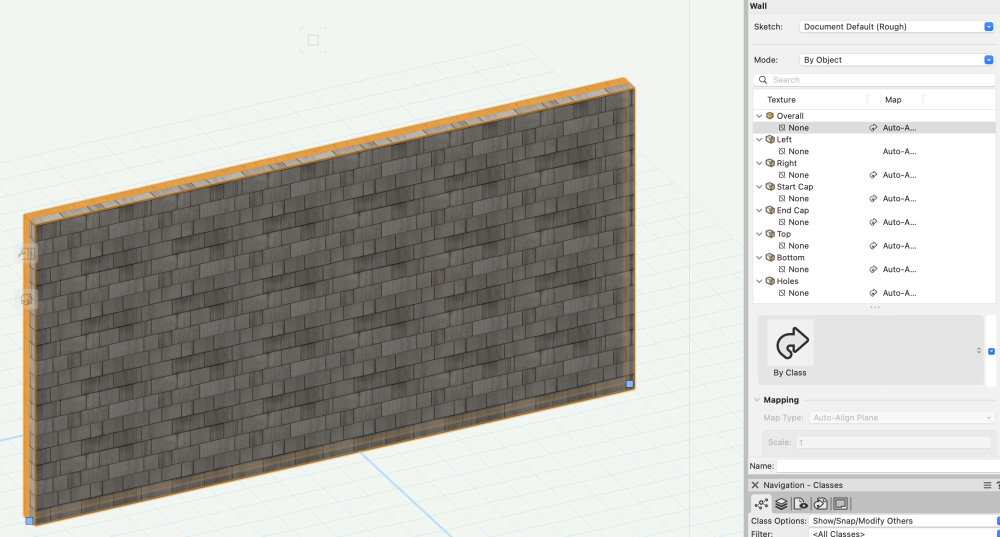
Our office has always used class to control wall textures, but this functionality seems to be severely diminished in VW 2024. In the below screenshot, I have a wall in a class with the wall textures specified as a shingle texture. The wall does show this texture BUT the Render settings in the Object Info panel do not acknowledge the texture and suggest the texture is None. The problem with this is then all the supplemental settings are greyed out and I can't, for example, adjust the texture vertically to get my coursing where I want it. Our workaround so far has been to manually override each wall's texture in the Object Info panel, which then allows us to control those supplemental settings, but this is far from ideal if we want to be able to quickly change all walls of a particular class from one siding to another. Is this a VW 2024 bug, or is there some new setting turned on in VW 2024 that is causing the issue and we just don't know about it. Thanks in advance to anyone who takes the time to provide insight! VW 2024 Wall Texture Issue.vwx
-
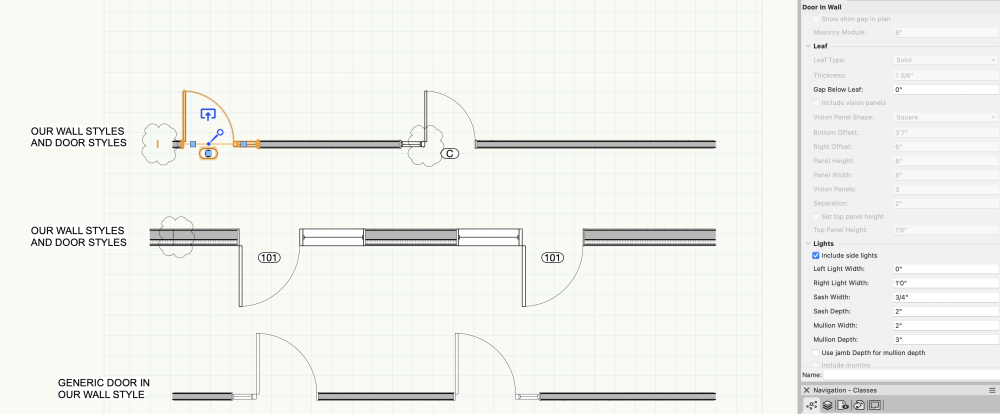
In our office we've been getting errant lines for doors with single sidelights in VW 2024. We use the same door styles and wall styles we used in VW 2023, but we did not have this problem before. I suspect it has to do with our door style settings, since when I put a generic door with a single sidelight into our wall style, there is no issue. But for the life of me I can't figure out what setting to tweak in our door styles to make them work right in VW 2024. I've included a mock file along with a screenshot so that some generous soul might look over our door settings and identify the issue. VW 2024 Sidelight Issue.vwx
-

MVR export : focus information
jcogdell replied to Light-House's topic in Vision and Previsualization
What focus data are you trying to export with MVR? The MVR only includes a limited amount of focus data. Currently this is pan, tilt, shutter cuts and zoom. -
 Thank you Tom. However, this doesn't seem to solve my problem. In the Title Block Border settings, in the Project Data tab, in the Project Name field, I entered 'ProjectData.FileName'. Whenever I reference the Project Name data, VW returns 'ProjectData.FileName', not the name of the file. Am I making sense at all? A part of what I'm trying to accomplish is to be able to use the file name when publishing, but I want to use the filename without the .vwx extension. Plus, I'm trying to learn how to add some automation to the title block fields. Again, thanks for the help.
 -
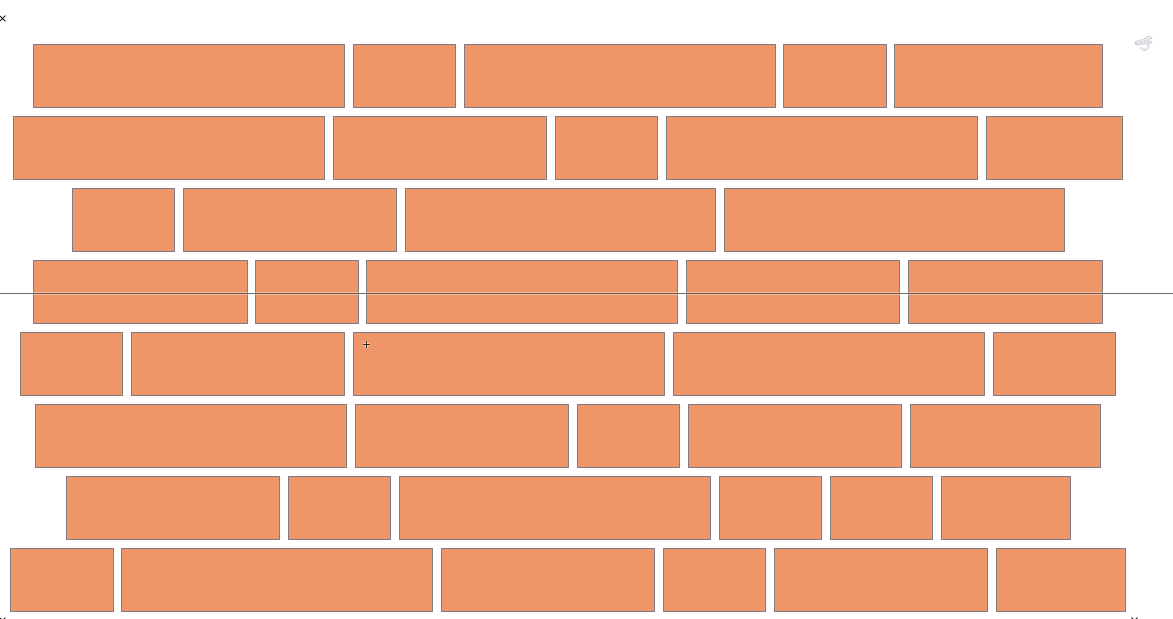
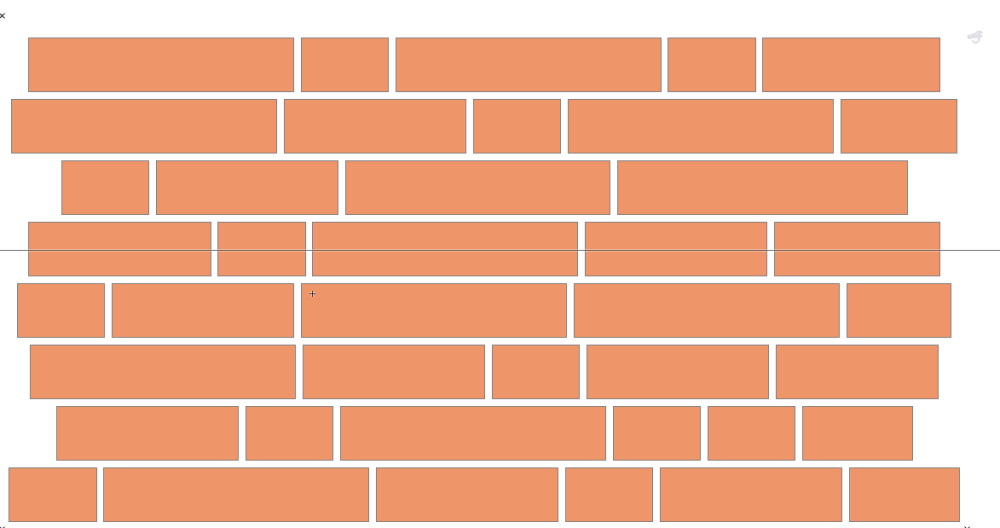
Hello, I have hardscape area and want to randomly stagger the tiles (3-5 tile width but same height) along the hardscape. While working with Marionette and going through the library I cam across "Tiles by Computer Works" but that particular wrapper is still repeating an existing layout of the tiles. Is there any script or marionette link I could use to randomize the tiles? Attaching the snapshot to show a small patch with 4 tile sizes but I need this to come in random so that the joint between the tiles are not repeated. We have been doing this manually or using the Tiles by Computer works but it has been rejected by the main designer due to repetition of joints. TIA
-
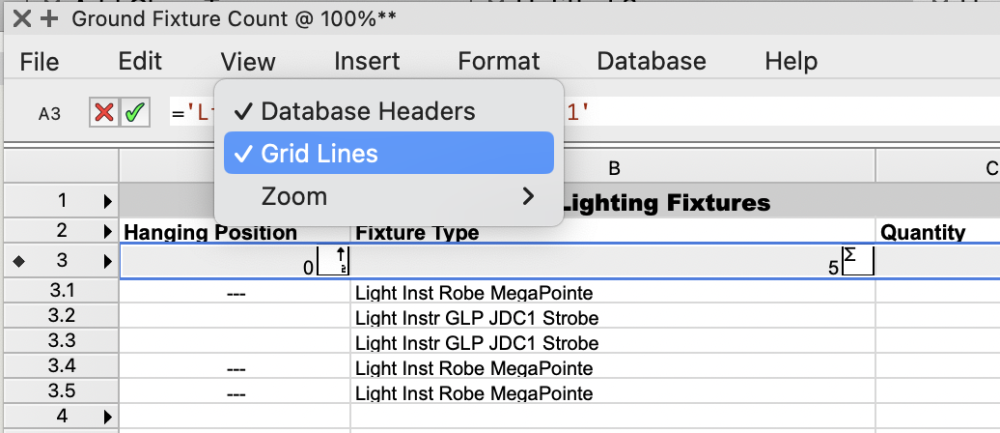
From the Worksheet View menu. Make sure there is a check next to Database Headers as shown in the following screenshot to have the headers be visible.
-
 GCVW joined the community
 -
 rsadhwan joined the community
 -
Hi, enquiring to purchase a 2020 perpetual license for VW . Please let me know. Thanks.
-
Ok I need to unpack that statement - not sure what a data tag is...Looking into how to change by instance vs by style. Thanks
-
You should abandon using the built in plant tags and switch to data tags. Built in tags seem to be going away in favor of data tags. Vectorworks changed how plants behave as they refined the Style based approach. If you want to change the attributes of individual plants, you need to change those attributes to “byinstance” instead of “bystyle”. If you want to control some attributes and keep them the same throughout a document for every instance of a particular plant, keep them “by style” and make any changes via the style editor.
-
Thanks Pat, so how does one go about hiding or unhiding the database header row?
-
I found it! Vertical Position in the OIP. Fixed the spelling too!
-
Here's a conversation similar to this.
-
A lot of the settings of the default content are set to By Style (to make them easier to manage via the style). If they're set to By Style, you will only be able to edit them through editing the style and all instances will take on the changes. If you want the ability to set them per instance, you will need to edit the style and set the parameters to By Instance.
-
Plant labeling in Landmark is not allowing me to adjust the label's leader line manually. It is placed in a rigid and unchangeable location and needs to be moved to the edge of the drawing. Any suggestions? Also, IF I want to update or change a plant configuration in Object Info palette, there are several fields not active. I can edit the plant info by right clicking on the plant and select edit, and style to edit under the 'edit plant style window' only. I do not remember this from earlier versions of the program.