
Luis M Ruiz
-
Posts
449 -
Joined
-
Last visited
Content Type
Profiles
Forums
Events
Articles
Marionette
Store
Everything posted by Luis M Ruiz
-
Navigating in TM needs you to use a combination of keys for movements and the right click of the mouse. I managed to connect my 3dconnexion navigation but only for replacing the keyboard. Navigation in TM feels a lot like a video game.
-
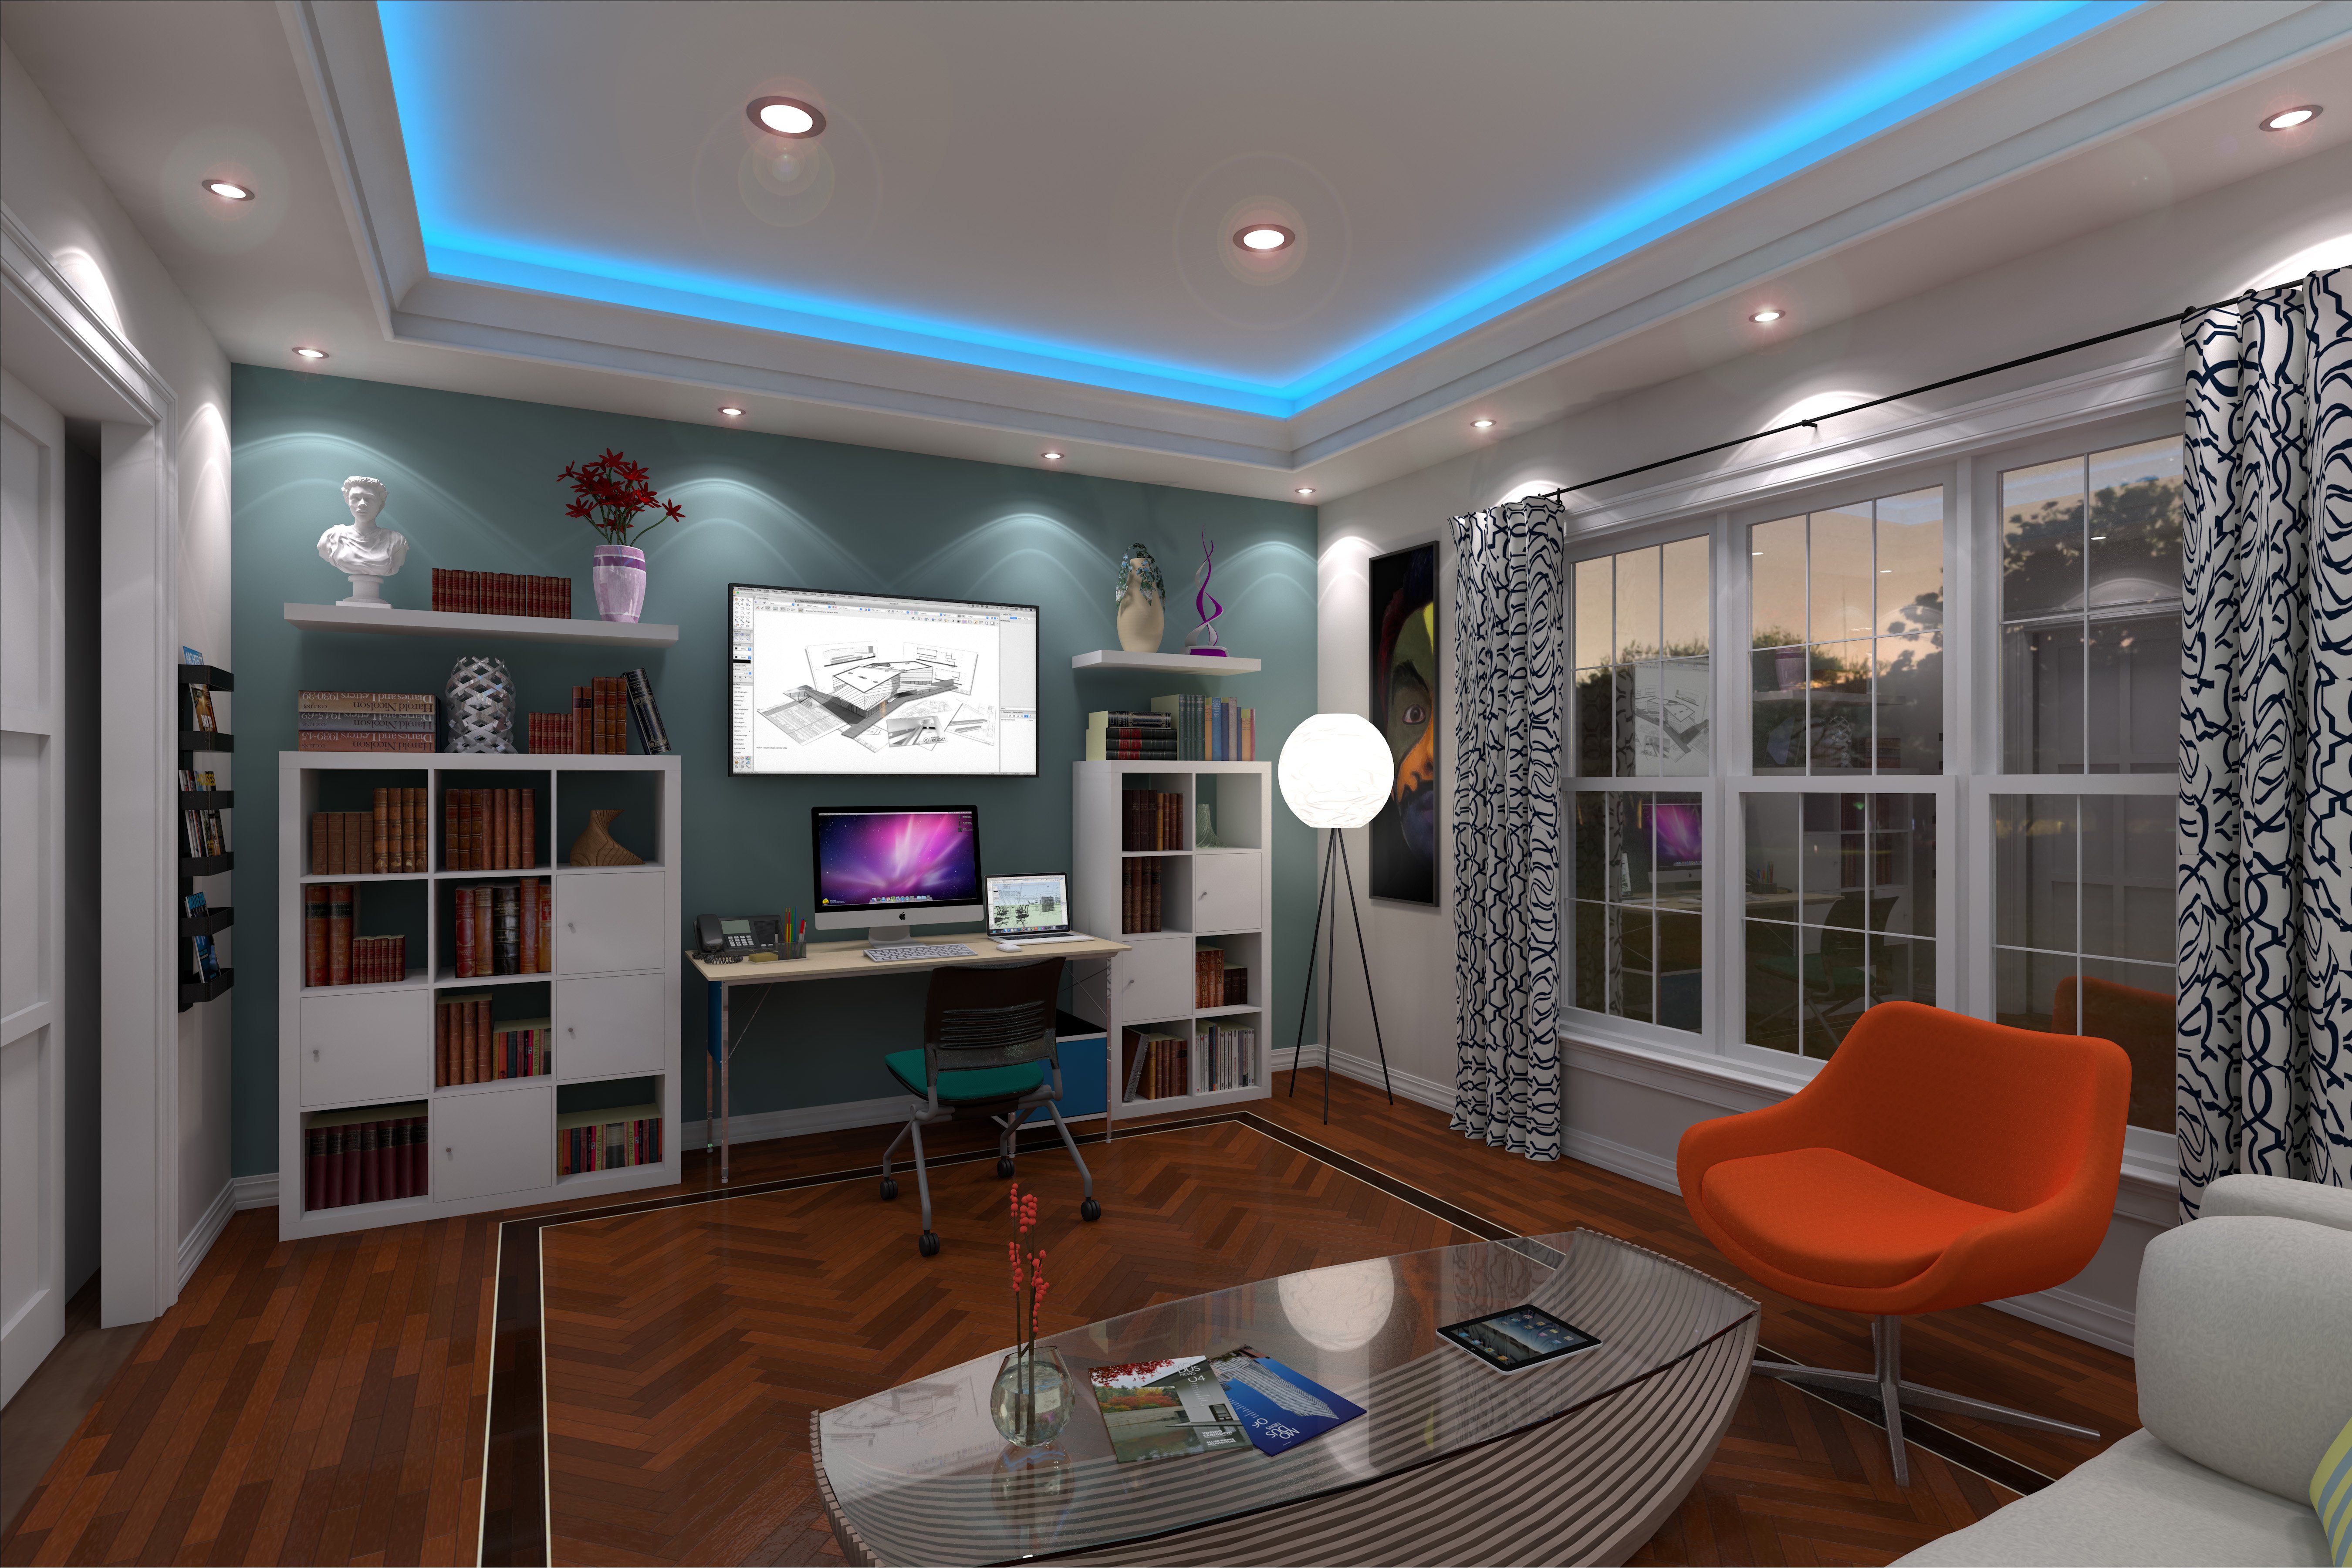
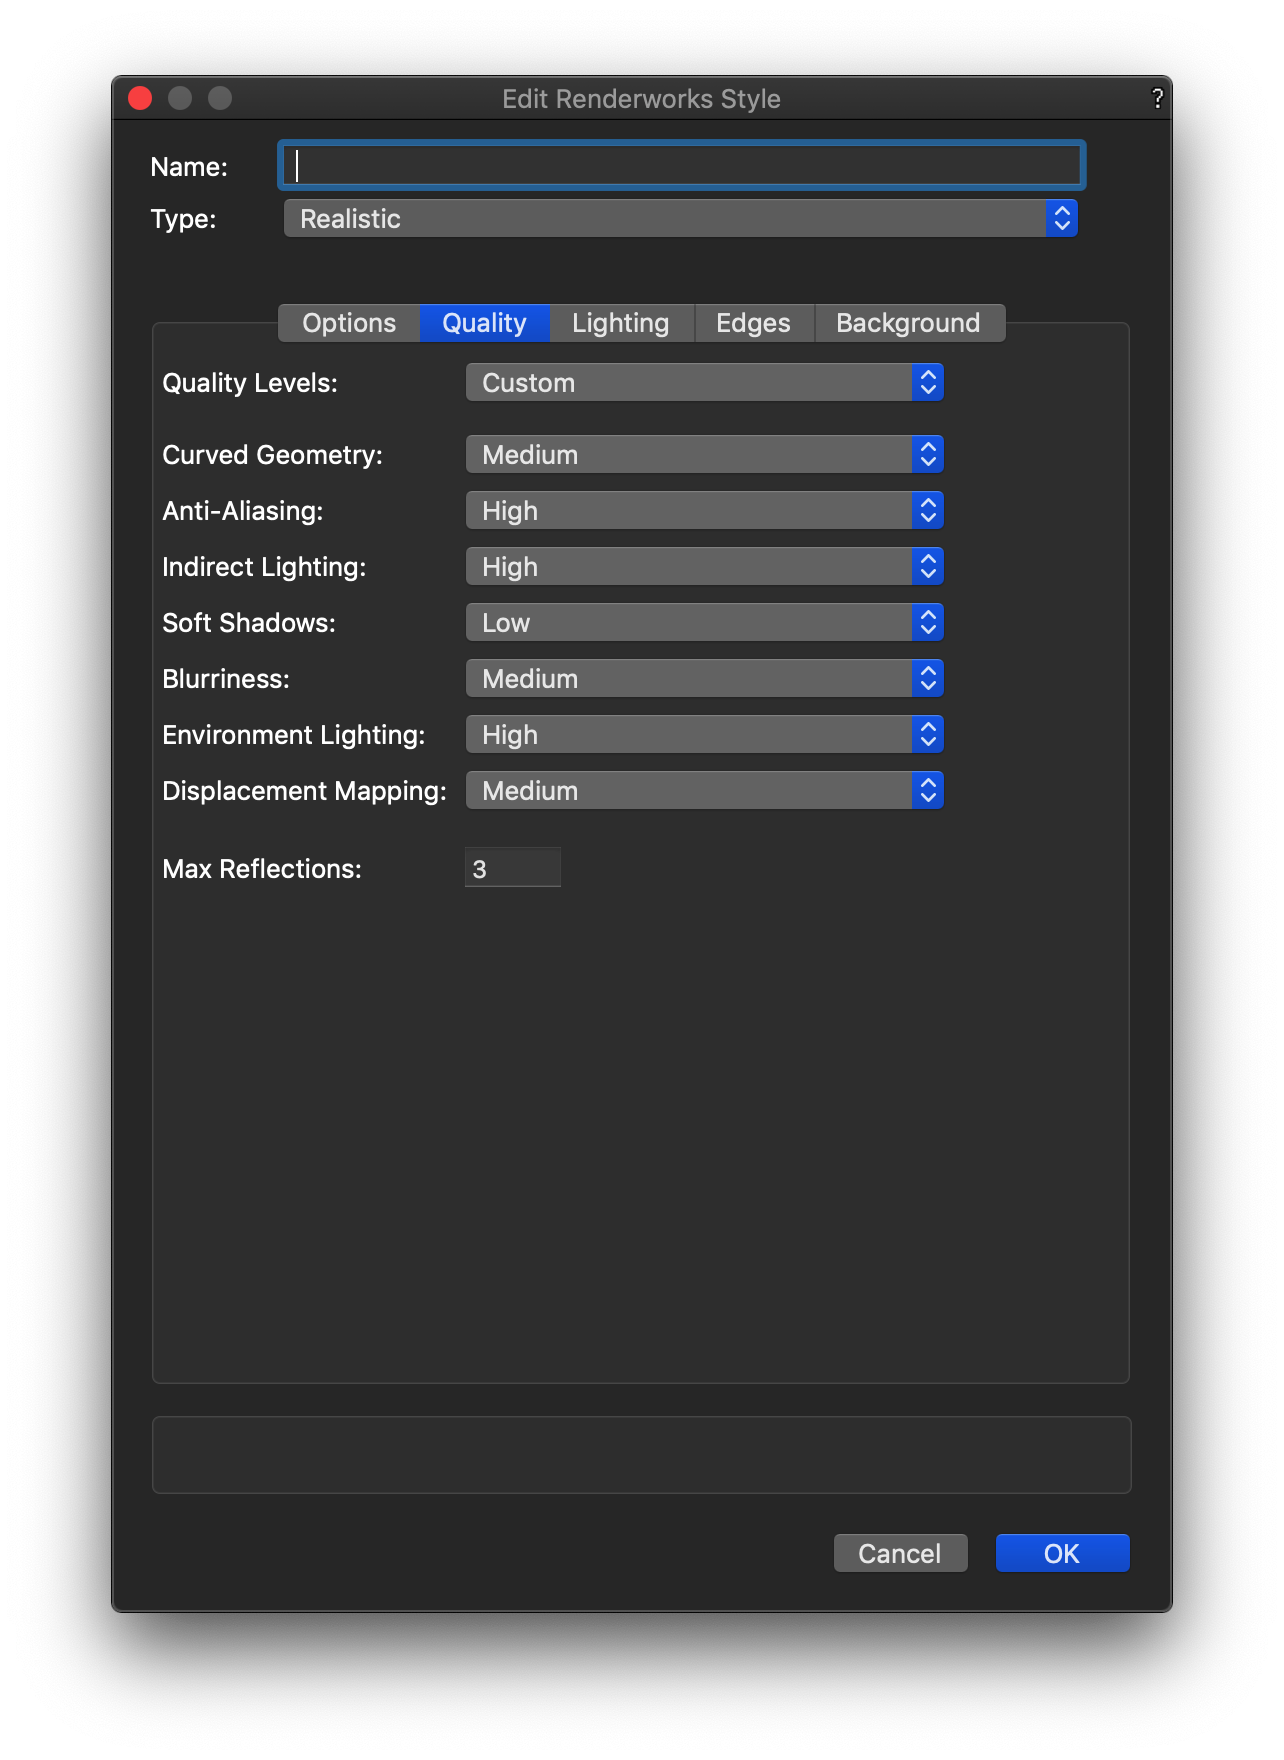
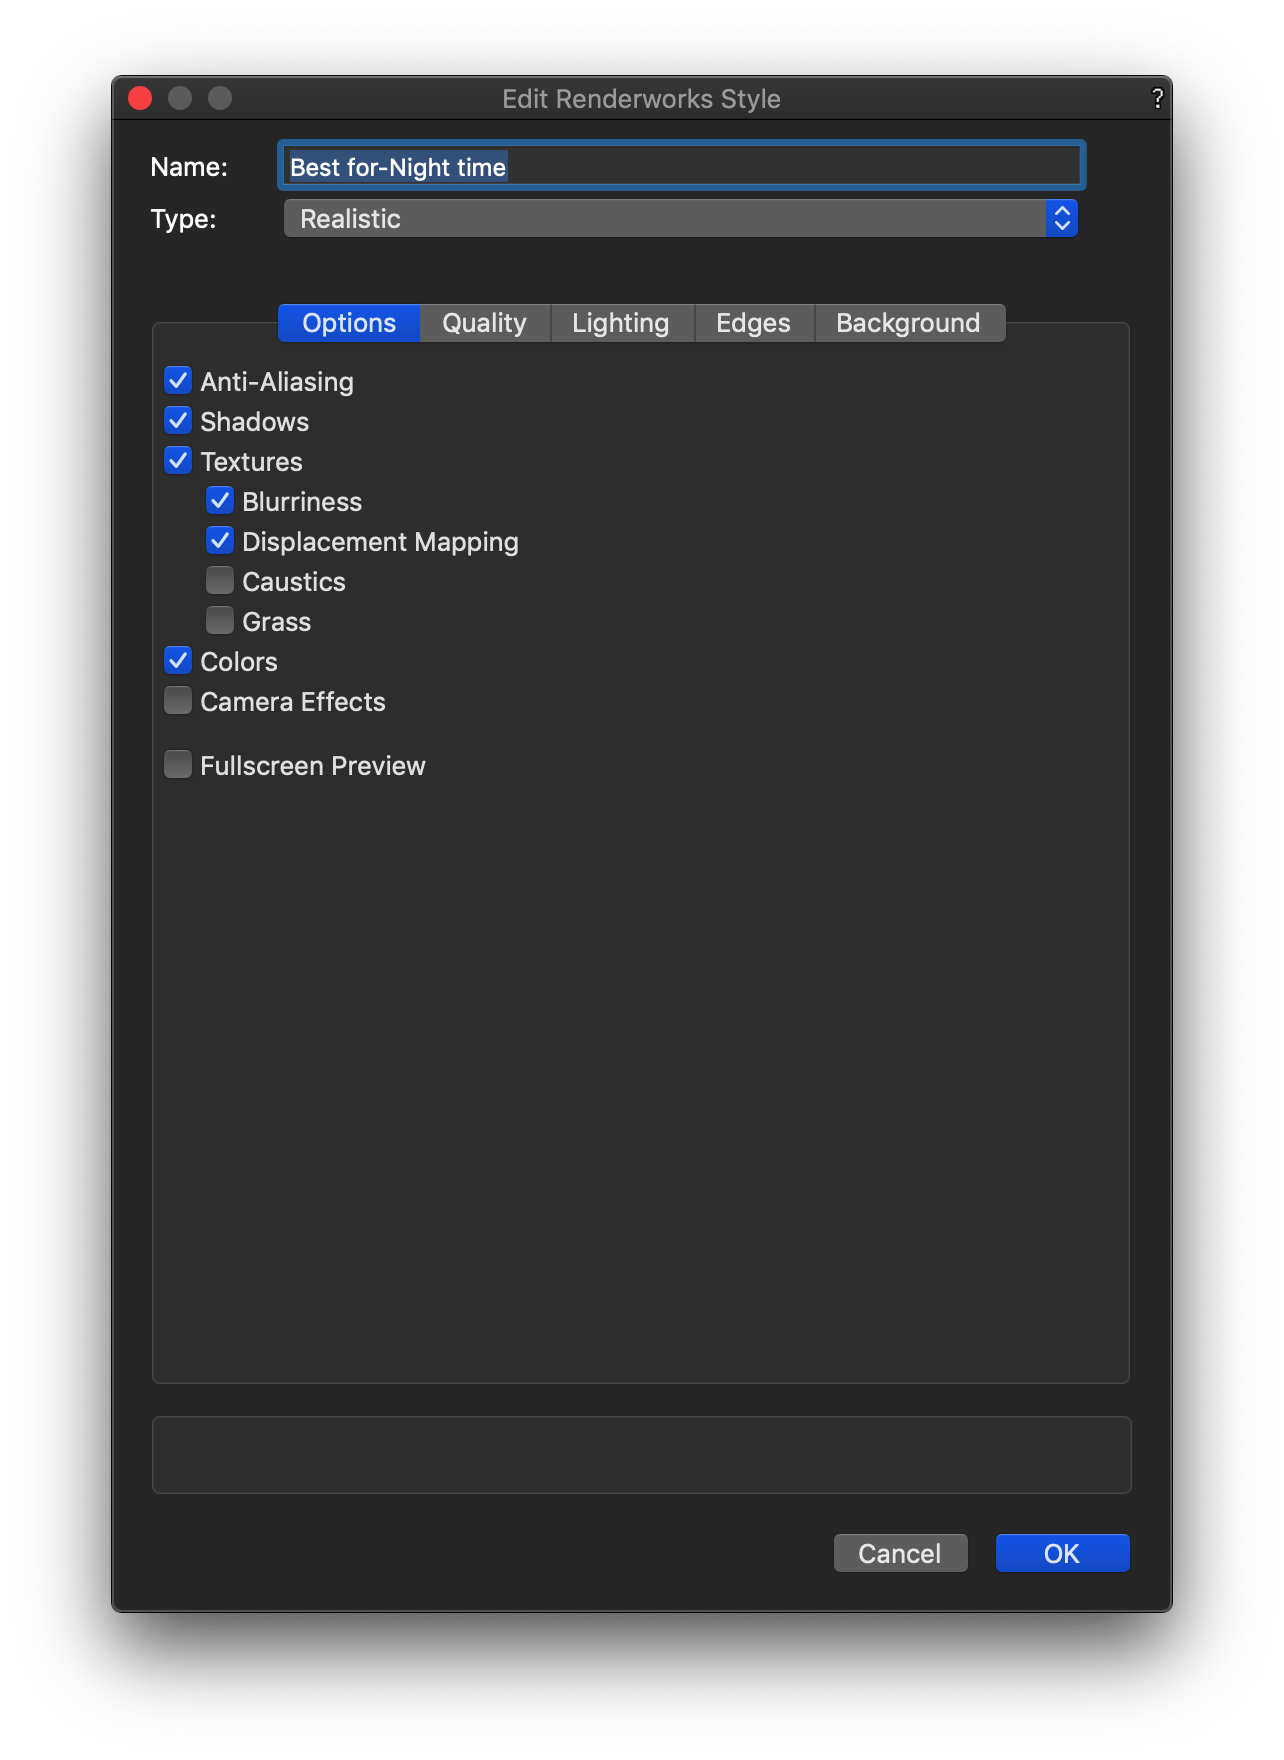
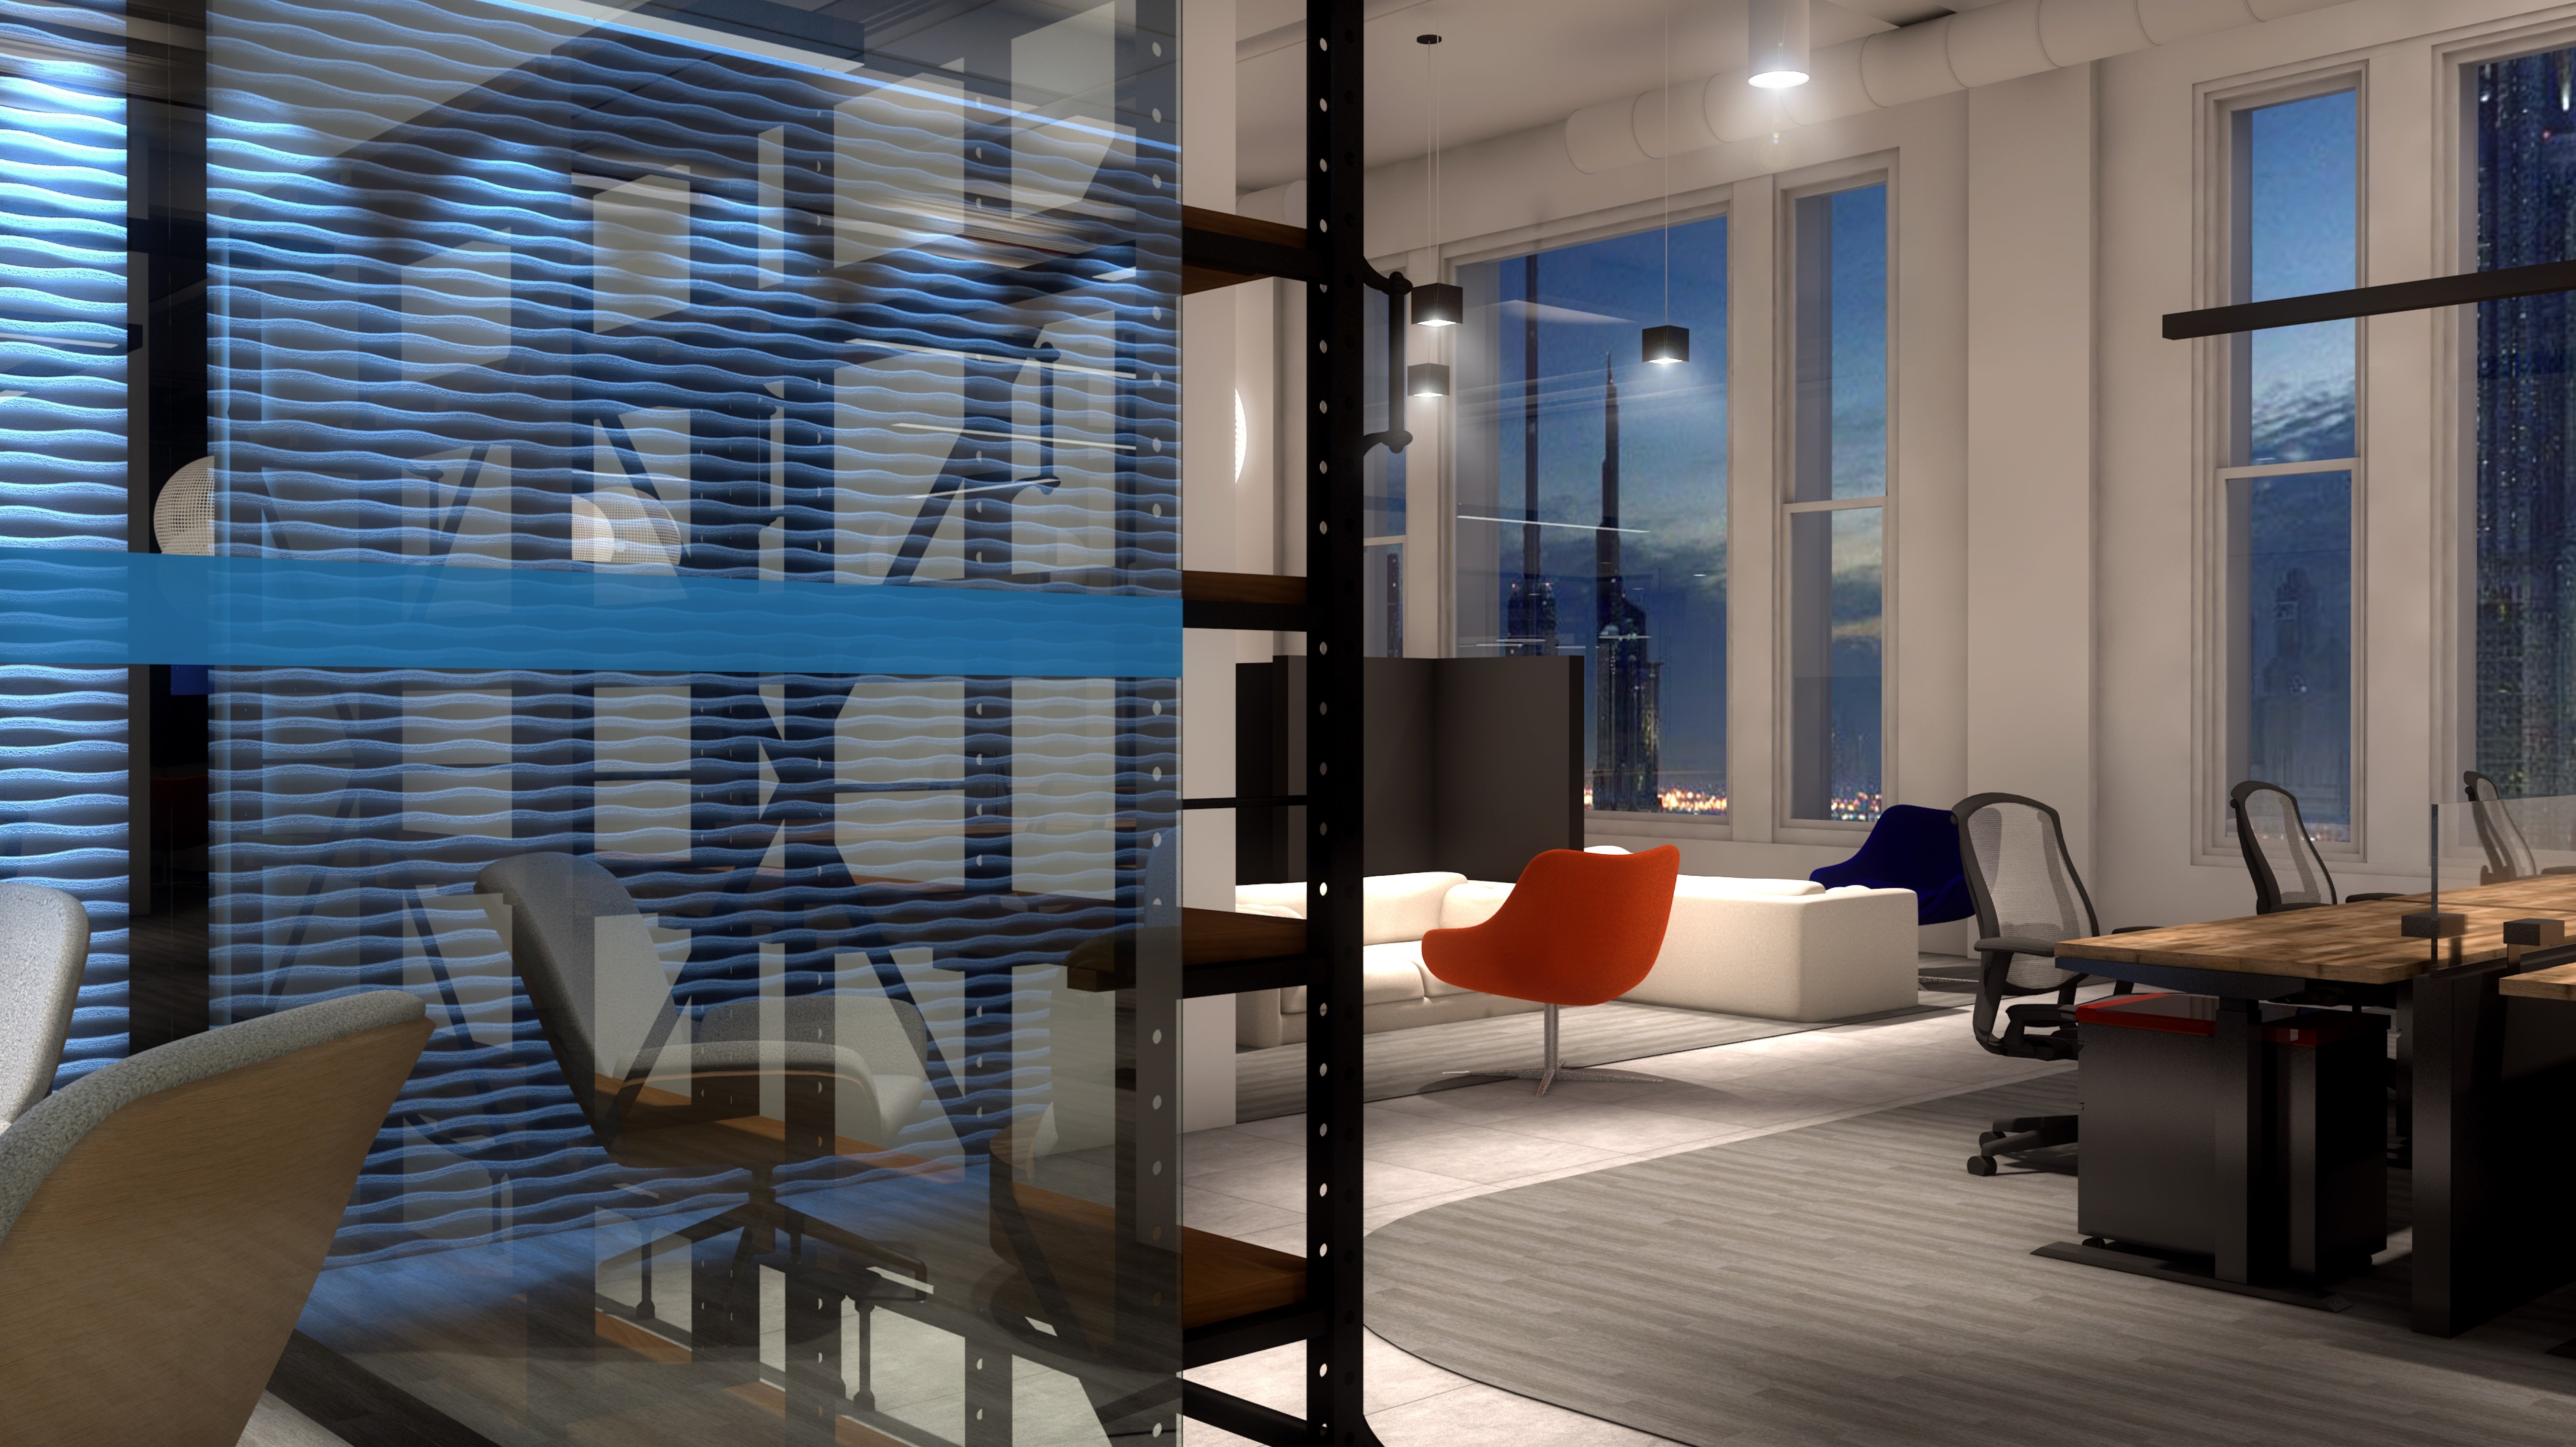
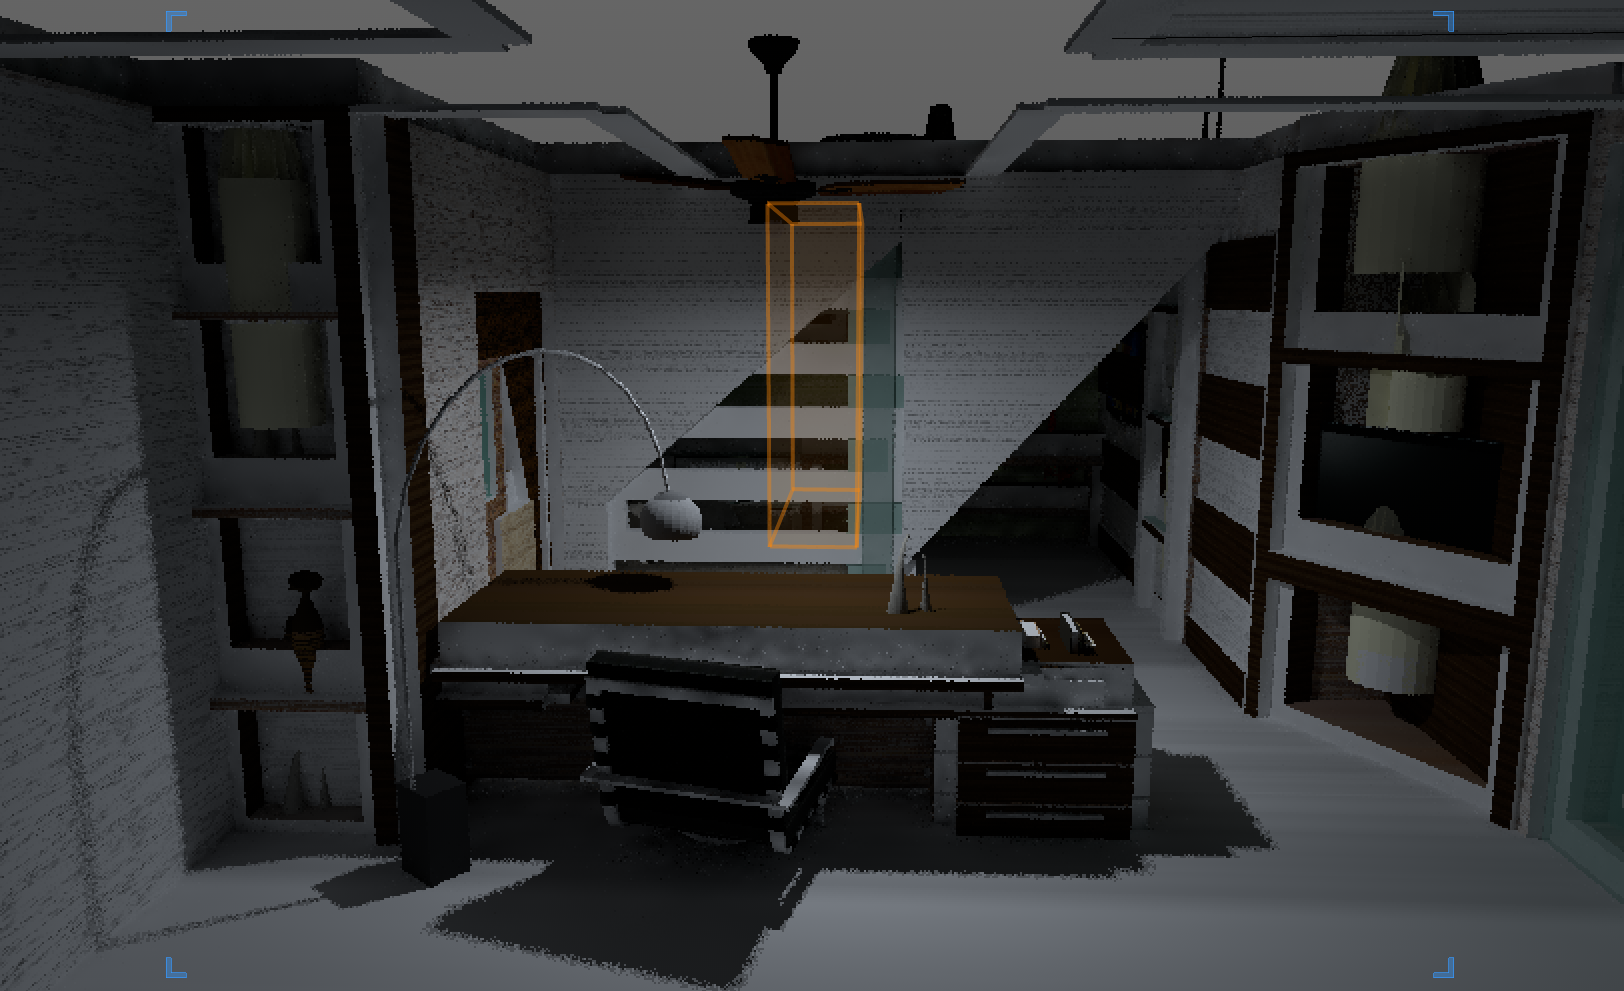
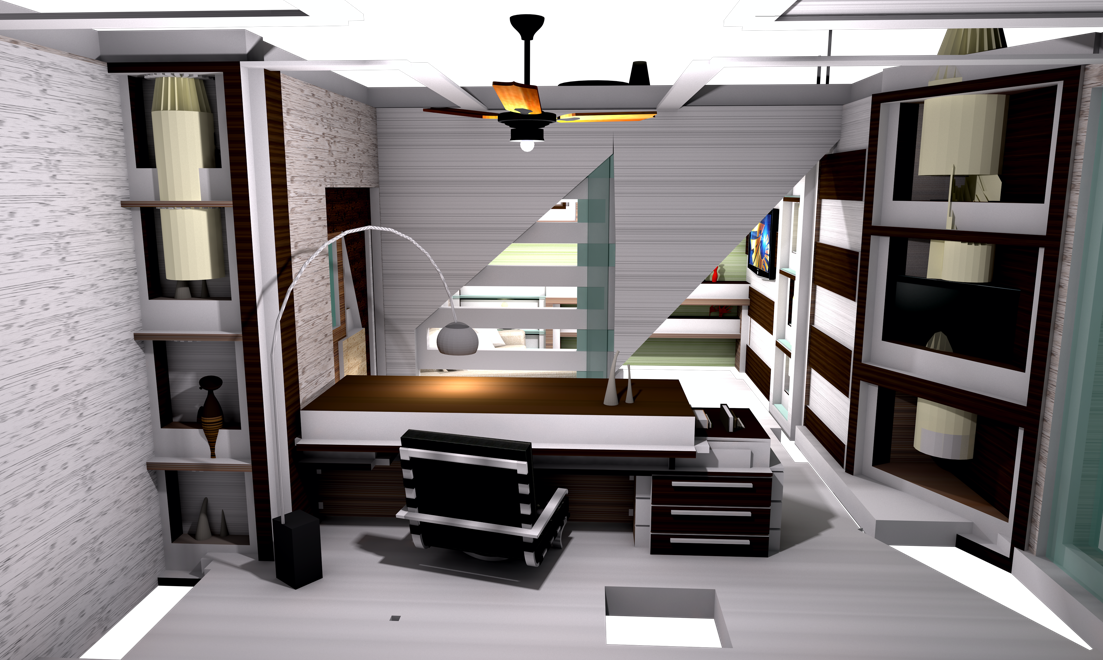
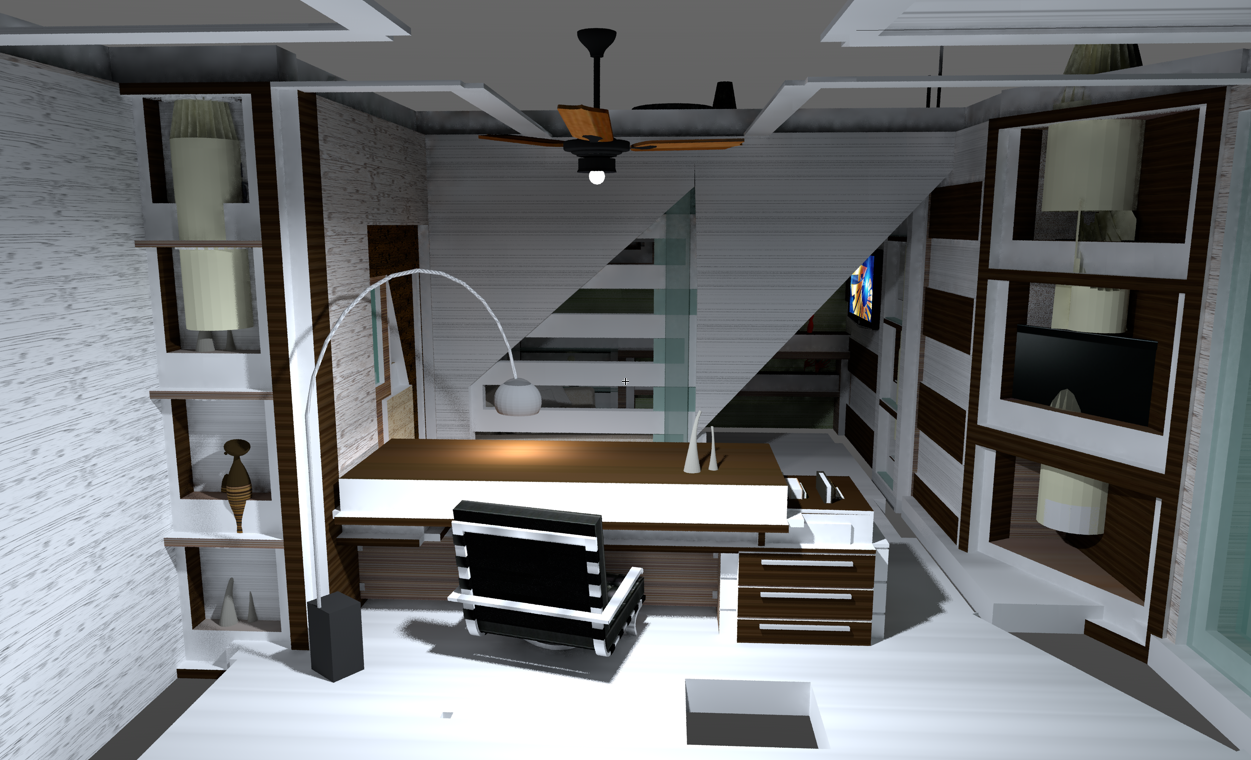
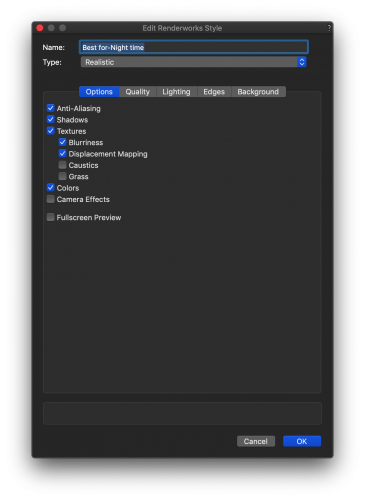
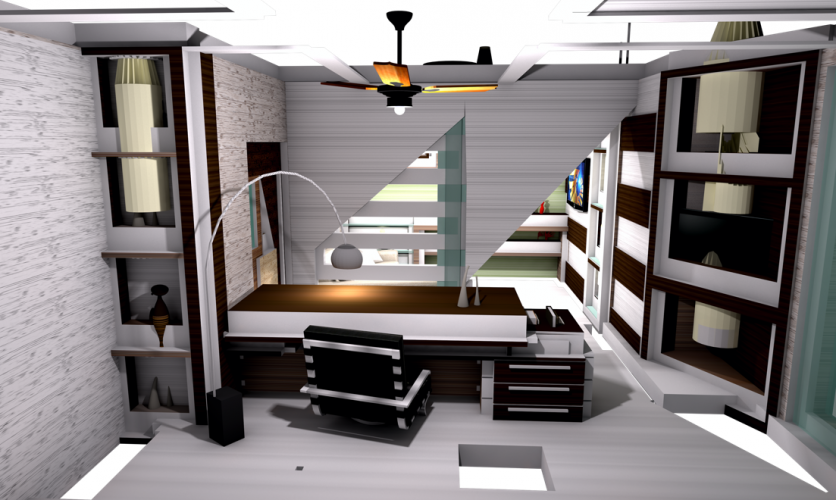
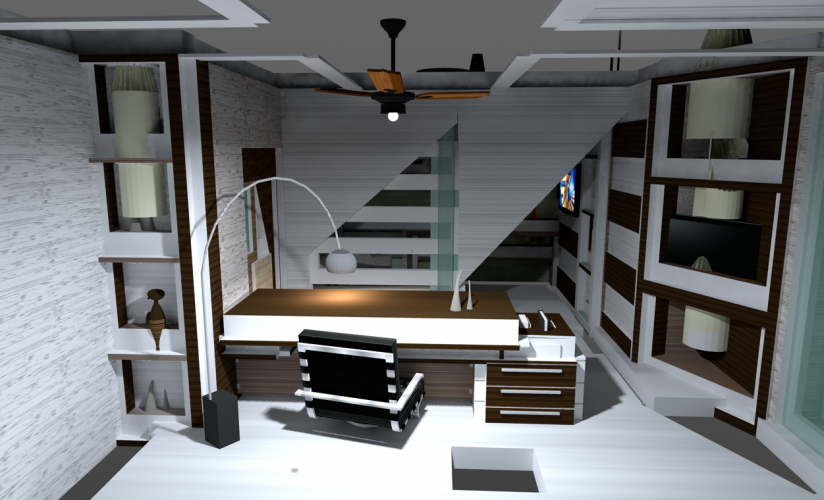
Here is a work in progress, but I wanted to share an interior rendering of an idea for a home office. Lots of items here and several light objects using realistic, smooth, backlit and glow attributes. The final rendering was rendered in the cloud using a rendering style, settings included here. Once the final project is ready, I'll make the file available.

-
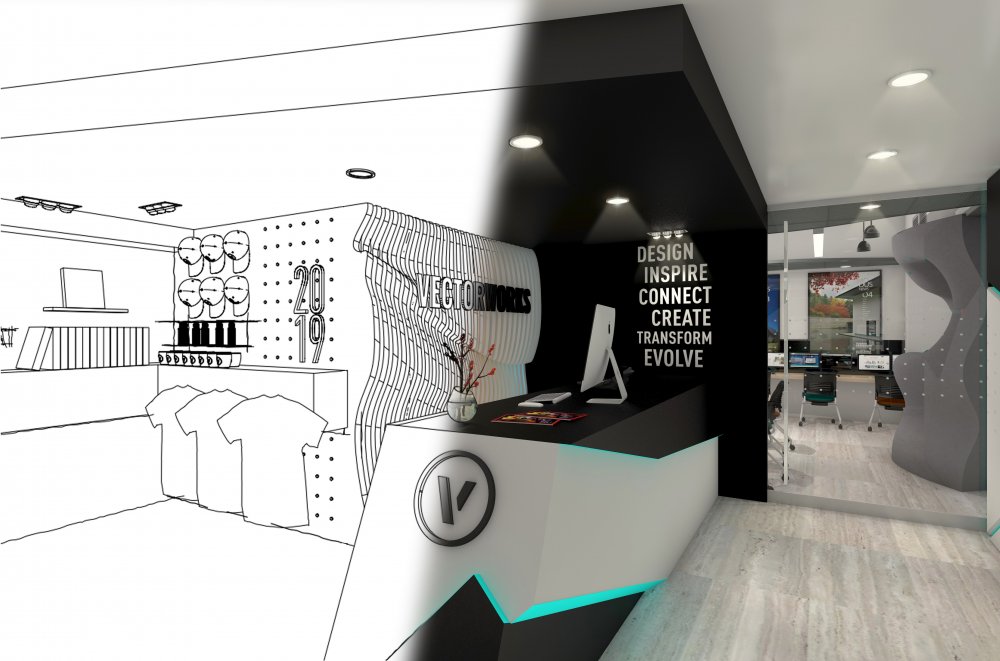
Here is a sample of my updated Cloud Presentation for our "VWX Store". One portion shows linked panoramas and the other one is a nice tour of the place including TM animations. Let me know what you think. https://beta.vcs.vectorworks.net/presentations/11e8df8e1bed1a3eabe812a7723e44fa/
-
I'd recommend you use a combination of glow textures and spotlight pointing down. Do not fall on the trap of adding a point light, that triggers rays in all directions and your shadows will not look correct. Also, once the render is done, add a little cone of light image (.png) to enhance the effect. Here is a sample.
-
This is part 3 of The Making of Active Campaign. Now that you’ve completed your 3D models, it’s time to get your designs ready for presentation. Explore the extensive options for lighting and textures to bring your space to life. Place lighting objects and select textures from an extensive available library of contents to make those final touches to your design. Then you can set up of viewing cameras and make use of the camera match tool when needed to create renderings. Or, integrate a Vectorworks professional partner animation software and take your presentation to a whole new level. These still renderings as well as 360-degree panoramas can all be processed in the cloud, allowing you to share the whole project as a cloud presentation, including hyperlinks to drawings, images, videos and other graphical information.
-
Sorry Kevin. I was hoping someone else from the Rendering team would take on that question and add more info. Short answer is no, currently there is no feature that allows you to just rotate the HDRI (dome). As you know, inside the settings of the background we can change the angle, then hit OK, check the background and see if it is close to the desire location, typically I don't get it right until the third try. Should we have this? absolutely, I am with you on that one, it'd save a few clicks and window dialogs. I am sure my friends here are taking notes.
-
Hi Kurt. Let me share with you my collection of hdri backgrounds, I think I purged most of the ones that trigger that yellow light. Let me know what you think: https://www.dropbox.com/s/bg2ub4y8o8cfrw8/Backgrounds %26 HDRI collection v2020.vwx?dl=0
-
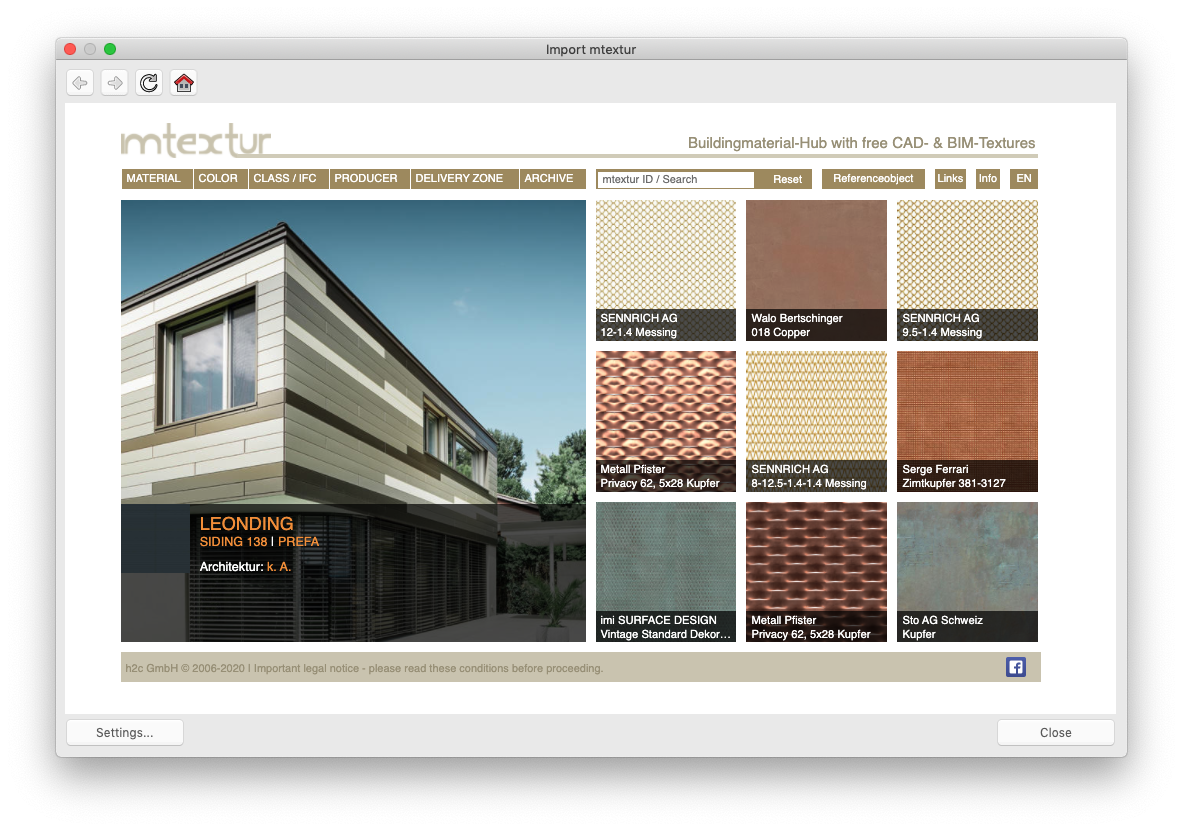
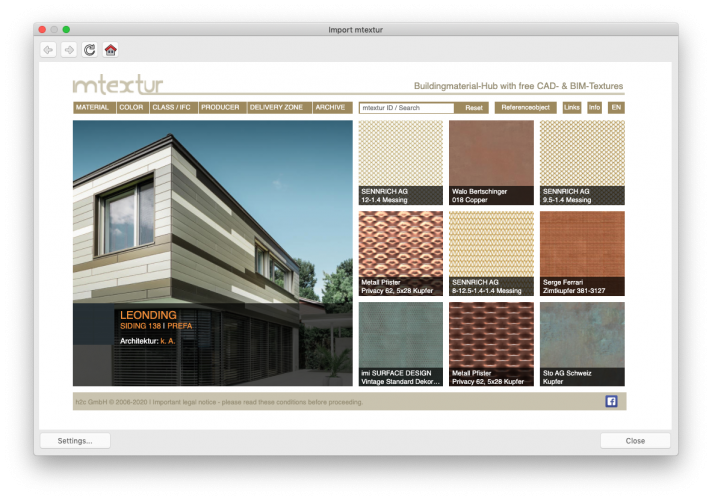
@ArchiPam For more variate on cool textures, check out the mTextures Library. That became my go to place for my own projects. See sample

-
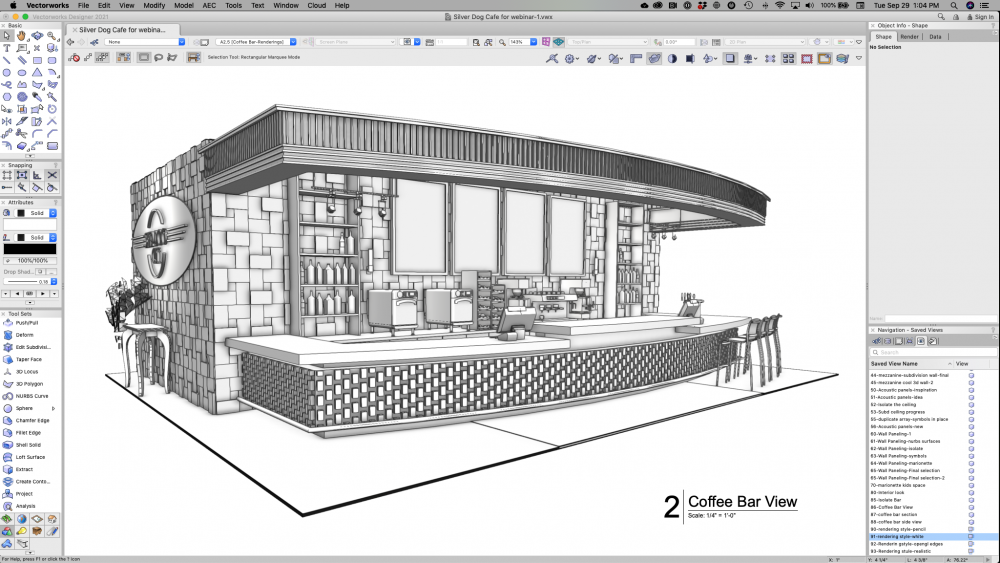
I'd have no trouble creating plans, elevations, sections and details from this model. In fact, you gave me a great idea for my next webinar, creating drawings from a decent model. If you want to know about the tools we used for this cafe project, please check out this webinar and let me know what you think. https://university.vectorworks.net/course/view.php?id=486
- 31 replies
-
- 3
-

-
- open gl
- elevations
- (and 1 more)
-
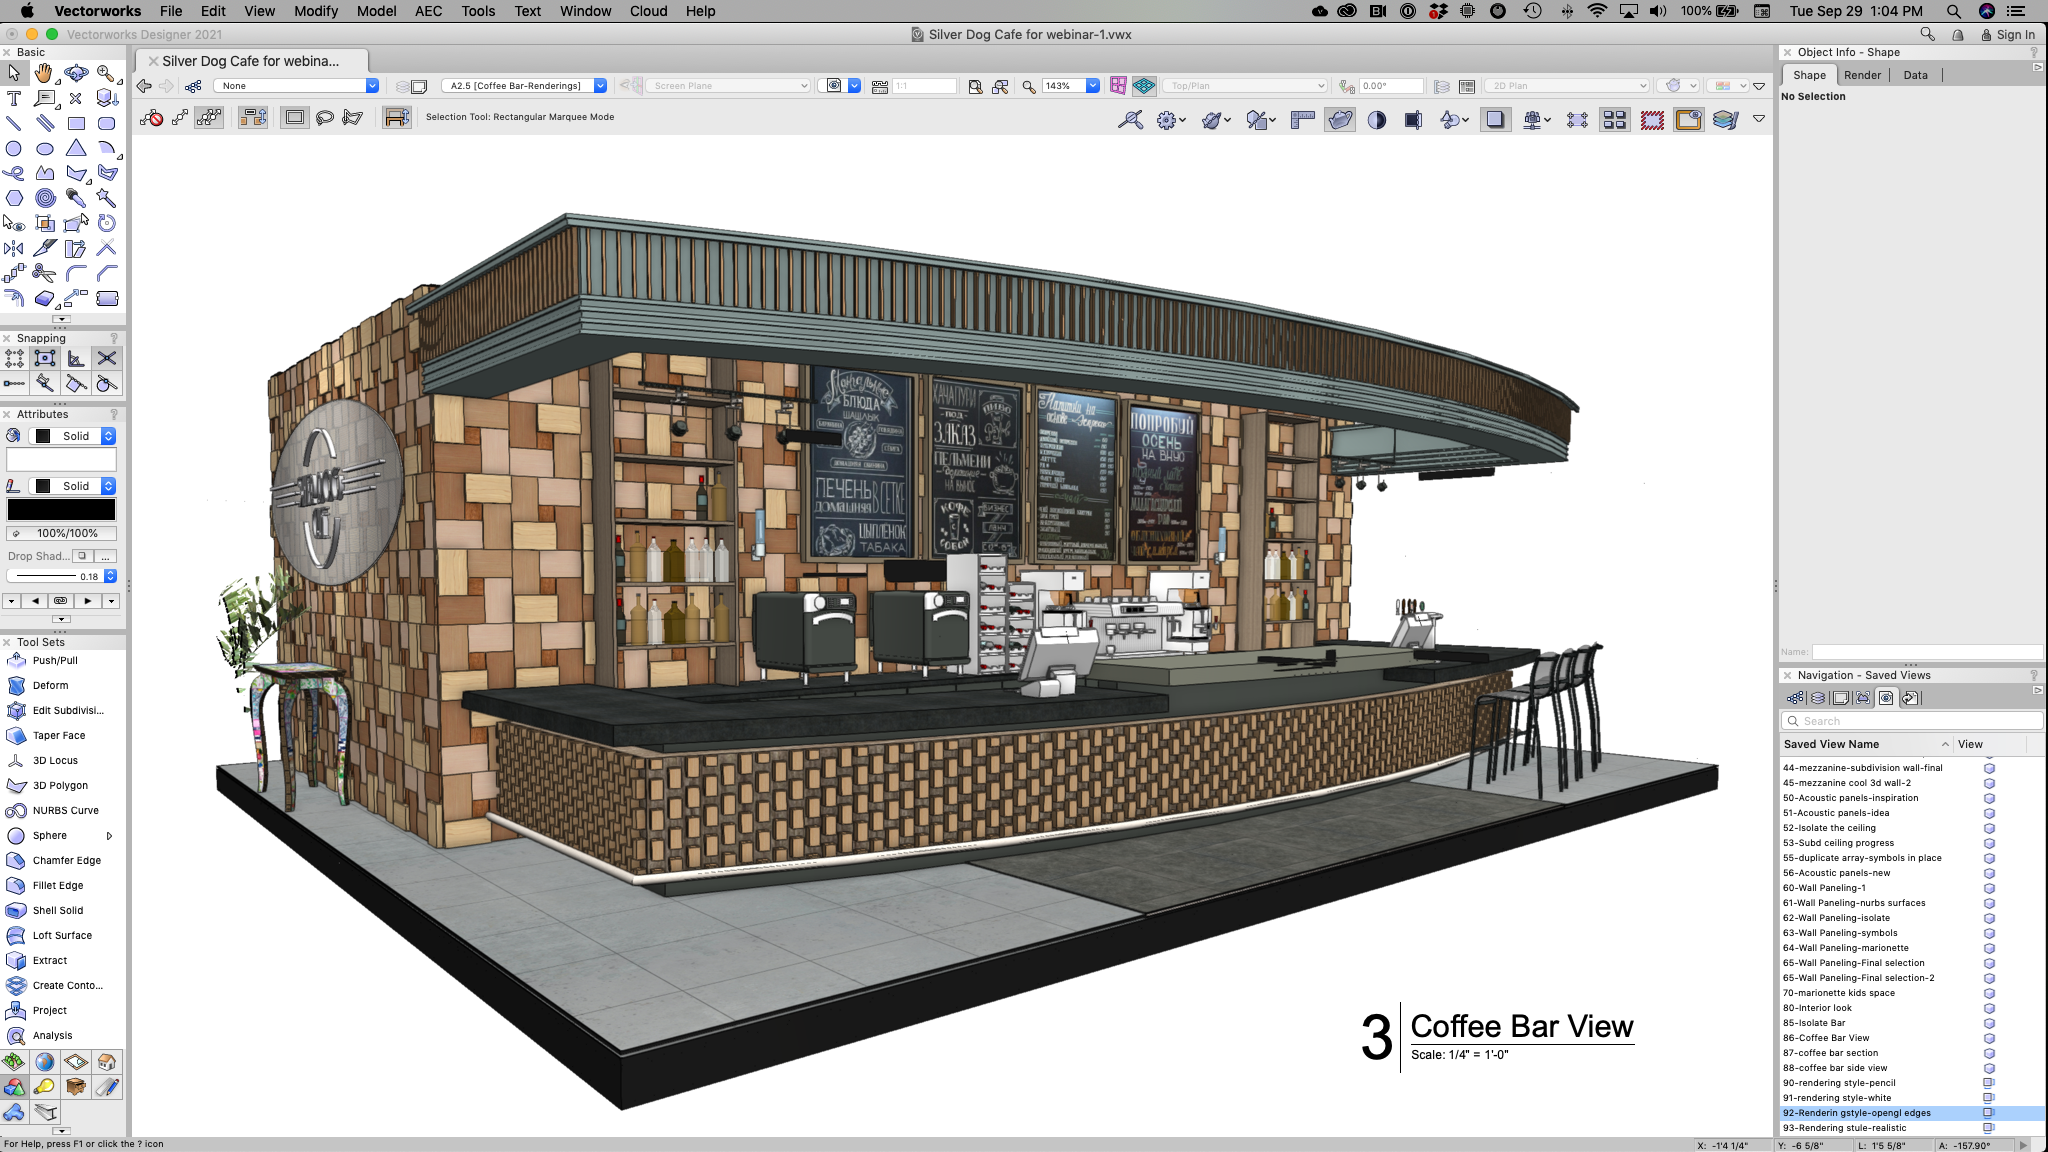
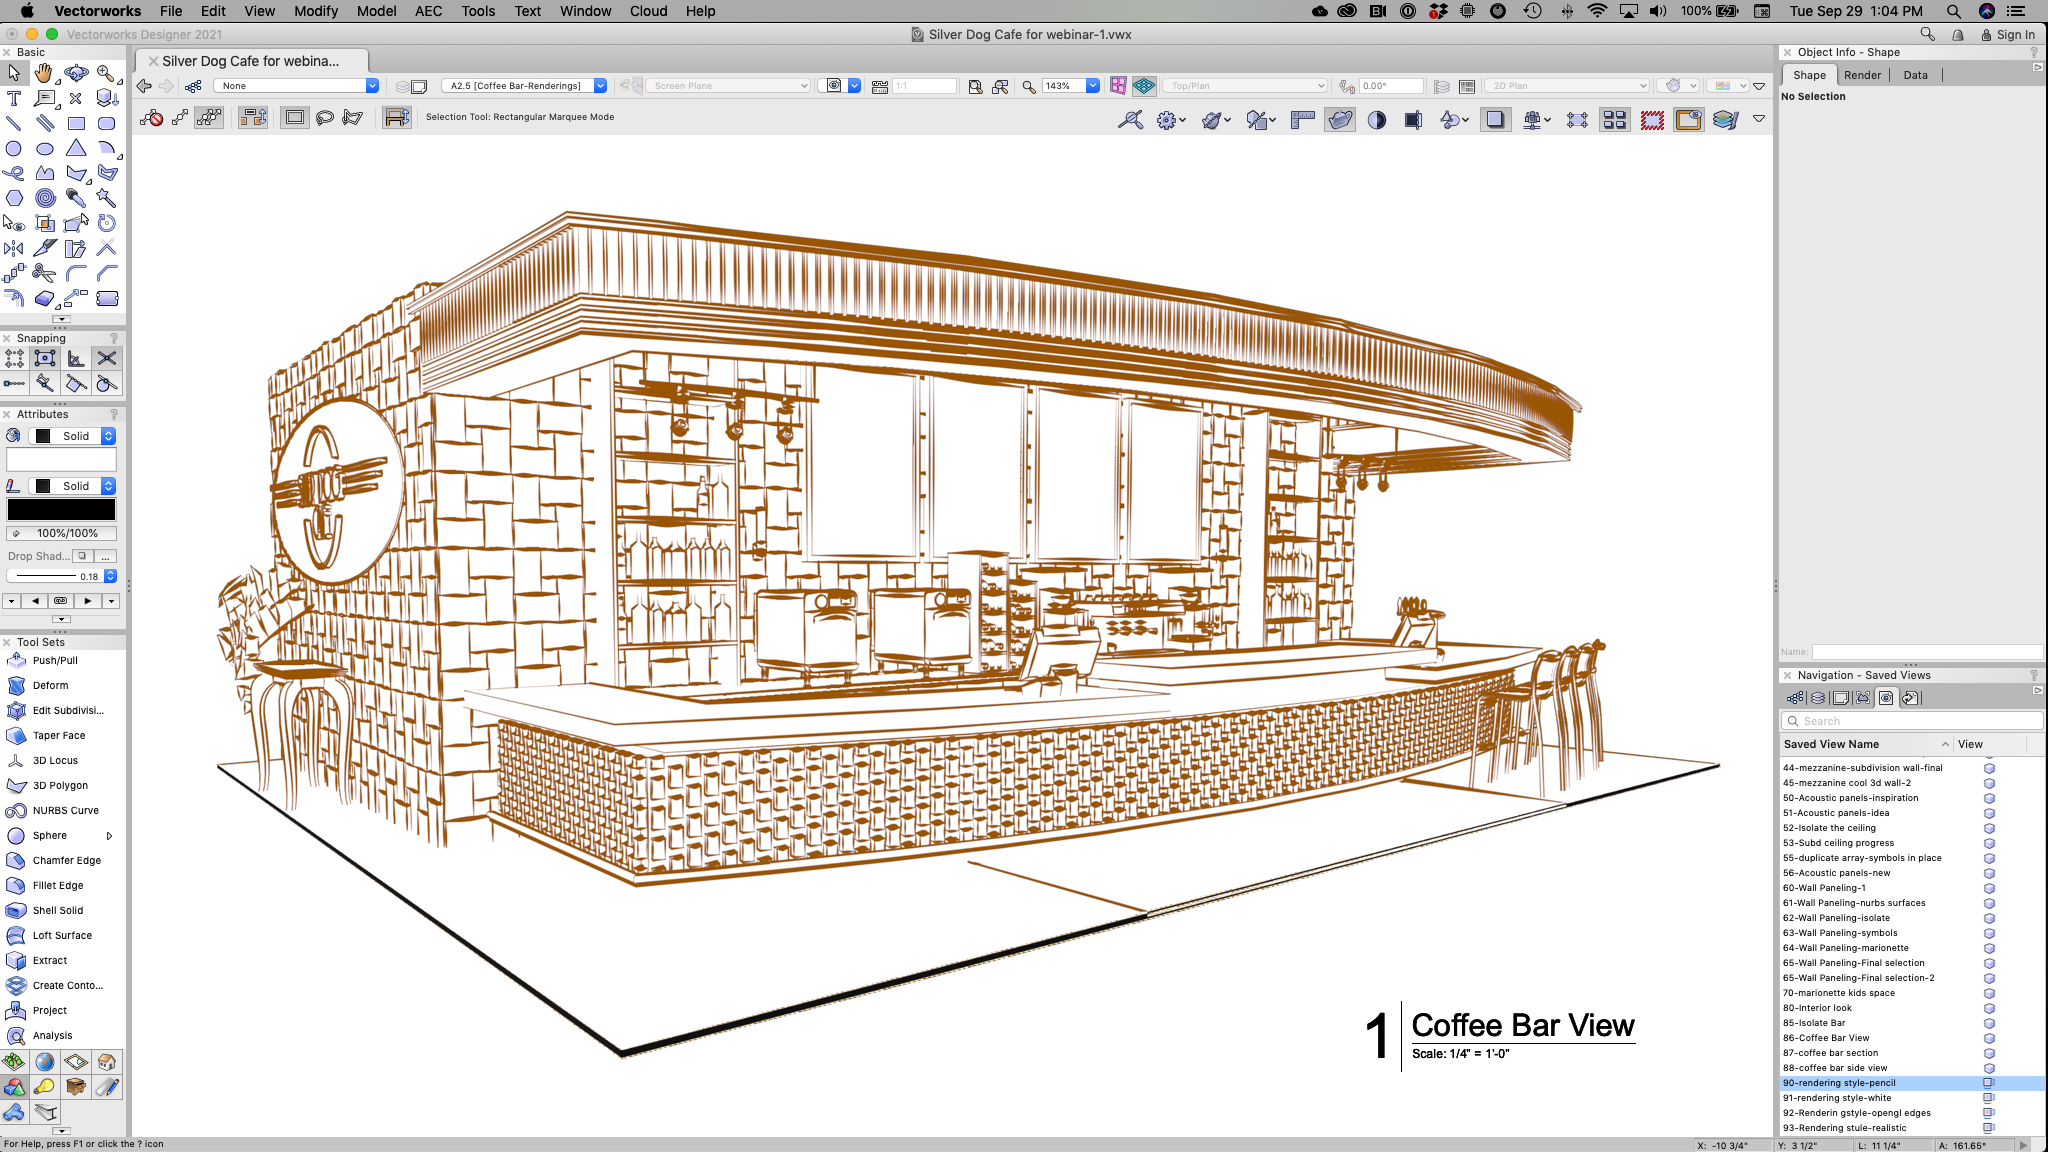
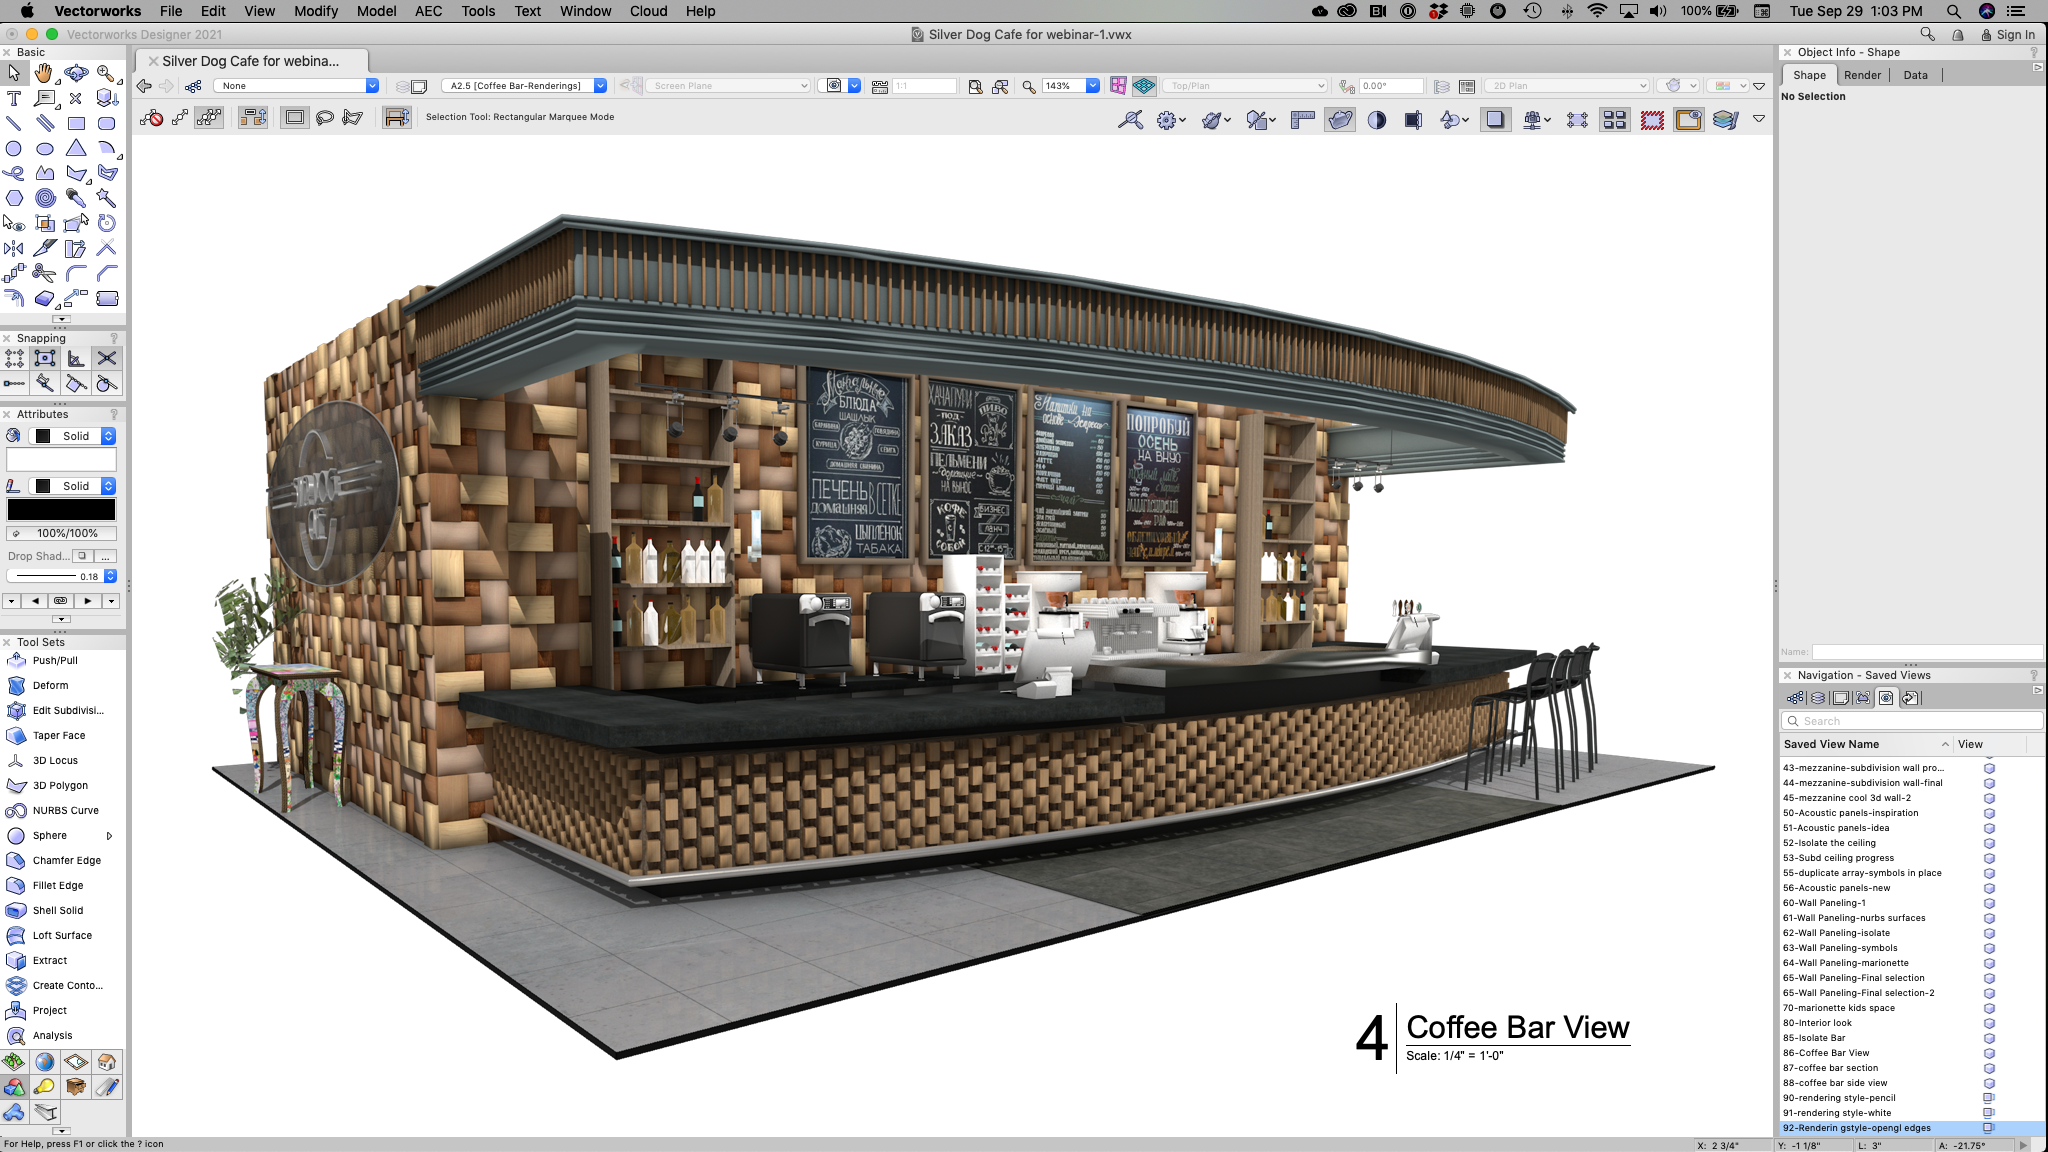
Hello Kevin C. If you just want to create views from your model and you need them quick and pretty, try these options, these are my personal favorites when I need to get an idea out for reviews. Create a viewport, whatever view tells the story better. If you set your sheet at 300 dpi or higher then your OpenGL renderings will look crisp and take no time to render. White model in OpenGL take less time compared with colors and textures. Artistic Rendering styles are effective and fast, and you can even leave your dpi at 100 since you'll just get a sketch look I am posting a few samples of one of my latest files.


- 31 replies
-
- 3
-
-
- open gl
- elevations
- (and 1 more)
-
I noticed this post and downloaded the file. I can tell this model was mainly made in sketchup and brought into vwx. Watch out for the import settings, you have roof faces as vertical planes and that is strange to see. Regarding the IES light, in order to test it, I'd turn off all extra lights, no ambient, no backgrounds, etc. Then fast render and see effect. At 100% I noticed it vary dim with a blue tint to it. I don't think this light is that cold, kelvin should be lower, perhaps 2500k. The IES light should not be just in the middle of the room. It needs to be placed by the hanging lamp and the texture of the bulb set to glow, otherwise the scene does not look real. To add more realism to this model, there must be attention put on the textures, otherwise these look like dull wall paper. For example the tv texture must be set to glow and 10% reflection and other things like that. By the way, if you are going to create still renderings, make use of viewports and render at minimum 300dpi, using custom renderworks so you can have more control over what is needed and what is extra. I am uploading the vwx file updated v2020 and a few screenshots. Office IES Brightness v2020.vwx


-
Vectorworks and the Cloud App are the new two best buddies. One creates the content and the other one puts it all together for presentation purposes. The help/information needed is in the cloud portal. Search for "Create presentations". Here is what is posted: "Vectorworks can generate many types of presentation files, such as PDFs, images, and movies, as well as web views and 360° panoramic images that provide interactive 3D views. You can use all of these file types to create interactive presentations of your design. The presentations can then be shared with clients and collaborators and viewed from any web enabled device, as well as in virtual reality. Check our sample here. A presentation can contain two types of slides: boards and tours. Boards enhance 2D images or .pdf files with other content, such as text or other linked files. Tours create virtual, immersive, 360° walkthroughs of your design by linking panoramic images to each other. Optionally, you can create a tour map to show how each panoramic image relates to the overall model. Before you create a presentation, generate files from the model in Vectorworks. Image files: See Publish files from Vectorworks. .pdf files: See Generate .pdf files from .vwx files and Publish files from Vectorworks. Movies: See Export animations from Vectorworks. 3D models (.vgx files): See Generate 3D models from .vwx files or Export Web View from Vectorworks. Panoramic images: See Export Rendered Panoramas from Vectorworks Each presentation has its own library, which contains copies of the original source files. This ensures that your presentation remains unchanged even if you make changes to the files in your cloud storage later. If you make a change to a file, you can re-add it to the library, overwriting the existing file in the library, and any slides that use it will be automatically updated. The Resource panel for each slide contains files that are only available to the current slide. It is not necessary for all files in a board to be pinned, in order to display them to your audience. For example, you can create one pin and then use the arrows at the bottom of the window to navigate between all the files in the Resource panel. In a tour, all panoramic images must be pinned either on a map or to each other in order to display them to your audience. Assemble the presentation on a desktop browser for the best possible experience. Due to screen size, some of the presentation editing capabilities may be limited on a mobile browser" Here is the link: https://cloud.vectorworks.net/portal/help/pages/create-presentations/?app=WEB I hope this helps.
-
Good Renderworks settings for "architectural model" look?
Luis M Ruiz replied to line-weight's topic in Rendering
My recommendation is not to add to the scene more light than needed. Turn off global illumination and let the light sources fill the room and adjust their power as needed. When done, if you feel like the rendering is too dark then make use of image effects, that brings the colors and contrast to life. -
Good Renderworks settings for "architectural model" look?
Luis M Ruiz replied to line-weight's topic in Rendering
Soft shadows is one of the settings on any light object. We can choose from sharp - smooth - realistic. I tend to stay on smooth. Here is a sample of the three types of shadows plus a test with a custom light.

-
Nope. I needed a tool that can raise the face dynamically. Subdivision is the correct tool for these types of animations. Granted, all I needed is to record my screen at the same time.
-
I was curious myself on creating a similar animation, specially with the event we had a few years back in Maryland. Here is my test. Flood animation.mp4
-
This might be a silly recommendation but, did you double check all your 3d object attributes are set to class?
-
I hope this video helps:
-
Good Renderworks settings for "architectural model" look?
Luis M Ruiz replied to line-weight's topic in Rendering
Hello group. This one is something we put together over a year ago, I just wanted to share. I found that combining "image effects" after the completing the process enhances these type of withe renderings nicely.
-
triangles is what matters. If you have a forest with 3d leaves, that would take forever. Then again, renderings are views, so scale is not an issue. Do not create renderings from the design layer, use viewports.
-
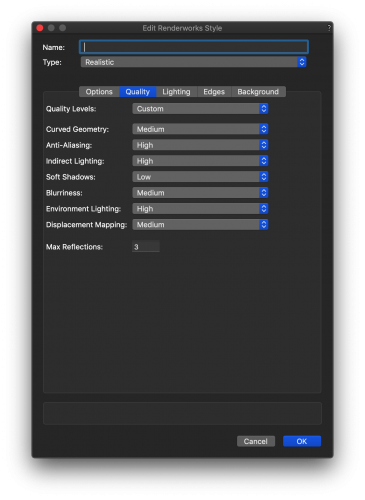
Good start, tank you. Ok, here is a recipe I recommend: 1- While in design layer, set your desired view and save the view so you can always come back to it at some point. Then create a viewport, place it on a sheet and set resolution to 300 dpi. Size? how about starting with a letter size, landscape. 2- Rendering: Use Custom Renderworks, that way you control over the settings. Fast rendeworks is all low (good for preview) High quality is all set to high (may be too slow) 3 - Lights first, then light bounces, then background, then materials and finally adjusting the resolution of your settings 4 - If things go as planned then export sheet as png, jpg, photoshop or tiff, depending on who need the rendering. 5 - Keep in mind that Image effects can add a punch to your renderings.
-
May I have a bit more information about your renderings workflow? what steps do you take? what style of rendering do you use?
-
Wall Sconce/Pendant Light fixture tutorials
Luis M Ruiz replied to MaxStudio's topic in General Discussion
Take a look at this file. Follow the saved views so you'll see the entire modeling process and at the end the final result. Saved 1 is the inspiration. https://www.dropbox.com/s/pgxogn7yvt8g5o9/Wes Lamp Process.vwx?dl=0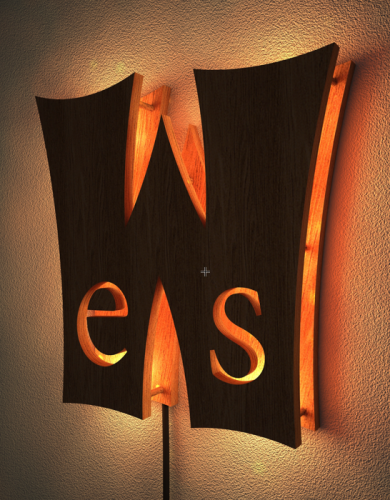
-
Currently, Panoramas are not exported as OpenGL, there is already an improvement request in place.
-
Try calculating the panorama in the cloud