


C. Andrew Dunning
-
Posts
1,153 -
Joined
Content Type
Profiles
Forums
Events
Articles
Marionette
Store
Everything posted by C. Andrew Dunning
-
Replace a truss symbol in a configuration
C. Andrew Dunning replied to Mickey's topic in Entertainment
...and...with all due respect...this is another example of the system being WAY more involved to use than it should be...and, of why this needs a SERIOUS re-think. The more I work with Braceworks-enabled truss, the more frustrated I get. -
Spotlight - Safelock Skirt
C. Andrew Dunning replied to Jesse Cole Guthery's question in Wishlist - Feature and Content Requests
The stands are Symbols that are stored in Resource folders or in your working file. Until versions with skirts can be added, simply add that to a duplicate of one of the existing Symbols - perhaps, using something like Multiple Extrude. -
Would you mind posting a sample VW file containing a placed instance of the fixture...with the Label Legend you're using? The stock Symbol, itself, seems to be OK so the issue might be in your LL...perhaps, in a container shape.
-
I don't know about the name...but..."yes"...to the folders it contains.
-
Assuming you're in the Spotlight Workspace... [Tools][Options][Vectorsorks Preferences...] "User Folders" pane The folder cited is the one shown under "User Data and Preferences Folder." This folder mimics the main Application folder, containing folders like "Libraries" and "Plug-ins" for holding things like settings and PIO files.
-
As-formatted, the lens options, no. But...with the Landru Design versions of the tools, things like tvs, projectors, and stands are chosen using the Resource Selector system, which IS Workgroup-aware.
-
2 things: Do not change the format of any text you edit. If you do, your tool(s) may not work and you may have to reinstall Vectorworks to get things working again. So...proceed with caution. Any edits you make will be over-written the next time you install a Vectorworks update/service pack. Open the Plug-in Manager ([Tools][Plug-in Manager]). Click on the "Built-in Plug-ins" tab." Scroll down until you get to the "Video Screen" item. Select it and click on the "Customize..." button. Click on the "Parameters" tab. Scroll down until you get to the Parameter you want to edit, select it, and click the "Edit..." button. (Different screen aspects are stored in each of the 4 stock screen size Parameters.) A dialog will open. Click on the "Choices..." button. You will then be given a dialog showing the list you want to edit. When you're done "OK" out until you get back to the Plug-in Manger and click "Close." I hope this helps...
-
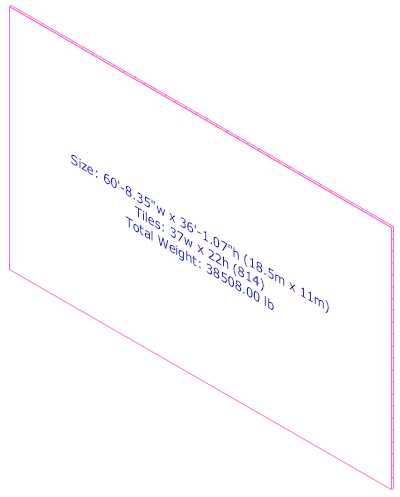
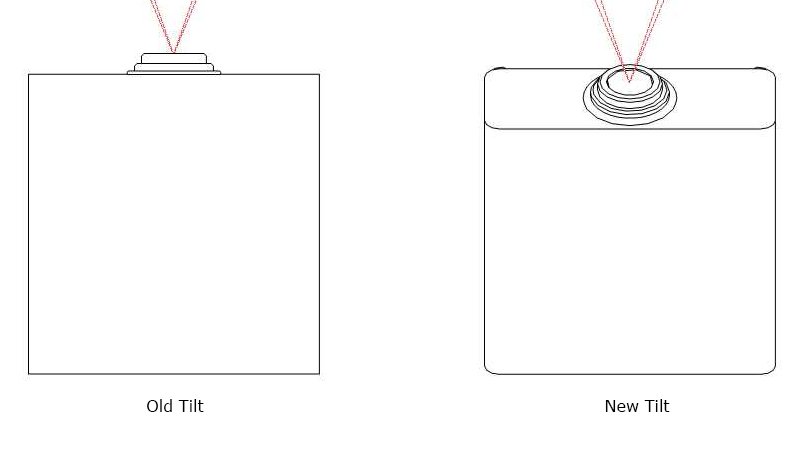
For all of the Landru Design tool users (and, those who wish they were), VW 2023 versions are available for immediate download! If you've not kept current with the tools, here are a few recently-added features you are missing: All of the tools include new fields, allowing you to track things like Position, Brand, Model, Vendor, and Cost. The VideoScreen tools also add fields for power and signal data. Several of the tools now allow you to collapse parts of the Object Information Palette you don't often use. The Staging ToolSet and VideoScreen tools now allow you to include 3D text blocks in your models. The VideoScreen tools now use the Resource Selector system for choosing projectors, stands, and television cases. VS4-Television adds the ability to tilt television cases on-the-fly and has expanded stand options. VS4-Projection and VS4-Blended Projector offer enhanced functionality for using UST/mirror-lens projectors, as well as improved 2D display of tilted projectors. VS4-LED now re-calculates weight and wattage on-the-fly as tile counts change. And...more... For users who purchased one of the tool sets or a Producer's Pack 3 license on or after March 1, 2021, applicable updates are available free-of-charge. Feel free to reach out if you have any questions...


-
Triangle Stage tool
C. Andrew Dunning replied to Jimmy DV's question in Wishlist - Feature and Content Requests
Have you tried Stage Plug?- 1 reply
-
- 2
-

-
Videoscreen Tool Worksheet Problem
C. Andrew Dunning replied to Wesley Burrows's question in Troubleshooting
Like @klinzey said, I think you've found a bug in the Criteria system. See the attached file with things working. Screen Vis WS.vwx -
Drawing a curtain/backdrop without fullness
C. Andrew Dunning replied to VenusD's question in Troubleshooting
Like @Klinzey said, use the "Simple" options. These will, for example, let you have a "curtain" look in 2D but a "flat" look (cycs, painted drops, etc.) in 3D. Much easier/faster than trying different pleat values. -
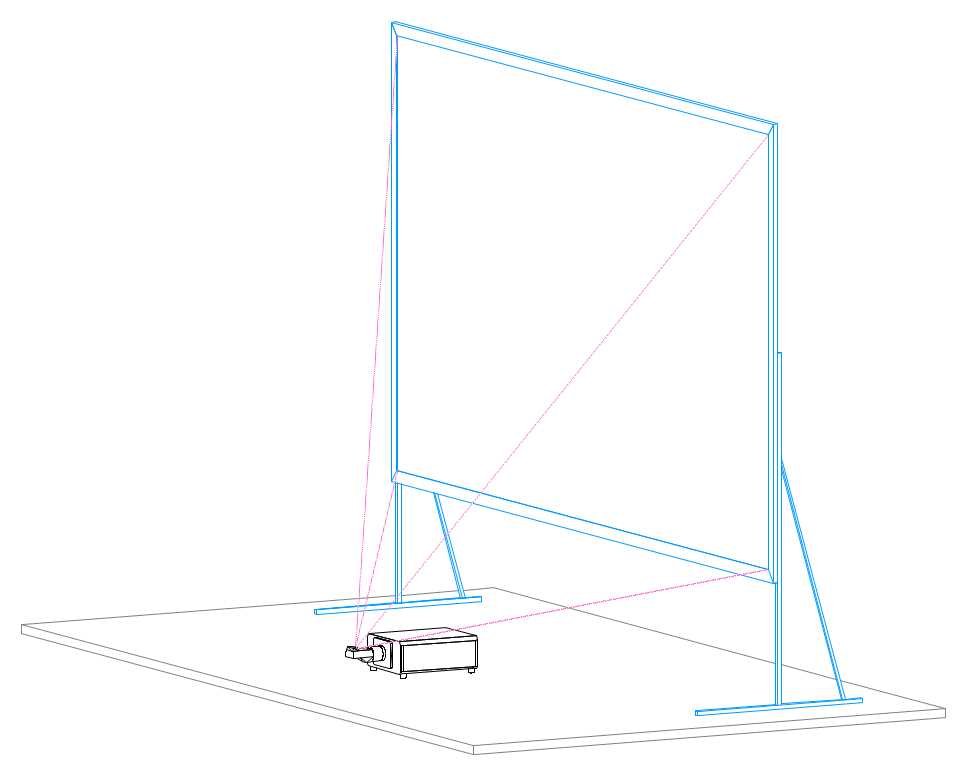
For those of you who have been doing projects using projectors w. UST mirror lenses, the Landru Design version of the tools now handles that MUCH better and has a "Floor" "Vertical Placement" option: And, we've improved the 2D display of tilted projectors:
- 1 reply
-
- 3
-
-

-
Like Pat said... If you don't have Designer or Spotlight, you have the option of buying our versions. In some cases, the tools are essentially identical. In others, the Landru Design versions have expanded functionality. Feel free to reach out if you'd like more details.
-
Correct. In my workflow, I never use the Lighting Device tool. All fixture placement is via the Resource Manager. That way, Red Symbols work and I choose the specific source folder. (No issues w. a "flattened" structure like you mentioned.) I've not seen that. Are the instances from which you built the Red Symbols using default orientation?
-
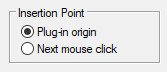
Correct. Though, once-placed, you're back to a Symbol wrapped within the Lighting Device container. 2 things: Within the Symbol Creation dialog, make sure "Plug-in origin" is selected under "Insertion Point:" When inserting Lighting Device Symbols, make sure the last mode is selected:
-
1) Create all Lighting Device Symbols using the default of lens-down/bottom hung. Let Vectorworks control the 3D orientation using the Rotation fields at the top of the OIP. Use "Custom plan rotation" (toward the bottom of the OIP) to correct any 2D issues. (Y = 180 - which VW will change to X = 180/Y = 0/Z = 180) will cause floor/top-hung orientation). This will make things work w. Vision/MVR. 2) Create separate Symbols for each of your desired orientations - 3D following the above convention and 2D being different for each orientation. This will make your intent more obvious on your plots. 3) After your initial Symbols are created, place an instance of each, making orientation/rotation changes as-desired. Attach Label Legends and enter any default data (like mode). 4) Create Red Symbols of these instances. 5) When designing, instead of placing Black Symbols, place your new Red Symbols. This way, orientions will be pre-set, data will be pre-attached, and Label Legends will be pre-configured. See attached for a simple example. VanGogh.vwx
-
Sorry, no...
-
The bulk of the Spotlight/entertainment/production PIOs apply code-generated (non-image) Textures. So...2 things: 1) The tools first check to see if the given Texture exists in the local/working file and then create it if it doesn't. This lets users tweak/edit Textures (once created) if they wish. 2) The different Texture settings can be challenging to fugure out. The easiest way to get those settings is to create the given Texture and to use "Export Vectorscript."
-
The Landru Design version of the tool now has this feature: See our Plug-Ins page for more info.
-
No issues, here. I opened the file, selected the Speaker Array instance, clicked the "Configure Array..." button, switched to the last pane and changed speaker angles, and clicked "OK." The array re-built itself just-fine. I did see that the dimension fields in the Record attached to the bumper need units markers but, as your file is in mm (the same unit used by your bumper), you shouldn't have any problems.
-
Be sure to include units markers ("mm") in the dimension fields of this record. Otherwise, if this Symbol is ever used in a file with anything other than mm as it main linear dimension, you'll have placement and spacing issues.
-
When in "Catalog" mode (or, "Library" in the Landru Design version), "Import" will import the data from the Symbol but will build the simplified model on-the-fly. When in "Symbol" mode, the tools will use the actual Symbol geometry. If your given Symbol has the same name as a Catalog/Library entry, you can switch back-and-forth, essentially giving you an "intricate" and "simple" mode.
-
Non hybrid videoscreen
C. Andrew Dunning replied to fuberator's question in Wishlist - Feature and Content Requests
FINALLY have a minute to work on The List. Just added this... -
OpenGL/Shaded Trouble with Curved Screens
C. Andrew Dunning replied to Tyler Forsberg's topic in Entertainment
No problem. CurveTest.vwx FWIW, the problem I'm seeing w. the Landru Design version is new to 2022. The problem: Image is flipped horizontally and starts from the wrong end of the curve. Open this file in 2021... -
OpenGL/Shaded Trouble with Curved Screens
C. Andrew Dunning replied to Tyler Forsberg's topic in Entertainment
Here is a file containing instances of the Spotlight PIO and the Landru Design version. While the faceting issue is gone w. the Landru Design version, clearly, I need to delve back into this tool a bit... 18x132 Curved Screen.vwx