


C. Andrew Dunning
-
Posts
1,151 -
Joined
Content Type
Profiles
Forums
Events
Articles
Marionette
Store
Posts posted by C. Andrew Dunning
-
-
An update...
I'm finally finding some success. Here is an example of what I've been trying to do.
Thanks for the thoughts...
-
Dave and Carl -
Changing the fill color will have to effect. The drape color is the same as the line color. Set the line color to be blue and the drape will be blue...
-
Is this going to be a new feature in VideoScreen 4?
Who knows...? I'd hoped something along these lines would have been ready for v2 but a combination of geometry generation and texture mapping challenges have made my hopes take a lot longer to realize than I'd anticipated. The former has been working for a while but the latter has really made my head spin. Every time I got above about 200 or so objects VW just didn't want to play. Things are starting to look up, though...
-
If any of you are interested, here's an update:
If I:
1) Create the set of arcs within a group...
2) Convert the group to 3D polys (and, leave as a group)...
3) Convert the group to a mesh...
Things work.
In trying to follow some of Pat's early advice the problem was that I was trying to create the arcs within a "BeginMesh" VectorScript call. Didn't work so well.
I still have some mapping challenges, but at least I'm getting the texture to map in the first place.
Thanks for the thoughts...
-
Michael -
I toyed w. the subtraction idea, but headed the other direction when I realized the high object counts.
-
Pat -
This is an array that is a mesh. The array is created in a script following a "BeginMesh" call. Using this approach I'm able to map a single Texture across a large number of objects.
FWIW, I had originally taken the approach of individually mapping the Texture to each element in an array - and adjusting the offset appropriately for each. That worked, but VW would choke when I got to a few hundred elements in the array - and I'm needing to be able to map to higher numbers than that.
Is the advice you're offering in-essence doing this, or something different? The closest thing to what you mentioned (that I could find) is one of the settings for "SetTexMapBool." Is this what you're meaning?
-
I've attached 2 files:
FlatMesh is an example of the intent of what I'm trying to do - map a single Texture across the array of objects. That image used 3D Polys.
ArcMesh is the array of the arcs onto which I'm trying to map the Texture. This is the one not working.
FWIW, converting the extrusion to 3D Polys didn't seem to fix things.
-
Greetings!
I am trying to create a Mesh of an array of extruded arcs. My question: Is this even permissible? I can create the geometry just fine, but Textures applied to the Mesh seem only to be applying to one of the arcs (there are 48).
Am I missing something?
Thanks!
-
Assembly -
A few questions:
- Your signature notes 2 different versions of VW. Are you seeing this odd behaviour in both?
- If you're only having the problem in `09, are you running the current update?
- Are your child objects event-enabled?
One of my PIOs uses a similar approach to create parent/child objects. Both the parent and the children are event-enabled. In one of the early releases of `09, I was having issues not unlike yours. NNA fixed a bug, but in the mean-time, turning off the event enabling fixed things @ my end.
Not sure if that helps, but something to consider...
-
Pat and Petri are correct; the articles on VectorLab are incredibly helpful. If you're like me, you may need to read them several times for things to click - but WELL worth the time.
As to setting parameters, try a couple of things:
- As part of the initial dialog set-up, read current PIO settings into the dialog using the PIO OIP field names (Pwidth, Pheight, etc.) and calls like "SetItem," "SetEditInteger," etc. to transfer those values into the dialog.
- In the "OK" event, use "SetRField" to write the resulting constant values back to the PIO.
That help at all?
-
How many users do you have?
1, but with my ADD, it's like having 10.
Hey, look, a squirrel...! ;-)
-
I'm not arguing this hypothetically. I know I'm right out of experience.
And that's where the value of forums like this can be so great. I, too, know I'm right about the way that I work being THE way to work, but the more I can see other approaches and get other perspectives the better. I might see a way to improve my particular method - or I might see value in changing the way I do things.
At a trade show this past fall I watched a VW demo. The person giving the presentation has a significantly different aproach than mine. The more I listened to him, the more wisdom I saw in his perspective. My workflow hasn't changed to match his, but I came away with a respect for his approach.
Whereas we often had problems with rogue Classes on printed drawings, since switching to Viewports for production prints we've had none.I don't believe I've ever had issues w. rogue Classes. I have, though, learned the hard way about the ill effects of different Class visibility settings regarding VPs. For example, if a VP lives in a Class called "Bob," that class has to be visible in the VP when the VP is visible in order for the VP to update correctly.
-
The user is keenly aware that to change the printed view they have to actually edit the Viewport itself.
I agree w. that - and appreciate your needing to "manage" your users.
At the same time, I often find myself doing a lot of Saved View updating. I used a 3rd-party script to do that before NNA added the functionality into VW. Now that it is native, doing that is incredibly easy. I would find managing Saved Views through VP settings to be much more cumbersome than necessary.
-
Have any of you looked at "Merge Organizations" from Software Customization Services (http://scs-inc.us/default.php?page=products&subPage=Products/Merge%20Organizations/Default) This command/tool might do what you're needing.
-
It's far easier for mistakes to be made when it comes to printing if Saved Views are part of one's workflow.
How so??? I'm not seeing the link here.
For my workflow, both Saved Views and ViewPorts are absolutely essential to my VW productivity. One does not (and, I don't think, was ever intended to) replace the other. I use Saved Views to make managing ViewPorts easier - and occasionally use ViewPorts to create/update Saved Views.
-
Stephen -
Here you go...
-
Sorry, folks...it's been a bit since I've stopped by...
To install the Curved Curtain tool:
1) With Vectorworks NOT running, copy both "Curtain From....vsm" and "LandruCurtain 1.0.vso" to your Vectorworks Plug-ins folder.
2) Start Vectorworks.
3) Open the Workspace Editor
[Tools][Workspaces][Workspace Editor]
4) Click the left (Menus) tab.
5) In the left pane, scroll down until you see the "Landru" category. Click the "+" next to "Landru."
6) In the right pane click the "+" next to the menu item into which you want to add the new command.
7) Drag "Curtain From..." to that menu.
8) Click "OK"
*** Do NOT add "LandruCurtain 1.0" to any Workspace.
9) To use the tool, create geometry in your drawing. The tool will only work on arcs and lines.
10) Select the geometry you just created.
11) Click the "Curtain From..." command you just added.
12) A "LandruCurtain" PIO will be created for each of the items you had selected.
13) Change the parameters as you wish in the OIP.
That help?
-
Dave -
Here you go. These have the AutoPlot record format attached, but you should be able to modify to meet your needs.
-
Greetings!
I'm having difficulty understanding mapping images to meshes.
For example:
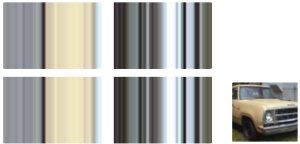
The single image on the right is the texture mapped to a single 3D polygon. The block of 4 rectangles on the left are 4 3D polygons converted to a mesh, with same texture applied.
Why the difference? What am I missing?
Thanks for any hints....
-
Here you go...
-
This one is fairly basic, but might fit your need.
-
Gentlemen, thanks for the kind words.
Patrick, if you have any questions about how this tool is supposed to work, let me know. Because its approach is different from the SpotLight Curtain Tool, it is easy for some users to get confused.
-
Chris -
What issues? And, what version? I've got things working cleanly @ my end through VW09.
Drop me a line off-list, if you'd like...
-
Chris and Matt -
Actually, there IS something easier. Go to http://www.landrudesign.com/VWPlugIns.htm and download our curtain tool. Install per directions. You'll end up w. a command that is used to transform arcs into curtain objects - with adjustable settings. Applying a texture to the curtain will map the image to the curtain - at full width. One of the options is "Simple 3D" - which will create a flat (non-pleated but curved) surface that should work beatifully for what you're needing.
As to translucency, just give your image a little transparency in the texture editor box.
Mesh Creation
in Rendering
Posted
Yup. Whereas VW would choke when tube counts approached 200, using this approach lets me get to over quadruple that. If simpler flat elements, I can get in to the thousands w/o issue.