


LJ TMS
-
Posts
178 -
Joined
Content Type
Profiles
Forums
Events
Articles
Marionette
Store
Posts posted by LJ TMS
-
-
This thread could be helpful in creating your random looks...
You could create a wristband for every seat, then use random selection to remove a percentage. Then random selection again for color. And again for intensity. Should help with your varied look.
-
 2
2
-
-
15 hours ago, Andy Broomell said:
I would definitely use these, though it should be noted that pre-2017, only Symbol Folders existed, so only Symbols could be put into folders (meaning no functionality has really been lost). But I do agree that it seems to natural to want to be able to freely organize all resources (for example, sometimes I wish I could put everything that's been imported/referenced into a single folder so I don't have to see those resources).
Interesting, I was certain pre-2017 folders allowed any type of resource to be placed in them. But I found a computer with VW2015 installed and your definitely right, they are strictly symbol folders. Guess my memory is failing me, lol. One thing I did notice and must have been what I was thinking of was that each resource was filed under a collapsible dropdown for that resource type. Seeing that gave me the idea for another feature request...
VE-99234 - Option to auto-sort resources into folder in the Resource Manager
Add a checkbox to the folder creation/editing dialog that would automatically place any new or existing resources of that type to within that folder.
This would give a functionality similar to the dropdowns pre-2017, and I would use this feature for my more create-it-and-forget-it resource types (gradients, hatches, line types, record formats, text styles, worksheets, etc).
15 hours ago, Andy Broomell said:But perhaps there's a hesitation that this would lead to poor organization and confusion for those who aren't careful? Not sure why else things were implemented the way they were.
I agree this may lead to some users to not use folder types altogether and make all folders generic. But I feel one of the great strengths of VW is in it's flexibility. Often times there are multiple ways to accomplish a task, and VW doesn't force you into a strict set of conventions. Two of the benefits of this are (1) you can accomplish tasks and organize in a way that best suits you, and (2) often times if I run in a bug, I can find another way of accomplishing the same thing by skirting around it.
I think flexibility in allowing us to organize in the way that best suits our needs is very beneficial (especially with the range of disciplines that use VW), even if it allows less experienced users to do things in a way we may consider disorganized. For example, I would be pretty upset if VW decided there is only one way to organize our classing structure, and everyone needs to adjust to the way VW deemed 'correct'.
-
2
-
-
- Popular Post
- Popular Post
VW2017 introduced a reworking of the Resource Manager and added "Folder Types", which restricted folders to only allow objects of a specific type to be placed in them.
I would like the addition of a generic folder type that would allow any object to be placed in it (like the folders pre VW2017).
This would allow me to place miscellaneous resources I very rarely use of various types into a single folder. It could also be used to keep related resources together in a single folder (for example an imported DWG with it's symbols, hatches, line types).
VE-99233
-
7
-
Yea there's definitely a few different DMX oddities going on. Just a little more info...
With the stuck animation wheel on the Mac Viper Performances, all (20) fixtures exhibited the behavior that wasn't there when we started the session. Restarted Vision and loaded the saved v3s and issue still there. Restarted and loaded the esc and the issue was gone.
I took the esc & v3s files to my 2nd computer and loaded each in Vision and verified that that both behaved the same as the 1st computer (stuck animation wheel saved with the v3s, no problem with the esc). I was pretty happy because I had something reproducible to send you guys.
Earlier in the day, about 10 (out of 50) of our Mac Quantum Wash fixtures got their color wheels stuck in various color positions. But a restart of Vision fixed the issue. I hate those because I have no idea how to reproduce the bug and open a JIRA ticket for it.
-
1
-
-
On 9/19/2018 at 5:32 PM, bbudzon said:
Hey Dan,
We found a pretty serious bug in DMX just before SP0 release and were able to get a fix into the initial build. Have you had a chance to test Vision 2019 SP0 to see if this issue still exists? It may require a new file as the bug may have been stored off in the v3s (the esc should be ok).
I just just ran into this bug again in Vision 2019 SP2 Beta 2
Running Vision a few hours before Mac Viper Performance's got their animation wheel stuck. Added to JIRA VB-155153
-
1
-
-
On 10/2/2018 at 4:31 PM, VClaiborne said:
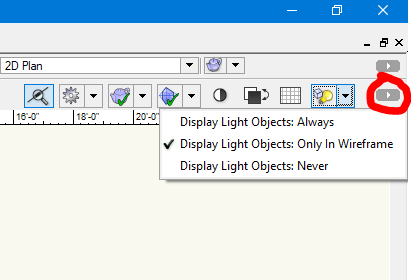
Hi VWX team, how do I turn off all beam directional markers while in Viewport? I inserted LEd and moving lights and created a viewport and have these directional arrows and angle markers that I want to turn off but can't seem to locate any settings for this
Also if you want a quick way to enable/disable without opening up VW prefs, in the top right of the VW window, click the small arrow in the 2nd from the top bar to add a "Display Light Objects" dropdown to that bar.
-
1
-
-
Vectorworks solution to lighting plots with non-horizontal truss is Design Layer Viewports. This is done using the Create Plot & Model View command under Spotlight > Visualization. This allows you to turn a lighting position with truss and fixtures into a single object (DL Viewport) that can be rotated on any axis for correct orientation & positioning in the 3D model space for renderings. You also have the Definition Layer for a nice clean Top/Plan look for use on your drawings.
The problem is Vision doesn't interpret a DL Viewport as an object with Spotlight Lighting Devices contained within it. It converts all the objects to meshes (including the lighting devices). If Vision were able to parse a DL Viewport as it's contents including Spotlight Lighting Devices (with correct orientation), I think this would greatly improve VW/Vision workflow in drawings with raked truss.
Submitted to JIRA as VE-99212
-
1
-
-
Not sure if the correct way is to create a new topic each year or add on to this one? Here's my request again to have an Spotlight menus & tools added to the Designer workspace (since Spotlight is part of Designer?) or create an "Everything Workspace" in VW2020.
This is my first year on JIRA since I had this request, so added there as well.
VE-99189 - Add Spotlight menus & tools to Designer workspace
VE-99190 - Allow selecting built-in Tool Set icons for custom Tool Sets in the Workspace Editor
How to build a Designer + Spotlight workspace in VW 2019
1. Create a duplicate of the default Designer workspace and name it.
2. Add the Spotlight menus & commands. Here is a compare of the default Designer workspace vs Spotlight workspace in VW2019. Add the green highlighted commands on the right side of the compare window to your workspace (except the Architectural submenu which I believe is already included under AEC).
3. Go to the Tools / Palettes, and add the Dimension tools to your Basic toolset. The list of tools to add is in the compare link (right side, lines 939-945).
4. Add a new tool set and name it Lighting. The list of tools to add is in the compare link (right side, lines 949-962).
5. Add a new tool set and name it Rigging. The list of tools to add is in the compare link (right side, lines 963-978).
6. Add a new tool set and name it Event Design. The list of tools to add is in the compare link (right side, lines 979-991).
For icons, use Andy's spotlight icon from his post above.
I've also attached a "Designer+Spotlight.vww" with the above changes already made. I did not have time to make a clean with transparency version of the Rigging and Event Design icons, so they are pretty crappy. Hopefully I or someone else can post some better icons to use (or even better we can get the actual icons from VW?)
If you use the attached VWW, for Windows place in C:\Users\YOUR_USERNAME\AppData\Roaming\Nemetschek\Vectorworks\2019\Workspaces
Re-open VW and select it under Tools / Workspaces
-
2
-
-
Awesome, thanks Andy! This is better than my hacky screenshoted icon.
Where did you extract the Spotlight toolset icon from? I remember searching through all the resources a few years ago and couldn't locate it.
-
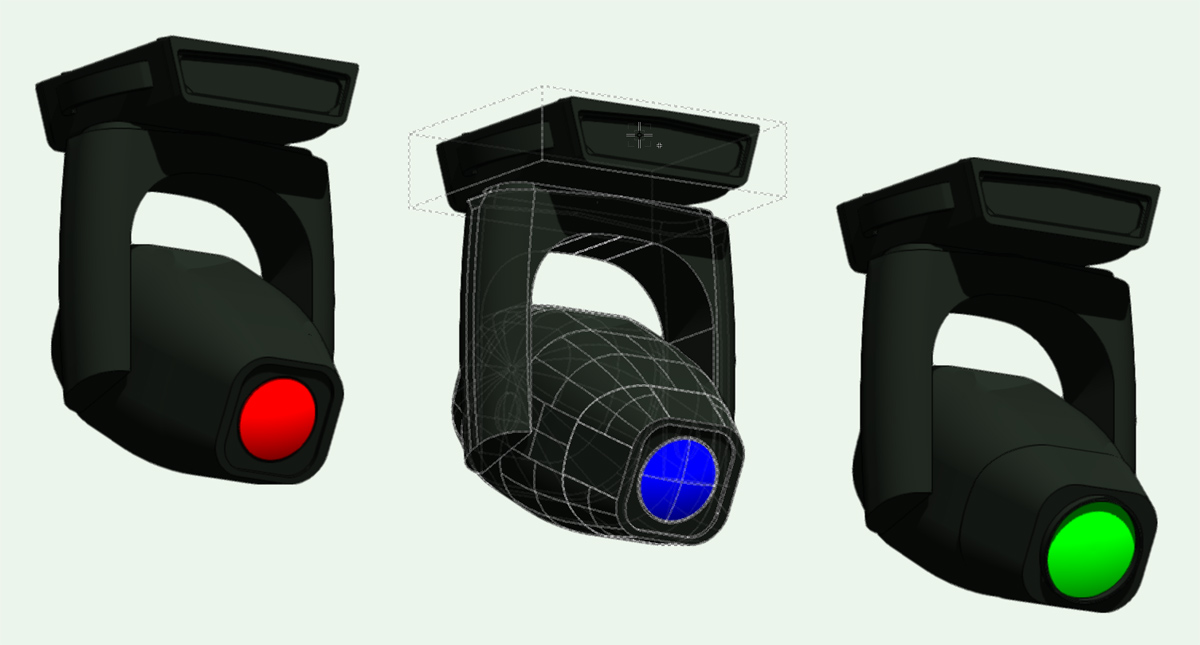
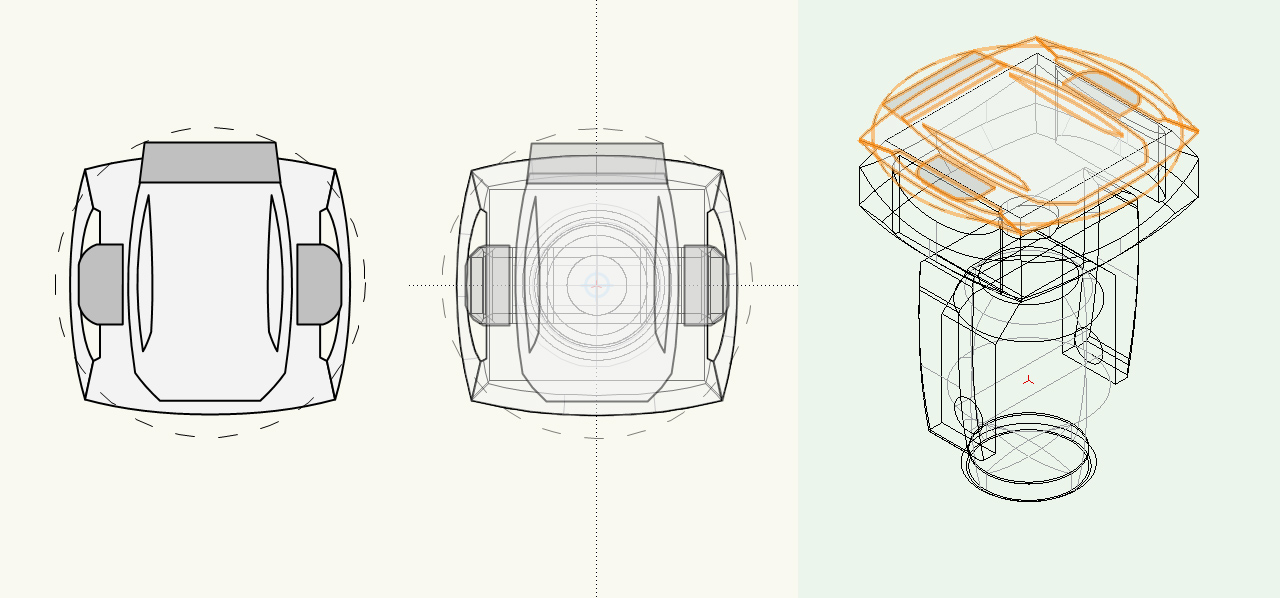
Needed these for a show and saw this thread, so figured I'd share. Made from Clay Paky website dwg's.
VW2017 attached with Spot, Profile, & Unico.
-
I agree with all the suggestions here. It really is a pain.
Here's is my workaround. Although a few extra steps, I find it's the most precise method for me (and won't mess up attached records).
1. Edit 2D component of symbol.
2. Select All. With everything selected...
2a. Attributes palette, change opacity to 50%.
2b. Object Info palette, change plane to 'Symbol Definition' (this will move your 2D to the 3D component).
2c. Group (so it will be easy to manipulate as a single object).
3. Exit 2D edit mode. Notice in the Resource Manager your symbol is a 3D only now.
4. Edit 3D component.
5. If you're in Top/Plan view, you'll see your semi-transparent 2D component on top of the 3D components. Move or edit as needed.
6. Once finished, select the grouped 2D component, ungroup, goto Object Info and change plane back to Screen.
7. Exit 3D edit mode. Notice in the Resource Manager your symbol is back to hybrid.
8. Edit 2D component.
9. Select All. Change opacity back to 100%.
Note that you cannot change the plane of a group. So you must change plane before grouping in step 2, and ungroup before changing plane in step 6.
-
No problem!
Yea I really can't understand how this feature request isn't fulfilled by now. It requires 0% engineering considering the user can fix this with the workspace editor. The only hack job is having to sceengrab the spotlight toolset icon, since the builtin icon can't be selected in the editor (and cannot be found in the Vectorworks.vwr as suggested here).
In the 2014/2015 discussions, it's mentioned there may be a hard limit on how many commands can be added to a single workspace. But this obviously isn't a problem (at least not in VW2017/2018) considering you can add all the missing Spotlight commands to the Designer workspace without any errors.
Heck, they can grab my shared Designer+Spotlight_2018.vww above, swap out the my Spotlight icon with the real icon, bundle the vww in VW, and wish granted!
-
For future Vectorworks releases, please add the Spotlight menus and toolset to the Designer workspace (or make a seperate Everything Workspace).
Here's a request from 2010
Add the Spotlight Toolset to the Designer Workspace
And 2014
And 2015 (and bumped again in 2017)
VW Designer 2015 - Still no complete workspace with all toolsets
In the meantime, here's how to build a Designer + Spotlight workspace.
1. Create a duplicate of the default Designer workspace and name it.
2. Add the Spotlight menus & commands. Here is a compare of the default Designer workspace vs Spotlight workspace. Add the green hightlighted commands on the right side to your workspace (except the Architectural submenu (right side, lines 512-532) which I believe is already included under AEC (left side, lines 445-536).
3. Goto the Tools / Palettes, and add the Dim tools to your Basic toolset. The list of tools to add is in the compare link (right side, lines 918-924).
4. Add a new tool set and name it Spotlight. The list of tools to add is in the compare link (right side, lines 928-963).
5. Add the icon your newly created Spotlight toolset using the attached icon. (This was a quick and dirty screengrab + cleanup until they allow us to select from the builtin icons).
OR, if you want to save a bunch of time, I've attached a workspace file which is just all the above steps completed (no other customizations).
Place the file in C:\Users\YOUR_USERNAME\AppData\Roaming\Nemetschek\Vectorworks\2018\Workspaces
Re-open VW and select it under Tools / Workspaces

-
2
-
-
I'd be very interested to hear the explanation of how the new way is "as designed". The Y Rotation has worked predictably the same since Lighting Device 3D Orientation was introduced (I believe with VW 2008, so 9 years/versions now).
As Mark said, Device Rotation and Y Rotation control exactly the same thing now. Rotation rotates around the Z axis, X rotates around X, and Y now rotates around Z instead of Y?
-
-
1. Insert Spotlight Instrument
2. Edit the symbol used for the lighting device.
3. "Refresh Instruments" does not refresh the changes made to the symbol.
A workaround until this is fixed is to select all instruments, click "Refresh Labels" in OIP.
-
In VW 2017, tabbing while entering information in the OIP with the Truss Tool (Straight or Curved) is broken. If you click a field, enter a value, and press tab to advance to the next field, the OIP seems to lose focus. This forces you to mouse click in the next field you would like to enter a value instead of tabbing through.
-
Actually looks like there's a bit more that needs to be added to the Designer workspace from Spotlight than my list above.
-
1
-
-
1 hour ago, Kevin McAllister said:
I'm not sure I understand? I wouldn't have thought any engineering was required. The parts all exist, it just requires someone with access to the proper icons and the Workspace editor to add the missing toolsets (e.g.. Spotlight) to the Designer workspace..... If the icons were available I could do it myself.....
Kevin
Totally agree, no engineering required to make a workspace with all the menus and toolsets.
For anyone with Designer who wishes to add Spotlight items to the Designer workspace, attached is a list of the Spotlight menu and toolset items to add to your workspace. Also attached an admittedly quick and dirty screen grabbed version of the Spotlight toolset icon for Windows (not sure if the Mac version is the same). At least it's better than the generic toolset icon.
Spotlight Workspace Additions 2017.txt

-
1
-
-
Has anyone been able to find the default Spotlight toolset icon?
I just upgraded from Spotlight to Designer and it's crazy to me there's no workspace that includes all the tools. Is the intended workflow to switch workspaces in the middle of a project when I need to use different tools?
Anyway, after manually adding all of the Spotlight menu's and toolset to a Designer workspace, I ran into the same issue of no Spotlight toolset icon. I grabbed the original using printscreen and cleaned the transparency up a little in photoshop. It's not as perfect as the original but it will have to do until they fix the issue.
Icon attached for whomever wants to use it.
-
I've encountered this in old version 12. Delete all your fixture label legends and anything in the label legend folder from your resource library and that should fix your issue.
-
Just wanted forward along that I submitted a bug report and talked to someone in QA. The bug that was reported fixed in SP2 was a separate issue than the one I described in my last post. Hopefully the "Distribute Spacing" bug should be fixed in the next SP.
-
Hopefully this highlights the difference between the 2010 & 2011 Align/Distribute command. Objects were selected, then Align/Distribute, and vertical spacing selected.
As you can see in 2010 with objects of various sizes, equal spacing is applied between each object. In 2011, it spaces the center point of each object regardless of object size.

-
Well, Service Pack 2 was released and this issue has not been fixed, although it is listed as being resolved.
http://www.nemetschek.net/downloads/notes/2011SP2_Notes.php
B089695 - Align Distribute does not work as it did in 2010

Select a random assortment of objects?
in General Discussion
Posted · Edited by LJ TMS
@Pat Stanford Thank you for this awesome script, super helpful!
I tried using this in VW2017, but it does not show up in the Plugin Manager or the Workspace Editor (so for anyone who wants to use this, looks like 2018 is minimum version).
When I tried using this in VW2019 on Windows, VW would stall and never recover. I saw in your description...
Windows immediately closes any open menus when pressing ALT, and won't let me open a menu while it's held. Thinking that may be the problem, I tried commenting out line 51 in your script...
If Not AUTOKEY(L1) AND OPTION thenand now the Plugin is working for me! The only change is now you get a dialog every time the plugin is run, but personally I prefer this (as I'll probably forget about the hotkey if I haven't used this tool in months).
I've attached the modified version for any Windows users that run into the same issue. Thanks again for the great script Pat!
Random Group.vsm