

LJ TMS
-
Posts
178 -
Joined
Content Type
Profiles
Forums
Events
Articles
Marionette
Store
Posts posted by LJ TMS
-
-
11 minutes ago, Sebastiaan said:
Hi In this topic I learned how to extract the original toolset pic from a workspace file.
I shared the rigging and event design pics in one of my posts there.
Awesome, thank you very much!
Updated OP attachment to include Rigging & Event Design toolset icons.
-
Yearly thread to please add the Spotlight menu items & toolsets to the Designer workspace. Or create an 'Everything' workspace.
This doesn't require any engineering since users can create it themselves (but shouldn't have to).
Previous threads... 2019, 2018, 2017, 2015, 2014, 2010
Also bumping last years JIRA Enhancement Requests...
VE-99189 - Add Spotlight menus & tools to Designer workspace
VE-99190 - Allow selecting built-in Tool Set icons for custom Tool Sets in the Workspace Editor
How to build a Designer + Spotlight workspace in VW 2020
1. Create a duplicate of the default Designer workspace and name it.
2. Add the Spotlight menus & commands. Here is a compare of the Designer vs Spotlight workspaces in VW2020. Add the green highlighted commands on the right side of the compare window to your workspace (except the Architectural submenu in Spotlight is already included under AEC in Designer).
3. Go to the Tools>Palettes and add the Dimension tools to your Basic toolset. The list of tools to add are on lines 941-947.
4. Add new tool sets for Lighting, Rigging, & Event Design. The list of tools to add are on lines 951-997.
5. Download the Lighting toolset icon here. Download the Rigging & Event Design icons here.
Attached is a Designer+Spotlight_2020.vww workspace with all the above changes. Windows users, navigate to and place the file in C:\Users\YOUR_USERNAME\AppData\Roaming\Nemetschek\Vectorworks\2020\Workspaces. Re-open VW and select it under Tools>Workspaces.
-
 1
1
-
-
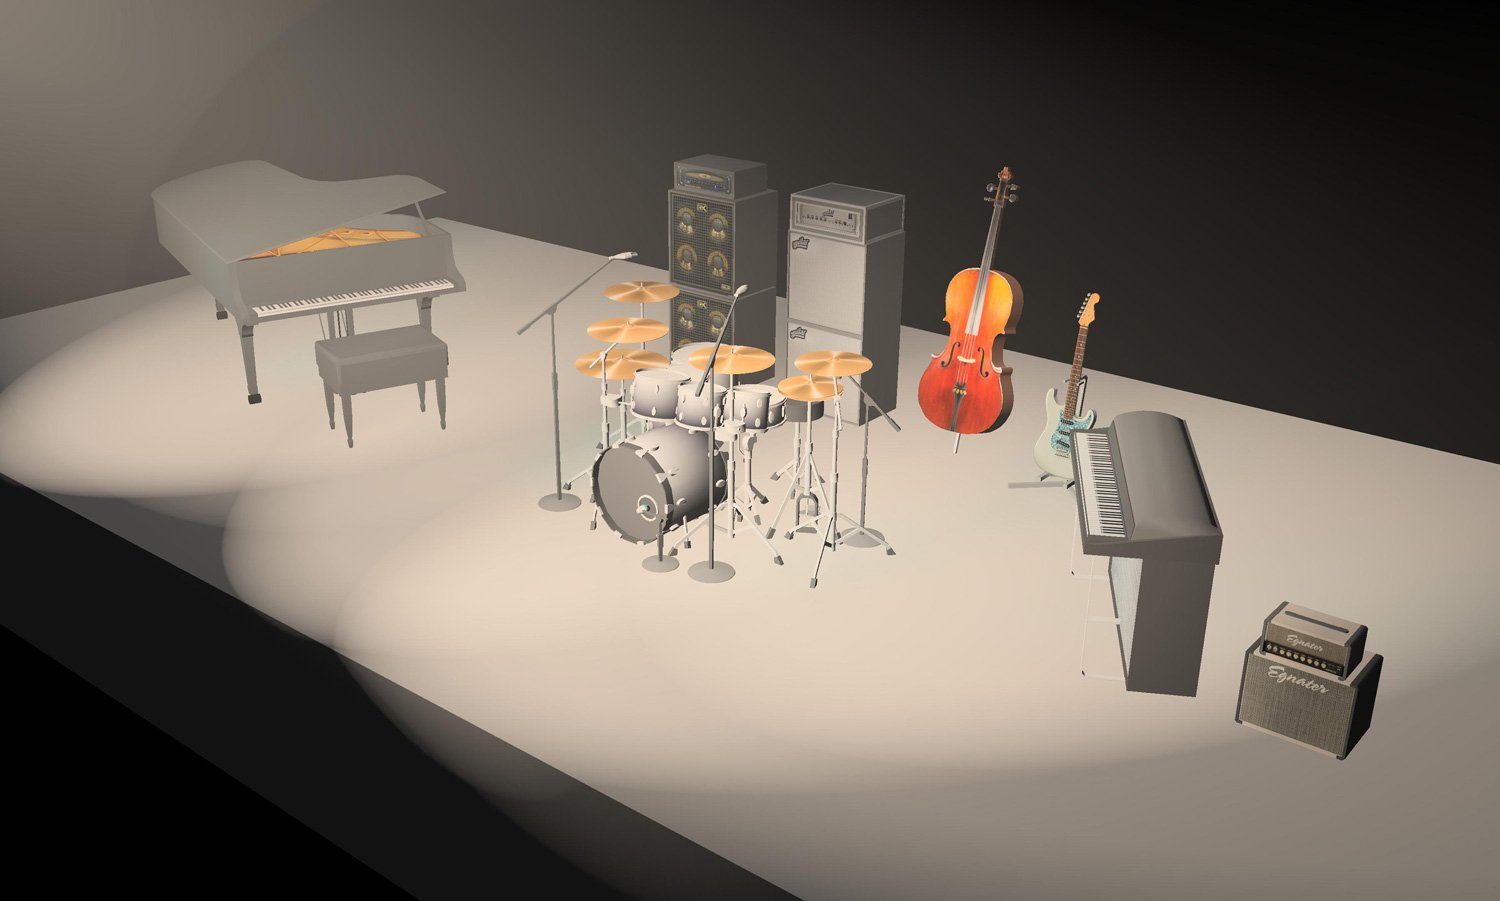
Prior to Vision being owned by Vectorworks, ESP Vision was it's own thing from a company based in Vegas. If I were to guess the reason for the rock musicians, it was mainly marketed more to that side of the entertainment industry.
People are about the only objects I don't import from VW and manually add on the Vision side. Since they are low-polygon, they won't slow rendering to a crawl like that old VW human figure tool that used about a billion polygons.
I definitely agree, VW+Vision should have a better selection of people to drop in.
-
5 minutes ago, EAlexander said:
Just bought this today finally - perfect for a new job we started. Thanks for making this.
Question - If I wanted to globally kill the textures (don't hate me) - is there an easy way to do that? Does just deleting the tex folder from the RM take care of that or will it just throw up errors?
I'm still using my hi poly gear in Cinema 4D for renders, just need these for drafting and open GL, so I want it all white. Any thoughts appreciate.
Thanks again!
e.
Yep, deleting the textures folder will remove all textures from the geometry (obviously backup the vwx first so you can always get back the original library w/ textures).
After viewing the 3D components of some of the symbols after removing textures, it looks like many of them have colors set (amps dark gray, cymbals yellow, etc). This script by Pat Stanford (Convert Objects in Symbol to ByClass) would help you achieve your all white look. Since everything is on the "None" class, running that would convert the symbol contents to "By Class" with a white fill. You would just need to place an instance of each symbol on the Design Layer to run the script against (still much faster than editing each symbol individually).
-
1
-
-
-
1
-
-
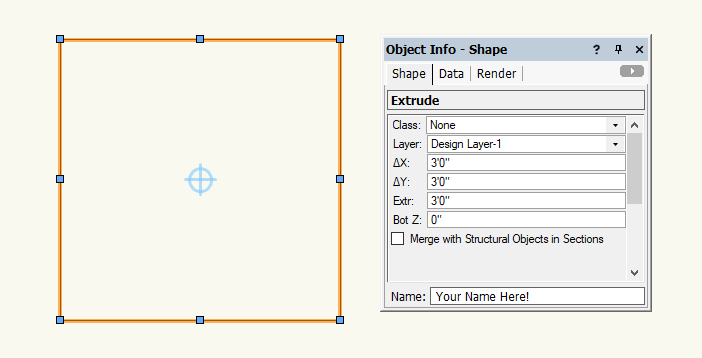
23 minutes ago, jweston said:
How does this work for a simple extrude shape? where is the Name for the MVR object?
There's a field at the bottom of the Object Info palette where you can type a name in for any object.

-
1
-
 1
1
-
-
3 minutes ago, bbudzon said:
ZOMG @LJ TMS you are a life saver hahahahah I totally forgot we already had this!! Thank you for being such a knowledgable customer!!! 😄
No problem, glad to help!
-
1
-
-
I actually recently encountered the same issue with a lighting plot originally drawn in VW2017 and exported to Vision via MVR in VW2019. Exporting MVR showed all the fixtures in the MVR export dialog, but only the geometry came through on Vision import (and ESC worked as expected).
I stumbled on a solution while prepping to file a bug report... copy/paste everything to a new file.
Turn on all your classes (if you have multiple layers, you'll need to do each individually), Select All (Ctrl+A), Copy (Ctrl+C), start a new file in 2019, and Paste in Place (Ctrl+Alt+V). Export MVR and everything came through for me.
-
29 minutes ago, bbudzon said:
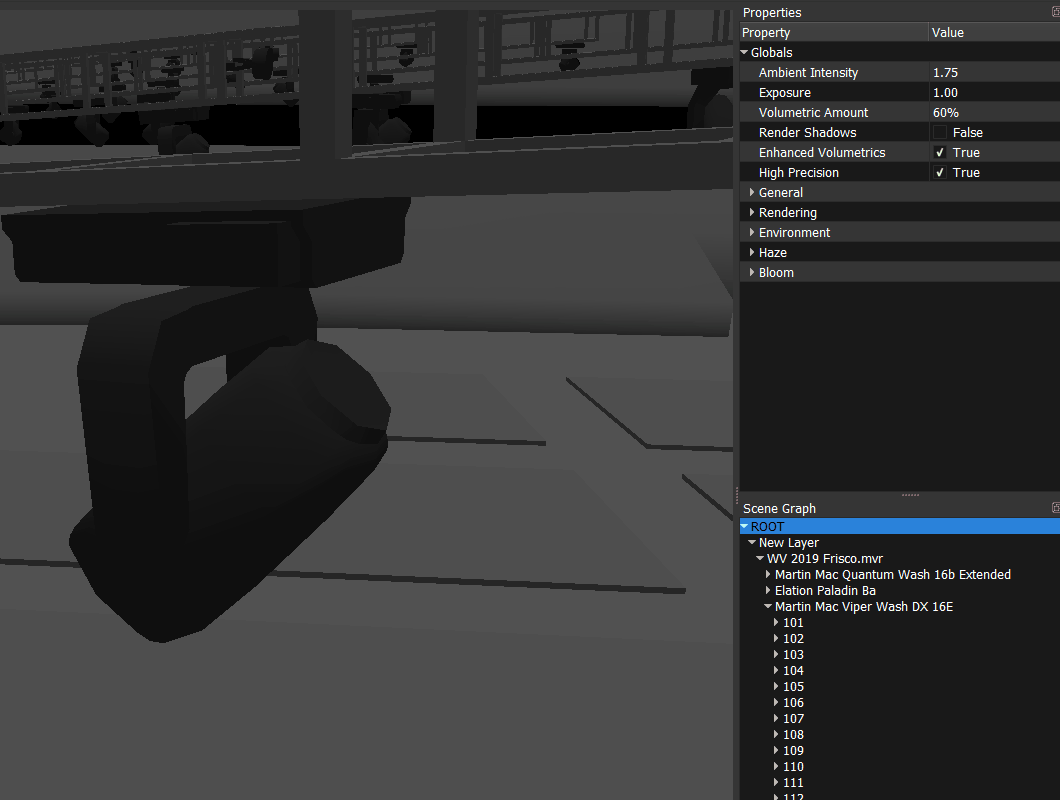
One such feature was the ability to turn off geometry for a fixture at the fixture level (instead of at the global level).
Individual fixture geometry can be turned off without doing so globally. In the Scene Graph, if you expand the dropdown of the fixture one level below it's name (called "base"), select it, then uncheck "Visible" in the Properties window, the fixture geometry will no longer appear.
-
1
-
1
-
-
2 minutes ago, bbudzon said:
Vision takes the uv texture coordinates from the main texture and uses them for bump/reflectivity/alpha/normal maps 😉 So, it should more or less "just work". While it is possible to map each texture onto the object in a different way, it doesn't seem to be common practice.
So if I understand correctly, you could use whatever controls you wanted to map the main texture properly to the object in VW (map type, scale, H offset, V offset, rotation), send to Vision, then replace out the bump/reflectivity/alpha/normal textures and they will match up to however the main texture is mapped?
-
On 5/31/2019 at 4:18 PM, bbudzon said:
However, if you can export the advanced shader images out of VW
Can you explain the process to do this?
On 5/31/2019 at 4:18 PM, bbudzon said:or locate the advanced images on your hard drive (or if @scott moore would be willing to include the images in his package), these can then be assigned in Vision's Materials section of the Properties Palette
I can give this a shot if @scottmoore wants to send me a few of the images used?
@bbudzon I see where to assign textures in the Materials dropdown of Properties but how would you go about mapping correctly on the object (map type, scale, H offset, V offset, rotation) that you have in the VW Render tab?
-
1
-
-
23 hours ago, BSeigel said:
These look awesome! I wanted to ask if you've had the chance to see how these look in Vision. I can see a lot of users wanting to use these symbols for Vision as well, however Vision will currently only support image based textures. Not sure how you textured these, but I'd be curious to see the results.
14 hours ago, scottmoore said:I’ve not really checked them in Vision. I used to be a Vision user in the early days of the product and I did use these or earlier versions of these symbols and I recall them working.
Most of the textures are indeed images. Some utilize images with some amount of reflectivity to create gloss or lacquer appearances. A few are simply reflective “gloss” surfaces. I don’t believe Vision supports any kind of reflections but I would imagine they should work pretty well.
Just dropped a few random symbols into a VW file and sent to Vision via MVR and everything looks great!

-
1
-
-
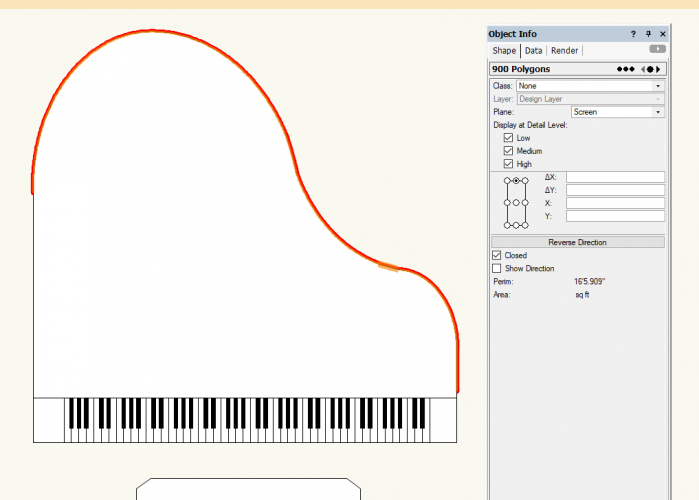
@scottmoore Hey Scott, one item for clean up I noticed.
In the 2D component of your 5' Grand Piano (Glossy & Matte) symbols, there are 900 polygons that can be removed from the curved portion of the frame.
-
1
-
-
@scottmoore These are awesome symbols Scott!
The modeling strikes a nice balance of complex enough to look good while simple enough to maintain speed and the textures look great!
-
1
-
-
Well that would explain it. No red astrick indicating a required field next to Phone, and I know I didn't fill that in last time I tried to submit.
@Rob Books Did you fill this field when you tested the form?
-
@nickvaphiadis If you can't find any objects nearby, it may be the rear surface of your video panels if they have very little depth. You could try giving them more depth so the rear surface isn't as close to the front surface. Or give them an extrusion of 0 so there is no rear surface.
The further distance you have the camera away from two surfaces Z-fighting, the further apart they need to be from each other to prevent it.
-
32 minutes ago, Rob Books said:
Just tested, seems to be working fine now. any of the requests sent through the Service select will be moved over.
Hey Rob, can you clarify... does this mean you found no problems with the form, or that you found problems and it is now fixed?
-
I had this issue as well when I last tried to make a fixture request. I ended up putting a fixture request in the VSS area and specifying I needed Vision profiles.
https://serviceselect.vectorworks.net/support/fixturerequestform
-
Love this thread and definitely count me in!
-
@hbeach Thanks for sharing! Looks like the results are really good, but duplicating of work is something I try to minimize at all costs. The interoperability of VW & Vision is pretty good (with the notable exception of DLVP's). I might have to give Capture a test run someday.
-
10 minutes ago, markdd said:
@ljtms I think the point was to make a multi circuit instrument.
Oops missed the multicircuit bit, my bad!
-
To me the problem is both VW & Vision excel at what the other is not very good at. Vision for volumetric rendering. VW for the rest (environmental & indirect lighting, textures with reflectivity and transparency, etc). While some might say that makes them complementary, I'd argue it makes it impossible to produce a great entertainment lighting render from either software.
Ideally I'd love for VW to make some huge strides in volumetric lighting so VW is the solution for concept renders & lighting plots. Vision should stay focused on real-time rendering for previz where performance is the most important aspect (although I'd love texture transparency & reflectivity).
I've considered adding C4D to my arsenal, but like Scott, I rarely have enough time to incorporate yet another software into my workflow for most shows.
@hbeach How's your experience working with Capture? Can you export your VW model w/ fixtures into it? Or are you recreating everything from scratch? Your renders look great!
-
22 hours ago, scottmoore said:
Personally, I will say that volumetrics in VW have become very disappointing since VW2011 was realeased. It is even more frustrating that the rendering engine introduced in 2011 is the C4D rendering engine. The issue is that VW really does not allow any reasonable control of volumetric beam properties. Also, there is no sense of origination scale of the beam using Spotlight instruments.
The latter can be worked around by building custom lighting instruments which is my solution. By doing that, you can have a beam of light that originated at the diameter of the lens. The former, however, is exceptionally problematic. The beams follow no law of squares and instead become brighter based solely on the diameter of the beam. That means, the beam starts off almost non existent and then gets brighter the further it goes.
Ive been harping on this for years now to no avail.
Most visualization packages produce really great looking beams, but the geometry of the scenic is often lacking which is how they accommodate real time functionality. Most will not include reflections. C4D will do all of that, but I find that I just don’t have time in my workflow to utilize two programs. Typically, I’ll need to produce shop drawings as quickly as the client signs off on a rendering.
Yup, unfortunately my experience mirrors Scott, and it's been a problem for way too long.
I remember seeing a couple forum posts that nicely illustrated the problems with rendering beams within VW, and after searching of course they were both written by @scottmoore.
@hbeach Those Capture renders look great! Nice job!
-
1
-
-
You can accomplish this by making it a blue symbol (or group symbol) during symbol creation. This will allow you to include plug-in objects (Lighting Instruments) within the symbol.
1. Draw your 4 Lighting Devices and bar
2. Select them, Create Symbol, and check "Convert to Group" in Other Options
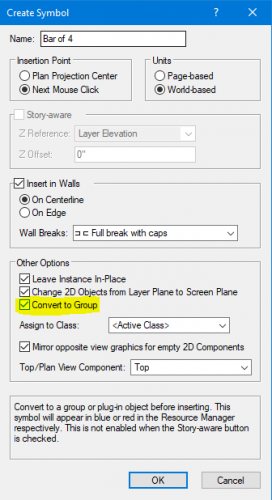
Now if you look at the symbol you created in the Resource Browser, the symbol name will be blue. When you insert a new instance of this symbol in the file, it will insert as a group. Ungroup it and you'll have four Lighting Instruments and a bar!


No 'grandMA' option in DMX Provider List
in Vision and Previsualization
Posted · Edited by LJ TMS
I've run into this when setting up a new Vision computer but never had a chance to work back on it to file a bug report.
I believe if you install Vision before installing the MA connectivity driver, grandma is removed from the provider list. If you install connectivity driver before Vision, no problems. The fix as Mark pointed out is to reinstall Vision again.
I assume something has changed with Vision over the years and the connectivity driver hasn't been updated by MA to reflect it. The driver hasn't been updated in a long time (5 years?) and is still called ESP Vision connection.
The driver is available on MA Lighting website, click Software + Release Notes, scroll to the bottom and find "grandMA ESP Vision connection 1.220"