


EmilyArch
-
Posts
21 -
Joined
-
Last visited
Content Type
Profiles
Forums
Events
Articles
Marionette
Store
Everything posted by EmilyArch
-
Hello! We dimension not from the face of a wall, but from the face of stud, but I cannot find a way to snap to a wall component in Vectorworks and have been manually offsetting a line in from the face of the wall and dimensioning to that line. Am I overlooking a more streamlined solution to dimension to a wall component? Surely there's a setting that I've not yet found that will allow this practice. Cheers, Emily
-
@Tom W. Thank you! Bummer that I can't set it in 2019, but I'm glad to have the answer.
-
I'm not able to access the Plug-in-Object Style Options by right clicking in the Resource Manager. Is that feature new in a recent update of VW? I'm working in 2019, so I suspect that might be the discrepancy between @Tom W.'s instructions and what I'm seeing on my end. Does anyone know if I can set the container class in VW 2019? Cheers, Emily
-
Wall Line Extending Past Window Opening
EmilyArch replied to EmilyArch's question in Troubleshooting
@Hans-Olav That did it! Thank you! I'm delighted to have that new tool in my toolbox. -
I have a window placed in a wall. The other windows in the project are functioning and appearing as desired, but this one includes a line from the wall extending into the window opening. It is part of the wall -- when I select the wall, this rogue line is also selected. If I remove the window from the wall, that section the the wall has no outline. In this particular instance, the casework (class turned off in screenshots) is there, so it's not noticeable, but I'd like to know what's causing it in case it happens elsewhere on another project. Any ideas what's causing this graphic issue or how to remedy it?
-
Exporting to Old Version without Access to New Version
EmilyArch replied to EmilyArch's question in Troubleshooting
Oh, I'm so glad to know it! How reassuring it is to have a community of users who help each other out. I actually got in touch with VW, who suggested a trial of 2022 so that I can export down. If for any reason that doesn't work, I'll absolutely post it here. Thank you! Cheers, Emily -
Exporting to Old Version without Access to New Version
EmilyArch posted a question in Troubleshooting
I have a 2022 file that I need to open with VW 2019. I do not have access to VW 2022 or know anyone who does. Of course, I know that the ideal scenario would be to open the file with 2022 and export it to an older version, but I do have access to VW 2022. Am I just out of luck? Or is there a way to save this file to the appropriate format from 2019? -
I'm having similar issues. Does anyone know if NNA has addressed this issue? If not, what are best practices for using keynotes in VW documents?
-
Update: If I duplicate the Class that the Space Labels are on, they show up in black. Woo! However, I deleted the original Class (named "Rooms - Tags" and renamed the new one from "Rooms - Tags - 2" to "Rooms - Tags". The Space Labels reverted to blue. Curiouser and curiouser. Added wrinkle, if I duplicate the Area Class ("Rooms - Areas"), the Spaces do not take on the appropriate color fill. I'm inclined to think it's a glitch at this point, but I'd appreciate if anyone has a deeper understanding. Also, I'd love more input on @jeff prince's suggestion to use Data Tags. Why are Data Tags preferable? Can I still get BIM capabilities for scheduling? Best, Emily
-
VW2018 Title Block Border: issue & revision lists double spaced?
EmilyArch replied to Markus Barrera-Kolb's question in Troubleshooting
@Nikolay Zhelyazkov That did it! Thank you. -
VW2018 Title Block Border: issue & revision lists double spaced?
EmilyArch replied to Markus Barrera-Kolb's question in Troubleshooting
@Nikolay Zhelyazkov Is there a way to link the Current Revision Note instead of Current Revision Number? I'd like to put the design phase on the cover sheet, separately from the Issue Log. Currently, we've added a parameter to the Project Data called "Current Issue" and we manually input the phase. Since we also put the phase in as the Issue Note, I'd like to have it pull that data from the Issue Log rather than put in the information twice. -
@Tom W. Thank you for your response! A little clarification: 1. Yes, I've set the Class in the Space Style. The Spaces are being assigned to the appropriate class, not the None class. The class has the appropriate graphic settings. The issue is that the attributes are not being assigned to the class attributes, but instead to the default solid white fill and solid black line. When I change them to be "By Class" in the Object Attributes, they take on the desired properties, but the change does not stick. It keeps reverting back. 2. The text is black in the Space Label Layout. The Class Attributes are black. I did, indeed, begin the process by duplicating and editing an existing label, changing only the font style. Following your feedback, though, I edited an OTB Space Label without duplicating it, then renamed the label. Not blue! The only difference I can tell in my process is whether I duplicated the existing Space Label before editing, though I'm sure some setting is different. Best, Emily
-
@jeff prince Thank you! That's good to know. Are issues like mine the reason that Data Tags are best practice? I'd like to be able to pull dimensions, area, finishes, and other information from the space. I'll start looking in to how to do so with Data Tags, and would appreciate any additional information you might provide on that work flow. Best, Emily
-
Hello! I am beginning to use Spaces and Space Labels so that our firm can enjoy more BIM capabilities than we've enjoyed in the past with simple Room Tags. I'm having two small issues that I think and hope have simple answers. 1. I've designated a Space Style that applies to our Spaces, which includes designation of the Space and the Space Tag to specified classes with graphic properties set up. The fill in the Class and the Pen Style are set to "None" and "Use on Creation" is checked. When I place spaces, though, they come in with a solid fill and solid outline. I can change them manually in the Attributes Palette to use the Class Attributes and they look correct. However, as soon as I change saved views, all the spaces revert to a solid fill. I tried closing and reopening the file, which worked until I published. 2. The Space Tags display and print blue. I'm certain this is a feature, not a bug, as the blue seems to indicate something (perhaps connected to the Space being a PIO?). Our firm can decide we're okay with blue Space Labels, we can print in BW to get around the blue text, but if there is a setting that will allow us to change it to black and maintain our ability to use other colors on the document (ie not print in BW), we'd love to know how to do so. I'd appreciate any guidance the forum can provide. Best, Emily
-
@ColinW Thank you! That resolves my search for the appropriate setting. I'm delighted to learn Command+K to convert to object to a group. That will certainly come in handy as I continue with template and library development. If I understand correctly, since the sash projection line is preset, I, as a mere mortal user, will not be able to change the preset settings. Am I correct on that? Perhaps it's time for me to try my hand at creating a custom window symbol (with guidance from Andy Broomell, @Andy Broomell found while learning to relocate the loci). I'm very grateful for your guidance! Best, Emily
-
@Matt Panzer Thank you! That resolves my search for the appropriate setting, though now it seems our firm will have to decide between including our Wall Components in the wall type and removing these wall portions from the the windows, at least until we upgrade to 2022. I look forward to exploring that system when we do. Best, Emily
-
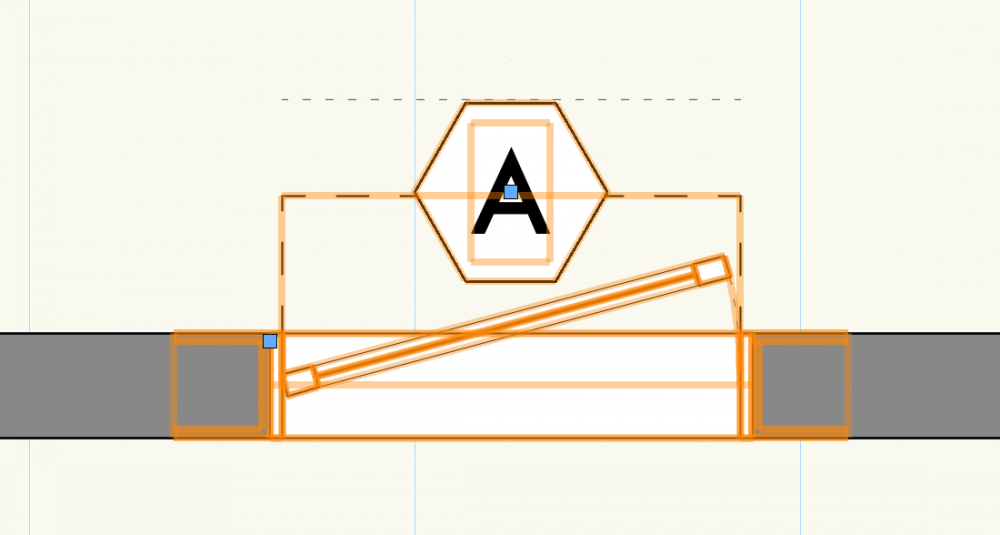
Hello! I'm creating a window style for a Vectorworks template, and in the effort to standardize our line types, I'd like to adjust the dash line type that represents the tilt of a tilt/turn window - see attached image. I have a Class that specifies the desired Line Type settings. I've discovered how to assign different window components to different classes, but am unable to find the appropriate component in either the 2D Visualization or the Classes sections of the Window Settings dialogue. I'd appreciate any help the community can offer to point me in the right direction. Best, Emily

-
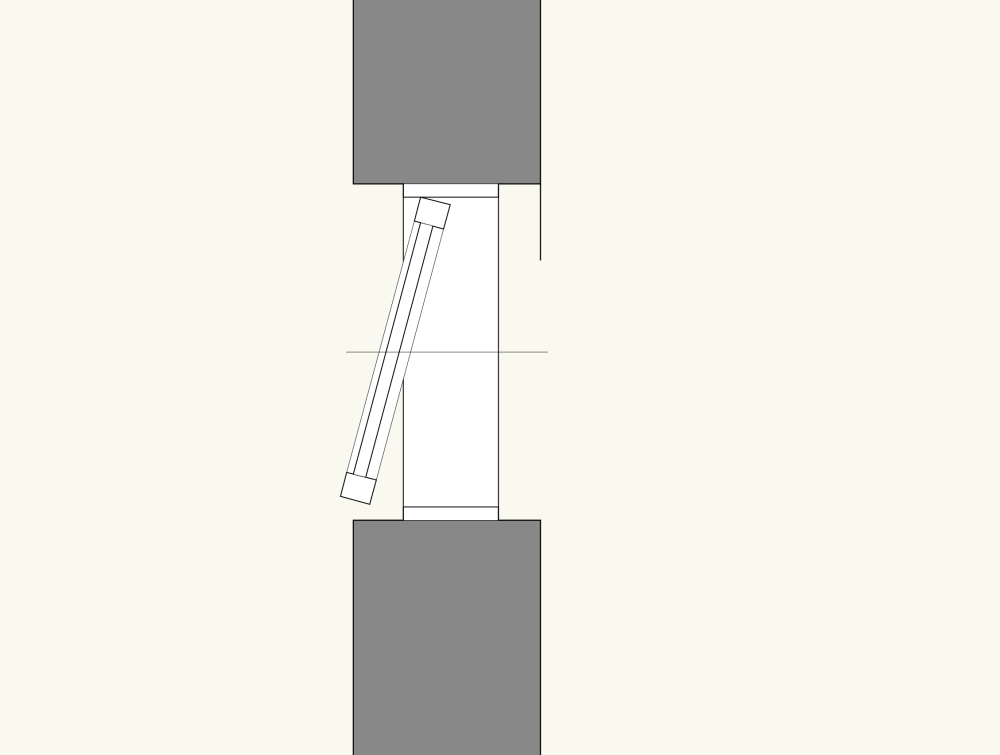
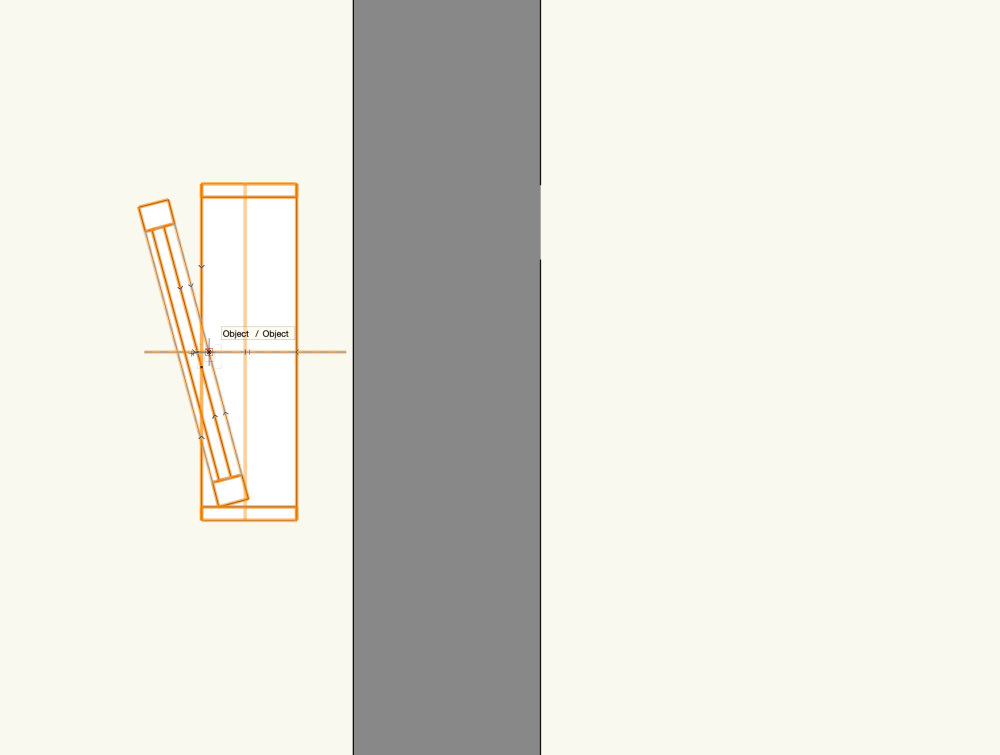
Hello! I'm sure there's a simple setting that I don't know about. I am placing windows into walls (both window and wall are styles), and finding that the window encompasses a portion of the wall on each side - see attached image. After a great deal of experimentation with the Window Style, including relocating the loci in the 2D Component, I've settled on believing the setting I need to change this function is in the Wall Style, but I'm having a very difficult time finding that setting. I have another wall type that does not behave this way with the same window inserted. I've gone through the tabs on the "Edit Wall Style" dialogue and compared the two wall styles, but cannot find a setting that differs between the wall style that functions as I want and the one that doesn't. I'd appreciate any guidance the community can provide. Best, Emily
-
Antonio, Thank you so much for the response. It did not resolve the issue I was having, but it did help me to find a solution. I wanted to update this thread with the resolution I finally discovered. The issue is a glitch - I had renamed by dimension nodes with the dimension (eg: a node that measured 6" was named "6"). Those nodes did not function in the less than comparison. When I deleted those nodes and replaced them, this time naming them with words (eg: "Six"), the nodes, and thus the script, functioned. I appreciate the help! I hope this will help someone else having a similar issue. Best, Emily
-
I'm trying to compare Dimensions using Less Than in a Marionette script, and I've found that I have to put Real Numbers into the Less Than Node in order to get the Boolean result I need. I've been trying to convert my Dimensions to Real Numbers, and I'm hitting a road block in doing so. I've tried Float, Div by 1", and Convert to Integer, none of which has worked. I'm sure I just don't know the appropriate node for the conversion, and I'm hoping someone can point me in the right direction. Thanks!
-
Since this thread was last active, the link to to other thread containing the stacking order nodes has moved. Can anyone post a link to its new location? Thank you!


