


MarcelP102
-
Posts
257 -
Joined
-
Last visited
Content Type
Profiles
Forums
Events
Articles
Marionette
Store
Posts posted by MarcelP102
-
-
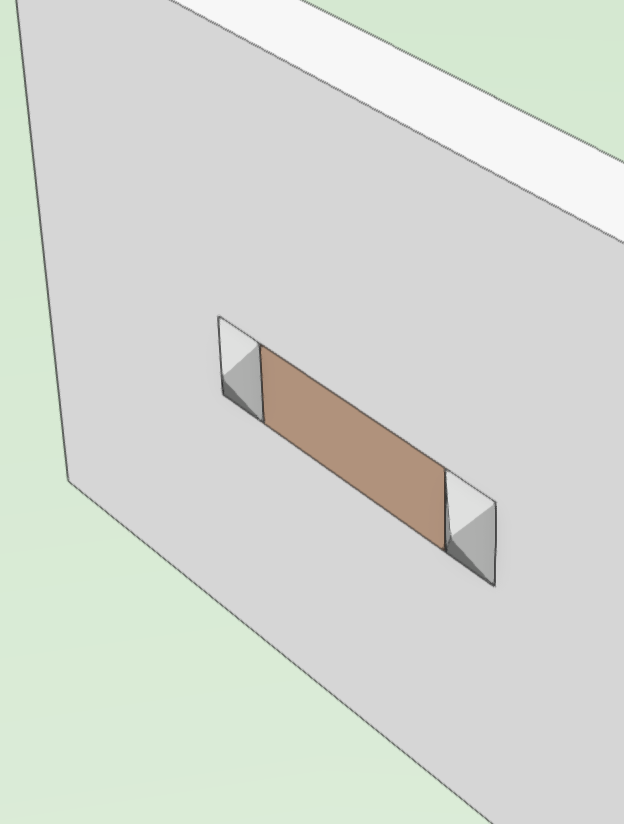
Thanks for the script and explaining the workflow. I've modified the script so it also works on symbols within symbols, and symbols hosted in walls. Only thing missing is to force a 'reset' of each object hosted in a wall. Normally when you edit the wall hole manual all the placed instances of the symbol gets updated. But when using the script the instance remain using the old wall hole object until you do a modification like moving the Z or similar. I've tried to use ResetObject command, but that didn't seems to do anything..
Modified script below
PROCEDURE Copy3DToWallHole;

CONST

	kSymbol = 15;
	kWall = 68;

VAR

	targetHd,H2,holeGroup:HANDLE;
	BSB:BOOLEAN;


FUNCTION Extract3DFromSymbol(sym:STRING) : HANDLE;

{Extracts Non-planar objects from given Symbol Definition and returns handle to 3D Solid}

	VAR

		h,tempHd:HANDLE;
		i,numSolids,result:INTEGER;
		solids:DYNARRAY[] OF HANDLE;

	BEGIN
		numSolids:=0;

		h:=FInGroup(GetObject(sym));
		WHILE(h<>NIL) DO
			BEGIN
				IF (GetObjectVariableBoolean(h,1160) = FALSE) THEN
					BEGIN
						numSolids:=numSolids+1;
						ALLOCATE solids[1..numSolids];
						solids[numSolids]:=h;

						h:=NextObj(h);
					END
				ELSE h:=NextObj(h);
			END;

		IF (numSolids > 0) THEN
			BEGIN
				tempHd:=HDuplicate(solids[1],0,0);
				FOR i:=2 TO numSolids DO
					BEGIN
						h:=HDuplicate(solids[i],0,0);
						result:=AddSolid(tempHd,h,tempHd);
					END;
			END;

		Extract3DFromSymbol:=tempHd;
	END;

BEGIN
	Locus(0, 0);				{ drop a bread crumb }
	targetHd := PrevSObj(LNewObj);	{ use PrevSObj or PrevObj, as required }
	DelObject(LNewObj);			{ remove bread crumb }


	{ script to select symbol in wall }
	IF (GetTypeN(targetHd) = kWall) THEN
		BEGIN
			H2:=Fin3D(targetHd);
				WHILE H2 <> NIL DO
					BEGIN
						IF Selected(H2) & (GetTypeN(H2) = kSymbol) THEN
						targetHd := H2;
						H2:=NextObj(H2);
					END; {while}
		END;

	{ if symbol is selected generate wall hole }
	IF (GetTypeN(targetHd) = kSymbol) THEN
		BEGIN
			holeGroup:=Extract3DFromSymbol(GetSymName(targetHd));

			BSB:=SetCustomObjectWallHoleGroup(targetHd,holeGroup);


			SysBeep;		{ Beep when done }
		END;
END;

Run(Copy3DToWallHole);
Opening after using script:
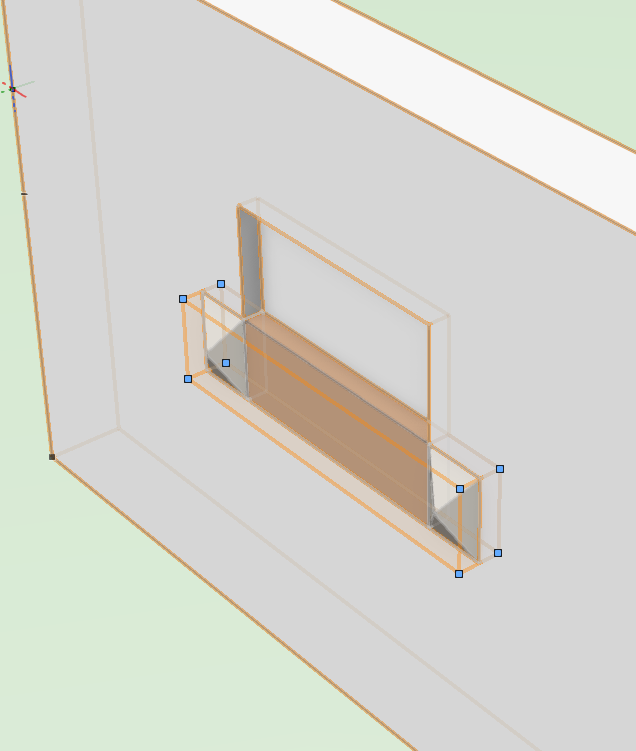
Opening after moving Z 1mm
-
Hi all,
I'm trying to make a script that gets the 3D part of a symbol, duplicate it, convert to group and merge it to a solid so I can set it as a wall hole object. This will save a lot of time to setup the wall hole object. I've reused a part of @MullinRJ script to convert all objects to groups. Then ungroup all the groups and merge all the solids. This works:
PROCEDURE CreateWallHole;

	function FlattenNestedSyms(H :Handle) :Boolean;
	Begin
		if ((GetTypeN(H) = 15) | ( GetTypeN(H) = 86)) then SymbolToGroup(H, 2);
	End;		{ FlattenNestedSyms }


	function UngroupIt(H :Handle) :Boolean;
	Begin
		if (GetTypeN(H) = 11) then ungroup;


	End;		{ UngroupIt }


BEGIN
	ForEachObjectInLayer(FlattenNestedSyms, 3, 2, 0);	{ Vis & Selected, Deep, Active Layer }
	ForEachObjectInLayer(UngroupIt, 3, 2, 0);	{ Vis & Selected, Deep, Active Layer }
	DoMenuTextByName('Solid Operations',1);
	SysBeep;		{ Beep when done }
END;
Run(CreateWallHole);
But when extending the script to also set the newly created object as the wall hole object I'm hitting a wall. This script doesn't work:
PROCEDURE CreateWallHole;


VAR
objectHand, holeGroup :Handle;
objectName :STRING;

	function FlattenNestedSyms(H :Handle) :Boolean;
	Begin
		if ((GetTypeN(H) = 15) | ( GetTypeN(H) = 86)) then SymbolToGroup(H, 2);
	End;		{ FlattenNestedSyms }


	function UngroupIt(H :Handle) :Boolean;
	Begin
		if (GetTypeN(H) = 11) then ungroup;


	End;		{ UngroupIt }


BEGIN
	objectHand := FActLayer;
	EditObjectSpecial(objectHand, 4);
	DoMenuTextByName('Select All', 0);
	DoMenuTextByName('Copy', 0);
	DoMenuTextByName('Paste in Place', 0);
	ForEachObjectInLayer(FlattenNestedSyms, 3, 2, 0);	{ Vis & Selected, Deep, Active Layer }
	ForEachObjectInLayer(UngroupIt, 3, 2, 0);	{ Vis & Selected, Deep, Active Layer }
	DoMenuTextByName('Solid Operations',1);
	holeGroup := LNewObj;
	SetCustomObjectWallHoleGroup(objectHand, holeGroup);
	SysBeep;		{ Beep when done }

END;
Run(CreateWallHole);
Any help would be appreciated.
-
@Jack2022Turn off Reference? 😉
-
Yeah the Benelux version got this one works great
-
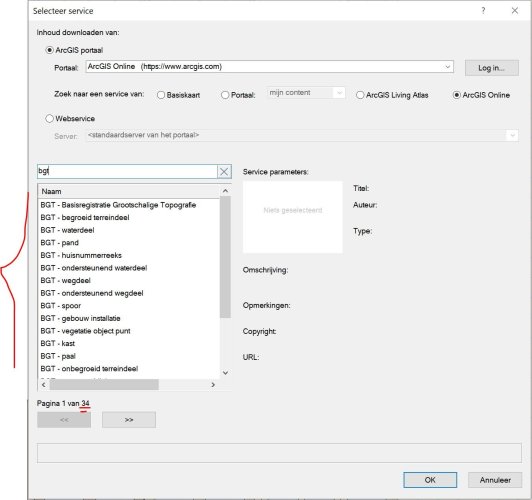
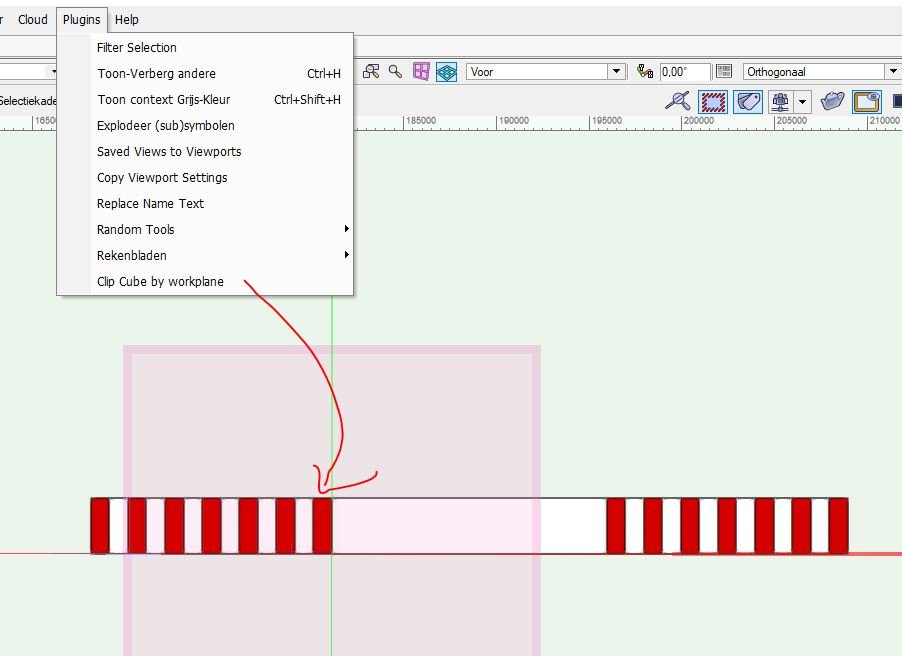
Hi @iborisov
I want to automatically download the 'BGT', the Dutch public map service. Right now it's available within ArcGIS online, see screenshot from VW below. As you can see it is build up with a lot of different layers. So a script than can download each BGT map in the same VW layer can speed up the process. So no pop-up and hardcode the URL, Layer ID etc is OK.
(even better would be if we can assign multiple feature services to the same VW layer. And we can map each feature service to a class. Than there would be no need for this script)
-
Made it work with a simple script below that displays the type number of the selected object in a wall. Will integrated it in my Select Similar Sub-Type tool another day. Thanks for the help.
Procedure Test; Var H1, H2 :Handle; Begin Locus(0, 0); { drop a bread crumb } H1 := PrevSObj(LNewObj); { use PrevSObj or PrevObj, as required } DelObject(LNewObj); { remove bread crumb } H2:=Fin3D(H1); While H2 <> Nil do Begin IF (Selected(H2)=true) & ((GetTypeN(H2) = 15) | ( GetTypeN(H2) = 86)) THEN H1 := H2; H2:=NextObj(H2); End; ALrtDialog(Concat(GetTypeN(H1))); End; Run(Test);-
 1
1
-
-
Thanks I think this will work. Will give it a try later this week.
-
On 5/4/2020 at 8:19 AM, Pat Stanford said:
Just to make this more fun, I am going to throw some Vectorscript in here. 😉
I think you need to approach this from the other direction. If the selected object is a wall, then you need to use Fin3D to find the objects in the wall and then attach the records to them.
Create a new file with a single wall and a door (or multiple doors/windows/symbols) and leave the wall selected and run the following script.
After a "few" (I think it will depend on the wall styles how many object you will see), eventually you will come up with an object of Type 86 (Plug-in Object) or 15 (Symbol). You may need to check more thoroughly if they are doors or windows, but at least you will have a handle to the PIOs in the wall and can determine if you want to attach your record or not.
Ask again if you need more help.
Procedure Test; Var H1: Handle; Begin H1:=Fin3D(FSActLayer); While H1 <> Nil do Begin ALrtDialog(Concat(GetTypeN(H1))); H1:=NextObj(H1); End; End; Run(Test);I'm currently making a tool similar to the Select Similar tool, but with more options to select sub-types. I'm struggling to get a handle to a selected symbol in the wall. With your script I can loop trough all the objects within a wall. But when there are multiple objects hosted in the wall I can't get a handle to only the selected object within a wall.
Is this even possible with Fin3D or do I need another approach?
-
At work I'm using a full HD screen. I have setup Vectorworks to use the shaded view with 1px line thickness. But as you can see the lines are much thicker than 1px. This makes designing and judging the design during drawing difficult. The 3D model looks ugly compared to the thin lines from sketchup. See screenshots below for same building in VW en SketchUp.
Any tips to make the lines more smooth? Turning off ant-aliasing making it worse. I've also tryed to override the settings in NVIDIA Control Panel but that seems to have no effect.
Vectorworks:
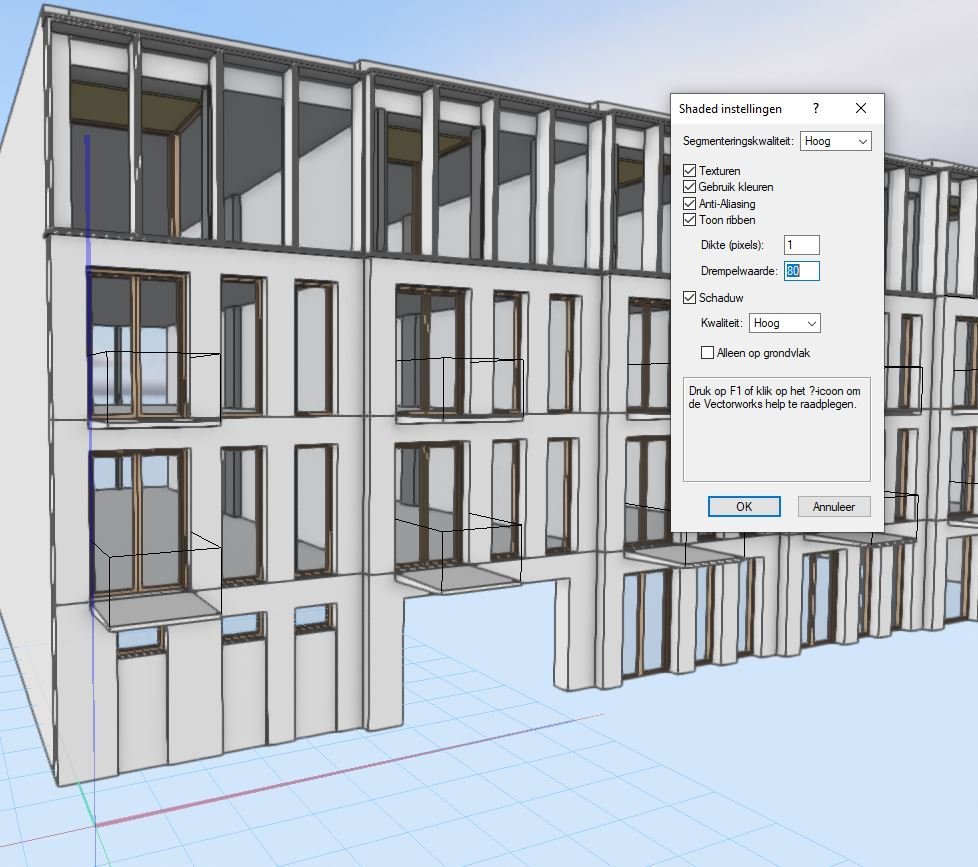
SketchUp:

-
2
-
-
I found Waldo😉 thanks it's working now!
-
I'm building a script to smarter and faster select similar objects then the default tool can do. I've got the first part of the code working but I'm unable to make it work within a symbol. FSActLayer returns the symbol name instead of the selected object. Before I used "SelectObj(selCriteria);" to select the objects. I read somewhere that "ForEachObject(SelectThem, selCriteria);" can work within symbols. But somehow I use it wrong I think. Any help would be appreciated.
PROCEDURE SelectSimilarSubtype; {Select similar objects based on select object type and sub-type} {© 5-7-2022 Arnhem - The Netherlands, Marcel Plomp} VAR Hd :HANDLE; selCriteria :STRING; iObjectType :INTEGER; PROCEDURE SelectThem(h :HANDLE); BEGIN SetSelect(h); END; BEGIN Hd := FSActLayer; iObjectType := GetTypeN(Hd); CASE iObjectType OF {symbool} 15: selCriteria := CONCAT('S=''', GetSymName(Hd), ''''); {wall} 68: selCriteria := CONCAT('WST=''', GetWallStyle(Hd),''''); {text} 10: selCriteria := CONCAT('TSTY=''', Index2Name(getTextStyleRef(Hd)),''''); {roof} 83: selCriteria := CONCAT('RST=''', Index2Name(GetRoofStyle(Hd)),''''); {PIO} 86: selCriteria := CONCAT('PST=''', GetPluginStyle(Hd),''''); END; {CASE} DSelectAll; message(selCriteria); ForEachObject(SelectThem, selCriteria); END; RUN(SelectSimilarSubtype); -
Thank you very much @Julian_Carr ! I will put it to the test. Enjoy the footy 😉
EDIT: Is it also possible to add (copy/cut) objects to the symbol that are outside of the symbol?
-
Right now when cut/copy-paste an object from a symbol to outside the symbol using 'Edit > Paste in Place' it places the object on the coordinates from the symbol. Instead of exact the same place but then outside the symbol. I'm looking for a way to easily add or remove objects form a 2d/3d symbol without the position of that objects changes. Like when you cut/copy-paste an object outside a group.
Is this something that a script can do? Can this be a command? (imho the easiest way) Or will this be a tool? (to click which objects to add/remove?)
This is something I really miss compared to SketchUp. I think this will improve anyones workflow a lot. Any help making this function a reality is really appreciated.
Some screenshot for explanation
1. Cut object
2. Paste in Place object places at coordinates as it was in the symbol. I would want it to be placed at same position but then outside the symbol
-
@brudgers File is down, can you upload it again?
-
Hi,
A lot of times when working in 3D I want to use the Working Plane but my view got blocked by objects in front of the plane. The Clip Cube can help with that. But it takes a lot of time to setup. That's why I decided to make a script that sets the Clip Cube based on the active Working Plane. Since there are no functions available to set the position of the Clip Cube I used a trick to make a huge extrusion on the workplane and use that to set the boundaries of the Clip Cube. This works for most user-cases but unfortunately not for rotated Working Planes. @Marissa Farrellcan you throw in an enhancement request for more control of the Clip Cube with Vectorscript?
Step 1: Set Working Plane
Step 2: Look at Working Plane, view gets blocked

Step 3: Run Script, view gets unblocked
PROCEDURE ClipCubeByPlane; {Sets the Clip Cube position equal to the Working Plane.} {Since we cannot rotate the Clip Cube by script this work best with Working Planes on X and Y.} {© 24-06-2022 Arnhem - The Netherlands, Marcel Plomp} {Licensed under the GNU Lesser General Public License} VAR H1 :Handle; xRot, yRot, zRot :REAL; p0X, p0Y, p0Z :REAL; BEGIN {Turn off Clip Cube} SetPref(6707, FALSE); DSelectAll; {Create big extrusion} BeginXtrd(0,-1000000); rect(-1000000, 1000000, 1000000,-1000000); EndXtrd; {Get workplane coordinates} GetWorkingPlane(p0X, p0Y, p0Z, xRot, yRot, zRot); {Move object to workplane} H1:=LNewObj; SET3DRot(H1, xRot, yRot, 0 , 0,0,0); Move3DObj(H1, p0X, p0Y, p0Z); {Enable Clip Cube and delete object} SetPref(6707, TRUE); DelObject(H1); END; RUN(ClipCubeByPlane);-
2
-
-
Very nice update. Materials and more texture control are really welcome. Did a quick test. When assigning a material to an object it seems that it only takes the texture, not the fill of the material.
-
@Julian Carr @JuanP Since WinDoor is available via the third-party products can we expect Detailer tool to be available there in the feature to? It seems a really awesome tool!
-
2
-
-
Perhaps you need to install WinDoor with the Help -> Install Partner Products
-
Thanks for looking in to it. Yes, please make an enhancement request.
-
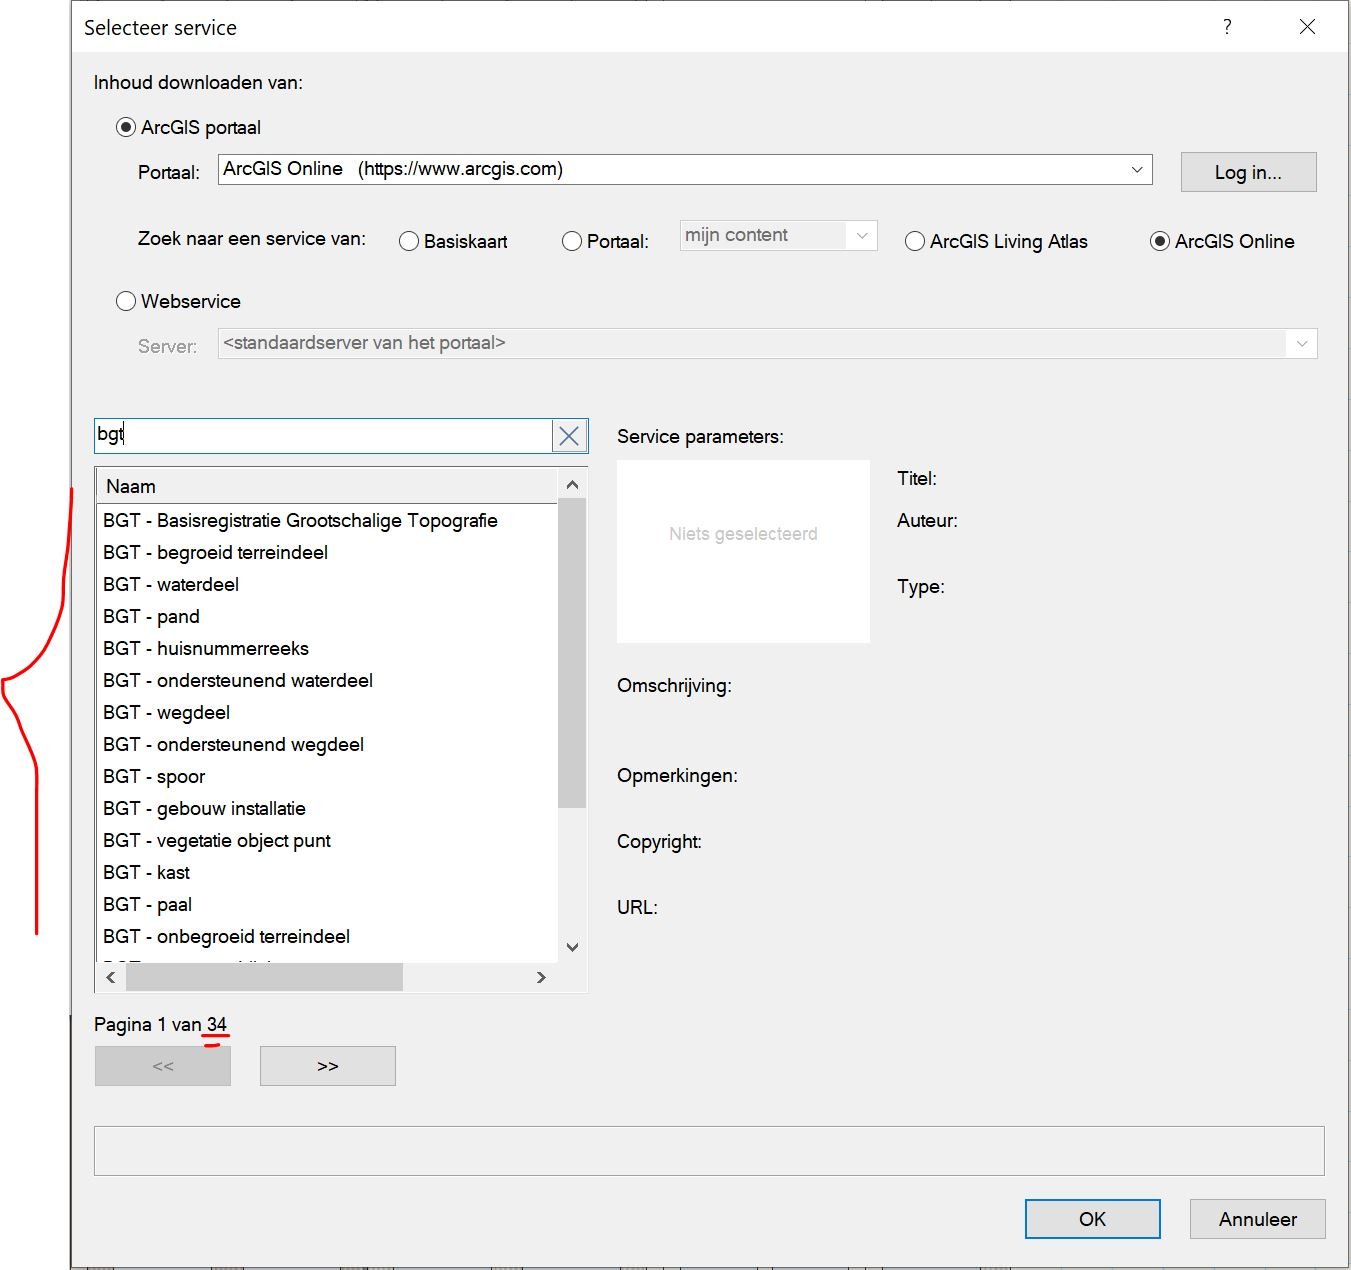
I'm planning to make a script that sets the feature service of a layer. Get's the geometry and than changes to another feature service and repeat the process. Unfortunately I can't find a function to set feature service of a layer. It's a relative new function, available since 2022 so perhaps that's why it's not available at the Wiki?
-
So I had some time today to continue with the script. I'm able to get the dimensions of an sweep with 'Get3DInfo'. But Set3DInfo doesn't seem to work with a sweep.
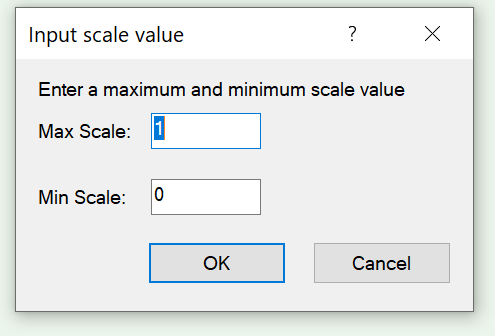
In the meantime I've tried to great a custom dialog so I can extend it later with more options. The code for the layout is working. The only piece of information missing is how to control value from the the input field (CreateEditReal) to the code. Any tips? Or can anyone point me to an example?
Custom menu script
PROCEDURE Example; VAR dialog1 :INTEGER; result :INTEGER; PROCEDURE Dialog_Handler(VAR item :LONGINT; data :LONGINT); BEGIN END; BEGIN dialog1 := CreateLayout('Input scale value', FALSE, 'OK', 'Cancel'); {create controls} CreateStaticText(dialog1,3,'Enter a maximum and minimum scale value',-1); CreateStaticText(dialog1,4,'Max Scale:',10); CreateEditReal(dialog1,5,3,1,10); CreateStaticText(dialog1,6,'Min Scale:',10); CreateEditReal(dialog1,7,3,0,10); {set relations} SetFirstLayoutItem(dialog1, 3); SetBelowItem(dialog1,3,4,0,0); SetRightItem(dialog1,4,5,0,0); SetBelowItem(dialog1,4,6,0,0); SetRightItem(dialog1,6,7,0,0); IF RunLayoutDialog( dialog1, NIL ) = 1 THEN BEGIN Message('Hello, world'); END; END; RUN(Example); -
Thanks! I will have a look at it.
-
I've continued the journey with Vectorscript using CASE statement and GetTypeN I came up with this script below. I have used HScale2D, to scale 2D items. And
HScale3D to scale 3D items. Unfortunately 3D Polygon, Sweeps and Multi extrude can't be scaled using that command. I've found that 'scale' can be used for those. But then all the selected objects will be scaled with the same factor. Properly because of the missing Handle? Do I need another approach for those object-types? Like what is done here? Why there is HScale3D and Scale command? HScale3D seems to be better because you can set the Z. The scale command always scales form the objects center it seems.
Updated Script
PROCEDURE RandomScaleObjects;
{Scales each selected object in the active layer randomly within a user given range}

{© 17-06-2022 Arnhem - The Netherlands, Marcel Plomp}
{With the help of Pat Stanford and others}

{Licensed under the GNU Lesser General Public License}

VAR
	rScaleFactor 						:REAL;
	rScaleMax, rScaleMin				:REAL;
	rCenterX, rCenterY, rCenterZ 		:REAL;
	iObjectType							:INTEGER;

Procedure WithIt(Hd:Handle);
BEGIN
iObjectType := GetTypeN(Hd);
rScaleFactor := Round(100 *(Random*(rScaleMax - rScaleMin) + rScaleMin)) / 100;
	CASE iObjectType OF
		{Scales the Line, Rectangle, Oval, Polygon, Arc, Freehand, Text, Rounded rectangle and Polyline}
		2..6,8,10,13,21:
			BEGIN
				HCenter(Hd, rCenterX, rCenterY);
				HScale2D(Hd, rCenterX, rCenterY, rScaleFactor, rScaleFactor, True);
			END;
		{Scales the Extrude, Sweep,  Mesh, CSG Solid, Nurbs Curve and Nurbs surface}
		{3D Polygon = 25, Sweep=34 and Multi extrude=38 does not work??}
		24,40,84,111,113:
			BEGIN
				HCenter(Hd, rCenterX, rCenterY);
				HScale3D(Hd, rCenterX, rCenterY, 0, rScaleFactor, rScaleFactor, rScaleFactor);
			END;
		15:
			BEGIN
				SetObjectVariableInt(Hd, 101, 2);
				SetObjectVariableReal(Hd, 102, rScaleFactor);
			END;
		{Look into if I want to add architectural objects like: 68,71,81,83,86,89
		Bitmap (=14) can be scaled with Hscale2D but moves in place..}
	END;
END;

BEGIN
	rScaleMax:=RealDialog('Enter a maximum scale value:','1.00');
	rScaleMin:=RealDialog('Enter a minimum Scale value:','0.00');
	ForEachObject(WithIt,((InSymbol & VSEL=TRUE)));
	ReDrawAll;
END;

Run(RandomScaleObjects);
Test script using SCALE function
PROCEDURE RandomScaleObjects; {Scales each selected object in the active layer randomly within a user given range} {© 17-06-2022 Arnhem - The Netherlands, Marcel Plomp} {With the help of Pat Stanford and others} {Licensed under the GNU Lesser General Public License} VAR rScaleFactor :REAL; rScaleMax, rScaleMin :REAL; Procedure WithIt(Hd:Handle); BEGIN rScaleFactor := Round(100 *(Random*(rScaleMax - rScaleMin) + rScaleMin)) / 100; SCALE(rScaleFactor, rScaleFactor); END; BEGIN rScaleMax:=RealDialog('Enter a maximum scale value:','1.00'); rScaleMin:=RealDialog('Enter a minimum Scale value:','0.00'); ForEachObject(WithIt,((InSymbol & VSEL=TRUE))); ReDrawAll; END; Run(RandomScaleObjects); -
Hi Jesse,
I did some more testing and found some missing subtypes and have some idea's for improvement. See attached file. Up to you if you want to add those. It's already working great as it is.
Thanks!

Mouldings Plugins Version 5
in 3rd Party Services, Products and Events
Posted
Hi @Paolo
I've noticed the new profiles wont show, see below. I've checked the folder, the files are there.
It's a nice update, I'm also liking the "Show Details (2D)" option.
Now that we can use the fill of the material another idea comes to mind; can this be smart like the Structural Members. So that it automatically shows the right 2D representation depending if the object is below or above the section ('hoogte snijvlak'). Using the fill of the material only when cut. And using fill of class when below section line. The dashed line representing the above section position of the profile can perhaps be another class? Or separate setting like Structural Members has.