


Tom W.
-
Posts
4,947 -
Joined
-
Last visited
Content Type
Profiles
Forums
Events
Articles
Marionette
Store
Everything posted by Tom W.
-

Selection Tool: does anyone actually use first two modes...?
Tom W. replied to Tom W.'s topic in General Discussion
I have long thought this too. I've been using Smart Options Display instead for Reshape Tool + Move by Points as it's quicker than cycling through all the modes using the U key, especially since it got a bit snappier in VW2024 (although perhaps I imagined that...). But I kind of feel the Selection Tool is a special case. Modes 3 + 4 should be in their own mode group with holding down the Option key activating the opposite one like the Eyedropper Tool, or mode 4 should be in a mode of its own like Tobi says. The other tools I use all of the modes more or less equally whereas the Selection Tool feels like it has redundant modes that could be relegated somewhere else. -
Does anyone actually use 'Disabled Interactive Scaling Mode' or 'Single Object Interactive Scaling Mode' for the Selection Tool? Up until Update 4 I never strayed from the third mode ('Unrestricted Interactive Scaling Mode') so it was never an issue for me: I just completely ignored the first two modes. But now we have the wonderful fourth mode - 'Transform Mode' - I am regularly toggling between the third + fourth modes. Or rather, toggling between the third + fourth modes via the redundant first + second modes... What I would really like to be doing is toggling back + forth between 'Unrestricted Interactive Scaling Mode' + 'Transform Mode' with a single click. I was going to post a Wish about this but thought I'd better check first: does anyone actually use the first two modes or could they happily be relegated somewhere else...? Another option might be to hold down the Option key to activate the fourth mode temporarily... I would like to move between the 3rd + 4th modes far more quickly + easily than is currently the case.
-
I've had lots of experience thank you 😆 Will do it now... Thanks for getting back to me.
-
@Nikolay Beshevliev you've been so helpful I wonder if I can ask another question... I am using a data mapping that uses Class-based Objects to attach a Record Format to objects in these classes. If I make one of the classes active + create an object the record is automatically attached. Alternatively, if I have an existing object + I place it in one of the classes using the 'Class' drop-down in the OIP for that object the record is attached. However, if I change the object's class by right-clicking on the new class in the Navigation Palette + selecting 'Assign to Selection' the record is not attached. Is there a reason for this or is it a bug? I ask because I use 'Assign to Selection' to change an object's class more than any other method + I was confused as to why the objects weren't taking on the record format in the process. In order to make the data mapping 'stick' I have to move the object to a different class then reassign it to the right class but do it via the OIP this time. Hope that all makes sense. Thanks.
-
VW 2024 worksheet plantlist adding remarks
Tom W. replied to Janine111's topic in General Discussion
I think with a database report you will need to use one of the Plant user fields or other existing data field for your notes (or attach a custom record) + get your report to return that field. -
You need to use three separate Walls one on top of the other. You can't do this with a single Wall
-
Managing data attached to symbols in the resource browser
Tom W. replied to pgreen's topic in General Discussion
No easy way but luckily we have @Pat Stanford on hand with a worksheet script which allows you to create a worksheet where you can edit the default field values for records attached to symbol definitions. See: -
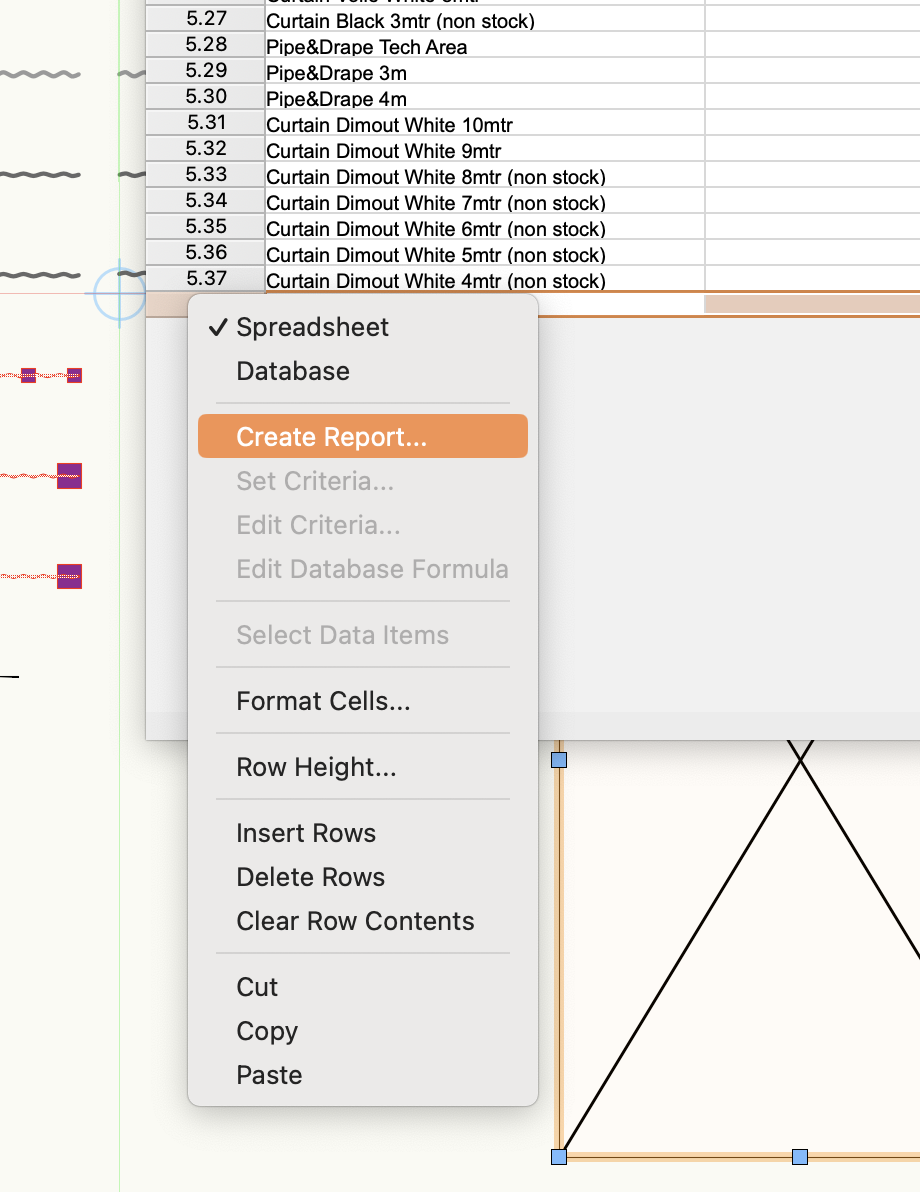
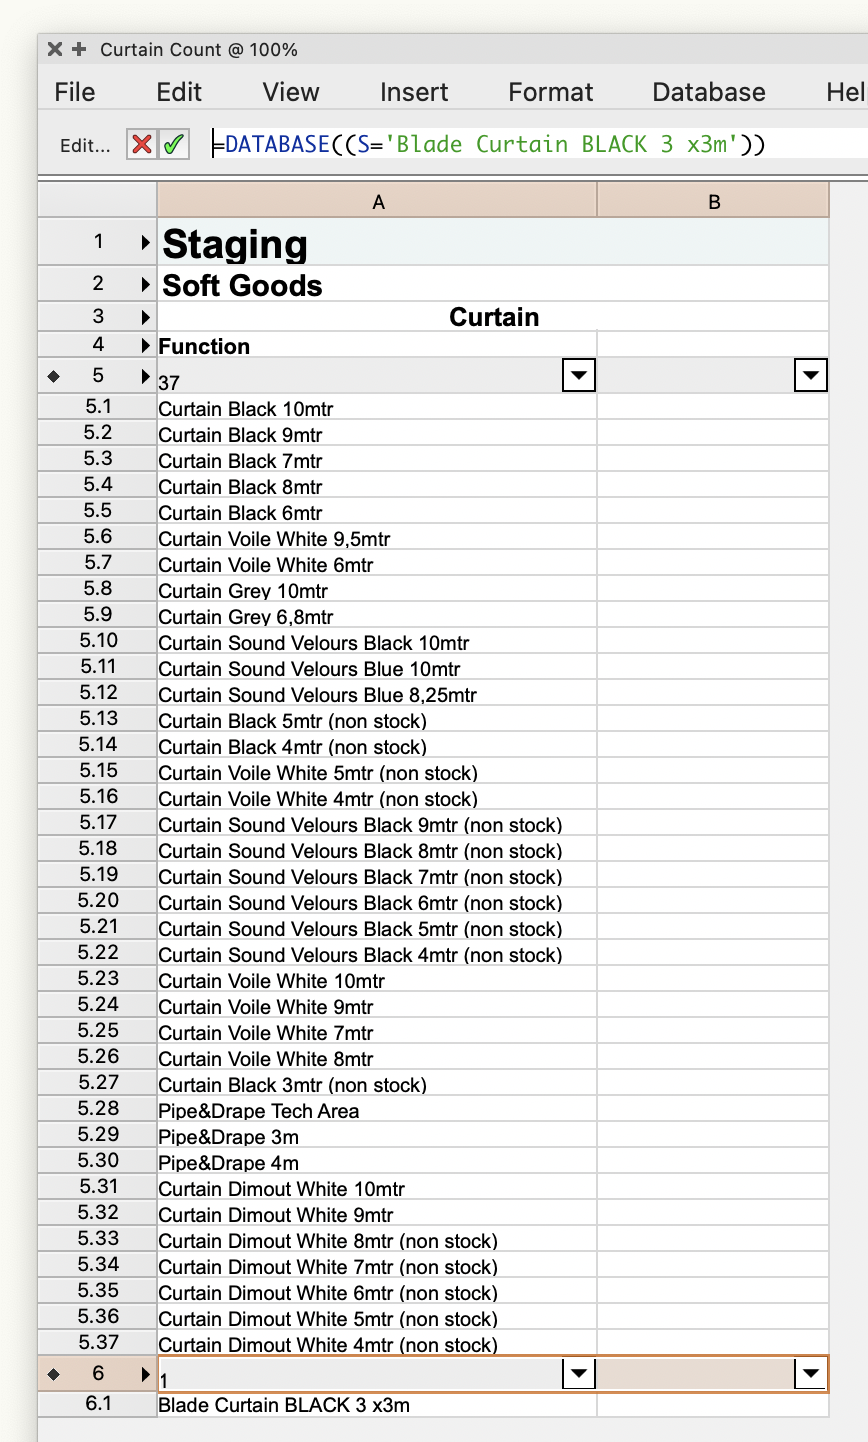
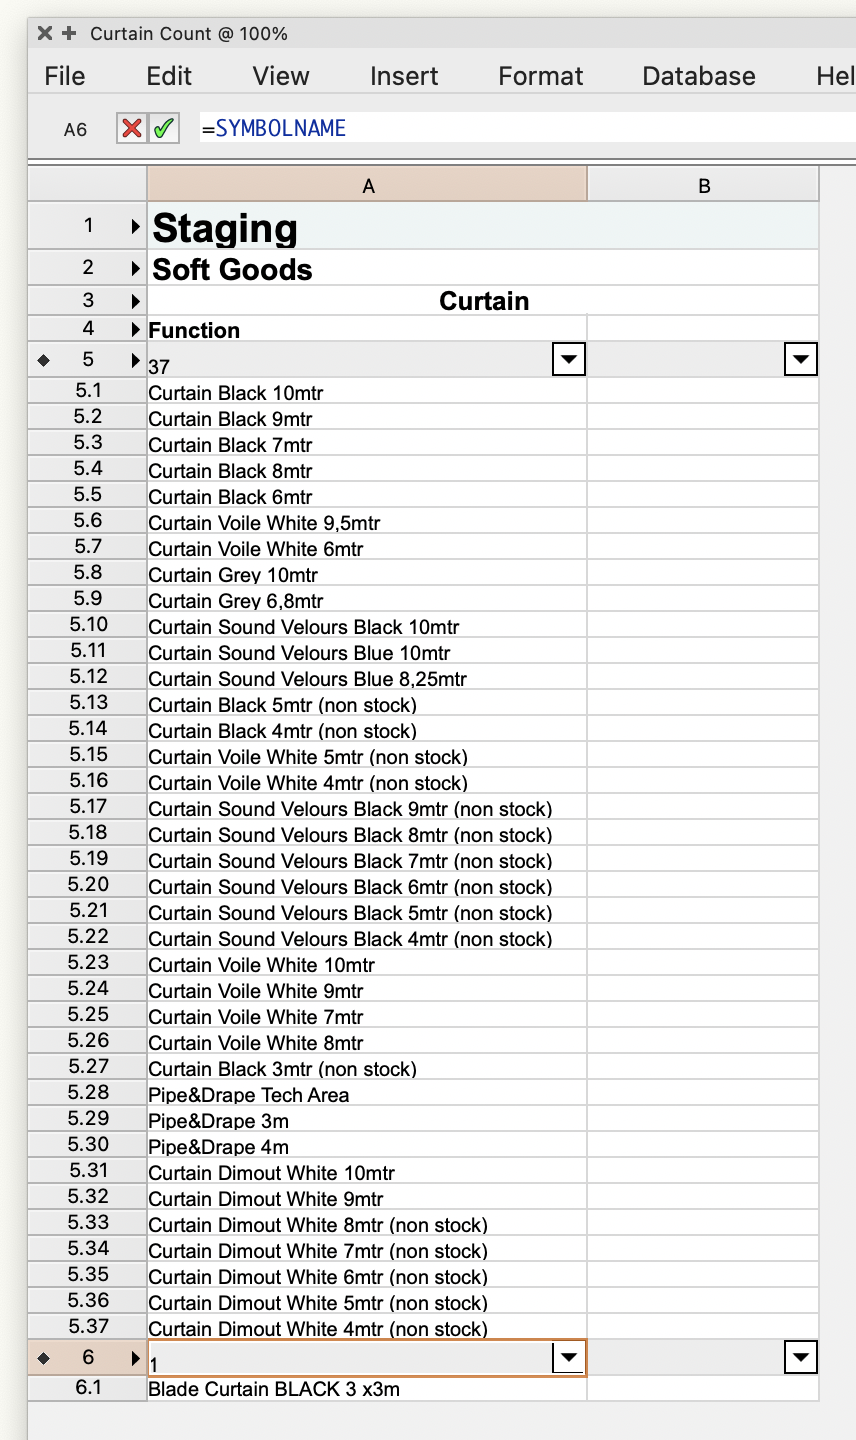
You need to expand the worksheet to create an extra row then right-click on the new spreadsheet row (6) + select 'Create Report...': Maybe have a look at recent Coffee Break on Worksheets by @michaelk: https://university.vectorworks.net/mod/overview/view.php?id=6579
-
I'd probably just add another database under the first one. Like this: By the way I have no idea why your B column is displaying blank in the worksheet! The data is there, it just isn't showing...
-
You can use WS functions in Graphic Legends in the same way as Data Tags.
-
Same here. See this thread - there are links to a couple of Wishlist items on it:
-
Working Plane view does not work correctly
Tom W. replied to MGuilfoile's question in Troubleshooting
There is a 'Plane Reference' button on the View Bar which sets whether the view is relative to the layer plane or working plane. I'm not sure what version you're using but this is VW2024: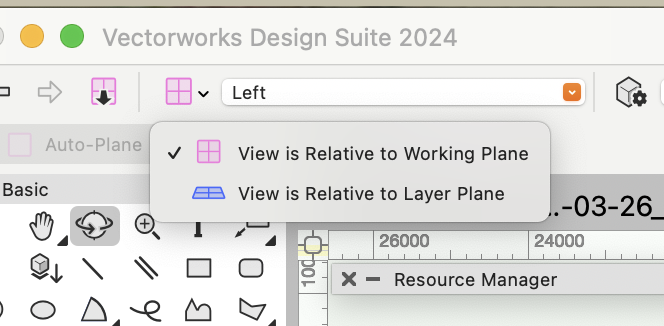
-
select layers as criteria for worksheet
Tom W. replied to Peter Telleman's topic in General Discussion
Sounds like you're using 'All criteria in this set' instead of 'Any criteria in this set'. The former will look for symbols which are on all three layers at the same time which clearly isn't going to happen. The latter will look for symbols which are on either one of the three layers. The former equates to 'Layer 1' and 'Layer 2' and 'Layer 3'. The latter equates to 'Layer 1' or 'Layer 2' or 'Layer 3'. -
Detail Viewport Tags not showing up in Sheet Viewport
Tom W. replied to CAD Cadet's question in Troubleshooting
Ok cool no worries! It's essentially the same deal with Section Viewports as well i.e. place the section lines in VP annotation space + use the 'Section Line Instances' dialog to determine where they additionally appear. -
Detail Viewport Tags not showing up in Sheet Viewport
Tom W. replied to CAD Cadet's question in Troubleshooting
If I understand you correctly you have placed your Detail Callouts on the Design Layer + you're trying to get them to display on a floor plan Viewport on a Sheet Layer? To do this you need to select the Detail Viewport + click on 'Detail Callout Instances...' in the OIP + make sure the floor plan VP is checked in the dialog. The way I do this is different though. I create the floor plan VP first then enter the annotations space + draw the detail callout out there to create the detail VP: I do it all on the sheet layer. If I want detail callouts on additional floor plans I use the 'Detail Callout Instances' dialog to add them. I don't put many annotations on the Design Layer. -
Saved Views - classes turned off
Tom W. replied to James Dawson Design's topic in General Discussion
I am, yes, and we've discussed this previously. I can't remember the precise details but for whatever reason I decided the way the script worked wasn't going to benefit me. What I tend to do is create my first VP from the Design Layer then create duplicates from that on the Sheet Layer. So the initial VP gets the benefit of the Saved View settings but the subsequent ones I have to adjust manually on the SL whereas what I really want to do is just tell it to take it's visibilities from an existing Saved View. I don't think Jesse's script allows this...? I seem to remember you kept a dedicated 'master viewport' sheet layer or something with the express purpose of transferring visibility attributes? Might have got that completely wrong... At any rate I definitely looked at the script a couple of times + on both occasions decided it wasn't for me. -
Cool. What 'Link to calculated/user-entered field' does is transfer all of the text in the Current Tag Field Definition (or User-entered field) to a chosen data destination. So for example your Current Tag Field Definition might have multiple data sources which return the make, model number + manufacturer of an object + all of these could be combined into a single text value transferred to the ‘Description’ field of that object.
-
The only way I can replicate this is if I have 'Link to calculated/user-entered field' enabled in the 'Define Tag Field' dialog. Does this apply in your case? If so, uncheck it. You don't want that to be checked. Otherwise it works fine at this end...
-
Thanks @M5d. is how I would have done it. I didn't realise you could also do it the other way e.g. . There is no reference to the alternative syntax in the WS Function Reference. So is it only applicable in Data Tags...??


-
@Pat Stanford so is this using the if((logical_test), value_if_true, value_if_false) function or something else...? I don't really understand what you have done but I like it! I don't see any documentation for it. I don't see @ as an operator. Thank you!
-
Saved Views - classes turned off
Tom W. replied to James Dawson Design's topic in General Discussion
The way I mostly update my Saved Views is using the 'Redefine' command which is accessed by right-clicking on the Saved View in the Navigation Palette. I do use the Organisation Palette in 'Visibilities' mode as well but less often: it feels like more clicks to get there + I prefer to have the view in front of me + see the impact of the visibility changes before saving them to the SV. I think the worst thing for me is not being able to then utilise these visibility settings when creating Viewports on a Sheet Layer. -
Thank you yes that's what I did in this example posted above: It's a very flexible tool. Be good if some of these features were incorporated into the VW tool.
-
I'd like to be able to save my Dark Background setting as part of my Saved Views. I often use it when viewing point clouds + it would be nice to automatically toggle it on + off as part of my Saved Views instead of having to do it manually separately. I tried using a black RW Background instead but you can't save this as part of a Saved View either so an alternative (+ perhaps more useful) wish would be for RW Backgrounds to be a Saved View option instead. I searched + saw this had been wished for previously but only gained one vote (mine just now 🙂) :
-
For me I think the most straightforward thing would be if no Modifier was created at all when we select 'Apply shape to entire slab' in the 'Clip Shape from Slab' + 'Add Shape to Slab' dialogs. I'd be quite happy for this to happen by default rather than there be a 'Merge' option. But I totally agree with you that we shouldn't have to enter the Boundary edit mode or add tons of vertices using the Reshape Tool when we want to edit the 2D shape of a Slab. Using Clip directly on the Slab would be much more efficient. You have my vote!
-
How to customize 2D/Plan visual settings of a landscape area
Tom W. replied to C_Howard's topic in Site Design
Isn't it avoided by setting the hatch by class...?
