


Neil Barman
-
Posts
669 -
Joined
-
Last visited
Content Type
Profiles
Forums
Events
Articles
Marionette
Store
Everything posted by Neil Barman
-

class text style use at creation - not working?
Neil Barman replied to Benedick_Miller's question in Troubleshooting
Have you contacted technical support for assistance? If not, please do get in touch with them so they can help you. Also, do make sure you’re running the most current version; your first post indicates that you may be using SP2.1 but there have been updates since. -
class text style use at creation - not working?
Neil Barman replied to Benedick_Miller's question in Troubleshooting
@Benedick_Miller Is what I am doing in this video what you are trying to accomplish? Text style per class.mov -
1. Agreed and because of that, the formatting can stay as is for now. 2. Keep an eye on that of course, and if it does turn out to be a bug, definitely submit it. 3. If a 100% accurate report is not currently possible, then I would say just get it as close as you reasonably can, noting the ways it doesn't work. If a 100% accurate report is possible now, then I could use that on a project, but if a 100% accurate report isn't possible yet we can still use the report you do create as part of a feature request (and the more info we can provide towards that, the better.)
-
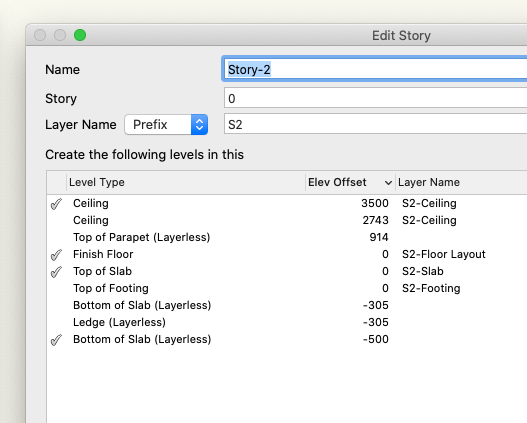
It's getting there. The layout of the data is looking good so far, but... the data that is being pulled isn't all correct. It seems that the data pulled for the levels themselves is mismatched and in some case not the actual levels used. There appears to be a mismatch with the Layers as well. For example, taking a look at Story-2 in the test file: Ceiling Level in the worksheet should be 3500, which is a custom Level I made. (2473 is the height of the default.) "Ceiling" should be the Layer noted in the Layer column to the right of it. Top of Slab should be 0, and it should have "Slab" in the Layer column to the right. Bottom of Slab (Layerless) should be -500 (also custom) and it should not have a Layer in its Layer column to the right of it. In contrast, the Finish Floor Level, at 0 height, with its "Floor Layout" Layer is correct. Having the Level, Level Ht and Layer. columns sorted from highest to lowest (with Level Ht. being the governing factor) is the goal, so that the words in the worksheet match how the building would "stack" in real life. Removing the zeros in the Storey Elev column would be ideal, if possible, in order to remove them from being a another piece of data that could be a distraction. Fonts and fonts sizes... As-is they can work, but if it possible: Row 1: 14pt, Arial, Bold. Row 2: 14pt, Arial, Bold, Underline. Row 4 onwards: 12pt Arial (I wasn't thinking of getting too fancy in terms of the look of the data, but simply having some examples of how formatting can be done would help.) Thanks!
-
That's interesting about there not being a call to get the Levels of a Storey. Hmm. Realistically, knowing the way templates will be set up and the way users may work "on the fly", it is conceivable that Levels will created both ways; Some Levels will be added from a template and others will be added manually as needed as planning a project. I very much appreciate you digging into this, Pat.
-
You bet... Here's one: Building with Storeys.vwx Thank you!
-
LOL... Busted! Yes, the end goal would be to view/print said Report so that a small-and-very-smart team could look at all the Storeys, and their associated heights, and building height limits and such, and plan the project (height-wise) well, before even drawing and objects.
-
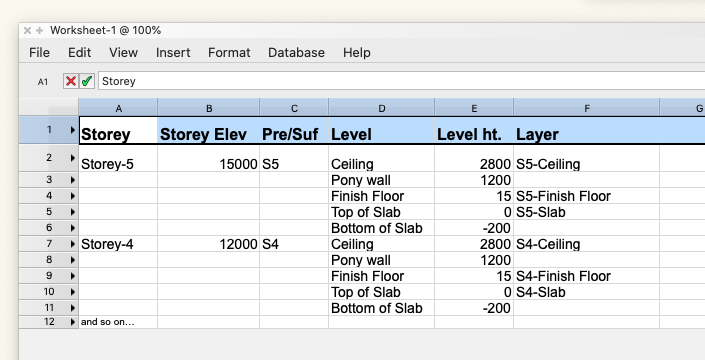
Thanks @Pat Stanford! The storey info I am hoping to extract is mainly what is shown in the Stories tab (and related dialogs) of the Organization Window. I'm thinking that this order should work: Highest Storey name & elevation plus prefix/suffix, then that storey's List of all Levels (the ones I have actually used, not the full list) in order from high to low plus the name of Design Layers associated with a Level. then Second highest Storey name (with all the info as above) then Third highest Storey and so on, until... Lowest Storey Something like this...
-
I am wondering if someone here might have a way to report the Storeys within a file (as well as each Storey’s contained Layers, Levels, their heights, etc) when the file ONLY has Stories set up so far? That is, there is no geometry drawn in the file yet, hence I'm not able to report the Storey, layer, level of a any of objects themselves. Thanks!
-
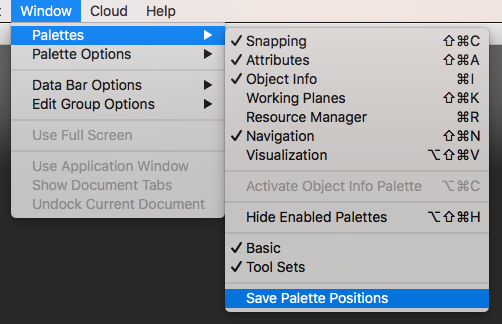
Once you get the palettes docked where you would like them please do make sure you then go to the Window menu > Palettes > Save Palette Positions. (and @Jeffrey J. Hummel, you are listed as a "Greenhorn" because you just joined the Community Forum and have only posted a couple of times as of now. Such membership "level" are fairly typical on public forums and simply indicate how long or how much a member has been involved/active. As you post more, your level will change. If you would like to indicate more about your history with Vectorworks, your Vectorworks version, your computer spec's, etc I would suggest that you enter this info into your forum signature. You can find this area to edit under your name at the top right > Account Settings > Signature.)
-
Choosing a line color from "color pencil box" freezes VW 2020
Neil Barman replied to MHBrown's question in Troubleshooting
Since that color pencil box is a Mac OS-based color picker, it sounds to me like Catalina is the reason for having to press the OK button to confirm the color. It may be a sign of things to come on the Mac side of things... it might not be a bad idea to review other Catalina changes to the OS. -
@Jalkana It sounds like you may be asking for something like “Viewport Styles”, according to the current way Vectorworks allows the user to set common options for objects. You would still need to set up the Overrides once somewhere – no software can read your mind, yet – but then you could then save the Viewport Style as a resource to be used at another time. Also, you may also need to tell each viewport to adopt a certain Viewport Style, but you can describe how you would like this to happen with the fewest clicks possible, or from a “central location” like the Organization dialog box. Whatever the case, I would recommend that you post this request in the Wish List section of the Forum. Include a description of what you would like to achieve, how you would like to achieve it, and how such a feature would be beneficial to your workflow and possibly for the workflows of others. (And not to diminish your request at all, but if you did actually run into the time-crunched scenario you describe above, you might need to have a serious talk with your structural consultant and especially your client about your Working Relationships. You would certainly need to say no to one of them – Most likely the client. Last minute information, requests and emergencies on their part do not need to equate to making you panic or work in a compromised way.)
-
@stephaneuk It looks like what you’re seeing may be different from the issue that was being discussed in much of the rest of this thread. If you are still experiencing the issue, I would recommend contacting your Vectorworks distributor’s technical support for assistance. Also, since you only mention Fast and Final Quality Renderworks, I would encourage you to try out Custom Renderworks Styles instead. You will likely find that you can create better looking renderings in shorter times by taking control of the render settings yourself.
-
Thanks for the suggestion, François. I was just looking for the "sweet spot" and, though I love pinball in machine form, I don't want to see it all day on-screen... a 0.6s delay is great!
-
I must say, I am really enjoying and appreciating all of the feedback that has been posted so far. It is making me think about modifying some of my prefs and techniques. Please do keep sharing your preference settings and your reasons for setting them as you do. Many thanks!
-
When a new version of Vectorworks arrives on my computer, even before I get too far into its new or enhanced features, I dive into the Vectorworks Preferences. These preferences control a number of aspects that make my Vectorworks installation work for me and feel like it’s my design workshop, no matter what file I’m working in. (If you’re wondering if I ever simply want to import my preferences from the previous version to the new version, I typically don’t. I like having a hands-on approach here and it really takes very little time to do.) First, I revisit the Vectorworks Preferences that I am quite familiar with and adjust some of my “old favourites” (listed below). When doing so, I always give them a second thought, ensuring that I truly do want to set them as I am. Workflows can evolve and change over time, so I want to make sure that my Vectorworks Preferences are set the best way possible for the way I work now, not just for how I decided they should be set many years ago. Next, I like to see what preferences have been added in the new version of Vectorworks. As vital as it may seem to set certain longtime prefs to my liking, it is actually this second step that is far more important – often a new preference will reveal aspects of a larger new feature that has been introduced. And it is the mindset of being open to new features and new ways of working that will help improve one’s design practice. I have found that this is an incredibly important approach to have as the digital tools of our practice evolve. So with that said, I wanted to share a list of the Vectorworks Preferences I adjust –and why I adjust them– so that you can get a better sense of perhaps how you too can take control of your Vectorworks experience. Edit > Offset Duplications = Unchecked Why I adjust this pref: Even though duplicating an object can replicate the last distance & direction I moved an object by Option-Drag (Ctrl-Drag on Win), I like my duplicated objects to “stay put” until I do something with them. Edit > Arrow Keys > Pan > Disabled Why I adjust this pref: The ways that one can change the view of their design have evolved so much over the years that I never find I never want to navigate this way... plus I don’t want to press an arrow key by accident and chance my view, thereby disrupting my train of thought. Session > Create new Document on Startup = Unchecked Why I adjust this pref: I rarely need a brand new, blank document available at my fingertips the moment I fire up Vectorworks. I’m usually working on an existing file, so I prefer to save myself the time of having to close the newly created document. Session > Display Classes in pop-up menus hierarchically = Unchecked Why I adjust this pref: This is very much just a personal preference, but I like seeing the entire Class name on one line, both in the pop-up menus and in the Navigation Palette and Organization dialog window (so I switch off hierarchical view there too.) Session > Maximum number of Undos > 42 Why I adjust this pref: I like to experiment and sometimes I need to “back out” of what I’m doing a lot. Plus, if it can be the answer to life, the universe, and everything, it must be a good number of undo’s. 3D > Render mode... > OpenGL Why I adjust this pref: I like my solids looking solid in 3D, the moment I switch from Top/Plan to a 3D view. 3D > View... > Normal Perspective Why I adjust this pref: The view looks more realistic than the default orthogonal view. Autosave = NN Operations, custom single location Why I adjust this pref: I find that having the autosave interval set to “operations” (no matter how many it is) rather than “minutes” means that Vectorworks will wait until I complete my action before saving, instead of potential saving while I am mid-action. I opt for a single backup location of my choosing in order to keep each of my project folders as “light” as possible; I have only a single backup folder that I need to manage and clean out when I tidy up old backups. Interactive > Interactive Appearance Settings… Object Highlighting-Pre-selection-Active Layer = Green Why I adjust this pref: I find it useful to differentiate between what I am about to select versus what I currently have selected. That’s my list. I’ve found it only takes about a minute to set all of those prefs to my liking. Now, I’m not saying that you should change your Vectorworks Preferences to match mine. What I do recommend, however, is that whether you are a new or a long-time user, you take some time to look through yours and fine-tune Vectorworks to work for you. If you have a Vectorworks Preference that you adjust for a particular reason, perhaps share below which preference it is and how & why you adjust it.
-
PDF only visible in active layer!
Neil Barman replied to vectorcheetah's topic in General Discussion
@vectorcheetah Since you mention being new to Vectorworks, you may also want to check out the Getting Started Guide video about "Importing a Scanned plan" here. The GSG videos are quite useful for both new users and those who have never had any formal training. -
@malonso Might you be able to share your Vectorworks file here so we can see how you have it set up?
-
@Patrick West I would recommend contacting Vectorworks Technical Support directly regarding the issue you're having. That way the Tech Support team can work with you to investigate it and help solve it.
-
Welcome to the Forum, @malonso! It sounds like what you are are wanting to do is what Classes can do. Using Classes, you can set the graphic attributes (pen colour, file colour, etc) for objects so that you can visually differentiate them while working with your project on a Design Layer. When it’s time to create the drawings, you would then create Viewports of what you wanted to show on the drawings. Viewports can be set to override the Class settings you previously assigned, so walls, for example, that appeared with colour when you were designing, can be set to appear black and white (or any colour really) for print/PDF. Since you are new to Vectorworks, I highly recommend checking out the Getting Started Guides here. The first four guides (Basics, 2D, 3D and BIM-Architectural) should be especially useful for getting you acquainted with many key core abilities of Vectorworks. I hope this information helps.
-
wall recess shows filled wall in plan
Neil Barman replied to Christian Fekete's topic in Architecture
You are most welcome! I’m happy to help. I made that little movie using Snagit, a great screen capture tool from Techsmith. It allows you to record just a specific region of your screen, which is very handy for focusing attention. Snagit is a superb tool for taking & saving screenshots and annotating them, but it also works well for shooting short videos. For longer videos that involve more post-production, annotations effects and audio tracks, I use Screenflow from Telestream, which is also amazing. -
wall recess shows filled wall in plan
Neil Barman replied to Christian Fekete's topic in Architecture
Hi @Christian Fekete, If you select the Wall Recess that is currently shown as a solid (where you want to see the opening), the OIP will give you a field to set the Cut Plane height. If you set it to a height that is within the actual Wall Recess height, the opening will show. I hope this helps. Wall recess cut plane height.mp4 -
Shortcut issues in VW2019 after upgrade from 2016
Neil Barman replied to DJMDevon's question in Troubleshooting
To export a .txt file of your customized workspace: Go to Tools > Workspaces > Workspaces... (which opens the Workspace dialog box) Select the Workspace from which you would like to generate the list of menu commands and tools. Press the "Export" button in the right sidebar. Determine the destination of the .txt file and save it. I hope this is what you are looking for. -
Shortcut issues in VW2019 after upgrade from 2016
Neil Barman replied to DJMDevon's question in Troubleshooting
For what it’s worth @DJMDevon, I have typically opted to not migrate when installing a new version, so that I get the version as the engineers built it. I have then edited a copy of a stock workspace to create my own custom workspace. My customization, which I will admit is not as “extensive” as some custom workspaces I have seen, usually takes under 5 mins. (I used to keep a list of my modifications, for easy reimplementation, but I’ve done it enough times over the years that I don’t need to review the list anymore.) I have always had good results from this method... Almost like starting from a tried-and-true recipe, then making small modifications to it over time to create your own version. This manual “revisiting” of customizing my workspace also provides me the focused, considered opportunity to add or remove aspects of the workspace that I realize I should be changed from my previous iteration. Sometimes a previous modification doesn’t get repeated because it wasn’t as useful as I thought it would, or I try out a new modification that subsequently proves to even more useful than I previously anticipated. I have even used or suggested this approach in offices where I have worked or consulted, and people have typically appreciated the results (even in cases where they insisted that doing so would take too much time... It turns out it didn’t actually take that much time and they too found it valuable to “revisit” the process of workspace modification.) Your mileage may vary of course, but I thought I would share that approach in case it helps. As for printing a list of your already modified workspace, I seem to recall that this is possible – I’ll look into it... -
lights not turning on/turning off when I turn others on
Neil Barman replied to BradLyons's question in Troubleshooting
My understanding is that the 8 light limit is part of the OpenGL standard as a whole because OpenGL is meant as a quick-to-render solid mode. If the OpenGL standard allowed one to add as many lights as they wished, then it is likely that the "quick" aspect of OpenGL would be gone (because rendering light can be complex and add rendering time.)


