Eliot Hartzler
-
Posts
37 -
Joined
-
Last visited
1 Follower

-

VW22 issues with crashing when resizing palettes
Eliot Hartzler replied to Wharf's question in Troubleshooting
Yep. Many users (me too) have been reporting similar problems, seems especially with Dell machines. See linked Tech Bulletin. I haven't tried fixing mine yet, so I'm not much more help than this.- 1 reply
-
- 1
-

-
@michaelk If it's bugging you 😋, there's a link to the help documents regarding this topic in the following post, but, as we've all mentioned, the @ syntax is the one that works.
-
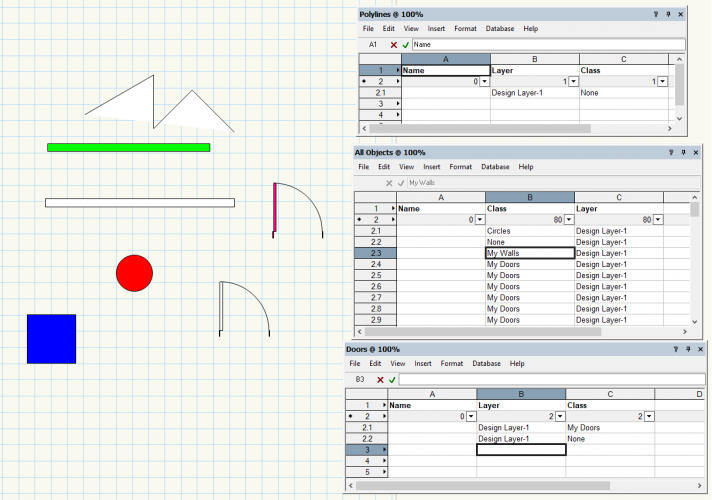
This happens even if you have been using VW for a while 🙂. I've found that ensuring that objects get placed on the correct design layer and class upon insertion is honestly the best way to combat this. Yep, the discipline! There are multiple ways of doing this, of course, and it may look slightly different for each object. PIOs such as Walls, Doors, TVs, Speakers, etc all have insertion options so that you can choose the class the object will be on before it is inserted into the drawing; symbols have an insertion class within their definition; etc. Setting your layer settings to "Grey/Snap Others" may help with ensuring you are on the correct design layer when adding objects by creating a visual difference between objects on your active layer and all the other layers. Checking the design layer and class of objects can be time consuming, especially if your methodology is to manually check each object. The design layer and class of an object can be displayed in worksheet columns by using function criteria, but the trick is how you gather the objects for the worksheet. Using "All Objects" will generate a HUGE report and a single object (such as a door) can create 10 or more lines within this worksheet. Creating a report for different types of objects (a door report, wall report, TV report, etc.) may be an option. In this way, you would be able to see the DL and class of each object. However, I don't believe you can change the DL or class field of the worksheet, so you can't make corrections within the worksheet itself. Of course, you could right click on the row header and go to the object and change it without too much effort. A different workflow that may be helpful (or interesting, I haven't tried it, just thought of it now) in correcting object DL and class assignment after insertion would be to use Data Visualization. You could assign an outline/fill/etc to each DL or class, turn on the data visualization, and correct any missing assignments. When finished, you could toggle the data visualization off, and continue on... Of course, there are scripting options as well, but I know how you'd feel about that @Ross McLee 😋
-
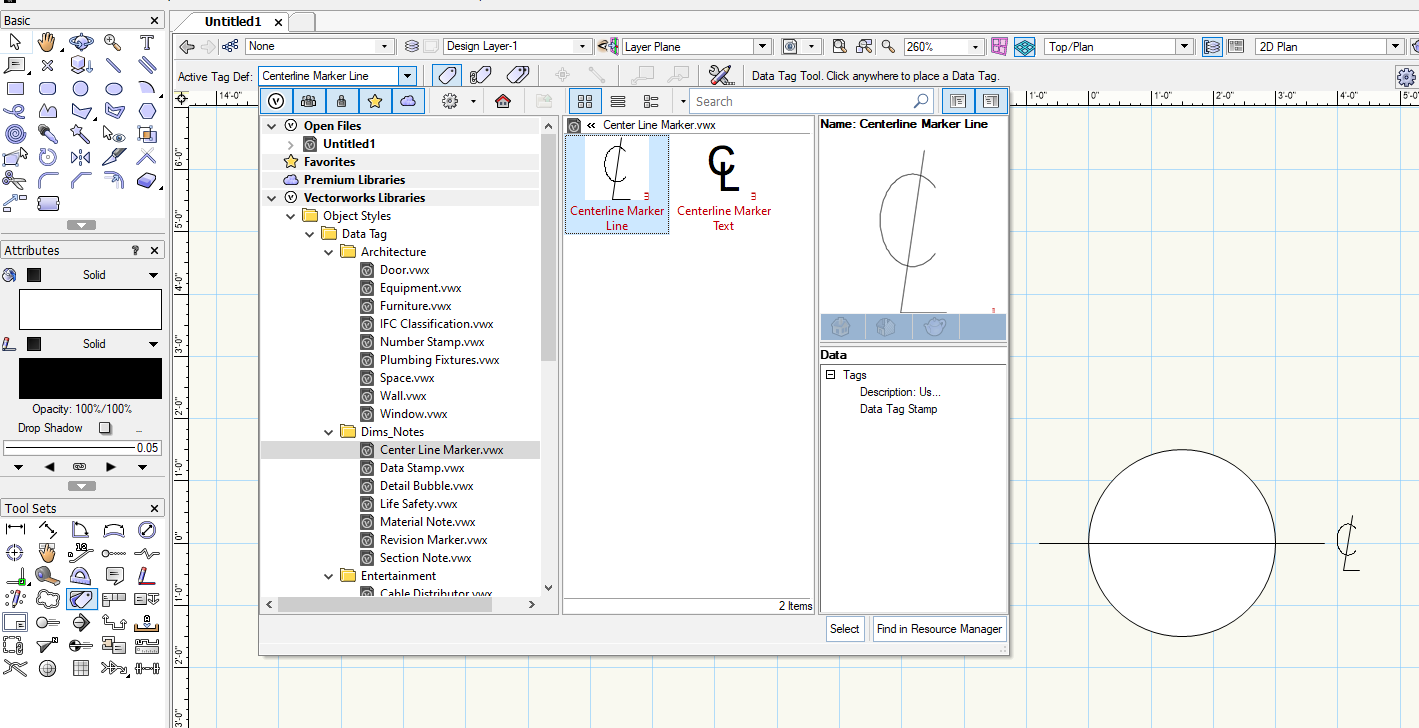
Centre Line marker - where is it now?
Eliot Hartzler replied to LarryO's topic in General Discussion
Data Tag tool is where I know to find the CL markers.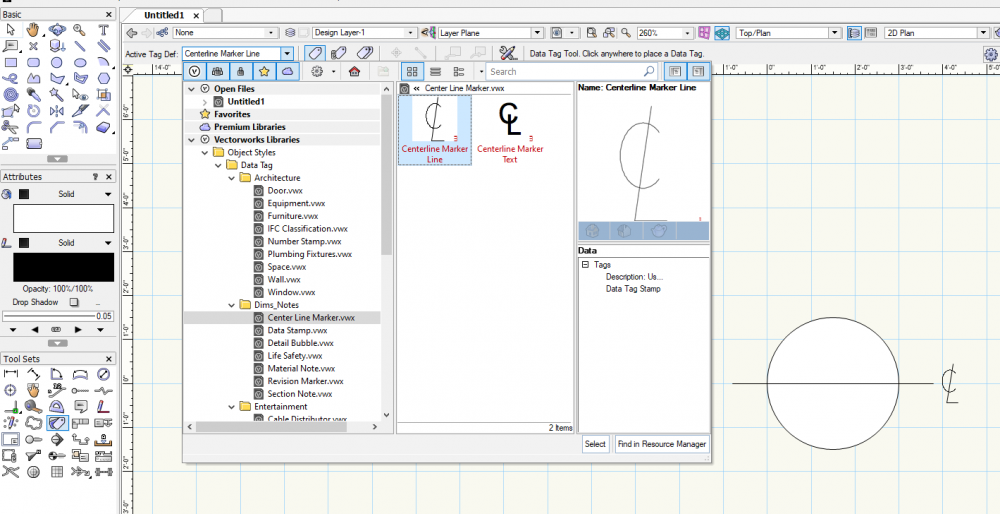
-
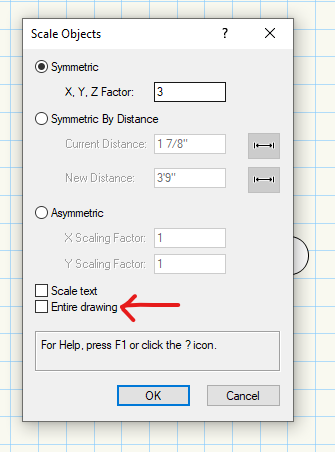
There is an "Entire Drawing" checkbox in the Scale Objects popup window, which essentially ignores the selection and scales the whole drawing. Have you made sure this isn't checked?
-
Hyperlinks are actually based on symbols, so to edit the look of a hyperlink you have to edit its symbol. Double click on the hyperlink object, or find the "Edit..." button in the Object Info Pallet. You can then edit the existing symbol or create a new one. Editing the symbol lets you edit how the symbols looks, including adding other geometry if wanted. Changing the attributes of the text object "#Hyperlinktext#" changes how the text will appear. So here's where you can change text color, font, or class of the text so that it conforms to the class's attributes. As far as if it is possible to have a hyperlink inside a callout...I can't find a way to make it happen (quickly, at least). Hyperlinks and Callouts are two different PIOs, and callouts don't use symbols, so I'm not sure how to get a hyperlink inside a Callout object. As a work-around, you could create a Hyperlink symbol that looks like a Callout, like the one below (you are constrained by how many characters of text you can have fit within the rectangle though). Or, you could use callouts as Keynotes and place the hyperlinks on top of the keynote legend...just a couple possibilities. With enough experimenting you can probably find a solution that will fit your needs. HTH

-
How do I keep the green squares on dimensions from printing?
Eliot Hartzler replied to rlb's topic in Architecture
Hey RLB, Interesting, they don't appear for me when I do an Export>Image File>JPEG... Anyhow, the green squares seem to have to do with associative dimensioning. Associative Dimensioning basically means that if the object the dimension is tied to changes, the dimension will adjust itself to the new object so you don't have to edit the dimension object manually. If a dimension is associated with an object it will have those green squares. You can right click on a dimension and select "Disassociate" to disassociate the dimension from the object and lose the green squares. If you want to turn Associative Dimensioning off, the preferences are found under File>Document Settings>Document Preferences>Dimensions tab, though you may find yourself manually updating dimensions 🙂 HTH. -
Get Connectors - All connector locations reset
Eliot Hartzler replied to AceRoehrborn's topic in ConnectCAD
I've been bouncing between VW2020 and 2021, so maybe I'm behind and didn't realize when this happened, but...just noticed (in VW2021 SP3 at least) that the "Get Connectors" button now acts more like an update command and pulls newly created connectors from schematic layers without resetting the Connector Panel's layout. Thanks for taking care of this CC/VW team! -
Change Worksheet Multiple Column Sort Order?
Eliot Hartzler replied to Bruce Kieffer's topic in General Discussion
I believe that the sort order is basically determined by the order in which they were created. So if you clear the sort on all the columns, then set the sort on the column you want as the primary sort, then set the sort on the secondary column, third, etc....you should be able to achieve the sort priorities you are looking for. If you are asking for a quicker/more efficient way to perform this operation, then that's beyond me 🙂. -
Team workspaces - save to workgroup folder
Eliot Hartzler replied to Ross McLee's question in Wishlist - Feature and Content Requests
I think that would be correct, though I haven't tested it. I could see this being a handy feature, though a quick copy-paste isn't too bad currently (although I can relate with the pain of having to remember to do it). Not sure what happens when you edit a workspace that someone else is actively using...although I suppose that is already a possible issue with workgroup-based workspaces today, regardless of whether or not a direct-edit is possible... -
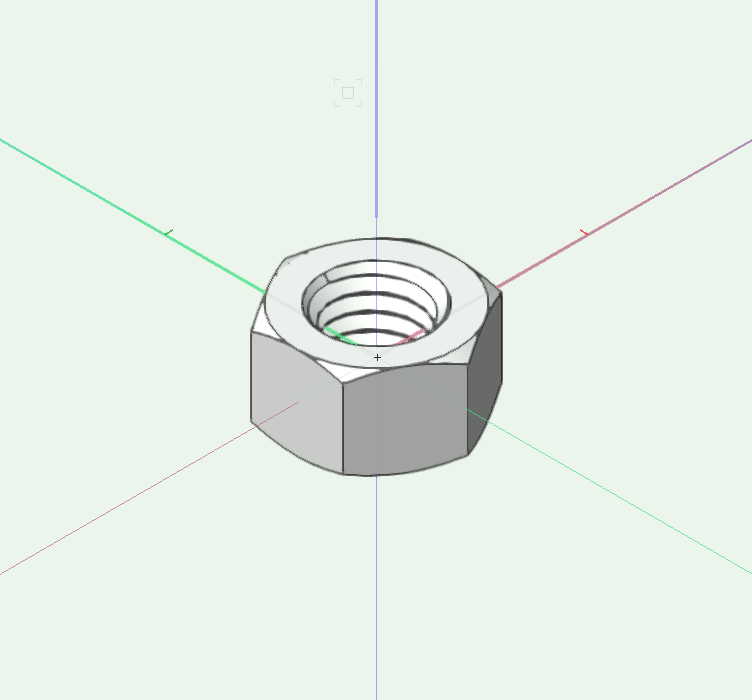
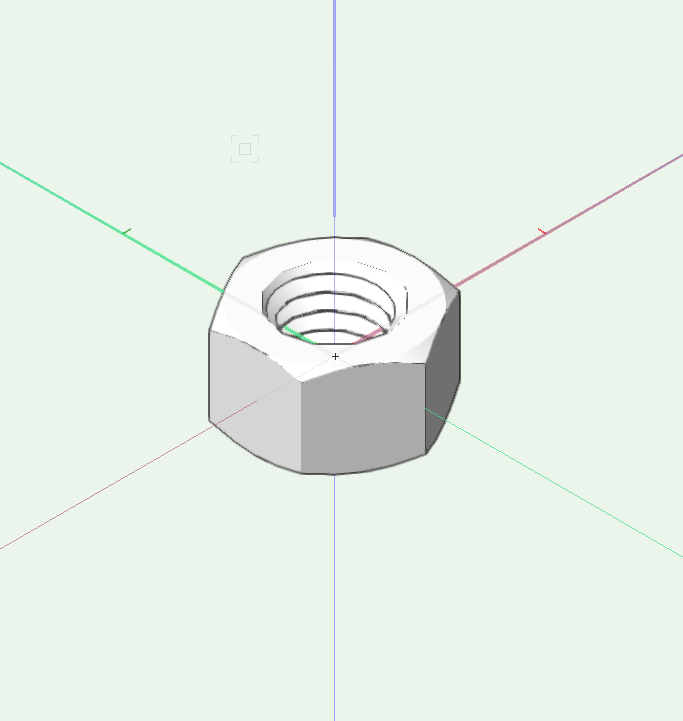
Importing McMaster Carr drawings
Eliot Hartzler replied to DWrightLocal80's topic in General Discussion
I don't think there's necessarily a "correct" file type to use when downloading from McMaster Carr. Obviously, 2D vs 3D makes a difference as far as if you want a 2D or 3D object to use in your VW file. But besides that difference, each file type might work just fine functionally and only have subjective differences. That being said, different file types do behave different ways. For example, I've used SAT, STEP, and IGES from McMaster Carr before. SAT and STEP seem to be fairly similar, while IGES seems different. SAT and STEP items tend to import as generic solids, while IGES items tend to import as a group of NURBS surfaces. IGES imports tend to have a more "defined" shape because of this, at least in OpenGL (IGES on left, SAT on right)(click picture to make bigger): The tradeoff is that when used in VW files, I've found SAT or STEP symbols to be only 50-70% the file size of an IGES symbol. So...there's a balance, and it's kinda up to you which route you go. I've been pleased with symbols I've created from SAT resources. I would encourage you to download a couple items in multiple formats, import them each, and see if there's a noticeable difference that you care about. Now as far as where you put these symbols when you are done creating them...you can import items, create symbols from them, and have them all in the same VW file. A file added to the favorites section will work for accessing your new symbols. Or, you could add the VW file(s) with your new symbols to your User Library (for yourself) or to a Workgroup Library (to share if your working with a team).

-
Utiltizing the Custom Parameters in All Layer Cable Report
Eliot Hartzler replied to hihosilvey's topic in ConnectCAD
From some quick digging around in the database formulas for the All Layers Cable Report, it seems like the report is actually generated from the fields of the Circuit PIO, not directly from the circuit_rec or skt_rec records. For that reason, I'm guessing that it won't be possible to pull a field from the skt_rec record into the report since it requires a database cross-referencing of sorts. I don't know this for sure though, that's just how it appears to me... -
Is there an easy way to move an object from one class or layer to another?
Eliot Hartzler commented on PVA - Admin's article in Knowledgebase
@JANE H. If you have both the class and layer options set to at least Show/Snap Others, all classes active, and both design layers active, then objects from both design layers should show up. If that is not the case, you might check your design layer scales; only design layers using the same scale will show up. Tools>Organization. Design Layers tab. Edit Scale for each layer if needed. -
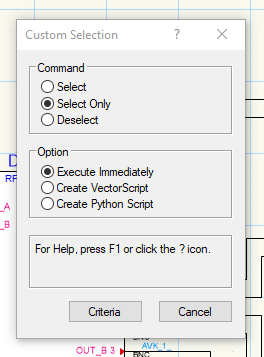
project revision: Numbering cables and naming devices
Eliot Hartzler replied to Thomas K.'s topic in ConnectCAD
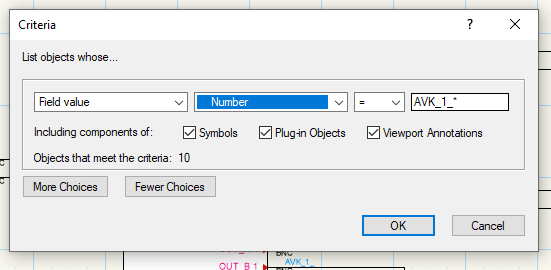
@Kelzilla1000 As Conrad mentioned, if you clear all cable numbers then the Number Cables command can still provide what you are looking for. But if that doesn't suit your needs, I think I can answer the part about how Spotlight Numbering could help. (Click on pictures to make them bigger) The Spotlight Numbering tool is helpful in this situation because it allows you to add prefixes to the objects you are incrementing. Therefore, you could put "AVK_1_" in the Prefix field and your starting number in the Start field and renumber the cables that are signal type 1. There are (at least) two methods that I can see of making this happen. The first is to launch Spotlight numbering, fill in the info, and then start selecting the cables you want to renumber one at a time (all the cables that will have the same prefix). The preview window will show you what you are numbering each circuit. You then hit the checkbox in the toolbar when you are done numbering cables. This is a manual process and you have to select each cable individually (but at least you don't have to type the number!!). The second option is a little more automated. If you select the cables you want to renumber before launching Spotlight Numbering, then the Numbering Direction fields (greyed out in above picture) become active and you get to specify a direction (left>right, top>bottom, etc) and a start point. Spotlight Numbering will then auto-renumber all cables you selected before running the Spotlight Numbering command. Advanced: To make the process even more automated, you can make VW select all cables with the same prefix in their name (which equates to all cables of the same signal type in your example) before you launch the Spotlight Numbering Command. To do this go to Tools>Custom Selection. Choose the "Select Only" Command and the "Execute Immediately" Option. Then click the criteria button. You want Field Value in the first box, Circuit>Number in the second box, "=" in the third box, and "your prefix" plus an asterisk in the last box (see picture below). This tells VW to select all cables whose Number is "AVK_1_anything else". When you click Ok, all cables (on ALL layers, so be aware of that) with the prefix AVK_1_ should be selected. You can then run the Spotlight Numbering command. This workflow should help speed things up significantly. Hope this helps.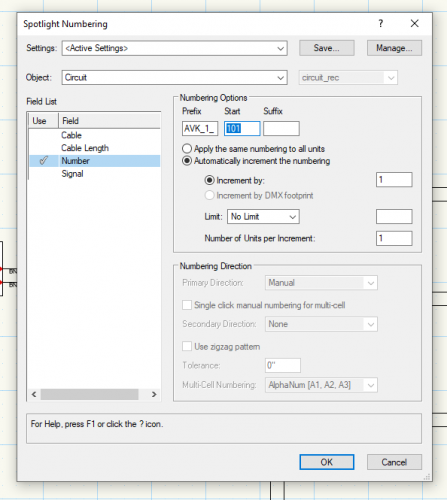


-
An issue with creating a new custom title block.
Eliot Hartzler replied to SirGreenWizard's question in Troubleshooting
Trying to work through this...I/we might just need some clarification on what you are trying to do... If you have a title block style (the one you created) and are wanting to add more elements (the revision data) so they show up, you can double click on the title block on a sheet to edit the layout, add linked text (that is linked to the revision data), etc. If you are looking to add/edit the actual data (project, sheet, revision, etc), that is done through the "Title Block Border Settings..." in the OIP. I was able to take an un-styled title block, attach a record, save the title block as a style, and use that style on another sheet. My record was attached to the title block on my new sheet and I could still find it under the Data tab of the OIP. So it doesn't seem like records are discarded when you convert an un-styled title block into a styled one. If you are looking to add fields to your record format, you can find it in the resource manager and edit it there. Here's the VW2019 Help article on setting up title blocks: Setting Up and Managing Title Block Borders If none of these responses is helpful or answers your questions, more information on your process so far or end goal might steer responses in the right direction 🙂