


Mike Rock
-
Posts
36 -
Joined
-
Last visited
Content Type
Profiles
Forums
Events
Articles
Marionette
Store
Posts posted by Mike Rock
-
-
Try this formula in C2 '=IF(('BrxHoist'.'OriginX'<=0), 'BrxHoist'.'OriginX', ' ')'
As for your Y values not sorting correctly it looks like you might be using Origin y (formatted) try changing that to Origin Y.
-
I can be more clever...
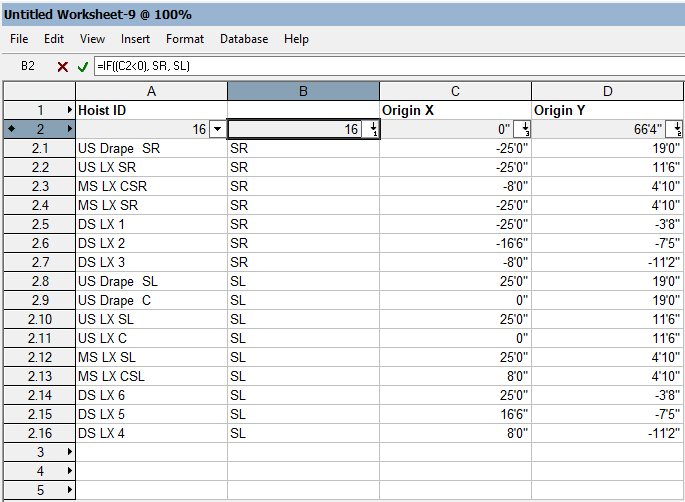
I inserted column B and put '=IF((C2<0),SR,SL)' in cell B2, that assigned each point to SR or SL without taking up the position field on the record. The edge case for points on the center line getting assigned to SL doesn't seem too bad for the ease of implementation...
-
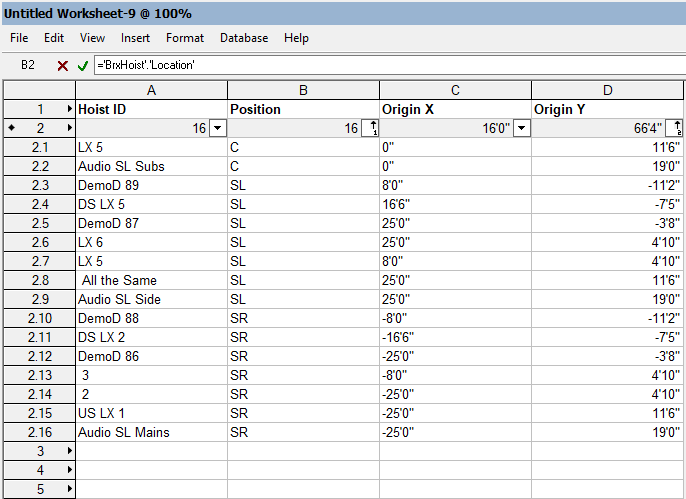
One way to achieve this would be to sort by a 2nd value. I filled in the Position field with SL, C, or SR to allow me to do all the points on center first, then all the SL points in order according to the origin Y value, I didn't bother but in theory you could filter the Origin X row to make sure you have the point closest to center first. Notice the small 1 under the filter arrow for position and the small 2 under the Origin Y filter. this tells you in what order the filtering is applied.
Someone a little more clever might have another solution... -
On 4/26/2021 at 1:25 PM, AlHanson said:
Were you able to solve this issue? I'm having the same problem with the Popup being blank after selecting an entry. I've included "result := SetObjPropVS(53, TRUE);" in the case for kObjOnInitXProperties:
-
As Mark said - Spotlight numbering could save you some trouble. I made a simple 12 X 12 grid of chairs and was able to get the tool to number them pretty quickly. Using letters for rows and then running the tool again using numbers for the seat number. Now if your arena is like most and some sections have uneven row lengths the spotlight numbering tool won't be able to easily account for those edge cases.
-
 1
1
-
-
Thanks folks - the code on the VS side is a single line '{include...' Saving the Notepad ++ file and recompiling the script is very helpful, now I can take advantage of more features of notepad ++ like bookmarks.
-
1
-
-
@BillW Thanks for taking the time to create, document, and share this, I've been using it for the last couple weeks and found it very helpful. A (possibly) silly question - is there a better work flow than copying and pasting the code back and forth between VW and Notepad ++? Using the Text File option in the script editor pulls it once but my ideal workflow would to be able to have the code refreshed each time the editor is open.
Any suggestions to be able to quickly push the code from Notepad ++ to VW? -
I'm hoping to use the floating data bar to display some information during a script. Currently I have the data being displayed with Message(); but I'd prefer it to be front and center where the work is being done. I'm hoping to achieve something like the Spotlight Numbering Tool has. I've searched this form and the VS:Function Ref but can't find anything to lead me to a floating data bar. Is the floating data bar something that can be implemented with a vectorscript? If so I'd love a hint...
-
Could you share a picture of what the goal looks like? maybe one you have done in auto cad?
-
I haven't jumped into the data tag pool, could you clarify your workflow a bit for me?
While you annotate the viewport do you have to click on each motor in the plot and then manually arrange the data tag into the grid?
-
Thanks @Jesse Cogswell - that was the solution and explanation I was hoping for.
-
1
-
-
Hi @MullinRJ
Thanks for cleaning up the code. I had to change the line SetFillback(h, r, g, b); to SetFillback(PIOHand, r, g, b); to reflect the new handle name used in your update. After that the code ran correctly. However it still requires the setclass line to work as intended. I can move to after the setfill line and it still works. If I comment it out completely I'm back the earlier issue of the color changing in the attribute palette for the rectangle but the rectangle color doesn't update until some action (clicking on solid fill, changing the line weight, manually assigning it to a new class) (What doesn't work - -changing views, moving or rotating the object) 'pushes' the new color to it.
For now I'm happy to keep the setclass line in there as a work around if the proper solution isn't apparent. If the issue is tied to something bigger I'll cross that bridge when I come to it.
Thanks again.
Mike
-
Here is the rest of code, for the 'real' script I do want to set to object to a specific class so I can use the code as is. I was just trying to understand what effect the setclass call was having on the code to make it work...
PROCEDURE Example3; CONST kObjOnInitXProperties = 5; kResetEventID = 3; kObjXPropHasUIOverride = 8; kWidgetButton = 12; kObjOnObjectUIButtonHit = 35; buttonID_1 = 1234; {user-definable index} VAR theEvent, theButton :LONGINT; result :BOOLEAN; sourceFieldNumber,dialog1 :INTEGER; buttonEventID, color :INTEGER; displayString :STRING; thisDoesNothing, r, g, b :LONGINT; H :Handle; FUNCTION ColorPopUp :Integer; VAR dialog1, result :INTEGER; PROCEDURE Dialog_Handler(VAR item :LONGINT; data :LONGINT); BEGIN CASE item OF SetupDialogC: BEGIN SetColorChoice(dialog1, 4, 1242); END; 1: BEGIN GetColorChoice(dialog1, 4, result); ColorPopUp := result; END; END; END; BEGIN dialog1 := CreateLayout('Example Dialog', FALSE, 'OK', 'Cancel'); CreateColorPopup(dialog1, 4, 24); SetFirstLayoutItem(dialog1, 4); result := RunLayoutDialog(dialog1, Dialog_Handler); END; BEGIN vsoGetEventInfo(theEvent, theButton); CASE theEvent OF {User has single-clicked the object's icon.} kObjOnInitXProperties: BEGIN {This tells VW to let the object decide what goes onto the Object Info palette.} result := SetObjPropVS(kObjXPropHasUIOverride, TRUE); {Now we manually add the "normal" parameters...} {One way is to use this single call to add all of the existing parameters.} result := vsoInsertAllParams; {Alternatively, you can use this to tack individual parameters onto the end of the list one at a time. This way, you don't have to use SetParameterVisibility in the reset event to hide parameters that you never want to see.} sourceFieldNumber := 1; displayString := 'My Great Field Name'; result := vsoAppendParamWidget(sourceFieldNumber, displayString, thisDoesNothing); {Finally, we add the button.} displayString := 'Color Select'; result := vsoAppendWidget(kWidgetButton, buttonID_1, displayString, thisDoesNothing); END; {User has clicked a button in the Object Info palette.} kObjOnObjectUIButtonHit: BEGIN CASE theButton OF buttonID_1: BEGIN color := ColorPopUp; {pops up a color select dialog} h := FSActLayer; {selects the rectangle created else where in the script} setclass(h, 'None'); {If this line is commented out the script doesn't work as intended} ColorIndexToRGB(color, r, g, b); {converts the value from the colorpopup function to RGB} SetFillback(h, r, g, b); {sets the color of the rectangle} RedrawSelection; {refreshes the rectangle to show new color} END; END; END; {Object reset has been called.} kResetEventID: BEGIN Rect(0, 0, 1, 1); END; END; END; RUN(Example3); -
I've got a bit of code that is making me scratch my head. I combined a couple examples to create a button in the Object Info Palette for a rectangle. The button triggers a color select dialog.
color := ColorPopUp; {pops up a color select dialog}
h := FSActLayer; {selects the rectangle created else where in the script}
setclass(h,(GetClass(h))); {If this line is commented out the script doesn't work as intended}
ColorIndexToRGB(color, r, g, b); {converts the value from the colorpopup function to RGB}
SetFillBack(h, r, g, b); {sets the color of the rectangle}
RedrawSelection; {refreshes the rectangle to show new color}
As this was a mash up of a few different experiments the code was a little sloppy. Once I got the script to run and do what I wanted I went back to clean the code up. When I remove or comment out the setclass line the script stops working as I want it to. With the line commented out the color in the attribute palette changes to match the selection but the rectangle does note change. If I click on the Attribute Palette and select solid for the fill it ' pushes' the color to the rectangle. Changing the line type also 'pushes' the color. Any idea what is going on here and why setclass seems to the the fix? Surely there is a cleaner way...
-
I found this thread trying to do something like the OP wanted to do. I want to be able to modify a field in a PIO so I modified the main chunk of code to be -
If Command then N1:=IntDialog('Enter Number for this Object.', Num2Str(0,N1));
SetRField(H1, 'Roadcase by Mike', 'Piece Number', ConCat(N1));
ResetObject(H1);
RedrawSelection;
It works but I'd like to improve it with two options.
1 - I'd like the PIO to refresh/redraw to reflect the new Piece Number while the tool is still active to make it easier to keep track of what has been numbered already.
2- Would it be possible to store the value of N1 when the tool exits to be able to resume numbering from the same place?
I've been able to make some solid strides in my coding so any bread crumbs that I can follow up with would be great.
-
Thanks @michaelk The simple is better approach seemed to help, oddly the redrawall line seemed to be causing the ghosts more than anything.
Your comment on kobj stuff is funny, I found it in a PIO and then also caught bits of it in the VS:REF. Picture me at my keyboard like Indiana Jones franticly googling for anything related to kobj sure it was the secret code I needed. Not knowing it was just a bit of copied code that had made its way around.... I should have paid more attention to the fact it was a constant.-
2
-
-
PROCEDURE DrawRectangle;
VAR
    Width, Height, CenterX, CenterY: REAL;
    X1, Y1, X2, Y2: REAL;
    RectHandle: HANDLE;
	TextValue: STRING;
    TextHandle: HANDLE;
    MaxTextWidth: REAL;
    ClickX, ClickY: REAL;

BEGIN
    { Set your desired values for Width, Height, and Center coordinates }
    Width := PWidth;
    Height := PHeight;
   { GetPt(ClickX, ClickY);} {line commented out, didn't do what I wanted}


    { Calculate the coordinate s of the corners of the rectangle }
    X1 := ClickX - Width / 2;
    Y1 := ClickY - Height / 2;
    X2 := ClickX + Width / 2;
    Y2 := ClickY + Height / 2;

    { Create the rectangle using the calculated coordinates }
    Rect(X1, Y1, X2, Y2);


    TextSize(PText_size); { Adjust the size as needed }

    TextJust(2);
    CreateText(PText);
	TextHandle := LNewObj;
	SetTextWrap(TextHandle, TRUE);
    MaxTextWidth := X2 - X1;
    SetTextWidth(TextHandle, MaxTextWidth);

    { Redraw the screen to see the changes }
    RedrawAll;
END;

{ Call the procedure to execute the script }
RUN(DrawRectangle);
I made a simple PIO to learn the basics of them. I used Chat GPT to get the code roughed in and looked at the vectorscript function reference to fill in the gaps. As a point plug in it works, it makes a rectangle where height, width, text size and text is set from the object info pallet . However I feel like it could be cleaned up a little. The first thing I would like to improve is the creation of 'ghosts' When activating the tool there is a ghost rectangle created at the origin and a dashed version around the cursor as you would expect. There is also a ghost at the origin when you edit any of the values in the object info pallet. Adjusting the view in any way seems to get rid of the ghost but I'd like to prevent them in the first place.
I looked at another script and saw code likekObjOnInitXProperties = 5; kObjOnWidgetPrep = 41; kObjXPropShowOthersEditGroup = 24; kObjXPropAcceptStates = 18; kObjOnAddState = 44; kObjXPropEditGroupPath = 2;Where can I learn more about those lines? They don't come up with googling or in the VS Ref...
-
1
-
-
How does it look if you do a sheet layer with a few view ports? I would have one VP with the whole wall, then maybe 3 VPs of L,C,R sections of the wall at an easier to read scale. I would be tempted to include a ruler so the distances and relation between L,C,R were clear.
-
2
-
-
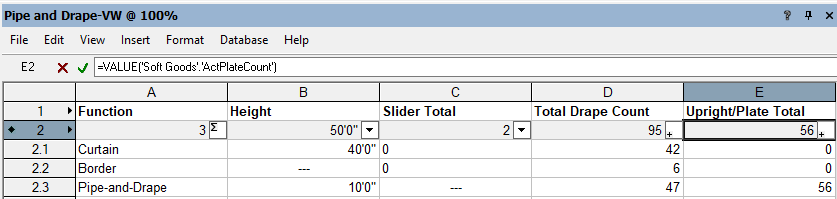
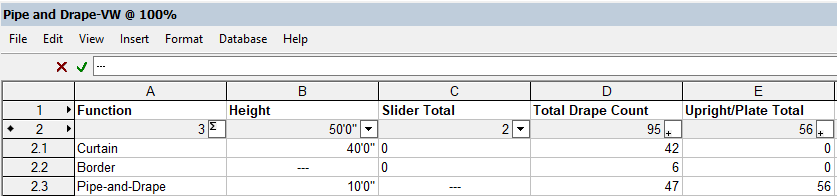
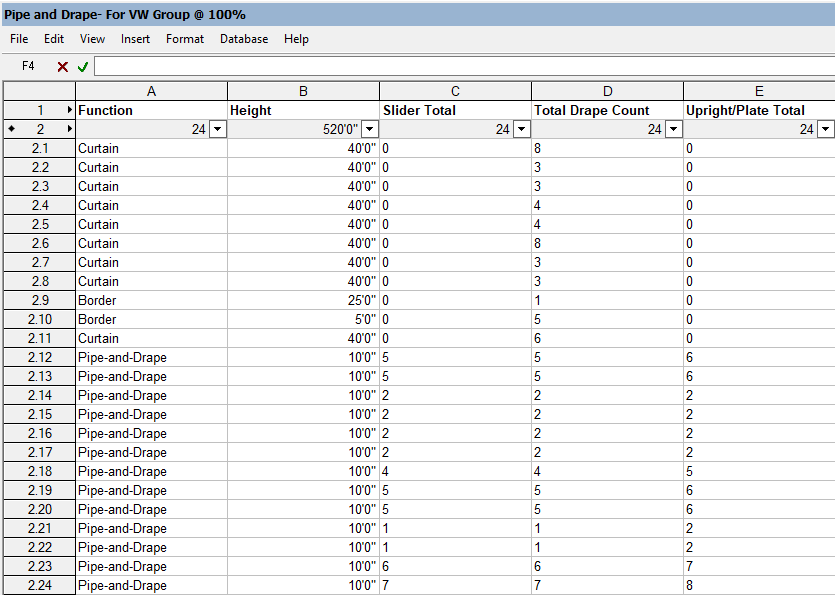
I was able to just add the =value()
-
I'm back on VW2021 which is before soft goods could be assigned a style. Hopefully someone with a modern copy of VW can help you figure this out.
-
Thanks @Pat Stanford Putting '=Value() into the value for row 2 was the trick I needed to get counts.
-
I just played around with this for a project - I was able to get what I wanted with a report but I could see wanting to get some totals out of it. =Sum(E2.1..E2.24) does not work as I would expect. EDIT issue addressed already
-
VW Distance from point to beam.pdf
Here is where I got to over the holiday weekend. The script grabs the point name and location from the symbol and same with the beam name and location. Then it runs some math on it to figure out the two closest beams and outputs it to a work sheet.
Right now it will only work with Y data but it wouldn't be two hard to modify to work with X data. I can think of a few rooms that 'go both ways' depending on where you are in the room. Also this script wont work for domes or other radial rigging grids. -
@AStein I think there is a lot to go on in your post. Compared to the workflow of a LX crew chief or master electrician the riggers workflow is a lot more segmented. Some riggers only care about getting the chain over the chalk and don't concern themselves with power or hardware below the hook. A Lightwright style program for riggers would be fantastic but I think the number of opinions would make it hard to implement.
As for floor stickers I use word to do a mail merge from a database, it is clunky to have to use VW, excel and word but I'd rather VW do some other fixes before starting to do stickers and labels.
I've been playing around with the distance between points using the help of chatGPT.
Using the example data of:
beams = {'beam1': 1, 'beam2': 8, 'beam3': 12}
points = {'point1': 2, 'point2': 4, 'point3': 7, 'point4': 10, 'point5': 11, 'point6': 5}
I get an output of:point1 between beam1(1), beam2(6)
point2 between beam1(3), beam2(4)
point3 between beam2(1), beam3(5)
point4 between beam2(2), beam3(2)
point5 between beam3(1), beam2(3)
point6 between beam2(3), beam1(4)
I thought having a record attached to each hoist to take the data was the way to go but thinking about how you are aiming to have a master VW file to handle all the venues for a tour you wouldn't want that data to live on the hoist because it would have multiple versions of it. So maybe a record per venue?

Hoist worksheet / Database
in Entertainment
Posted
You need to provide the value for if the IF statement was false. It will go between the last comma and ) In the formula I supplied I used an empty string ' ' You could also put some text there. To learn more with the worksheet open click Insert>Function and select If and it will tell you how to structure the formula.