

bgoff
-
Posts
291 -
Joined
-
Last visited
Content Type
Profiles
Forums
Events
Articles
Marionette
Store
Posts posted by bgoff
-
-
@Robert DRobert, based on what you posted this is exactly how this would work. If you could PM me your file I could take a look and get back to you with a solution.
-
@jmccain8 Can you get the dwg of the same file? This would eliminate all of this PDF cropping process.
-
There really isn't a need to edit the contours inside the DTM. With proper application of site modifiers, all can be achieved externally. This way there is no interaction between the DTM contour modifiers and the external modifiers.
-
 1
1
-
-
By design the Landscape area has the pen and fill linked.
-
1
-
-
Try to stick with site modifiers to modify the contours.
-
Yes Data Tag All the way! It has so much more power and be designed to your graphic needs.
-
1
-
-
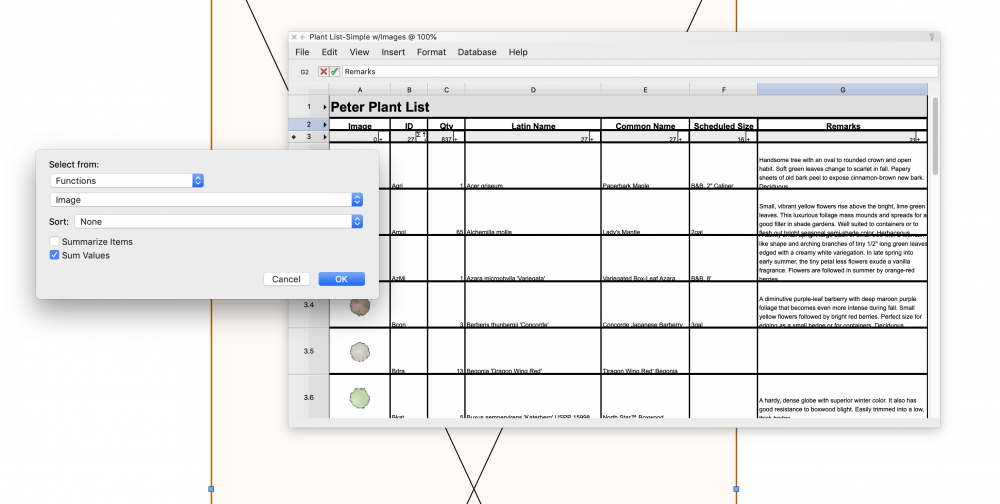
When selecting the worksheet (two clicks) the database header under image needs to be changed. Select the grey header in that column and select the little box to the right. Here change the top selector to function and the second selector to image. This should fix it. I am not quite sure why this was changed but this will get it back to where you need it.
-
1
-
-
I tested this on my side and cannot repeat this. Could you share a file where this is happening? Or you could PM it to me also.
I would like to take a look at what you have going on
-
@BGD
First let me just say that your name trips me out every time I get a notice. My initials are BDG! 🙂
Answers for above!
1) first turn off KLC Site plan it is covering the hardscape. Second, with the "Hardscape Decking Const" style edit the deck boards component and change the Texture from Class texture too Texture.
2)This is because you have the opacity to 0% change it to 100% and they will show. Or if you want some opacity change it there.
3)Select the site wall and in the Render tab in the OIP change where it says none in the texture picker to Class Texture
4)My suggestion is to learn Data Tags. These will allow you to set any graphic style you like.
5)I believe this is answered above.
6)Use Roof Face to create the desired short roof, and use fit walls to objects to fit the walls to the roof.
-
1
-
-
@jpccrodrigues yes this process can work but requires much more time and more clicks. By simply simplifying the poly (Modify>drafting aids>simplify polys) you achieve the same result with a measured affect that can easily be modified from there.
and @elch I would second @Rossford remarks. Let us know. and if you would like feel free to PM me the file. I can take a look and send back.
-
1
-
-
If you need to move the geo image just click and hold using the Geo locate tool and move to the desired location
-
1
-
-
Vectorworks creates a TIN for the model so if you are referring to the flat house pad having terrain you would need to use a pad to modify the surface.
Let me know if this is what you are referring to.
-
you have one wall that is 1900m tall so it is zooming out to fit the entire wall making everything look nonexistent. Use the flyover tool to rotate and see the tall wall and you can reset the values and all will work fine.
-
1
-
-
convert the poly lines to 3d polys, then set each lines Z value to the desired elevation. I would then select all lines and use simplify polys to reduce the number of vertices. Once this is done, select all 3d polys and create site model.
-
Same with the wavy line create one arc and mirror it for the wave. Then compose to make as one.
-
Draw one side of the leaf outline as you would like and use the mirror tool in the duplicate mode to create the opposite matching side. You could then compose the lines to make them one.
-
No Problem! HTH
-
You should reset you attributes. To do this click with the selection tool in blank space, set you attributes how you would like them and even though it is not necessary I like to click in blank space again. This will reset your attributes to your new selection and choices.
-
1
-
-
Try this. Go to the Landmark Menu, and select "choose plant database". In the wind that pops up there is a dropdown picker at the top. Here choose "Vectorworks Plant Database"
This should get you to the database instead of the Plant Catalog.
-
1
-
-
you can draw a poly line around the plants in that area(ensure that those plants are not "Attached" to plants outside of that shape. Then in the OIP at the bottom, name that shape. Then in the worksheet set criteria to "Location>is within> NAME OF SHAPE". This will include only those items within the bounding box.
-
1
-
-
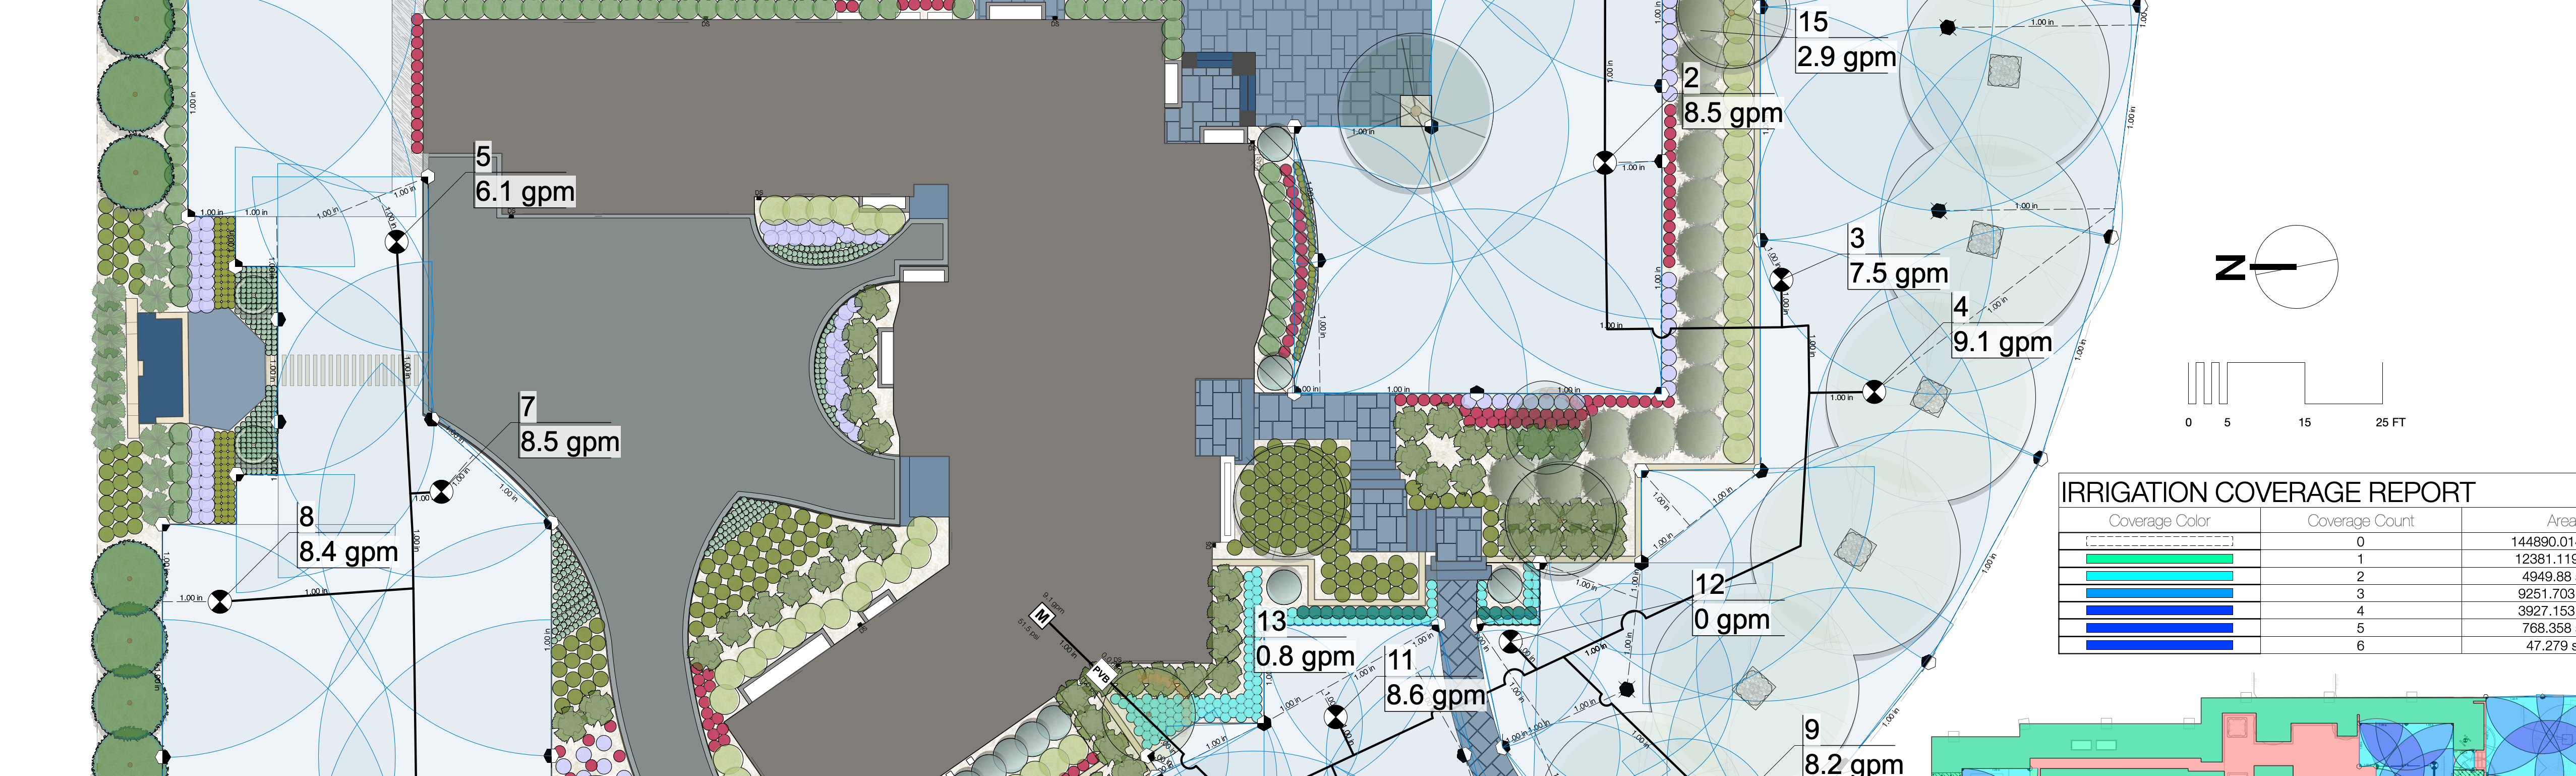
In the OIP for the site modifier you should use a simplification tolerance of 6". It is directly above the Modifier vertex count. this will fix the issue. It took 4.8 seconds (yep I timed it) 🙂 to update the DTM.
Hope this helps.
-
4
-
-
@LVyas There is not a way to assign to only the bottom of the tag. However I would suggest using the Data Tag Tool. This will allow you to design the tag any way you would like graphically and it is very fast to use once setup.
-
3
-
-
@rowebar97 yes you are correct. check your settings and ensure that your OpenGL is set to high.
-
Ensure you have smoothing applied in the Terrain Model settings. Also much of that is caused by vertices and how many or not you have. also what is the final applied texture on this? textures will often hide that. feel free to send me the file and I can look through it and help you through what you have. PM it to me if you like.
-
2
-

Drawing a grid
in Site Design
Posted
Convert your shape to a ceiling grid. Select your shape>Create Objects From Shape>Ceiling Grid, then set values as needed.