


Jesse Cogswell
-
Posts
634 -
Joined
-
Last visited
Content Type
Profiles
Forums
Events
Articles
Marionette
Store
Everything posted by Jesse Cogswell
-

vs.CreateCustomObjectN() not showing in PDF Export
Jesse Cogswell replied to Jayme McColgan's topic in Python Scripting
For menu commands, you can call another VS menu command by using DoMenuTextByName('Your Command Name',0); I assume it would be the same with Python. In this instance, I think the way I would go about doing this is to make the PDF export the main script and call the label creation script with vs.DoMenuTextByName. This should allow the label creation script to fully complete before exporting the PDF. If you put the label creation script into the Category Don't Put In Workspace, it won't populate in the Workspace Editor, so you can make sure someone doesn't try to use that script by mistake. -
Random positioning of symbol within a defined area/volume
Jesse Cogswell replied to StudioVerma's question in Troubleshooting
I had some work I felt like procrastinating on this afternoon so I wrote you a plug-in that will take care of this for you. You will select a symbol and enter the number of symbols you want to insert. You can then select either a fixed height or set a range, same for rotation. There is a checkbox to group all inserted symbols (might be handy if you're generating a lot of them). Here's a video of it working in VW2019: 2023-12-01 15-51-28.mp4 For the example I created a basic symbol that was 6"x3", 1/8" thick. The marquee selection was 20'x20' with a height between 0'-0" and 10'-0". The plug-in was written in VW2019 and should work in any version from 2019 onward. I did test it in 2024 and it worked as expected. To install the plug-in, follow the steps below: Download the attached Randomize Symbol Insertion.vsm file Get access to your Vectorworks User Folder. The easiest way to do this is to: Open your Vectorworks Preferences Go to the User Folder tab Click on the Explore (Windows) / Open in Finder (Mac) button Insert the downloaded .vsm file into the Plug-ins folder inside the User Folder. Restart Vectorworks Insert the menu command into your workspace Go to Tools - Workspaces - Edit Current Workspace Click on the Menus tab In the box on the left, find and expand the JNC category In the box on the right, find a menu to put the command in, such as Tools or Edit Click and drag the Randomize Symbol Insertion command from the box on the left to the target menu on the right Click OK Let me know if anything weird happens. I tested it with 3D, 2D, and Hybrid symbols. When you use 2D symbols, it will place them on the 3D plane, so you want the symbols left on the Layer Plane, it's best to use the Fixed Height option set to 0. One thing to keep in mind, is that the marquee boundary box and entered heights will only limit the symbol's insertion point, not the geometry of the symbol itself. So if you are using this with large symbols, consider that when setting your insertion area. Randomize Symbol Insertion.vsm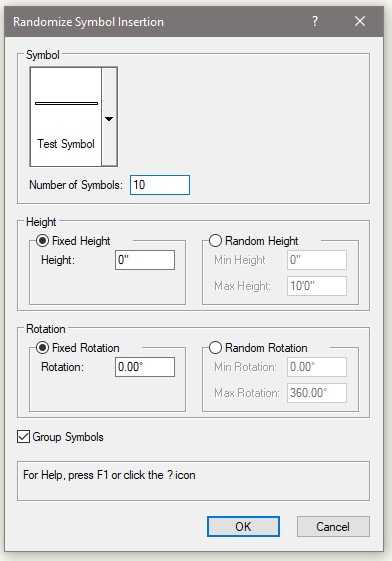
- 7 replies
-
- 12
-

-

-
How to identify screen plane objects in an old file?
Jesse Cogswell replied to Amanda McDermott's question in Troubleshooting
How timely, this topic just came up a couple of hours ago. This thread should give you some ideas about where these objects might be and how to deal with them: -
@zoomer I am 100% with you. I would love to have Vectorworks change the name of the Screen Plane when editing symbols to "2D Component" and allow its use in the OIP without having Legacy Features engaged. Or even better, an OIP option for planar options that only appear inside the symbol edit container, similar to the detail checkboxes. It seemed that my conversations with Steve would lead things in that direction, but it's been three years and nothing has changed in this regard. Have a look at my surprised face.
-
@zoomer Deprecating the Screen Plane was actually a huge bummer in my workflow. Doing lighting, I'm often near the end of the pipeline, so I get a "finished" model of the scenic or exhibit design. Unfortunately, most of the designers I've worked with don't use hybrid symbols, so I'll get a file full of 3D Symbols and occasionally (shudder) just Groups of objects. Converting the groups over to symbols is easy enough, just create the 2D geometry and Create Symbol, but editing 2D geometry into 3D Symbols can be a bit tricky. I do not like the Generate 2D from 3D Component command because you lose class information and it hard sets the lineweights, so I rarely use it. I developed a workflow of going into the 3D component edit and using Extract Face to quickly build geometry, then selecting all of it and sending it to the Screen Plane. Ta-da! Now you have a hybrid symbol. Video example below: JNC Screen Plane Demo.mp4 This process was made more difficult in 2022 when they deprecated the Screen Plane, as I would have to enable to Legacy Features, move the objects, then disable the Legacy Features anytime I wanted to use this process. After I complained on the forum when 2022 first came out, Steve Johnson from VW emailed me asking for a demo of my workflow. I recorded the video above, and we started talking about adding a plane option when inside the 3D edit component for something like "2D Symbol Component", but it never happened. So now I have a script in my workspace that will set the plane of any selected object to the Screen Plane that I can run when creating hybrid components.
-
Importing resources from another drawing shouldn't re-engage the 2D Legacy Features, since it's going to assume that you will be putting things on the Layer Plane or a 3D working plane. Even copying and pasting groups containing screen plane objects will result in all group objects being on the current working plane. I just did a quick test trying to force the features on by importing and copying and pasting as wasn't able to do it. You should be in the clear.
-
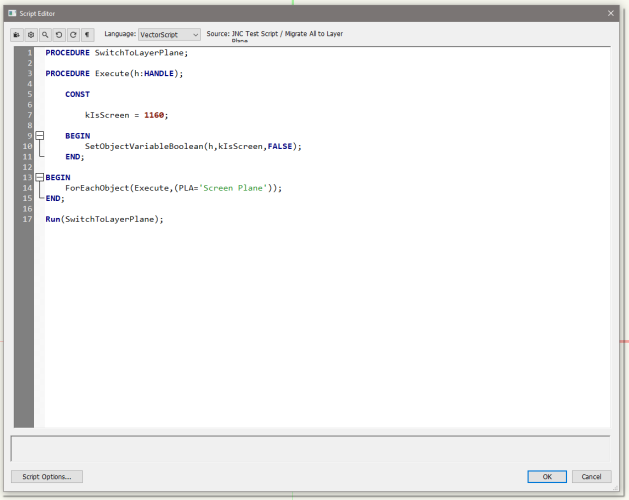
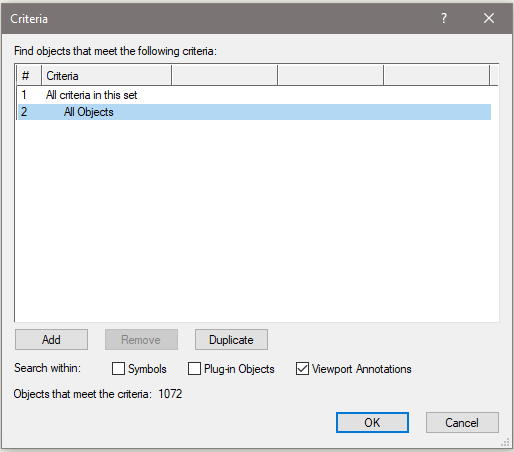
When you set your criteria to search, you can uncheck all of the Search Within checkboxes. Though they deprecated the Screen Plane, Vectorworks still uses it on hybrid objects to determine 2D vs 3D components. If you have a 2D or hybrid symbol, all of the 2D geometry will be on the screen plane by default, and this is set when the symbol is made. So, if you are building a hybrid symbol containing both 3D and planar geometry, when you create the symbol, Vectorworks will automatically assign any planar geometry on the Layer Plane (IE, not on the 3D Plane) to the Screen Plane to separate the 2D and 3D geometry for the hybrid symbol. Likewise for plug-in objects that have hybrid geometry, all of the 2D is technically on the Screen Plane. Viewport annotations (and anything placed on a Sheet Layer) are also automatically placed on the Screen Plane behind the scenes. What I'm getting at is that objects within all of those things currently on the Screen Plane must be on the Screen Plane and are not counted when assessing whether you can disable the Legacy 2D Features. One thing that you will want to make sure of is that you have all classes and layers visible and have both your Class and Layer View settings set to Show/Snap/Modify. The criteria box will count all eligible objects across the drawing, but the selection will only result in what you can currently select based on the current visibility and selection settings. This will also affect objects inside of groups, since the objects will be counted but not necessarily selected (kind of, they will be selected but you wouldn't see that until you enter the group edit container). There is a fairly simple script that you can run that will migrate all offending objects to the Layer Plane and thus allow you to disable Legacy 2D Features. Note that this script does not come with a warranty, and while it shouldn't bork anything in your drawing, I take no responsibility if it does. PROCEDURE SwitchToLayerPlane; PROCEDURE Execute(h:HANDLE); CONST kIsScreen = 1160; BEGIN SetObjectVariableBoolean(h,kIsScreen,FALSE); END; BEGIN ForEachObject(Execute,(PLA='Screen Plane')); END; Run(SwitchToLayerPlane); To run this script, go to your Resource Manager, right-click and select New Resource - Script. This will ask you to select or name a "Script Palette" (something like "Drawing Macros" will work just fine, don't select Saved Views if it shows up in the dialog box), then name the script whatever you want ("Migrate All to Layer Plane" would be a fine name). It will now open a notepad for your script. Make sure the Language is set to Vectorscript, and copy and paste the above code in. It should look like this: Click the OK button to close the notepad. This will generate a floating palette with your new script in it. Double click the script to run it. This should move anything on the screen plane over to the layer plane excluding the objects inside symbols, plug-in objects, viewport annotations, and on sheet layers. After running it, you should be able to disable the Legacy 2D Features. I have seen some weirdness in very old drawings where some objects are more or less "stuck" on the screen plane and it won't let you disable the features, but it should work for most up to date drawings.
-
Rhino.Inside for Vectorworks
Jesse Cogswell replied to elepp's question in Wishlist - Feature and Content Requests
I think we have truly lost this thread. Ultimately, this is a wishlist post asking for Rhino.inside integration in Vectorworks. There's any number of reasons users could want this beyond just NURBS modelling. Vectorworks has many instances of integrating "live links" with other programs such as Unreal Datasmith, C4D, Enscape, Vision, and Lightwright, so there's precedence for this and Rhino.inside looks to be another viable integration. If there is some computational or licensing barrier, it's up to the folks at Vectorworks to tell us. Currently, the only response from them in this thread is at the very top from @JuanP saying that they looked into it and determined that users weren't interested. This thread, aside from one user, proves otherwise. This thread should be much less questioning why someone would want this functionality and a show-and-tell, and should instead be a show of hands of people who want this functionality in Vectorworks. I've never touched Rhino and rarely need NURBS modelling, but I would love to see Vectorworks integrate more technology from other sources to give us more options while also stressing their developers and engineers less so that we can maybe get fully functional window and door tools. -
Assuming that you are using a Viewport on a Sheet Layer, you should look into the Detail Level parameter in the Viewport's Object Info Palette. When you are editing a symbol, the Object Info Palette for each object will have a field called Display at Detail Level, with checkboxes for Low, Medium, and High. What you would need to do is to find the details that are lost at that size and uncheck the Low checkbox in the OIP or build simplified geometry and make sure that only Low is selected. Then, you'd set your Viewport to Low Detail. I can understand that this may be very tedious at this point, as you seem to have a finished model, so it would mean editing a good number of symbols. But, this can be a very valuable thing to incorporate in your workflow if you find yourself working with big and complicated models. There's even an option in Document Settings called Auto display detail levels for design layers that will set the viewed detail level of design layers based on the scale settings. EDIT: I see in your signature that you are using VW Fundamentals. I'm not sure if this functionality is in Fundamentals, as Fundamentals is very stripped down compared to the other Vectorworks modules.
-
Using PythonExecute in encrypted plug-ins
Jesse Cogswell replied to Jesse Cogswell's topic in Vectorscript
For those playing along at home or searching for this solution somewhere down the line, the test code above changed to use the Rpstr_GetValueStr and Rpstr_SetValueStr implementation that will survive encryption is below: PROCEDURE TestPythonEncrypt; VAR testString:DYNARRAY[] OF CHAR; BSB:BOOLEAN; BEGIN testString:='Vectorscript'; Rpstr_SetValueStr('testString',testString); AlrtDialog(Concat('Test: ',Rpstr_GetValueStr('testString',''))); PythonBeginContext; PythonExecute('import vs'); PythonExecute('vs.AlrtDialog("Python is executing")'); PythonExecute('vs.AlrtDialog(vs.Rpstr_GetValueStr("testString",""))'); PythonExecute('vs.Rpstr_SetValueStr("testString","Python")'); PythonExecute('vs.AlrtDialog(vs.Rpstr_GetValueStr("testString",""))'); PythonEndContext; AlrtDialog(Concat('Test: ',Rpstr_GetValueStr('testString',''))); BSB:=Rpstr_RemoveValue('testString'); END; Run(TestPythonEncrypt); -
Using PythonExecute in encrypted plug-ins
Jesse Cogswell replied to Jesse Cogswell's topic in Vectorscript
@JBenghiat I just tested this and you appear to have saved the day. Totally works. Thank you also to @Pat Stanford for the enlightening reading material. Answered some questions while raising several others. -
I'm afraid that I already know the answer to this one, but I would most definitely love to be proven wrong. I have a Vectorscript plug-in that uses PythonExecute and vs.GetVSVar and vs.SetVSVar to get a file's Last Modified date using the pathlib Python library. This all works beautifully until I encrypt the plug-in, in which case it breaks and crashes Vectorworks. The issue seems to stem from vs.GetVSVar not working correctly and returning a "NoneType" object rather than a DYNARRAY[] OF CHAR of the supplied variable. I did some tests and it seems that vs.GetVSVar and vs.SetVSVar do not work within encrypted plug-ins. I'm guessing that the variable names are encrypted but not in the same way that strings are, so when you pass in the variable name in a string, it no longer matches with the actual variable name so it returns NIL. Here's my test code: PROCEDURE TestPythonEncrypt; VAR testString:DYNARRAY[] OF CHAR; BEGIN testString:='Vectorscript'; AlrtDialog(Concat('Test: ',testString)); PythonBeginContext; PythonExecute('import vs'); PythonExecute('vs.AlrtDialog("Python is executing")'); PythonExecute('vs.AlrtDialog(vs.GetVSVar("testString"))'); PythonExecute('vs.SetVSVar("testString","Python")'); PythonExecute('vs.AlrtDialog(vs.GetVSVar("testString"))'); PythonEndContext; AlrtDialog(Concat('Test: ',testString)); END; Run(TestPythonEncrypt); It should return: Test: Vectorscript Python is executing Vectorscript Python Test: Python After encryption, it instead returns: Test: Vectorscript Python is executing Test: Vectorscript This tells me that Python is working, but not the vs.GetVSVar or vs.SetVSVar functions. The whole point of the plug-in is lost without being able to pull a file's Last Modified date, and I'd rather not send out an unencrypted plug-in. Any ideas on a solution?
-
IES file interpretation - false light distribution
Jesse Cogswell replied to bjoerka's topic in Rendering
I posted about this back in 2022: Even though luminous area is included in the IES spec, Vectorworks ignores it and treats the custom light as more or less a point source. I'm guessing that this is a limitation of the Vectorworks rendering engine. For linear fixtures, I've cheated by having multiple custom lights per fixture, but it really doesn't work well for things like LED tape. It's unfortunate that using custom lights with distribution files is the only way to get photo-accurate beam/field falloff, but doesn't work correctly for linear fixtures.- 1 reply
-
- 5
-
-
In my mind, there are two: There is some direct integration with fixture modes in Vectorworks, letting you bypass some of the current awkwardness with GDTF fixtures. The Fixture Mode parameter in the Lighting Device OIP will automatically be exported into the matching Vision profile. But this only works if there is a Vision profile (otherwise you have to wait for one) and that the Vision profile is correct (not always guaranteed). Vision is much cheaper than L8. But that's about it. L8 has far more features (better laser control, water features and pyro, animated models, better handling for reflection), and the final output is much more polished. I went in on a full Vision license in 2017 right after Vectorworks bought them because of the relative ease of getting a model from Vectorworks to Vision and with the hope that having Vectorworks behind them, we'd see some meaningful upgrades. Unfortunately, the software has mostly stayed the same with only minor changes from year to year (and some features removed because they never worked. The "Attachments" feature that would handle things like color scrollers and remote dimmers was entirely broken between 2017 and 2019, before being completely removed in 2020. Bad luck if you ever need to do scrollers or play with lens options in your VL500s, there's no way to do it). And now with the ubiquity of the MVR file format and GDTF fixture profiles, the one major advantage that Vision had is largely moot. I bought Vision primarily to do some moving light preprogramming for mostly theatre, dance, and opera and with both ETC and MA consoles having a built in solution where you have XYZ control of fixture focus, I barely ever use Vision anymore. If I were in the market for a previs software for concert and event work, I would most definitely look into L8, Capture, or Depence2 before considering Vision. Hell, I'd probably even look at WYSIWYG if you need something more budget conscious. Or you could look into Carbon for Unreal, which looks pretty promising and is very affordable.
- 1 reply
-
- 2
-
-
I've seen this kind of thing when the Clip Cube is active, especially when you have textures with image transparency shaders. Is it happening in 3D views or in Top/Plan as well?
-
The quick and dirty way to do it would be to go to Tools - Custom Selection, select Execute Immediately then select All Objects as the criteria. There will be a counter at the bottom of the dialog box that shows the number of objects. You can check the Search Within Symbols, Plug-in Objects, and/or Viewport Annotations depending on what kind of count you are looking for. If you want something a little faster, you can create a script (Vectorscript format) with something like: AlrtDialog(Concat(Count(ALL),' objects in drawing')); for all objects on layers, but not going inside of symbols (each symbol would count as one object), plug-in objects, or viewport annotations. AlrtDialog(Concat(Count(INSYMBOL & (ALL)),' objects in drawing and symbols')); would count all objects on layers and inside symbols (each component of the symbol would be counted separately and in addition to the symbol, so a drawing consisting of 2 symbols, each with 2 rectangles would come to a count of 6 objects). For a full count of every single object, inside symbols, plug-ins, and annotations, the script would look like this: AlrtDialog(Concat(INSYMBOL & INOBJECT & INVIEWPORT & (ALL)),' total objects in drawing')); EDIT: I realize now that you weren't specific about what kind of objects you are trying to count. I usually use the Custom Selection method outlined above, just setting the criteria to match exactly what I'm trying to count and then reading the value at the bottom of the dialog box. Another method would be to make a Worksheet with a cell with the =COUNT() function and inserting the criteria within the parentheses.
-
Removing a password to send a file off to print
Jesse Cogswell replied to Cesc79's question in Troubleshooting
Unfortunately, that password lock is a byproduct of the student version watermark and, as far as I have been able to find, not possible to bypass without getting the watermark removed. It's one of the reasons I shudder when I get scenic or exhibit drawings with the student watermark, as it's much harder to later incorporate my drawings into the larger PDF packets that I need to generate. One way to kind of get around it is to use the Print function and to print to PDF using the Microsoft or Adobe rather than doing the traditional Export PDF or Publish functions. You'll lose some functionality (no way to do PDF layers, automatic hyperlinks will be broken, may lose ability to import PDF to Illustrator and retain vectors, etc), and you'll have to do this separately for each sheet and merge them in a PDF later, but at least it won't be password protected. -
Lighting Devices take over class properties
Jesse Cogswell replied to Krokodil's topic in Entertainment
This is most likely related to a setting found under File - Document Settings - Spotlight Preferences. In the Classes and Color tab, there are a couple of things to check out. There is a section to determine what class the fixture should be in, with options for: Currently active class Symbol Definition class Automatic assignment using a class set in this dialog or tracked by a Lighting Device Field My guess is that you have something set not to your liking here. There are also options to change the visual attributes of the Lighting Device based on the color field. This also might be causing you some grief. This dialog may be slightly different depending on which version of Vectorworks you are using, but will generally have the same options if you're on VW2019 or newer.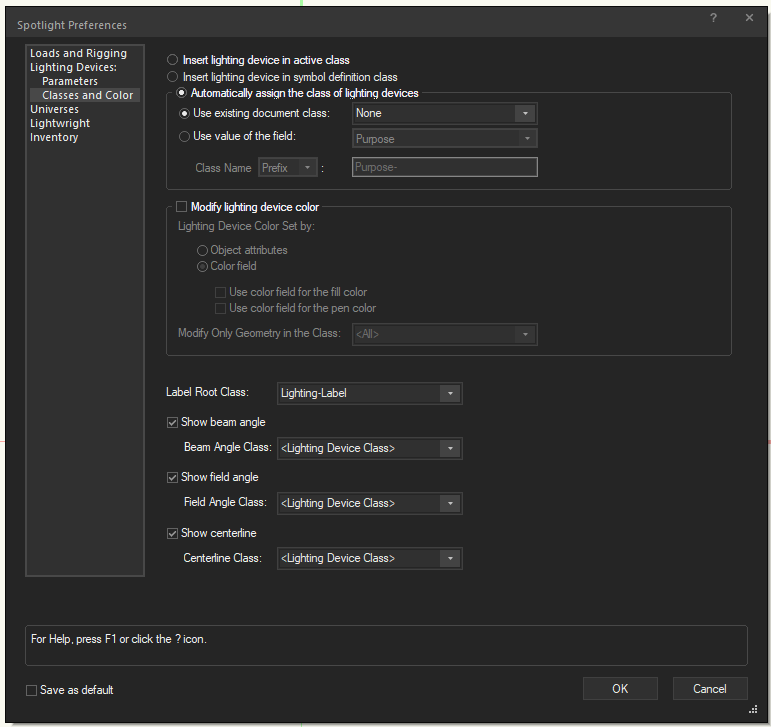
-
Hear, hear! All of the old Vectorlab documentation is invaluable, and I've been using her Rosetta Stone article to help understand Python implementation in Vectorworks. I do wish it was easier to find her page on the wiki, though. I finally ended up making a bookmark so I could quickly get back to it without having to do a deep search of the wiki or track down one of her forum posts where she linked to one of the articles.
-
Selector 7013 did the trick, and I certainly do like it. Selector 6755 sounds interesting. I usually drop in a Waldo locus and do GetParent to figure out where I am, but I think the inconsistency you've stumbled on is fascinating. Thank you for finding the answer. Just as a curiosity, what documentation did you find the answer in? The SDK?
-
I discovered a small bug with my code pasted above, once you selected a class to transform into, you weren't able to set it back to "No transformation". That is corrected below: PROCEDURE ClassTransformer; {* Converts objects in one class to a different class with options to delete original class Developed by: Jesse Cogswell VW Version: 24 (VW2019) Date: 11/5/2023 Revisions: *} VAR dialog,layoutDialog:LONGINT; classArray:DYNARRAY[] OF STRING; PROCEDURE BuildClassArray; {Builds array of class names and sorts alphabetically} VAR i:INTEGER; BEGIN ALLOCATE classArray[1..ClassNum]; FOR i:=1 TO ClassNum DO classArray[i]:=ClassList(i); SortArray(classArray,ClassNum,0); END; PROCEDURE TransformClass(origClass,targetClass:STRING; deleteClass:BOOLEAN); {Converts objects in origClass to given targetClass, deletes origClass if deleteClass is TRUE} CONST kSymbolDef = 16; kNone = 'None'; kDim = 'Dimension'; VAR resList,numItems:LONGINT; i,insertMode,breakMode:INTEGER; currentClass:STRING; PROCEDURE TransformObjectClass(h:HANDLE); {Converts class of given object to targetClass} BEGIN SetClass(h,targetClass); END; BEGIN ForEachObject(TransformObjectClass,(INSYMBOL & INOBJECT & INVIEWPORT & (C = origClass))); resList:=BuildResourceList(kSymbolDef,0,'',numItems); FOR i:=1 TO numItems DO BEGIN GetSymbolOptionsN(GetNameFromResourceList(resList,i),insertMode,breakMode,currentClass); IF(currentClass = origClass) THEN SetSymbolOptionsN(GetNameFromResourceList(resList,i),insertMode,breakMode,targetClass); END; IF((deleteClass) & (origClass <> kNone) & (origClass <> kDim)) THEN DelClass(origClass); END; FUNCTION DrawDialog(DName:STRING) : LONGINT; {Creates dialog box} CONST kLBWidth = 100; kLBHeight = 50; kListBoxWidth = 50; VAR dia:LONGINT; BEGIN dia:=CreateLayout(DName,FALSE,'OK','Cancel'); CreateLB(dia,11,kLBWidth,kLBHeight); CreateListBoxN(dia,21,kListBoxWidth,kLBHeight,FALSE); CreateGroupBox(dia,101,'Transform From',TRUE); CreateGroupBox(dia,102,'Transform To',TRUE); SetFirstGroupItem(dia,101,11); SetFirstGroupItem(dia,102,21); SetFirstLayoutItem(dia,101); SetRightItem(dia,101,102,0,0); DrawDialog:=dia; END; PROCEDURE DialogHandler(VAR item,data:LONGINT); {Handles dialog interaction} CONST kColWidth = 238; kColor = 255 * 0.6; VAR i,colNum,kImageCheck,kImageBlank,BSI,choiceCounter,selRow,textOpacity:INTEGER; origClass,targetClass,BSS:STRING; deleteClass,BSB:BOOLEAN; BEGIN CASE item OF SetupDialogC: BEGIN kImageCheck:=AddListBrowserImage(dialog,11,'Vectorworks/Standard Images/Checkmark.png'); kImageBlank:=AddListBrowserImage(dialog,11,'Vectorworks/Standard Images/Blank.png'); colNum:=InsertLBColumn(dialog,11,0,'Select',50); BSB:=SetLBControlType(dialog,11,colNum,5); BSB:=SetLBItemDisplayType(dialog,11,colNum,1); colNum:=InsertLBColumn(dialog,11,1,'Class',kColWidth); BSB:=SetLBControlType(dialog,11,colNum,1); BSB:=SetLBItemDisplayType(dialog,11,colNum,0); colNum:=InsertLBColumn(dialog,11,2,'Transform Class',kColWidth); BSB:=SetLBControlType(dialog,11,colNum,1); BSB:=SetLBItemDisplayType(dialog,11,colNum,0); colNum:=InsertLBColumn(dialog,11,3,'Delete',50); BSB:=SetLBControlType(dialog,11,colNum,3); BSB:=SetLBItemDisplayType(dialog,11,colNum,1); colNum:=InsertLBColumn(dialog,11,4,'Eligible',0); BSB:=SetLBControlType(dialog,11,colNum,5); BSB:=SetLBItemDisplayType(dialog,11,colNum,0); colNum:=InsertLBColumnDataItem(dialog,11,0,'Checked',kImageCheck,-1,0); colNum:=InsertLBColumnDataItem(dialog,11,0,'Unchecked',kImageBlank,-1,0); colNum:=InsertLBColumnDataItem(dialog,11,3,'Checked',kImageCheck,-1,0); colNum:=InsertLBColumnDataItem(dialog,11,3,'Unchecked',kImageBlank,-1,0); AddChoice(dialog,21,'No Transformation',0); BuildClassArray; FOR i:=1 TO ClassNum DO BEGIN colNum:=InsertLBColumnDataItem(dialog,11,1,classArray[i],0,0,0); BSI:=InsertLBItem(dialog,11,colNum,classArray[i]); BSB:=SetLBItemUsingColumnDataItem(dialog,11,colNum,1,colNum); AddChoice(dialog,21,classArray[i],i); END; EnableLBColumnLines(dialog,11,TRUE); BSB:=EnableLBSingleLineSelection(dialog,11,TRUE); END; 1: {OK} BEGIN FOR i:=0 TO GetNumLBItems(dialog,11) DO BEGIN BSB:=GetLBItemInfo(dialog,11,i,0,BSS,BSI); IF(BSI = kImageCheck) THEN BEGIN BSB:=GetLBItemInfo(dialog,11,i,1,origClass,BSI); BSB:=GetLBItemInfo(dialog,11,i,2,targetClass,BSI); BSB:=GetLBItemInfo(dialog,11,i,3,BSS,BSI); deleteClass:=(BSI = kImageCheck); TransformClass(origClass,targetClass,deleteClass); END; END; ReDrawAll; END; 2: {Cancel} BEGIN END; 11: {List Browser} BEGIN FOR i:=0 TO GetNumLBItems(dialog,11) DO IF(IsLBItemSelected(dialog,11,i)) THEN selRow:=i; DeleteAllItems(dialog,21); AddChoice(dialog,21,'No Transformation',0); choiceCounter:=1; FOR i:=0 TO GetNumLBItems(dialog,11) DO BEGIN BSB:=GetLBItemInfo(dialog,11,i,0,BSS,BSI); IF(BSI <> kImageCheck) THEN BEGIN BSB:=GetLBItemInfo(dialog,11,i,1,BSS,BSI); AddChoice(dialog,21,BSS,choiceCounter); choiceCounter:=choiceCounter + 1; END; END; BSB:=GetLBItemInfo(dialog,11,selRow,4,BSS,BSI); IF(BSI = 0) THEN BEGIN DeleteAllItems(dialog,21); EnableItem(dialog,21,FALSE); END ELSE EnableItem(dialog,21,TRUE); BSB:=GetLBItemInfo(dialog,11,selRow,2,BSS,BSI); IF(BSS = '') THEN SelectChoice(dialog,21,0,TRUE) ELSE BEGIN GetChoiceIndex(dialog,21,BSS,BSI); SelectChoice(dialog,21,BSI,TRUE); END; END; 21: {List Box} BEGIN FOR i:=0 TO GetNumLBItems(dialog,11) DO IF(ISLBItemSelected(dialog,11,i)) THEN selRow:=i; GetSelectedChoiceInfo(dialog,21,0,BSI,targetClass); IF(BSI <> 0) THEN BEGIN BSB:=GetLBItemInfo(dialog,11,selRow,1,origClass,BSI); IF(origClass <> targetClass) THEN BEGIN BSB:=SetLBItemInfo(dialog,11,selRow,0,'Checked',kImageCheck); BSB:=SetLBItemInfo(dialog,11,selRow,2,targetClass,0); BSB:=FindLBColumnItem(dialog,11,1,targetClass,BSI); END ELSE SelectChoice(dialog,21,0,TRUE); END ELSE BEGIN BSB:=SetLBItemInfo(dialog,11,selRow,0,'Unchecked',1); BSB:=SetLBItemInfo(dialog,11,selRow,2,'',0); END; END; END; {Cleanup List Browser} FOR i:=0 TO GetNumLBItems(dialog,11) DO BSB:=SetLBItemInfo(dialog,11,i,4,'',1); FOR i:=0 TO GetNumLBItems(dialog,11) DO BEGIN BSB:=GetLBItemInfo(dialog,11,i,2,BSS,BSI); IF(BSS <> '') THEN BEGIN BSB:=FindLBColumnItem(dialog,11,1,BSS,BSI); BSB:=SetLBItemInfo(dialog,11,BSI,4,'',0); END; END; FOR i:=0 TO GetNumLBItems(dialog,11) DO BEGIN BSB:=GetLBItemInfo(dialog,11,i,4,BSS,BSI); IF(BSI <> 0) THEN textOpacity:=0 ELSE textOpacity:=kColor; BSB:=SetLBItemTextColor(dialog,11,i,1,textOpacity,textOpacity,textOpacity); END; END; BEGIN dialog:=DrawDialog('Class Transformer'); layoutDialog:=RunLayoutDialog(dialog,DialogHandler); END; Run(ClassTransformer);
-
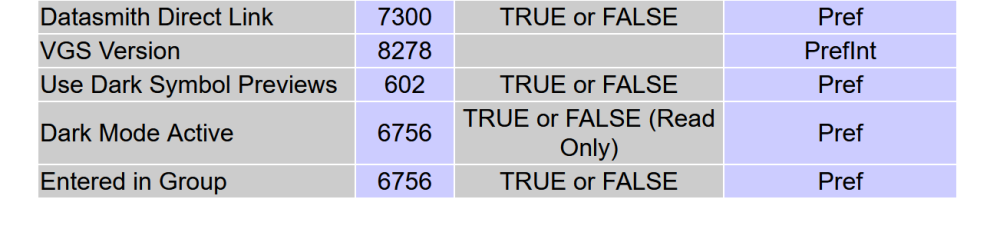
I'm trying to get the preference selector to detect whether or not the user has Dark Mode enabled. In the VW2024 offline function reference, there is selector 6756, but it also is the same selector for Entered in Group and is returning false to me regardless of what my dark mode settings are, so I'm guessing that it's not correct.
-
There's not a great way to go about being able to handle multiple classes at a time without writing a dialog box. So I did. It basically builds an array of classes (sorted alphabetically) and populates a List Browser on the left and a List Box on the right. When you select a class on the left, it will jump to the List Box to select the new class. When a class is selected in the List Box, it adds it to the selected row in the List Browser and makes the choice ineligible to be selected in the List Browser. Likewise, it will remove the original class from the List Box, so you can't convert in circles. There's also an option to delete the original class by clicking on the Delete column of the List Browser (with code to prevent the None and Dimension class from being deleted). Code is pasted below. List Browsers are fairly complicated and are tedious to code, but there's a terrific primer here: https://developer.vectorworks.net/index.php/User:CBM-c-/VS-List_Browsers_part_1 PROCEDURE ClassTransformer; {* Converts objects in one class to a different class with options to delete original class Developed by: Jesse Cogswell VW Version: 24 (VW2019) Date: 11/5/2023 Revisions: *} VAR dialog,layoutDialog:LONGINT; classArray:DYNARRAY[] OF STRING; PROCEDURE BuildClassArray; {Builds array of class names and sorts alphabetically} VAR i:INTEGER; BEGIN ALLOCATE classArray[1..ClassNum]; FOR i:=1 TO ClassNum DO classArray[i]:=ClassList(i); SortArray(classArray,ClassNum,0); END; PROCEDURE TransformClass(origClass,targetClass:STRING; deleteClass:BOOLEAN); {Converts objects in origClass to given targetClass, deletes origClass if deleteClass is TRUE} CONST kSymbolDef = 16; kNone = 'None'; kDim = 'Dimension'; VAR resList,numItems:LONGINT; i,insertMode,breakMode:INTEGER; currentClass:STRING; PROCEDURE TransformObjectClass(h:HANDLE); {Converts class of given object to targetClass} BEGIN SetClass(h,targetClass); END; BEGIN ForEachObject(TransformObjectClass,(INSYMBOL & INOBJECT & INVIEWPORT & (C = origClass))); resList:=BuildResourceList(kSymbolDef,0,'',numItems); FOR i:=1 TO numItems DO BEGIN GetSymbolOptionsN(GetNameFromResourceList(resList,i),insertMode,breakMode,currentClass); IF(currentClass = origClass) THEN SetSymbolOptionsN(GetNameFromResourceList(resList,i),insertMode,breakMode,targetClass); END; IF((deleteClass) & (origClass <> kNone) & (origClass <> kDim)) THEN DelClass(origClass); END; FUNCTION DrawDialog(DName:STRING) : LONGINT; {Creates dialog box} CONST kLBWidth = 100; kLBHeight = 50; kListBoxWidth = 50; VAR dia:LONGINT; BEGIN dia:=CreateLayout(DName,FALSE,'OK','Cancel'); CreateLB(dia,11,kLBWidth,kLBHeight); CreateListBoxN(dia,21,kListBoxWidth,kLBHeight,FALSE); CreateGroupBox(dia,101,'Transform From',TRUE); CreateGroupBox(dia,102,'Transform To',TRUE); SetFirstGroupItem(dia,101,11); SetFirstGroupItem(dia,102,21); SetFirstLayoutItem(dia,101); SetRightItem(dia,101,102,0,0); DrawDialog:=dia; END; PROCEDURE DialogHandler(VAR item,data:LONGINT); {Handles dialog interaction} CONST kColWidth = 235; kColor = 255 * 0.6; VAR i,colNum,kImageCheck,kImageBlank,BSI,choiceCounter,selRow,textOpacity:INTEGER; origClass,targetClass,BSS:STRING; deleteClass,BSB:BOOLEAN; BEGIN CASE item OF SetupDialogC: BEGIN kImageCheck:=AddListBrowserImage(dialog,11,'Vectorworks/Standard Images/Checkmark.png'); kImageBlank:=AddListBrowserImage(dialog,11,'Vectorworks/Standard Images/Blank.png'); colNum:=InsertLBColumn(dialog,11,0,'Select',50); BSB:=SetLBControlType(dialog,11,colNum,5); BSB:=SetLBItemDisplayType(dialog,11,colNum,1); colNum:=InsertLBColumn(dialog,11,1,'Class',kColWidth); BSB:=SetLBControlType(dialog,11,colNum,1); BSB:=SetLBItemDisplayType(dialog,11,colNum,0); colNum:=InsertLBColumn(dialog,11,2,'Transform Class',kColWidth); BSB:=SetLBControlType(dialog,11,colNum,1); BSB:=SetLBItemDisplayType(dialog,11,colNum,0); colNum:=InsertLBColumn(dialog,11,3,'Delete',50); BSB:=SetLBControlType(dialog,11,colNum,3); BSB:=SetLBItemDisplayType(dialog,11,colNum,1); colNum:=InsertLBColumn(dialog,11,4,'Eligible',0); BSB:=SetLBControlType(dialog,11,colNum,5); BSB:=SetLBItemDisplayType(dialog,11,colNum,0); colNum:=InsertLBColumnDataItem(dialog,11,0,'Checked',kImageCheck,-1,0); colNum:=InsertLBColumnDataItem(dialog,11,0,'Unchecked',kImageBlank,-1,0); colNum:=InsertLBColumnDataItem(dialog,11,3,'Checked',kImageCheck,-1,0); colNum:=InsertLBColumnDataItem(dialog,11,3,'Unchecked',kImageBlank,-1,0); AddChoice(dialog,21,'No Transformation',0); BuildClassArray; FOR i:=1 TO ClassNum DO BEGIN colNum:=InsertLBColumnDataItem(dialog,11,1,classArray[i],0,0,0); BSI:=InsertLBItem(dialog,11,colNum,classArray[i]); BSB:=SetLBItemUsingColumnDataItem(dialog,11,colNum,1,colNum); AddChoice(dialog,21,classArray[i],i); END; EnableLBColumnLines(dialog,11,TRUE); BSB:=EnableLBSingleLineSelection(dialog,11,TRUE); END; 1: {OK} BEGIN FOR i:=0 TO GetNumLBItems(dialog,11) DO BEGIN BSB:=GetLBItemInfo(dialog,11,i,0,BSS,BSI); IF(BSI = kImageCheck) THEN BEGIN BSB:=GetLBItemInfo(dialog,11,i,1,origClass,BSI); BSB:=GetLBItemInfo(dialog,11,i,2,targetClass,BSI); BSB:=GetLBItemInfo(dialog,11,i,3,BSS,BSI); deleteClass:=(BSI = kImageCheck); TransformClass(origClass,targetClass,deleteClass); END; END; ReDrawAll; END; 2: {Cancel} BEGIN END; 11: {List Browser} BEGIN FOR i:=0 TO GetNumLBItems(dialog,11) DO IF(IsLBItemSelected(dialog,11,i)) THEN selRow:=i; DeleteAllItems(dialog,21); AddChoice(dialog,21,'No Transformation',0); choiceCounter:=1; FOR i:=0 TO GetNumLBItems(dialog,11) DO BEGIN BSB:=GetLBItemInfo(dialog,11,i,0,BSS,BSI); IF(BSI <> kImageCheck) THEN BEGIN BSB:=GetLBItemInfo(dialog,11,i,1,BSS,BSI); AddChoice(dialog,21,BSS,choiceCounter); choiceCounter:=choiceCounter + 1; END; END; BSB:=GetLBItemInfo(dialog,11,selRow,4,BSS,BSI); IF(BSI = 0) THEN BEGIN DeleteAllItems(dialog,21); EnableItem(dialog,21,FALSE); END ELSE EnableItem(dialog,21,TRUE); BSB:=GetLBItemInfo(dialog,11,selRow,2,BSS,BSI); IF(BSS = '') THEN SelectChoice(dialog,21,0,TRUE) ELSE BEGIN GetChoiceIndex(dialog,21,BSS,BSI); SelectChoice(dialog,21,BSI,TRUE); END; END; 21: {List Box} BEGIN FOR i:=0 TO GetNumLBItems(dialog,11) DO IF(ISLBItemSelected(dialog,11,i)) THEN selRow:=i; GetSelectedChoiceInfo(dialog,21,0,BSI,targetClass); IF(BSI <> 0) THEN BEGIN BSB:=GetLBItemInfo(dialog,11,selRow,1,origClass,BSI); IF(origClass <> targetClass) THEN BEGIN BSB:=SetLBItemInfo(dialog,11,selRow,0,'Checked',kImageCheck); BSB:=SetLBItemInfo(dialog,11,selRow,2,targetClass,0); BSB:=FindLBColumnItem(dialog,11,1,targetClass,BSI); END ELSE SelectChoice(dialog,21,0,TRUE); END; END; END; {Cleanup List Browser} FOR i:=0 TO GetNumLBItems(dialog,11) DO BSB:=SetLBItemInfo(dialog,11,i,4,'',1); FOR i:=0 TO GetNumLBItems(dialog,11) DO BEGIN BSB:=GetLBItemInfo(dialog,11,i,2,BSS,BSI); IF(BSS <> '') THEN BEGIN BSB:=FindLBColumnItem(dialog,11,1,BSS,BSI); BSB:=SetLBItemInfo(dialog,11,BSI,4,'',0); END; END; FOR i:=0 TO GetNumLBItems(dialog,11) DO BEGIN BSB:=GetLBItemInfo(dialog,11,i,4,BSS,BSI); IF(BSI <> 0) THEN textOpacity:=0 ELSE textOpacity:=kColor; BSB:=SetLBItemTextColor(dialog,11,i,1,textOpacity,textOpacity,textOpacity); END; END; BEGIN dialog:=DrawDialog('Class Transformer'); layoutDialog:=RunLayoutDialog(dialog,DialogHandler); END; Run(ClassTransformer); There's some funky things in there to handle the error checking between the two boxes. If you would like, I can give you a simpler example with all of that code removed if you're okay with throwing caution to the wind. Let me know if you have any questions.

-
I have been using a variation of this 42.5" 4K LG display since early 2020 (last big purchase before COVID hit). A friend of mine had been trying to get me to buy one for years, but a display that size seemed to me to be far too large. I finally caved and bought one, and it was seriously life changing. I can look at a D-Size plate in nearly 1:1 size on the screen, and with DPI scaling set to 100%, I can get nearly the full OIP for Lighting Device objects without having to scroll. It's really helped with being able to see the bigger picture while also reducing eye strain. So much room for activities: Even better, if you treat the monitor as quadrants, you get 4 1080, 21" displays out of it. It even has a picture in picture mode so that you can have multiple video sources on screen at once. It tops out at 60hz, so definitely not the best for gaming, and the color isn't reference monitor accurate, but it does work great for drafting. The only snag is that VW doesn't quite handle jumping back and forth between the monitor and my laptop display (which is also 4K, but run at 200% scaling), so I have to resize all of my palettes everytime I jump back and forth. Minor complaint but a complaint none the less. It's also a bit too large and bulky for most standard VESA arms, which can be a bummer for some folks.
-
Also, it took a little fiddling, but you can totally have the VW2023 tool icons in VW2024. The process is more than a little wonky and has to do with modifying the Vectorworks Resource File (very much not recommended unless you really know what you are doing), but it's technically doable. Can't do anything about the Toolset icons since they were VWR resources in VW2023. If you are interested in doing this, DM me and I can help you out. It's probably for the very best that I not post the steps on the public forum in case someone borks their Vectorworks trying to follow along.
- 99 replies
-
- 3
-
-
-
- vectorworks 2024
- new ui
- (and 1 more)


