Jesse Cogswell
-
Posts
634 -
Joined
-
Last visited
Content Type
Profiles
Forums
Events
Articles
Marionette
Store
Everything posted by Jesse Cogswell
-
 I wrote a tool for this last July that can be used to track down objects using a class. When you run it, you can select a class and it will build a list of every object using that class. It will find objects embedded in groups or symbols, symbols with the class selected in the Symbol Options, whether the class is part of a wall style or material, etc. You can then send the list to a worksheet (since VW won't let you do anything until the dialog box is closed), or select the offending object and VW will do it's best to take you to it.
 -
Sure thing. After deleting the references and having the assets imported, the final file size is 419,238 KB. But now there's a ton of classes and layers that are all over the place, and my Resource Manager has exploded.
-
So I was curious about this and did a bit of an experiment this morning. I have a file for one of the museums that I regularly do work for that served as a "master gallery plan" that I made back in 2019. The file contains the full floor plan of the museum, built in 3D using the Vectorworks walls and doors, and six referenced files, one for each exhibit at the time. These referenced files are from a range of designers, dating between 2009 and 2019, all with 3D elements modeled with a wide range of different approaches that ultimately affect file sizes (high-res textures, mesh objects, solids with various levels of "proper" construction, use of groups instead of symbols, etc). I updated all of the references up to VW2022 from their original VW2019, and saved a version of the file with the references cached and one not cached and ran a variety of tests including changing views, changing layer visibility, and navigating in flyover view with Shaded rendering while keeping an eye on the memory and CPU usage in Task Manager. Here are the results: Cached: File Size: 358,469 KB Time to open: 0:15 Time to switch from Plan to Isometric first time: 1:06 Time to render Shaded from Wire-frame first time: 0:15 Peak memory use: 13,264 MB Average CPU use when using flyover in Shaded: 17-20% Non-Cached: File Size: 168,176 KB Time to open: 0:36 Time to switch from Plan to Isometric first time: 1:09 Time to render Shaded from Wire-frame first time: 0:15 Peak memory use: 13,204 MB Average CPU use when using flyover in Shaded: 17-20% I tested each drawing 3 times, fully closing Vectorworks between each test. What does this tell us? There's probably not much of a difference from a performance standpoint between caching and not caching your references. The two biggest differences are between the master file size (which can be major when you start to factor in backups), and time to open (which can be major if VW continually crashes, though I've had relatively high luck with 2022 and 2023). Anecdotally, back in 2017 I was working on a light plot with fairly complex 3D scenery that I initially imported directly into my lighting file. I experienced crashes very regularly, and after getting frustrated having to reload for the umpteenth time, I finally just referenced in the set as a referenced viewport and removed the assets from the lighting drawing. Not only did the drawing run a little faster, it started crashing only occasionally rather than often. After that I made it my standard practice to reference scenery and exhibit drawings rather than importing directly with the added benefit that I no longer had to deal with another designer's class structure and assets cluttering up my drawing.
-
When you reference files, you have the option of saving referenced data in the master file. This has the benefit of maintaining the referenced viewport even if the reference link gets broken, but also means that all of the referenced resources are still being saved in the master file. I suspect that is what is causing your issue. If you go to the References tab of the Organization Window, you'll see a column named Save Cache. In your instance, you want that to read "no" for each of your references. If you see one marked "Yes", click on the reference, click the Edit button and deselect Save referenced cache to disk.
-
Are you at liberty to post the drawing to the forums?
-
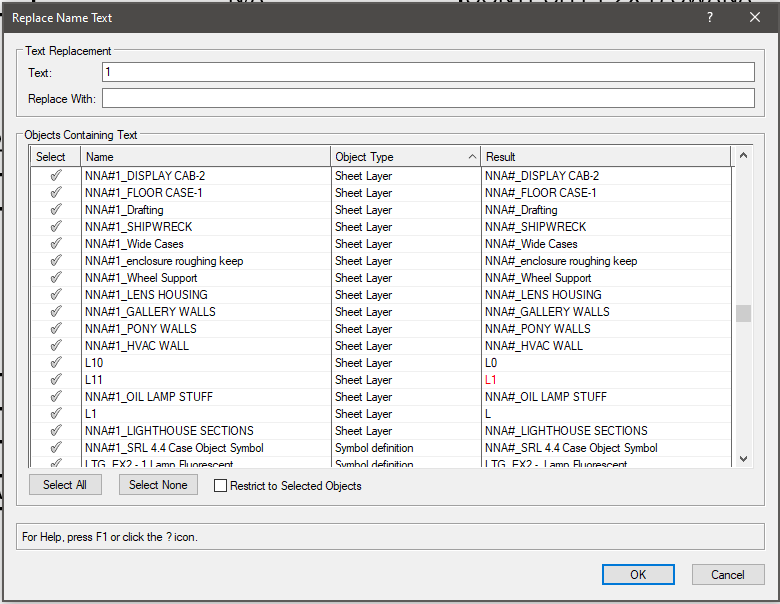
Where I most commonly see single digit named objects (outside of Focus Point objects that is), is with Sheet Layers. Vectorworks uses the Sheet Number field as the actual name of the sheet layer, so if you have a sheet "1", then that is likely going to be your named object 1. As a way around this, I often add a letter identifier to my Sheet Numbers (A for architectural or audio, E for electrical, L for lighting, S for scenic or structural). Otherwise, you can use this tool that I wrote to batch replace text within a Vectorworks drawing to track down at least what the object type is. As you type in text in the top box, the list browser will automatically populate with named objects containing that text, sorted by object type. Individual numbers will likely turn up a large number of matches, but it would be a quick and dirty way of tracking down the culprits (and it might prove to be handy to your for its original purpose as well). To install, follow the directions below: Open up your Vectorworks User Folder in Mac Finder / Windows Explorer. One quick and dirty way to get to it is to navigate to your Vectorworks Preferences, go to the User Folders tab, and click on the Explore / Open in Finder button. Open up the Plug-ins folder. Download the attached .vsm file and put it in that Plug-ins folder. Restart Vectorworks. Go to Tools - Workspaces - Edit Current Workspace. Click on the Menus tab. In the box on the left, navigate to and expand the JNC category. In the box on the right, find a menu to deposit the command, like Tools. Click and drag the Replace Name Text command from the box on the left to the desired menu on the right. Click the OK button. The command will now be found inside the chosen menu. The command will work with any version of Vectorworks from 2019 forward and can be used to quickly rename or remove text from classes, layers, symbols, just about anything aside from Resource Manager Folders. I use it fairly often to remove the annoying "Light Instr" prefixes from lighting fixtures from the VW library. It will also flag changes that might cause naming conflicts after operation (look at the Sheet Layer named "L11" above). Replace Name Text.vsm
-
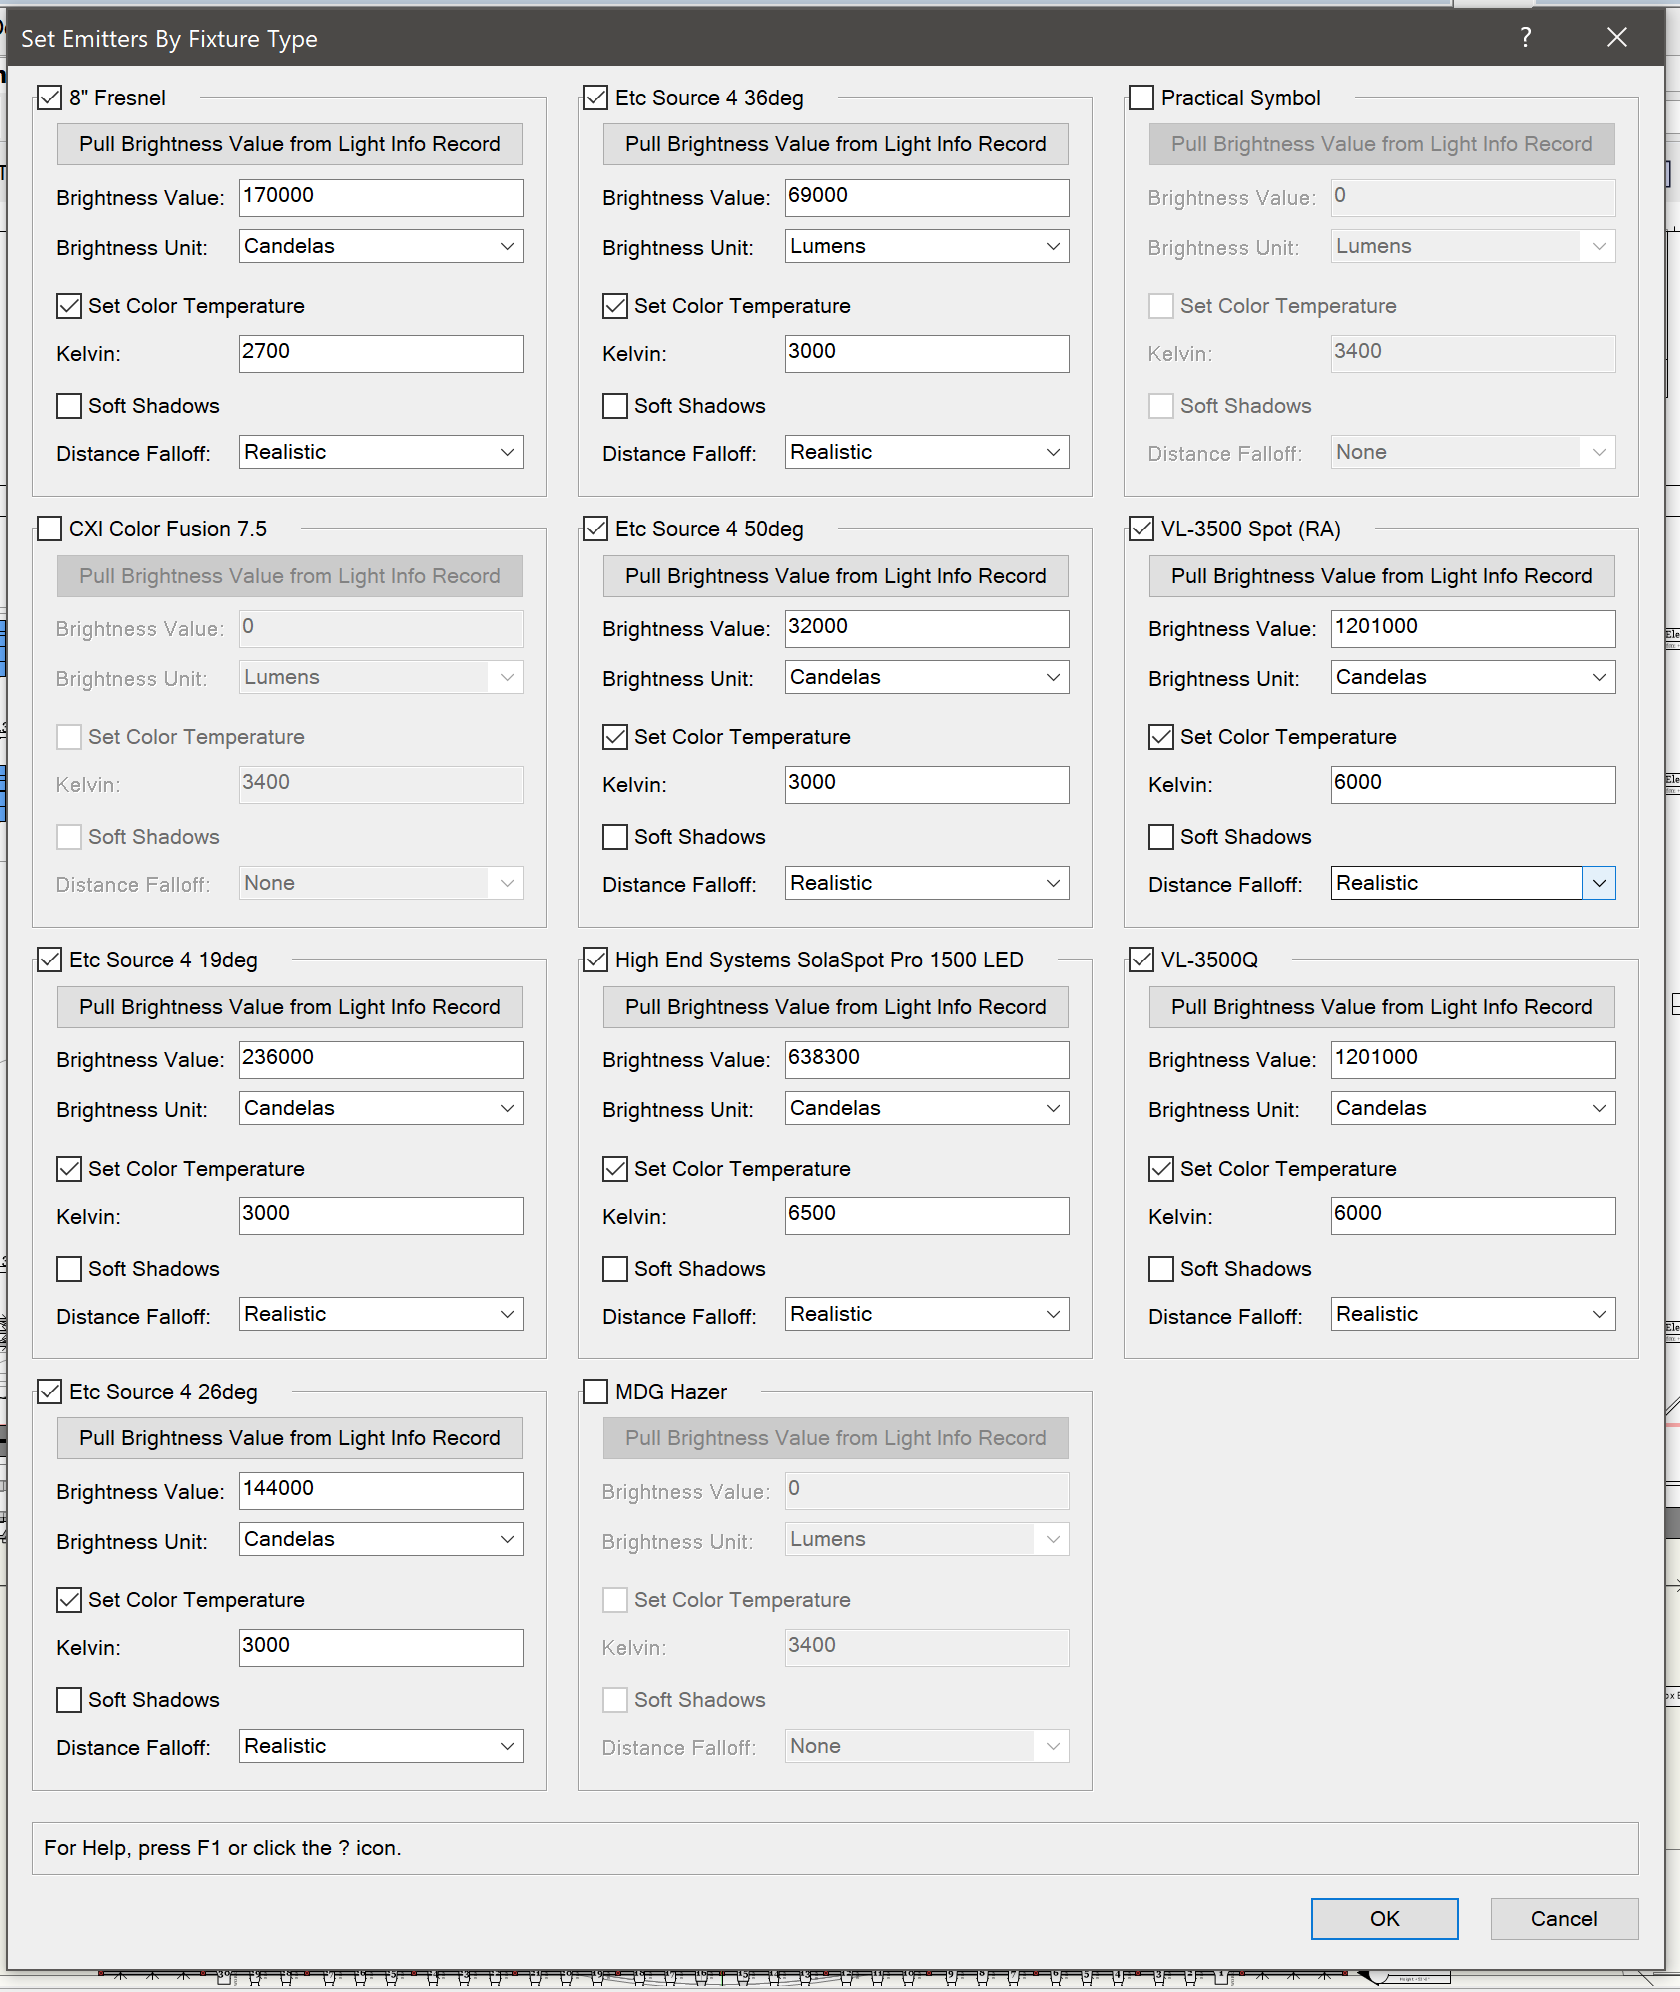
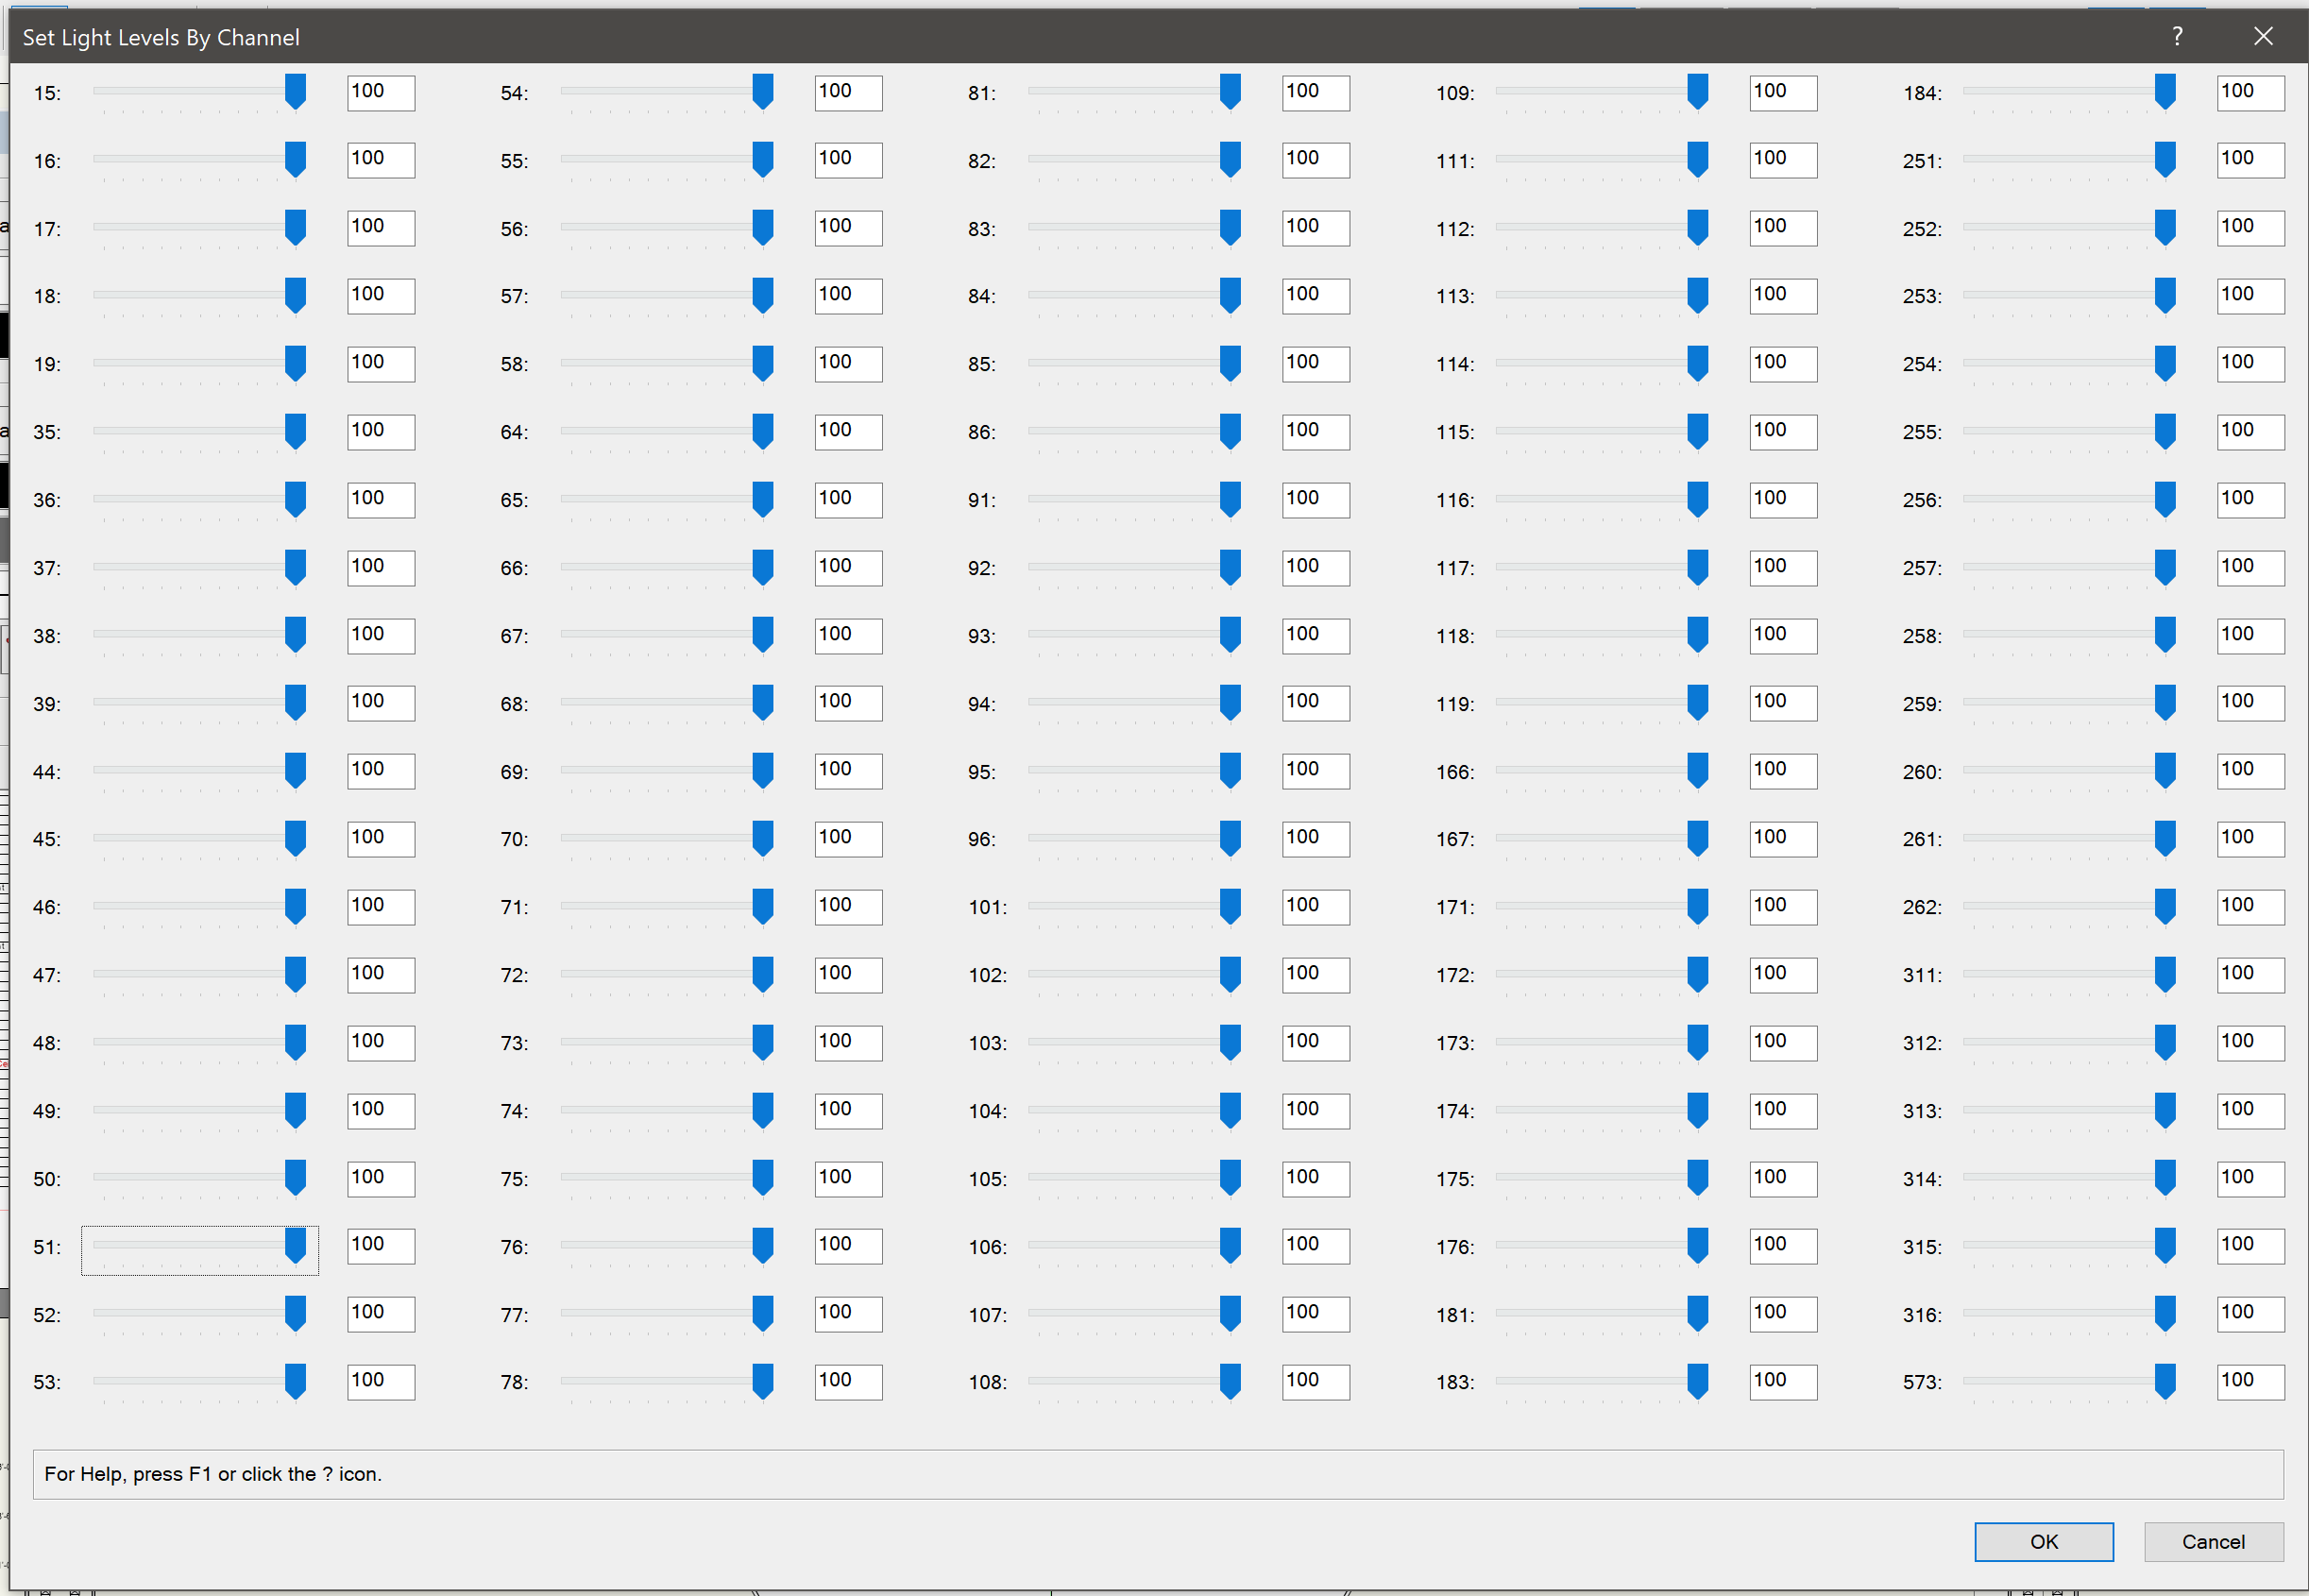
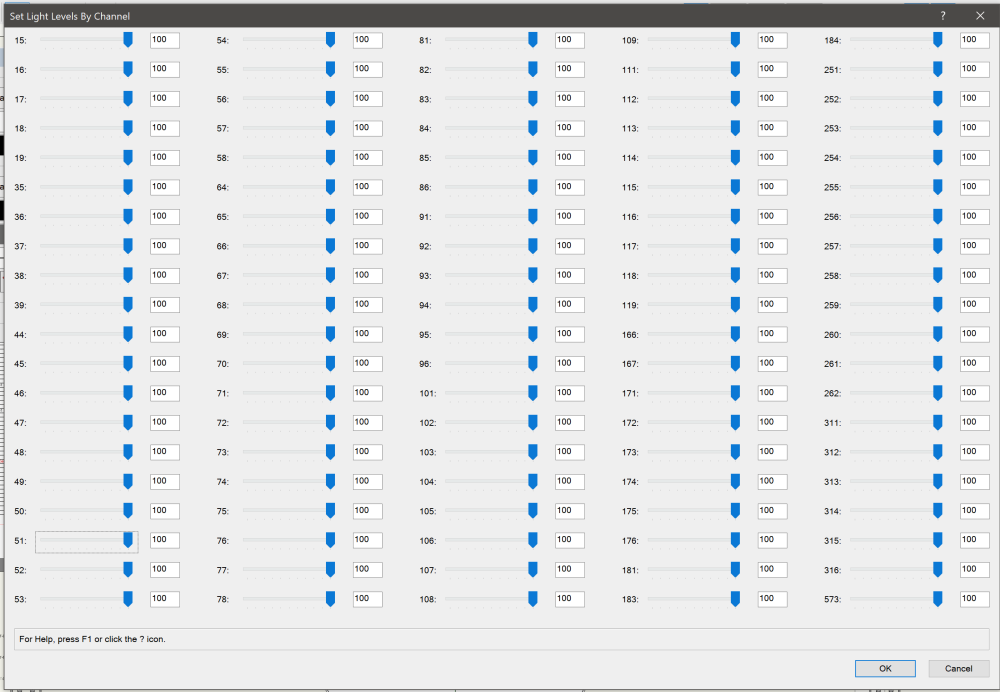
I've attached a couple other menu commands that I've done in case you want to borrow any other features from them. Set Emitters by Fixture Type: This is a command that I wrote to take advantage of new object variables added in VW2020 to deal with emitter settings. I often use emitters to get more realistic output for Renderworks renderings (don't work in Redshift unfortunately), and was getting frustrated with having to manually input the emitter data every time I changed a fixture type. This command will detect the selected fixture types and scale a dialog box allowing you to set the emitter settings for each type. Once you click OK, the settings will be updated for all selected Lighting Device objects. Set Light Levels by Channel: This command will likewise scale a dialog by number of selected lighting fixtures (up to 100 channels), allowing you to quickly set levels based on a bunch of channels at once. Set Emitters By Fixture.vsm Set Light Levels by Channel.vsm

-
I've hit a serious roadblock dealing with version control, updating, and copy protection on several of my plug-ins and am curious about how some of you handle it. I have managed to embed version numbers into the plug-ins themselves by adding a popup parameter called '__version', then using GetLocalizedPluginChoice(<plug-in name>, '__version', 1, versionNum), but what's a good method of handling updating? Using Python to poll an online manifest to determine if a plug-in is out of date? Then using Python to download the new version from an online depository and overwrite the existing plug-in definition? Then there's the whole issue of copy protection. Right now, I sell my plug-ins on Gumroad.com but there's nothing really stopping one person from purchasing the plug-ins and then sharing the .zip package with others. I've thought about ways to create a key based on a user's serial number, but what is the best way to manage users? Should I consider writing an external application to manage things? I'm open to any and all ideas and methods.
-
Here's a snippet from my own code that I use to toggle whether a light is on or off. I wrote it to combat the annoying "feature" introduced in VW2022 where new Lighting Device objects defaulted to being "on." It will take any selected Lighting Device object and toggle the state of the internal light. It works for standard Light Devices as well as Lighting Devices using the Emitter settings. PROCEDURE ToggleState(h:HANDLE); {Polls embedded Light object and toggles its on/off state} CONST kLight = 81; kLightOn = 50; VAR h2,lightHd:HANDLE; currentState:BOOLEAN; BEGIN selDeviceCount:=selDeviceCount+1; h2:=FInGroup(GetCustomObjectProfileGroup(h)); WHILE(h2<>NIL) DO BEGIN IF(GetTypeN(h2)=kLight) THEN BEGIN lightHd:=h2; currentState:=GetObjectVariableBoolean(lightHd,kLightOn); h2:=NIL; END ELSE h2:=NextObj(h2); END; SetObjectVariableBoolean(lightHd,kLightOn,NOT currentState); ResetObject(h); END;
-
Spotlight-Lighting Device-Focus Dropdown Menu
Jesse Cogswell replied to Bill_Rios's question in Wishlist - Feature and Content Requests
The pre-2021 version of Vectorworks handled this with the Focus Instruments menu command, which was bound to the Ctrl+Alt+Shift+F shortcut by default (on Windows that is). In 2021, they changed the dialog to the Focus Lighting Devices menu command, which doesn't use Focus Point objects at all. As part of my workflow, I lay out all of my focus points before I plot any fixtures, so I've imported the old menu command into the newer copies of VW as Focus Instruments Old.vsm and using it instead.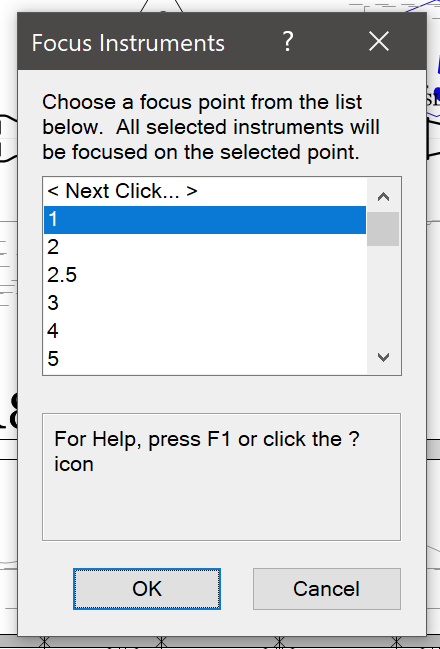
-
Sweeps coming out as squares/diamonds
Jesse Cogswell replied to SamIWas's topic in General Discussion
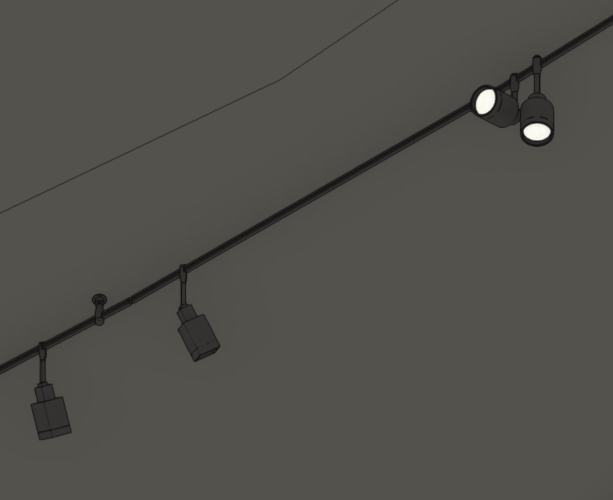
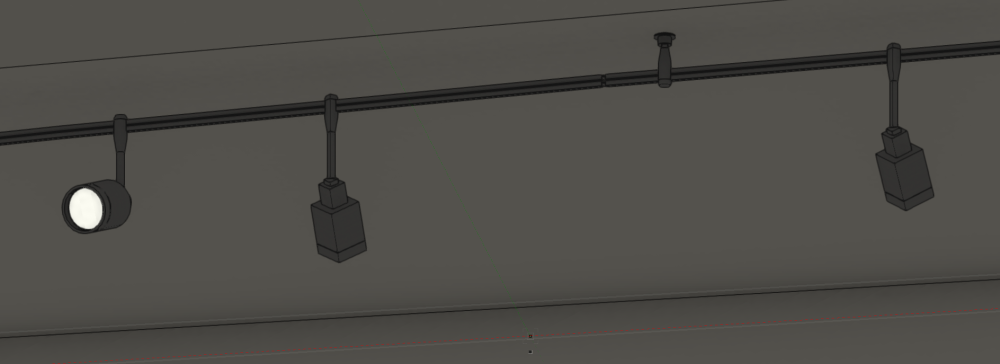
I have seen this in both VW2022 and VW2023, but it only affects the Shaded render type. If you do a Hidden Line, Redshift, or Renderworks rendering, it all works fine. I suspect it has something to do with the new Shaded code in regards to Lighting Devices by trying to keep the 3D geometry simple when you have a lot of lights. Shaded w/ Lighting Device next to Symbol, quality set to High It's almost like it's defaulting the Shaded quality to Low. When I make any change to the Shaded quality, even setting it to Medium, the geometry resets and displays properly, but only sometimes and not on all Lighting Device objects. After changing the Shaded Quality from High to Medium Zoomed out from above, left two fixtures still low quality Elsewhere in the drawing, correct fixture is of a different type and using a different symbol than example above The drawing has 61 lighting fixtures currently visible, and only 1 or 2 of the fixtures are rendered properly at any given time. Which fixtures display properly appears to be random and change each time I change the Shaded quality level. I have also found that this only affects design layers, if you have a viewport set to Shaded background render mode, everything renders as it should.

-
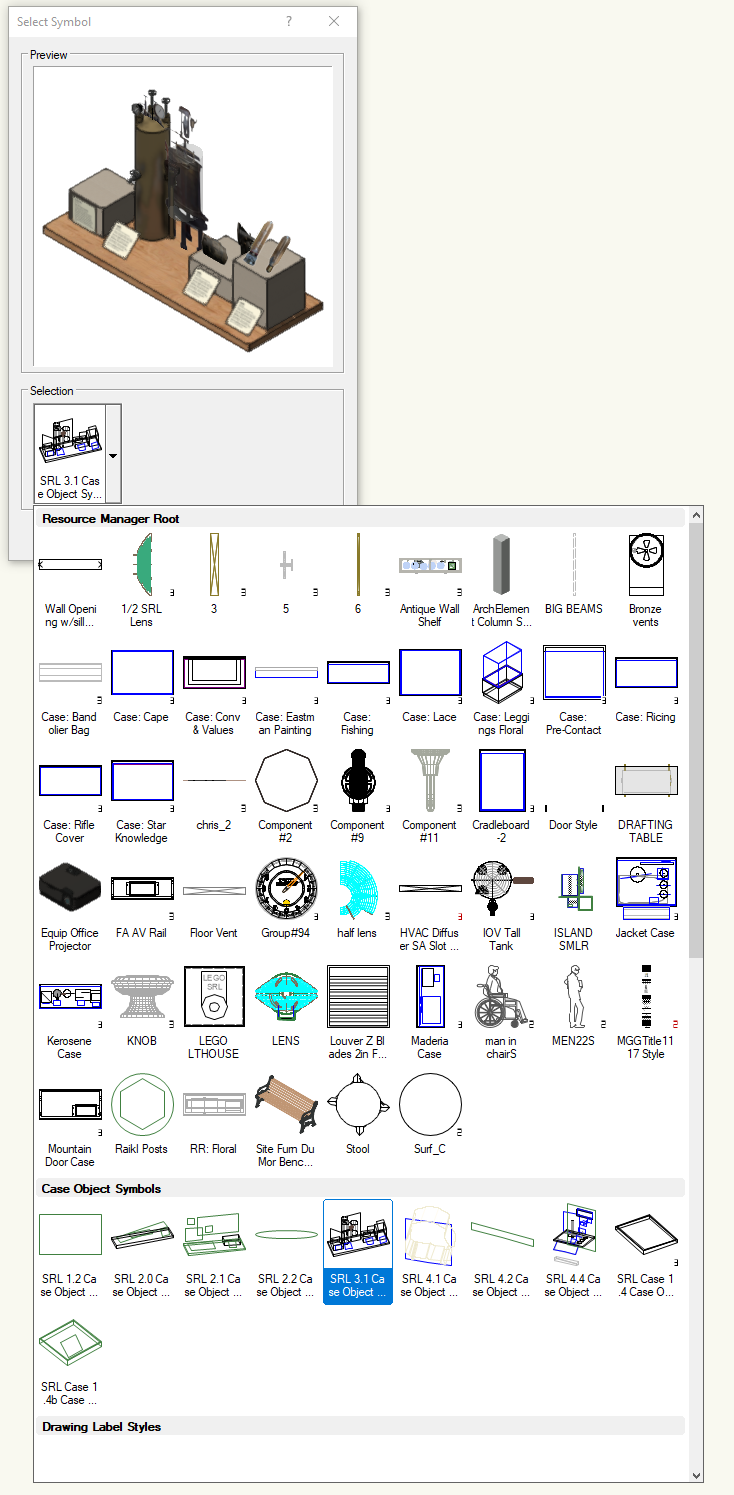
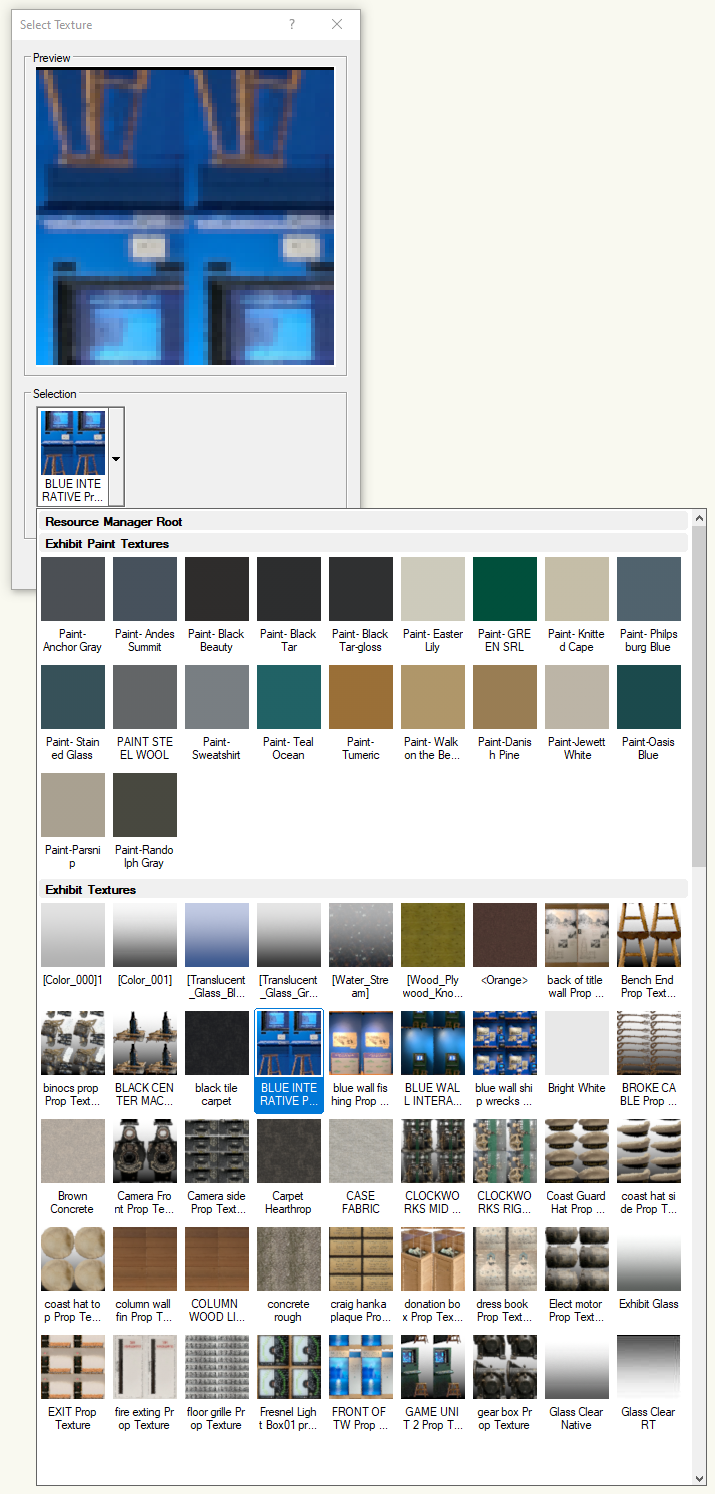
@michaelk I've attached an example that should be able to answer most of your event-enabled questions (and probably raise some new ones) as well as provide an example of symbol and texture pickers. Unfortunately, they are quite complicated, but you can copy and paste my code to get it set up. The procedure you are looking for is the PopulateResourceArray procedure, which allows you to pass in a resource type and will return the number of parents (IE Resource Manager Folders) and resources, which can then populate the Thumbnail Popup. My method allows for sorting by folder, so it's easier to stay on top of drawings with a lot of symbols or textures. The PIO itself is fairly straightforward, it takes the selected Symbol and separates out the 2D and 3D components. The 2D components get their fill set by the Color Index parameter, and the 3D elements get their overall texture set to the selected Texture. Double-clicking the object will advance the color index by 1. I know the preview for the texture selection is muddy and backward, but it is the best I've been able to figure out with the CreateImageControl procedure. There is a CreateImageControl2 added in 2012, but I've never been able to figure out how to get a texture into it. As for PIOs and Object Styles, I haven't gone through with adapting my plug-ins to using them (I overhauled all of my plug-ins during the 2020 quarantine JUST before VW2021 came out, and I haven't had enough time to incorporate styles since), but @Julian_Carr and @_c_ included a ton of good information in this thread: Event Enabled Example.vso
-
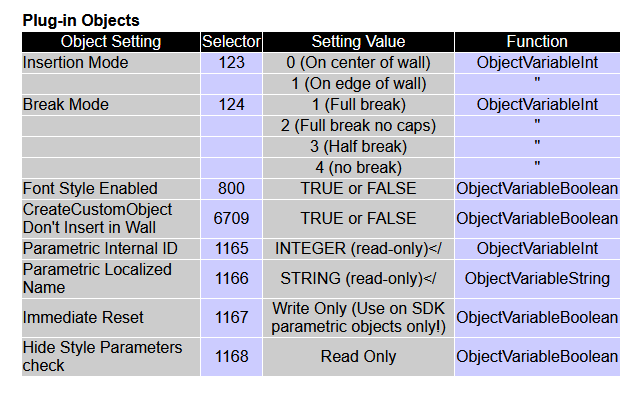
It would appear that the online function reference is out of date and incomplete. Looking at the local function reference (found in the Vectorworks application folder in a folder called "VWHelp"), it lists 1166 as Parametric Localized Name. It looks like the online appendix is missing a bunch of these.
-
The INVIEWPORT flag only affects objects that are in a viewport's annotation or crop space. Looking at the code above and doing a quick test with it, it is working as intended. The viewport is only relaying the visual information from Design Layer space, so if objects on Design Layers are now set to By Class, those changes will be reflected in the viewports as well. You could lock in class overrides per viewport to combat this, but that would be a tricky thing to script out. If you don't want your code to be reflected on Sheet Layers, there is a fix I can recommend. What you sill want to do is poll whether an object is on a layer using a combination of GetParent and GetTypeN. GetParent will return a handle to an object's parent, which could be a symbol, group, PIO, layer, or viewport. GetTypeN will return a number based on the type of object passed to it. In this case, we're looking for 31, which is the internal object number of a layer. From there, we can use GetObjectVariableInt on the handle to the layer and selector 154 to poll whether the layer is a Design Layer (return 1), or a Sheet Layer (return 2). If it returns a 1, we execute the code. The finished code would look something like this: Procedure UseClassAttribs; Procedure Execute(Hd1:Handle); CONST kDesignLayer = 1; kLayer = 31; kLayerType = 154; VAR hParent:HANDLE; BEGIN hParent:=GetParent(Hd1); IF(GetTypeN(hParent)=kLayer) THEN BEGIN IF(GetObjectVariableInt(hParent,kLayerType)=kDesignLayer) THEN BEGIN SetFillColorByClass(Hd1); SetPenColorByClass(Hd1); SetFPatByClass(Hd1); SetLWByClass(Hd1); SetLSByClass(Hd1); SetOpacityByClass(Hd1); END; END; End; BEGIN ForEachObject(Execute, (INOBJECT & (ALL))); End; Run(UseClassAttribs);
-
Here you go. This script will open up a dialog window so you can select the target class. PROCEDURE ChangeTextClass; VAR targetClass:STRING; dialog,layoutDialog:LONGINT; check:BOOLEAN; PROCEDURE Execute(h:HANDLE); {Changes class of given object to targetClass} BEGIN SetClass(h,targetClass); ResetObject(h); END; FUNCTION DrawDialog(DName:STRING) : LONGINT; {Creates dialog box and returns dialog ID} CONST kClassWidth = 25; VAR dia:LONGINT; BEGIN dia:=CreateLayout(DName,FALSE,'OK','Cancel'); CreateStaticText(dia,11,'Select Target Class',-1); CreateClassPullDownMenu(dia,21,kClassWidth); SetFirstLayoutItem(dia,11); SetRightItem(dia,11,21,0,0); DrawDialog:=dia; END; PROCEDURE DialogHandler(VAR item,data:LONGINT); {Handles dialog box} VAR int:INTEGER; BEGIN CASE item OF SetupDialogC: BEGIN END; 1: {OK} BEGIN GetSelectedChoiceInfo(dialog,21,0,int,targetClass); check:=TRUE; END; 2: {Cancel} BEGIN check:=FALSE; END; END; END; BEGIN dialog:=DrawDialog('Select Text Class'); layoutDialog:=RunLayoutDialog(dialog,DialogHandler); IF(check) THEN ForEachObject(Execute,INSYMBOL & INOBJECT & INVIEWPORT & (T=TEXT)); ReDrawAll; END; Run(ChangeTextClass); Slight word of warning: This script will change the text within Plug-in Objects as well. With most PIOs, the text objects inherit the class of the PIO itself, so if anything causes the PIO to be reset (layer changed, OIP value changed, moved or rotated with certain PIOs, etc), the text class will be reset to the PIO class. But the script above WILL work until the object is reset. There is no way to permanently change the text class for PIOs without editing their code directly, which no script can (or should) do.
-
That was the first thing I tried. But the only way the texture would reset was if a parameter in the OIP was changed or if the object was moved to a different layer. Moving the object to a different layer and back worked, but only in drawings with more than one layer, and it didn't work with objects inside symbols. The duplication turned out to be the easiest solution in this case.
-
What you are looking for is a combination of two different commands to get Auto-Align Plane and one command for World Z Origin: SetTexMapIntN(<Handle>,<texture part>,0,1,0); {Sets map type to Plane} SetTexMapBoolN(<Handle>,<texture part>,0,7,TRUE); {Sets map to Auto-Align} SetTexMapBoolN(<handle>,<texture part>,0,6,TRUE); {Sets map to use World Z Origin} One major thing if using VW2022 or later when using objects with class textures is that you MUST have a texture assigned to the class. If not, all of the mapping gets set back to default regardless of the script commands. I've attached a little plug-in that I used to learn texturing in VS that might help you out. For your extrude, you will likely be using texture part 3 for Overall or 4 for Top, 5 for Bottom, or 6 for Sides. Texturing Test No Event.vso
-
In this case, there's no need to make the tool event enabled (though I am a huge proponent of event enabled plug-ins, you can do a lot of cool things with them). I've attached the same plugin above with all of the event script removed. Texturing Test No Event.vso
-
As for the texture By Class, it's a wee bit trickier. Objects can have multiple components, such as an Extrude's top, sides, and bottom, or a Wall's top, left side, right side, cap, hole, etc. These are known as "Texture Parts." There's not really a script command to pull an object's texture parts, so doing a full reset to By Class is kind of tricky. Texture Part 3 is considered an object's "overall" texture, so the code below will force all objects' Overall part to be by class. PROCEDURE TextureByClass; PROCEDURE Execute(h:HANDLE); BEGIN SetTextureRefN(h,-1,3,0); ResetObject(h); END; BEGIN ForEachObject(Execute,INSYMBOL & (ALL)); END; Run(TextureByClass); However, what you'll discover is that the above script will technically work, with the texture properly updating in the Render tab of the OIP, but the object won't reflect the change until you change a value on one of the object's properties to force the object to reset. I tried this with extrudes, sweeps, and 3D polygons and all of them exhibited this issue. I found a solution by creating an array of handles to texturable objects, then running code to set the texture, then duplicate the object, and delete the original. It's complicated, but I think it works. PROCEDURE TextureByClass; VAR objectArray:DYNARRAY[] OF HANDLE; numObjects:INTEGER; PROCEDURE SetTextureByClass(arr:DYNARRAY[] OF HANDLE; num:INTEGER); VAR i:INTEGER; hParent,hDup:HANDLE; sName:STRING; BEGIN FOR i:=1 TO num DO BEGIN sName:=GetName(arr[i]); hParent:=GetParent(arr[i]); SetTextureRefN(arr[i],-1,3,0); ResetObject(arr[i]); hDup:=CreateDuplicateObject(arr[i],hParent); DelObject(arr[i]); SetName(hDup,sName); END; END; PROCEDURE BuildArray(h:HANDLE); BEGIN IF(GetObjectVariableBoolean(h,500)) THEN BEGIN numObjects:=numObjects+1; ALLOCATE objectArray[1..numObjects]; objectArray[numObjects]:=h; END; END; BEGIN ForEachObject(BuildArray,INSYMBOL & (ALL)); SetTextureByClass(objectArray,numObjects); END; Run(TextureByClass);
-
I'm not sure which version of Vectorworks you are using, but I would add the SetPref(6839,TRUE) call before the ForEachObject call. If you are running version 2022 or newer, the screen plane is disabled by default, so running your script to force objects onto the screen plane will technically work, but if the Legacy 2D Features option isn't enabled for the drawing, the Plane field in the OIP will be blank. This command will enable the feature before placing objects on the screen plane. If you are on an older version of VW, please disregard this message but keep it in mind in case you upgrade. Screenshot without SetPref code with Legacy 2D Features disabled at runtime: Screenshot with SetPref code with Legacy 2D Features disabled at runtime:
-
The script to change all screen objects to the layer plane is listed below: PROCEDURE ScreenToLayer; PROCEDURE Execute(h:HANDLE); BEGIN SetObjectVariableBoolean(h,1160,FALSE); END; BEGIN ForEachObject(Execute,(PLA='Screen Plane')); END; Run(ScreenToLayer); VERY IMPORTANT IN THIS CASE: Do not put the INSYMBOL and INOBJECT flags in the criteria for the ForEachObject call. Vectorworks uses the screen plane to determine which objects exist within the 2D component of hybrid symbols and plug-in objects. So, if you include those flags, all of your hybrid symbols will be turned into 3D only symbols, and plug-in objects that contain 2D and 3D geometry will project the 2D geometry into 3D space. You don't need the INVIEWPORT call because annotations ignore the plane anyway. As for ObjectVariable 1162, "Object is in Layer Plane", it is read-only, so using SetObjectVariableBoolean(h,1162,TRUE) won't do anything. EDIT: Looking back over this post, I'm a little confused about what you are looking for. Are you looking to force things onto the Screen Plane or taking objects existing on the Screen Plane and forcing them to Layer Plane? If you are looking to force all objects to the screen plane, you can use the code below: PROCEDURE ScreenToLayer; PROCEDURE Execute(h:HANDLE); BEGIN SetObjectVariableBoolean(h,1160,TRUE); END; BEGIN SetPref(6839,TRUE); ForEachObject(Execute,ALL); END; Run(ScreenToLayer); Please note that in this case, you will need to engage the legacy 2D features with SetPref(6839,TRUE) to enable the screen plane before you can assign objects to it.
-
@michaelk you might consider adding custom texture parts for the shelving and rod so that a user can texture each without adding separate classes. I've attached a PIO that I used to experiment and figure out adding texture parts. It builds a cube using 3D polys and adds a texture part for each side, defaulting each to use the By Class setting mapped to auto-align plane. The PIO was written in VW2019 and will work with any copy of VW from 2019 forward, and I tested it in VW2023. Just know that I don't think there is any VS commands to handle the newer Surface UV mapping and that there is a nasty bug starting on VW2022 where, if there isn't a texture assigned to the class, when you change the texture part to use a unique texture, it will reset ALL mapping settings back to default, which can be incredibly annoying if you want specific mapping settings. The PIO is a wee bit complicated, as it's event enabled so that I could test editing textures through a button in the OIP, but I've notated the texture setup procedure to explain the various steps you may need. Please feel free to reach out if you have any questions. Texturing Test.vso
-
@Sam Jones I think your code is working, but it's placing the locus inside the 3D component of the symbol. The way I usually combat this is to force the planar object (such as the locus point) onto the screen plane by using SetObjectVariableBoolean(<object handle>,1160,TRUE). I understand that the screen plane is considered deprecated, but it is still what Vectorworks uses to differentiate objects in the 2D component compared to the 3D component of a hybrid symbol. And forcing an object onto the screen plane with this script will not trigger the "Enable Legacy Features" flag to get set. The script below will place a locus inside the given symbol at X: 1", Y: 1" while also correcting for the User Origin being different than the Internal Origin. Confirmed working in VW2023. PROCEDURE TestLoci; CONST kSymbol = 'Test Symbol'; kScreenPlane = 1160; VAR hSymbol,hLocus:HANDLE; BSB:BOOLEAN; Origin:POINT; BEGIN GetOriginInDocUnits(Origin.x,Origin.y); hSymbol:=GetObject(kSymbol); Locus(1-Origin.x,1-Origin.y); hLocus:=LNewObj; BSB:=SetParent(hLocus,hSymbol); SetObjectVariableBoolean(hLocus,kScreenPlane,TRUE); ResetObject(hSymbol); END; Run(TestLoci);
-
That's what I get for being in a hurry and not thoroughly going through my code. I wrote a procedure in my plug-in to check whether 'ISO-02 Dashed' exists in the drawing and, if not, imports it in from the Vectorworks default using Resource Lists in the same manner that Sam posted above. I had that procedure buried in the reset event with a IsNewCustomObject call, so missed it until I went more thoroughly through the code. But you would still need the Name2Index call to accurately assign the line style with SetLSN, and that it needs to be a negative number. Thank you @Pat Stanford for keeping me honest. I remember having a really hard time trying to figure out how to get the index number, since older versions of the Function Reference had them listed in the appendix but it was eventually removed. I eventually found it in the online Function Reference here (which does mention that it only works if the style is present). Sorry to disappoint @michaelk , I thought I was being so clever.
-
I'm away from my computer right now, but I'll try it when I get home. I copied and pasted the code from one of my plugins that was working until at least 2022, and I think I've used it successfully in 2023.