Gadzooks
-
Posts
509 -
Joined
-
Last visited
Content Type
Profiles
Forums
Events
Articles
Marionette
Store
Everything posted by Gadzooks
-
Is this for internal visuals? I think if you were to show us a photo.. ..we'd be able to offer more help on the detail you require.
-
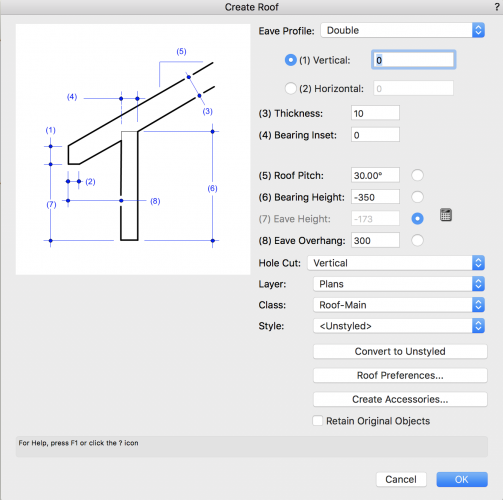
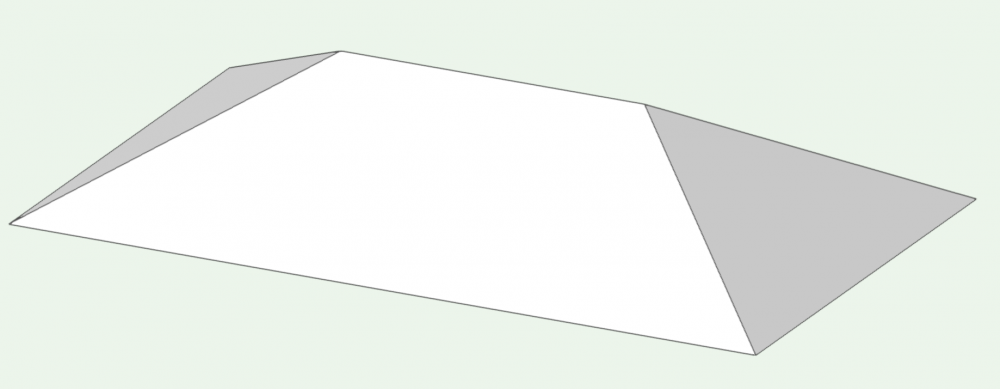
(unless I've speed read this and missed - sorry if I have) the quickest solution is to draw a rectangle (size you require @VinceK) and use AEC > Create Roof I believe you have this (your signature says Spotlight) under the Architectural menu Keep the thickness appropriate - Ive use 10mm only A reasonable 'tent' roof is provided straight away. I assume you will have already drawn the walls/openings/window panels etc. (Just an observation guys - no criticism😍) I have to say most tents described so far don't do it for me. I generally would want a more convincing drape to the appearance of the canvas to 'hit the money'. For that level of modelling there are two really good in-depth vids on the VW site that take you through this. Go to http://www.vectorworks.net/training/2017/getting-started-guides/freeform-modeling/subdivsion-tool-primitive-types-and-tent-roofs and you will see there's a 'part 2' to this. Having said that - I appreciate many of the modern system built structures are more 'shed' like and flat surfaces probably are suitable. More of a Boy Scout myself🤠 Hope this helps
-
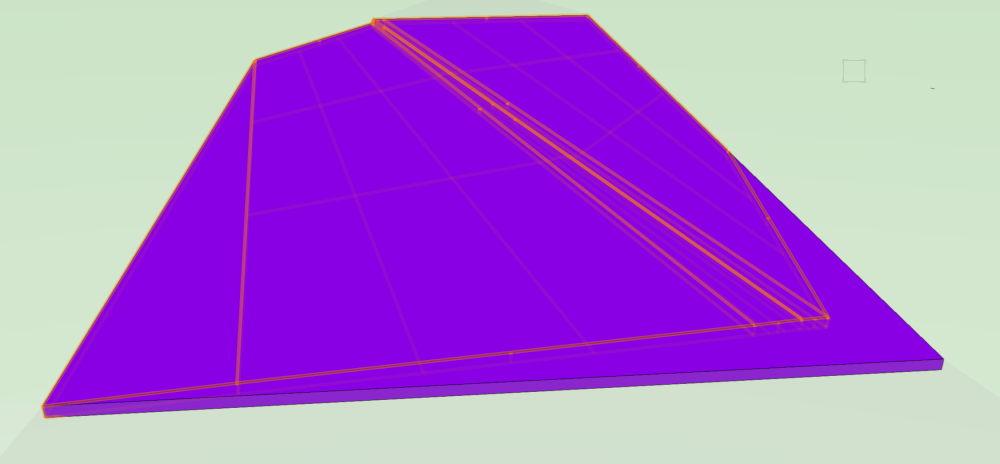
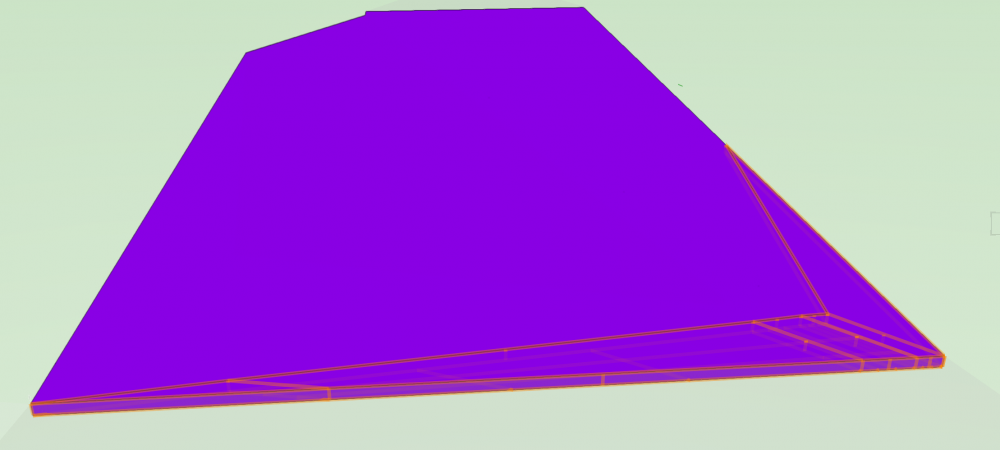
I see you have added solids - not sure that has any bearing but this is my version of the same area (in your first file) and the section is complete Maybe all areas were not correct before you added solids? ___________ Just tried adding solids and it messes things up - I suggest you live with it as the geometry is not to VW's liking I find I can add these... and these... but if I then add the two parts together it falls over. I'm sure theres a reason, but I'd stick with what you've got 😎

-
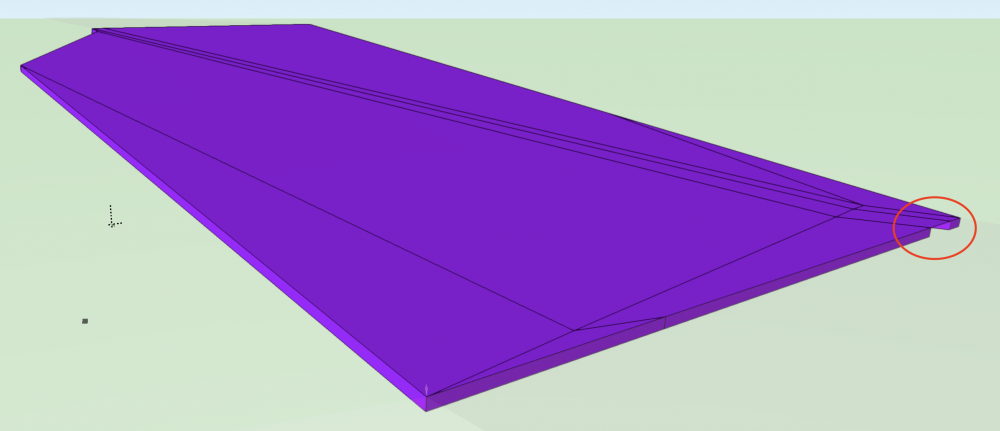
You've missed a section! Something is not shelled and its on the line of your section This bit maybe? I think just go over the model and inspect all areas are as you need - you'll find it!
-
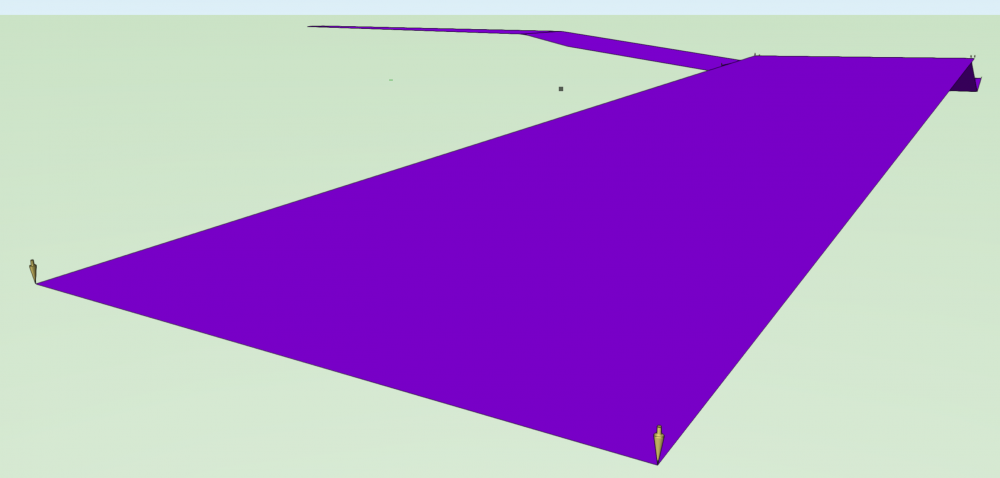
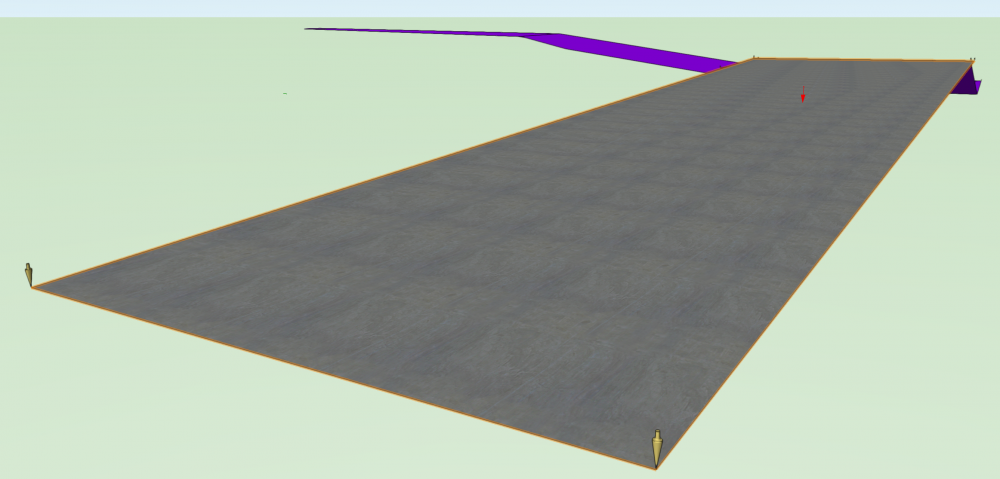
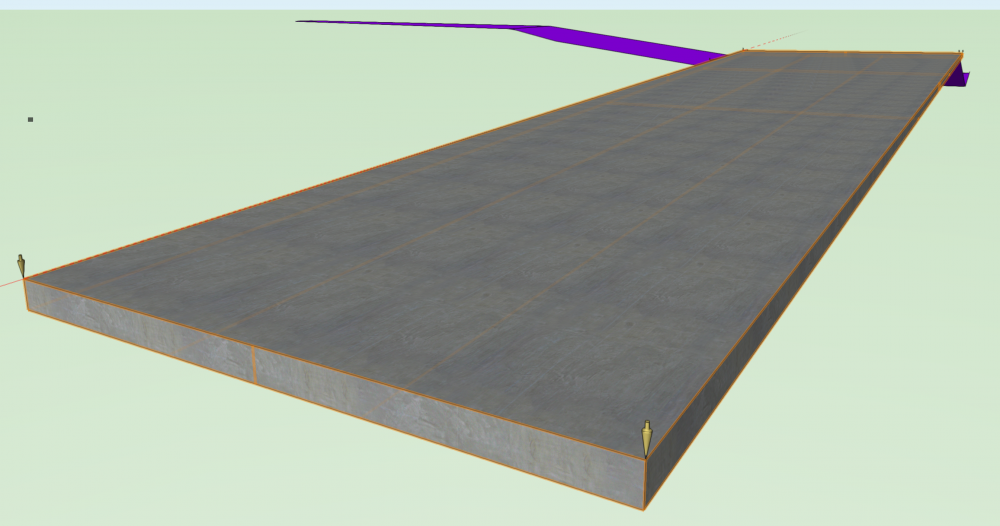
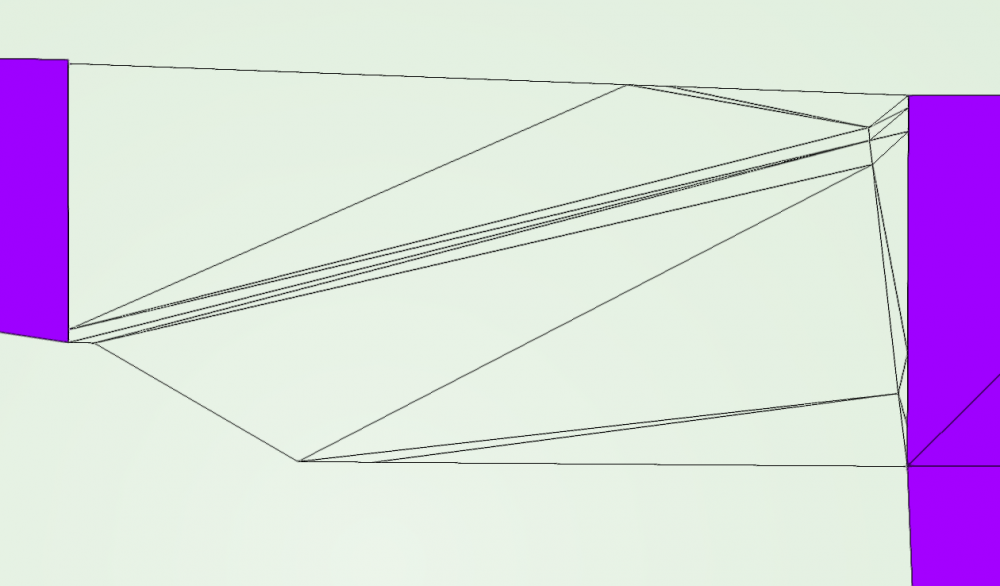
Like a lot of operations, there's probably a few ways to do this. I think the roadway tools would probably do the job better (someone may jump in and advise), but you can do this with surfaces then shell Taking your file.. 3D poly by 3D poly, highlight and choose Model>3D Power Pack>Create Surface from Curves with your concrete class set, you then get.. Note the red 'normal' arrow as this influences the shell command Then choose the shell command tool with the appropriate settings - you wanted 0.2m The slab is formed This has formed in the correct direction. If the slab is shelled upward, either reverse the 'normal' arrow, or change the shelling criteria (inside vs outside) Then try again. You'll find the larger sections of your roadway are more complex and VW divides it into many more triangulation parts. Its just a matter of highlighting the various pieces and applying shell separately. Someone may jump in and point out a way to shell all at the same time. Section-wise, you'll see the slabs are individual and don't merge at he 'touch' positions as they ought to. You could rectify this with a a bit of 3D tweaking, but I assume you don't need that level refinement. Hope this helps.
-

to renew or not to renew (that is the question)
Gadzooks replied to Phil hunt's topic in General Discussion
My sentiments (perhaps put rather more eloquently 😅) Thanks @line-weight -
to renew or not to renew (that is the question)
Gadzooks replied to Phil hunt's topic in General Discussion
Thanks for your response Jim, but I'm already a 'leaver' (as explained elsewhere). It's a great pity that subscription renewals enevitably cannot coincide with (or shortly after) your, now legendary, 'teasers'. So people such as myself have to take a view based on promise vs delivery. Shot myself in the foot? In a way, (weirdly) I'd like to say yes, as I have only good intentions for VW. We'll see.............. -
to renew or not to renew (that is the question)
Gadzooks replied to Phil hunt's topic in General Discussion
I agree. Not enough fixes (to some major problems - with forum members working hard to highlight and beta the software without recognition) and the boffins continue to concentrate on 'fanfare' functionality (which is, after all, the way they've been tasked). Then we have @JimW saying ' This is kind of a spoiler but I already have a list of over 1300 bugs (and counting) fixed in 2019...' With respect Jim, aren't those fixes (ok some of them are probably as a result of new functionality for 2019 - so happy to discount those) 'owed' to the users who bought into 2015,16,17,18? Will we see them brought forward to their rightful position - 2018 SP4/5 ? I recognise the marketing strategy, but no Company can keep its loyal users yearly subscription without an even fleeting recognition of fair and equitable balance of 'Year on year, did we deliver all we promised' And I'm one of VW's sincerest champions - since MiniCad. -
Lucky you caught me on a (semi) genius day! Most days I top out at simple.
-
Like the way the font menu lists recently used at the top of all available above a divider. Which, I've got to say is both simple and genius. (Bit like me) Sorted!
-
Hi David - That will work, but for the OP won't provide the interactivity (if I can describe it like that) of some sort of 'now you see me, now you don't' construction 'veil'.
-
Interesting question Rachel - Ive had similar problems on small bathrooms and tight corridors etc. Can't think of an answer for mirrors atm, but (you got me thinking) would suggest that an alternative (and maybe more long-term useful??) would be to be able to 'modify' (by assigning a class action - say 'camera/view portal') to walls/items in the way, so that they don't have to be removed to get into tight spaces for the visuals - and would still provide required reflection for feature mirrors, bounce light as if there and generally still interact in the 'scene' Class action 'camera/view portal' is something I just made up btw - don't go looking for it until v2019 (or later!!). Unless its available now and I'm going to be saying DOH!!
-
Worksheet: Show zero values as empty
Gadzooks replied to Thomas Wagensommerer's question in Troubleshooting
I think we now ought to see your image resplendent without zeros! 😀 -
Worksheet: Show zero values as empty
Gadzooks replied to Thomas Wagensommerer's question in Troubleshooting
Excellent. Yes Ive had problems with database/spreadsheet formulas (in other software) where it seemed obvious I'd picked the wrong separator, but just couldn't get it right. Your solution is what I do in the situation - keep trying with subtle changes until the cells suddenly reveal you've done it! HTH -
Worksheet: Show zero values as empty
Gadzooks replied to Thomas Wagensommerer's question in Troubleshooting
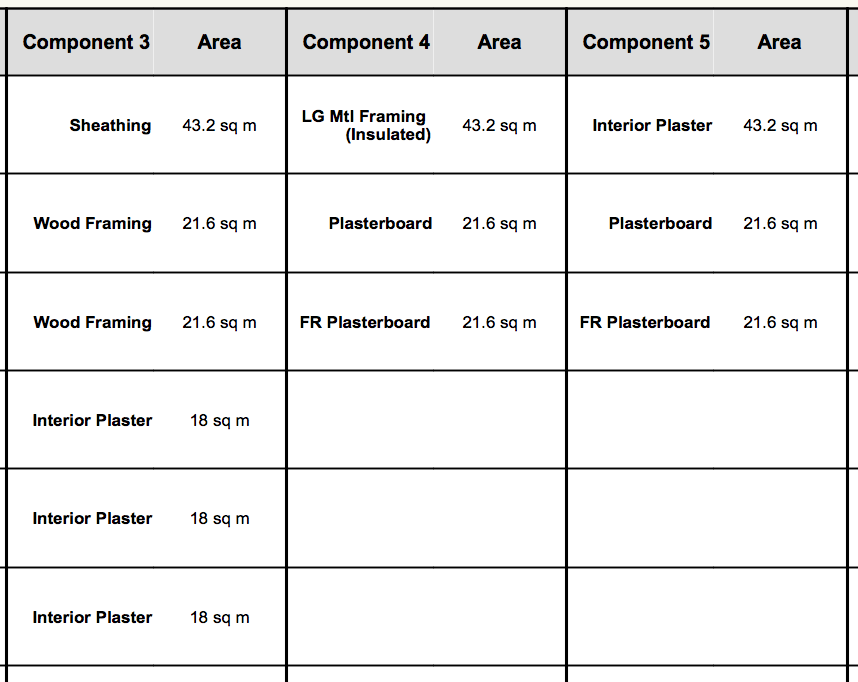
Yes - the formula returns exactly what you want This is an extract from a Wall Areas Database You will see some wall types do not have anymore than three components and therefore do not show 0 (zero) in the cell.
-
Worksheet: Show zero values as empty
Gadzooks replied to Thomas Wagensommerer's question in Troubleshooting
Sure is Thomas. I too dislike zeros on my nicely tabbed sheets. Standard logic applies and you need an IF xxxx(Then,Else) statement. So as an example.. =IF((COMPONENTAREA(4)<>0), COMPONENTAREA(4), '') Step through the logic and it will all make sense (I hope). You either get a value greater or less than zero, or the cell has a big fat 'space' printed in it. Come back if you would like more - or PM me the sheet and I'll tidy it for you. -
Well one thing is for sure guys - VW is getting better responses, good ideas, knowledgeable and clear, well thought practical issues from this thread than the email survey will have directly produced. Maybe they thought this would happen (but I somehow doubt it😃) 'bout time someone chipped in from VW for good measure. Nice to to be part of a 'sensible' forum/community - thanks guys.
-
(Just quickly off the top of my head) Use a 'fraction friendly' font. Have a look around....maybe http://www.fontspace.com/kimberly-geswein/kg-traditional-fractions Hope this helps. (One thing I'm happy with being 'A European' !!!)😀
-
Ahh yes - More hyp in my email. "Lets get the boffins onto something else we can 'fanfare' at the Design Summit" (as none of them want to go back to stairs, roofs, doors, windows..........). So did I, but I didn't think I fitted the intended 'sales profile' (maybe a better outline of the benefits might have been more persuasive?) Then theres (got to be) some downside. Are you going to trust your company's life blood to a cloud. Most clouds in the adverts are white and fluffy. In the UK ours are grey and tend to p*££ on me at the worst moments☔. (Recent News -Tell VisaCard you are worried about their vulnerable system!! ) You maybe can tell I'm not such a happy bunny. I've decided to let VSS go as I can't see the value in it. When I bought (back) into VW (v2017), I was enthusiastic that my 'investment' would repay, but not having any 'on-line' problems, not needing any training (for my low level use), not needing Nomad, Cloud storage etc. etc. and feeling that the product doesn't get 'repaired' as it should before moving on to another fanfare, has made me (yes, reluctantly) cancel. Plus the 'weight' of VW as a software package - yes hugely capable (Since MiniCad I wouldn't recommend anything else), but if I could buy into parts and have a discount for the bits I wouldn't use (lets face it, can't get to grips with) ever, I maybe could rethink my personal 'value'. The licensing aspects have been discussed before and I appreciate its difficult to split it into certain packages and sell into the different markets without the 'cross-over' parts either being too great or too scant for individuals' and companys' requirements. So there's no fix for my predicament. I could do with a 'leavers survey'. You know, the one were it says 'we're sorry to see you go'. But I'm only a small fish. Have I done this at the worse possible time? Was I about to find all the niggles me and my new chums on the Forum fight with were to be (finally) fixed with v2019? I'd be please to receive comments, but it wasn't my intention to highjack this thread. Best regards
-
Hi @BJRobinson i assume you've searched the forum for ideas, but if not this may help There are some links within the post that will maybe expand the solution for you.
-
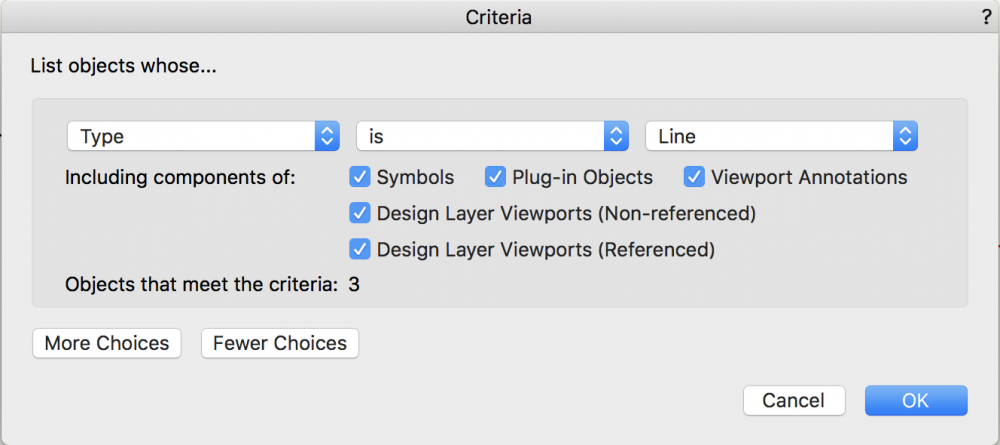
HI @acrane I'm assuming you'd like to create this yourself so I'm giving general directions rather than than just supplying a sheet for you. You don't say whether you want just your 'chosen' class or show all classes in this exercise. I've chosen to 'see' all - You can make changes by adding a specific class name to the criteria. So, set the criteria as simple as possible - you can add as many criteria as you want. This will just choose lines in general. To provide an example, I've set up a special class here called 'Your Special Class Name' - you'll be changing to suit your project. Then draw a few test lines choosing the Class as you go. The black line is in 'Dimensions' and the red ones are set to 'Your Special Class Name' And so, the lines are added to the simple 2 column worksheet. (appropriate headers added) To Get the above, the column filters are set as below. Class Name.... (you obviously don't have to Sort, but its provided) Total line Length... Come back if you have problems.


- 1 reply
-
- 1
-

-
Hi @MHBrown Does this help? http://app-help.vectorworks.net/2018/eng/index.htm#t=VW2018_Guide%2FPrintPublish%2FPrinter_Setup.htm&rhsearch=printer setup&rhhlterm=printer setup&rhsyns=
-
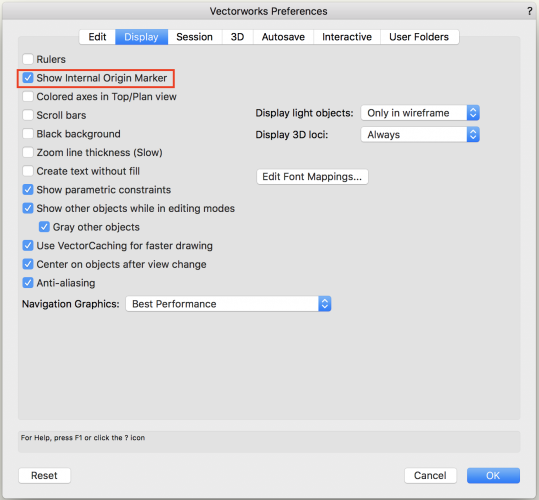
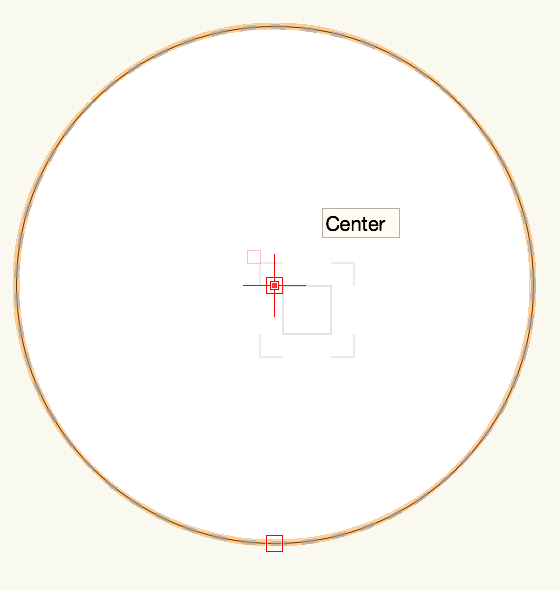
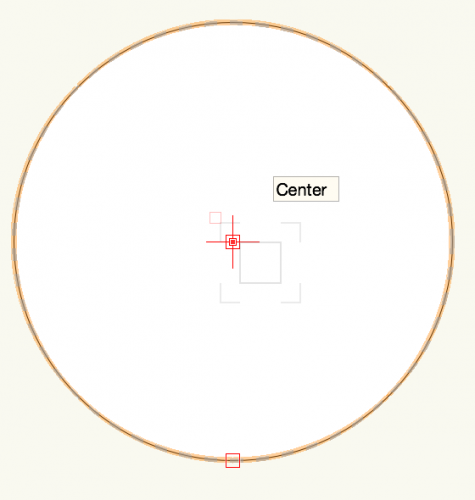
Oh, ok Bruce - I took a bit of a flyer there as I couldn't make out any other parts in your image that pointed to it being object centre-point you were after. You're right, there are sections of VW operation that would be helped by larger screen 'markers'. It doesn't help that the centre mark is a 'relative' hint and will reduce as you try to zoom it. Best way I can think of would be to use snapping to best advantage (even to adjust the size of the acquisition/snapping boxes in VW preferences) to better highlight the parts you need - which I assume you're already doing.
-
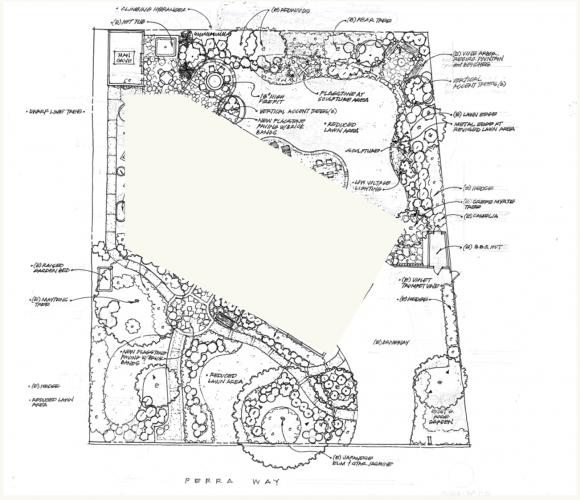
Greenhorn seeking a simple answer VW2018 Landmark
Gadzooks replied to caryme's question in Wishlist - Feature and Content Requests
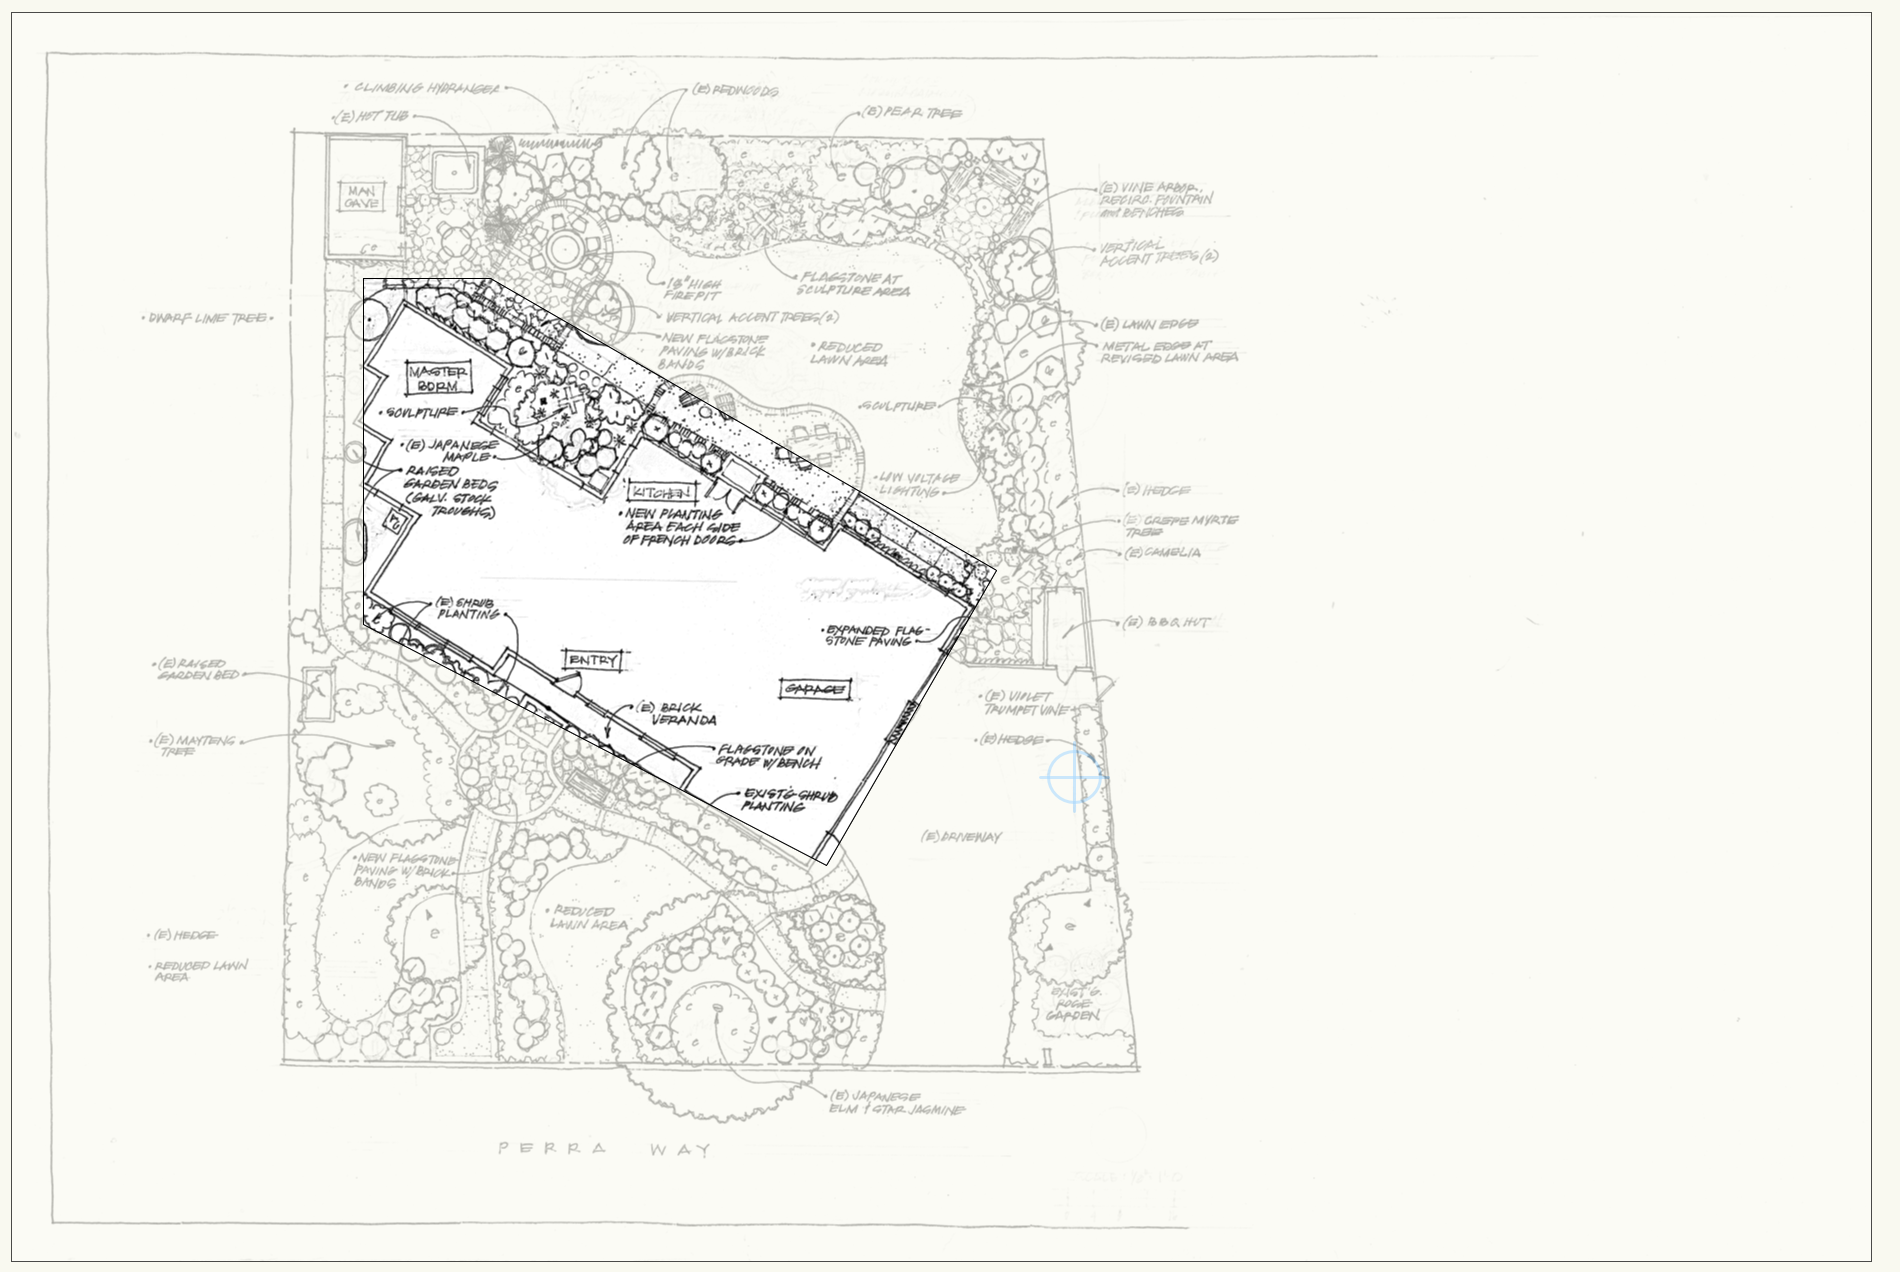
You got there before me Zoomer. I've occasionally done this (the Vectorworks option) and, some tweaking required, the results have ranged from utterly useless to amazingly helpful. So its definitely worth having a look at and if not this project, keep it in mind for others. Always worth taking some check dims off 'something solid!!' - The house would be my choice. This will give you a pretty sure base scale object. As an aside - when you have a PDF that has some ares that are not needed, double click it and you can mark off a Crop Area. Exiting the crop window.... Crop only allows one shape, but (as an alternative) you can create a shape with a clipped centre (or other difficult shape) to provide the correct crop for what you want. Can be really useful. The reverse.. Also worth using the technology available on the net for projects. Find the plot on google maps and copy/paste it in as an underlayer to help position/relate things. You can crop photos the same way as above!
-
Hi @Bruce Kieffer Do you mean the internal origin? Or - sometimes when I want to keep something in sight, I place a cross or bullseye on the drawing. So it doesn't get caught up with the other drawing elements, you can either place it on an underlayer (just for this exercise) or choose Modify -> Lock to protect it on the same layer as everything else. Hope this helps