


Judy Cosgrove
-
Posts
15 -
Joined
-
Last visited
Content Type
Profiles
Forums
Events
Articles
Marionette
Store
Posts posted by Judy Cosgrove
-
-
On 4/9/2021 at 1:15 PM, zoomer said:
There are a few NURBS Face options in VW.
Either create a simple Rectangle in plan and convert to NURBS Face,
to pull your edges to the desired Z offsets and move it in place in Z height.
or create Arcs between the base points and finally create a NURBS Face from
2 Profiles and 2 Paths. there are a lot of older NURBS tutorial Vidoes on VW's
youtube channel or Help files and VW university will also help.
If you are more on the sculpting side, you can also convert a Rectangle to
a SubDivision object and use the SubD Tools to manipulate the corner heights.
There are maybe even more viable ways in VW to do that.
Also there may be even already some ready to use Symbol Resources in
VW Libraries in Resource Manager ...
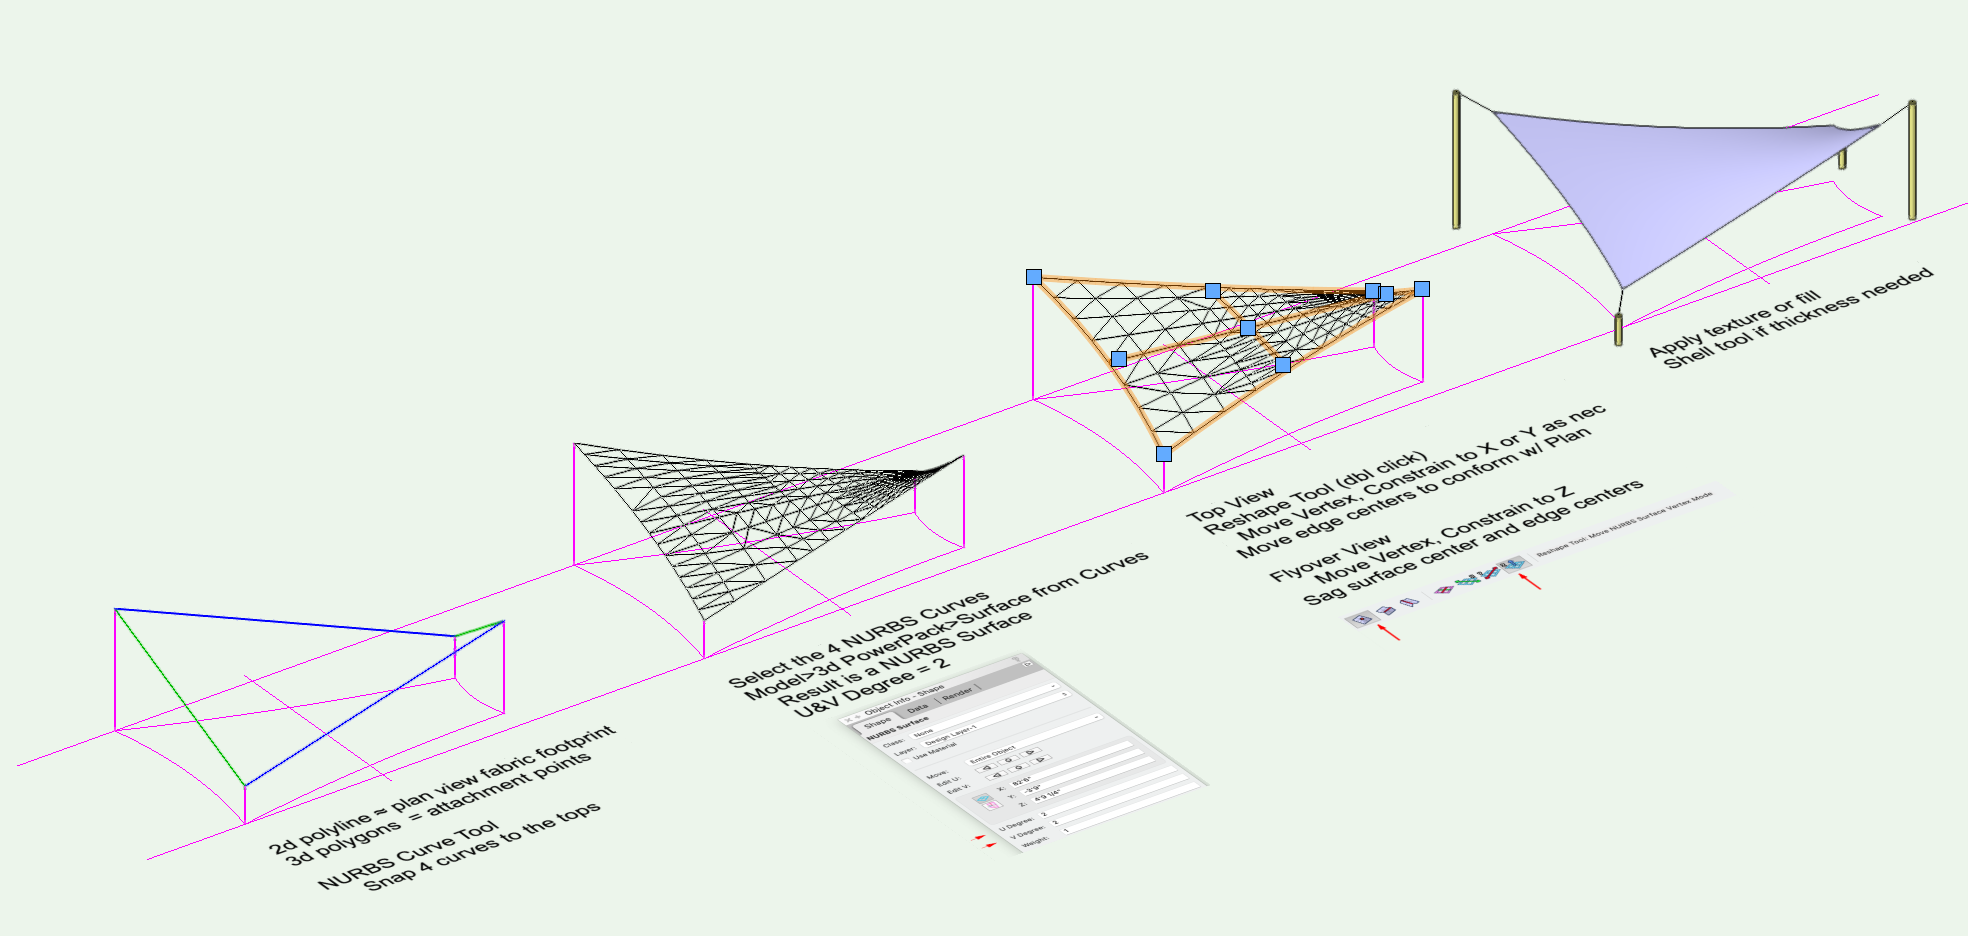
zoomer- is it possible to not distort the size/shape/volume/area of the nurbs surface when moving it around? How do I "lock" the shape? I want to be able to start with a flat material so I can draft it later for the fabricator.
-
On 4/10/2021 at 12:59 AM, Benson Shaw said:
Here is quick NURBS method:
Your sail maker and engineer may have guidance for how much z sag will be produced in the center, and xyz sags of the edges.
More sag means less tension and, therefore, less structure needed to support wind/snow loads.
Several more ways and refinements to do this with NURBS, Interpolated Surfaces, Sub D.
Post if more help needed.
-B

Help please! I would like to model flat sails, possibly with slight curves cut into the sides, and want to be able to have that as a flat pattern for the fabricator. I also want manipulate the sails in 3D without distorting it, so I can see what it would do if twisted or bowed etc. Some of the sails may need to be more than 3 or 4 sides... How do I accomplish this in VW? .... The reverse would be to model something I like, then flatten or unfold the sails to get the patterns, but don't that is possible in VW? any tips? thanks in advance- JC
-
Curtain Wall tool drives me crazy. In the past whenever I would try to edit one horizontal up or down, the rest of the horizontals revert to some default, and I would have to re-do everything.
More recently I stopped using it and create them with extrudes.
-
 2
2
-
-
Andy are you coming the the VW use group meeting 2PM on Saturday at the ADG? Hope to see you there.
-
YAY! thanks Andy!
-
1
-
-
did you try increasing the resolution (DPI) in the sheet layer? Also try increasing the CAMERA resolution/dpi in OIP...
-
I like the colors - makes it faster to locate things.
-
4
-
-
I love OpenGL!!!
-
@Maho555 you may have to change preferences
again if it happens again... which it did for me. I have not updated to Mojave either... holding off til the coast is clear!
-
The same "ghosting mirrors" thing was happening on my iMac Pro when I would scroll- zoom in or out...I would have to restart. I was able to fix it by changing preferences for navigation graphics to "Best Compatibility"
.
-
I am using 2019 with Mac OS high Sierra... .I have had trouble with panning and zooming in viewports. It was creating ghost images. Pat Stanford suggested I change my graphics preferences which I did. That seems to have solved the problem.
I will heed the warning NOT to upgrade to MOJAVE just yet.
-
Great- Thanks!! Is that an add-on or plugin? How do I get that?
-
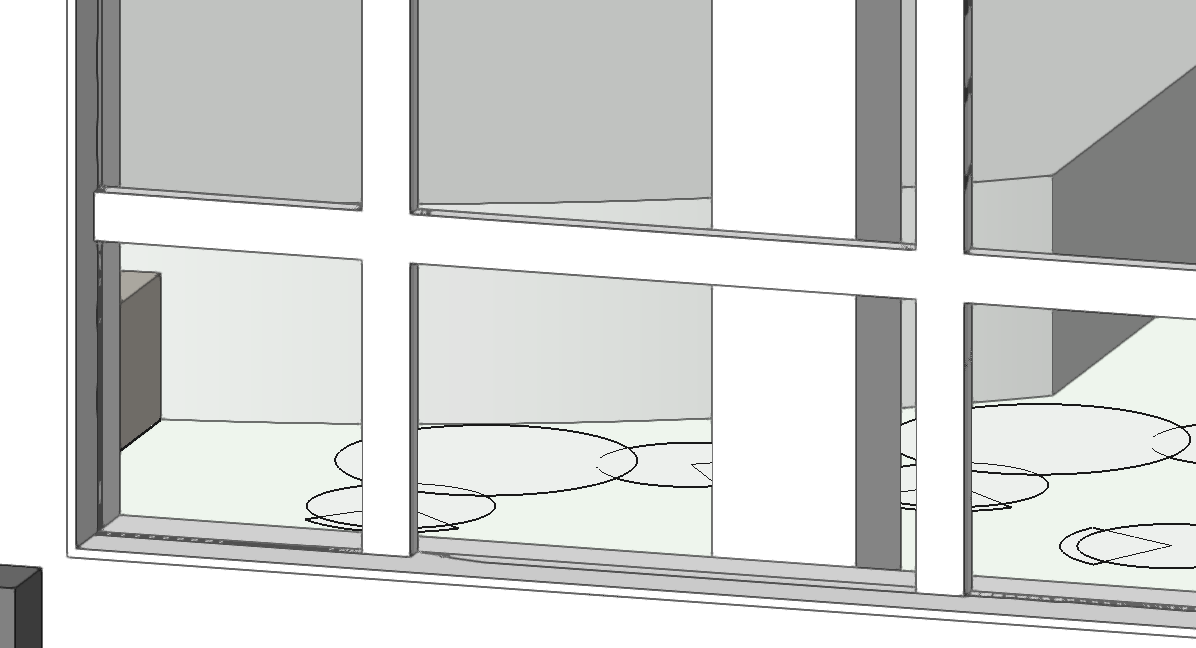
How do I get a 4" wide sash around the perimeter of of window opening using the custom sash options? When I try to add it, I get 4" sash between every muntin. I made the muntins 4" wide to simulate the sash pattern in between and thats not right either. Also when I try making the jamb 4" wide, to simulate a 4" sash all around, it does not sit in the 12" thick wall properly. This is an existing location with a wood sash pattern, but should I just simulate it with the CURTAIN WALL TOOL instead?
Thanks
Judy

 d
d
-
Is there a way to set a default style for a viewport label?
Specifically for Font Style, line weight, bubble scale factor, Drawing # size, and Title Text size?


Shade Sails
in General Discussion
Posted · Edited by Judy Cosgrove
thanks for that - I just tried "unfold surface" on one of my objects, but didn't work as it was a compound curve ...but "tool tip" says it would work on a surface modified in one dimension, such as the surface of a cylinder.
would be better if I could start with a flat shape and move it around without distorting, but you are correct - there would be so stretching for sure...I would have to approximate, and the fabricator would need to factor that in. I would like to do a model that is "build-able" and not one that is misleading. Its a conundrum.