


CiaMariaPia
-
Posts
36 -
Joined
-
Last visited
-
Wall styles should be able to have different components (brick, CMU, concrete, wood framing, etc) stacked vertically atop one another. For example, an 8' high cast-in-place concrete wall supporting a 6' tall CMU wall directly above with a ribbon strip window above that should be able to be a single wall style that cleans up to other walls and has all of the behavior of a regular wall. After much experimentation and a posting to the forum, it seems like the only option to a single style is to manually stack completely separate walls with individual "styles" atop one another and manage all of the alignment and other mechanical issues by hand. Walls with different components stacked atop one another is a common detail and VW ought to either be able to handle them as a single style (preferred) or VW ought to prominently publish the work-around and include it in your various VW University articles and PDF training manuals. The ability to handle "stacked" components smoothly and fluently style is really a necessity of a modern CAD/design software.
-
Thank you all for your responses. You've confirmed that my frustration was due to VW not being able to do this (it could have been my brain). For what it's worth, this is something that VW ought to be able to do. Given the advertisements and the marketing promises, you'd think it would handle this easily given how often the condition arises in almost every type of building. I guess this is why it's not listed as a "feature" My current building is relatively simple so I'll use multiple individual walls stacked atop each other but this is neither logical nor efficient. Thank you again:)
-
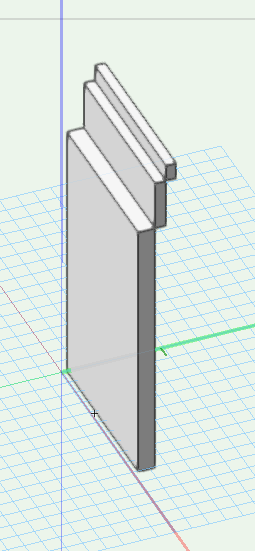
I'm trying to model an existing warehouse building whose 20' tall exterior wall construction varies by height. The first 16' is 12" thick concrete. A 36" tall 8" CMU wall is set atop the concrete wall with the west faces aligned. Finally there is a 12" tall x 4" thick insulated metal sandwich panel set atop the CMU wall. The west faces of all three sections are aligned (so the east faces step back 4" as each material ends and the next begins. Can this wall be modeled as a single style? I've tried but I can't seem to get the 3 walls to be aligned atop one another. Instead of a wall that is 12" thick at the bottom, 8" thick in the middle section and 4 " thick at the top - BUT only 12" thick at it's thickest point - I get a wall that is 24" thick in plan view. The three components are the correct thickness and located at the correct height but they are not vertically aligned but rather staggered. How can I get the three sections aligned?
-
Line Types of Symbols from Existing to Demo
CiaMariaPia replied to MaxStudio's topic in General Discussion
Thank you Tom! I've turned off "auto-classing" and can see that's having the desired affect - at least on my test symbols. I've got a bunch of (failed) samples with small variations that I've been using to work thru this question. I'll go back through them and reset them to the new settings to make sure I've got right idea. Have a great day!- 7 replies
-
- 1
-

-
- line types
- symbols
- (and 2 more)
-
Line Types of Symbols from Existing to Demo
CiaMariaPia replied to MaxStudio's topic in General Discussion
I've been trying the "demo stuff in a demo class" approach but the objects I'm trying to do this to are Symbol/Plug-in Objects that come with VW. They are auto-classed and resist my efforts to assign them to "demo" class, they just re-assign themselves to their original class. This includes following the VW Help instructions to duplicate the original symbol, rename the duplicate and edit the duplicate. I've also edited the class name worksheet to add the desired "demo" classes to it. No luck so far. -
Line Types of Symbols from Existing to Demo
CiaMariaPia replied to MaxStudio's topic in General Discussion
I'm having the same problem so I'm wondering if you ever found a reliable solution. Thank you. Tom -
I have the same question: How can these workflows - which seem to use "unstyled" walls, be applied to styled walls that have internal components (and the linework that goes with them)? Thank you.
-
Thanks for the advice! I'm just working locally, not on a network. I've been "importing" the pdf but I'll try the JPG approach. Have a great week.
-
I'm trying to trace information from a scanned pdf. I import the PDF into VW and can see the image. I work with it for a few minutes and then the image disappears. The PDF file is still loaded and I can see its outline but there is no image. I've tried saving, shutting down and restarting. Sometimes the image re-appears but generally the image will not appear. I've tried turning the PDF's "fill" and "pen" settings on and off. No effect. Any suggestions to get the PDF image to appear? Thank you. Tom
-
My Wish List item: The "Search" function in VW's "Help" feature should return results in some type of hierarchy to make the results more immediately useful to the User. Example: I recently had the opportunity to use the VW Landmark workspace to augment the building I was designing in the VW Architect workspace. Switching back and forth was easy! But then I realized that I had no idea how the tool I was going to use (Hardscape) was supposed to work. So treated it like a slab and off I went but then drove myself into a corner when it came to controlling the hardscape's slope and displaying that information. After some frustration looking in VW Help (a "Hardscape tool" search returned 24 separate entries, some them different portions of the same page but none focused on the tool itself and how it worked) I got some excellent help from the folks at VSS. I realized my problem was that the results I got using VW's Help "Search" suffered from whether or not I used a appropriate search word/phrase and from the fact that VW's Search tool doesn't produce any type of sorted or hierarchical results. In addition, the tool icon/pallet didn't allow right-clicking to get a context menu where I could go to a "how to use this tool" explanation for the tool.. It would be a great help to be able to jump directly to "how to" info on a tool or at least get Search results that are sorted. Perhaps categories such as "How To", "Simple Tasks", "Special Topics", "VW University" etc. Thank you.
-
Thank you both for responding to my initial post.
-
Tom W - Thanks for the suggestions. I have been trying to model the windows using the standard window tool because there are so many "flavors" of windows and so many manufacturers. I was hoping I'd find a few key variables that would give me enough control that I could get close enough . As you note, it's a struggle mostly because it's so time consuming. I'll look at Andy Broomell's tutorial and learn something new. Thanks again! Tom O
-
We use many different types of windows and doors and try to design AND draw accurately so that our "design intent" is clear and simply stated. Is there a way to create window "styles" that create windows that are more reflective of modern aluminum or vinyl windows and glazing systems? VW's window styles always look like wood windows. That's fine for old buildings that use wood windows or for residential applications where wood-based windows (Pella, Marvin, etc) are the norm in our area. But when it comes to schools and other commercial buildings created from extruded aluminum or vinyl are at least as commonly used. Even the Anderson windows that come in the standard VW Library really don't display the window components in plan view accurately (window sash size and location relative to the window frame. 1. Is there a white paper or tutorial that explains the various different style parameters and how they interact with each other? 2. I see that creating symbols is often recommended for customizing components. Can such symbols be linked to window styles so that they substitute for the off-the-shelf component profiles when a window is inserted? Thank you
-
Matt - Thanks for the tip. This is actually a great solution because it's simple, uses regular workflows (not work-arounds) and avoids the time and effort required to fuss with graphic settings to "hide" the sometime unintended consequences of work-arounds.
-
Thanks to both Tom and Kevin some ideas for me to try. My building has a couple of different flavors of this condition. I only illustrated 1 because it was easy to grab a screen shot of that particular spot (2 offsets fairly close together). I have a number of conditions where there is only a single offset and the next offset is 20'-30' away, sometimes on the other side of an intersecting wall. I also have a condition where the wall keeps getting thinner as it steps from 16" thick to 4" thick in 4" increments over a distance of 20 feet or so. But you've shown me a couple of ideas and I'll start trying them out. Thanks again and have a great week!