
Taproot
-
Posts
516 -
Joined
-
Last visited
Content Type
Profiles
Forums
Events
Articles
Marionette
Store
Everything posted by Taproot
-

window sill and glazing bar glitches
Taproot replied to Cadplan Architecture's topic in General Discussion
Adding to Wes's comments, regarding the offset sill - check the "Plan Wall Offset" setting on the "General" tab of the window settings to see if it is set to something wonky. One of my personal frustrations with the window tool is that Stool and Sill settings are linked. If your exterior and interior trims are different sizes, and you exterior sill horns and interior stool horns are controlled by a single setting, so one of them isn't going to look right. -
Perfect - now it works. Thanks.
-
Thanks! This inspired me to give it a try. It looks like Twinmotion no longer supports OBJ file import. FBX seems to be the only compatible format between Vectorworks export and TwinMotion import. Is that true? I ask, because using the FBX format, I found that a number of object planes didn't translate as solids (notably roof edges and undersides). Is there a current standard practice of how to get files from Vectorworks into TwinMotion listed somewhere? I couldn't seem to find one.
-
That's been true for me as well. With 2019 Service Pack 3.1 the software finally feels stable enough to use.
-
We usually move the demolished items into a "demo" class. That lets us automatically assign common attributes to the objects. I try to limit extrudes in architectural drawings because of the difficulty in controlling 2D rendering. We use them primarily in complex modeling applications where they are used for 3D renderings and assign them to a "Model Only" class (so that they disappear in 2D. Instead of extrudes, try using the "Floor" feature. That will allow you to create an object that will allow for independent control of 2D and 3D appearance and can often be used instead of an extrude.
-
Typically "Balloon Framing" means that the studs are continuous across multiple stories.
-
We upgraded one of our workstations to Mojave and ultimately had to return it to High Sierra (it wasn't an easy process). Perhaps you will have a better experience than us, but I agree with Lupin - to preplan an exit strategy just in case.
-
seemingly not available this year... In your situation, you are probably best off just redrawing that wall. The new wall will likely accept the doors and windows. I find when an object 'breaks' like that, recreating it is usually the best long-term solution. Over the last five months, we've tried to use v2019 several times... starting up new projects, etc. Even with the latest service packs and a lot of patience, we've eventually had to abort each attempt and return to v2018. This last week, I just re-expierenced this lesson (again). Fortunately, backsaving to the older version of the program has worked fine. The Undo bug I posted in this thread is mostly fixed ... but yes, I have still been able to recreate the problem - albeit after several hours in the program. One of the other critical bugs that we discovered ... and I don't believe has been reported yet is in Floor Objects. This one is hard to recreate - as it works fine for quite a while ... and then it doesn't. We found that when reshaping a floor object (the polygon within the object) that the 3D object would remain unchanged regardless of the fact that the 2d geometry had been revised. Once the bug appeared, it was stubborn and persistent. After a fair bit of troubleshooting, we eventually replaced all of our floor objects with roof objects (with no pitch). That solved 'that' problem. Another critical flaw was the disappearance of all geometry display in 3D openGL. Fortunately, our pre-saved views would restore visibility, so we just learned to work from saved views rather than axonometric or other standard VW views. I like a lot of the features in 2019, but using it hasn't worked well for us. Upon Reflection: I think the bug submital process could be really improved for program users. Our working files have private information relative to our clients as well as lots of intellectual property that we don't mind sharing with the VW engineers, but also don't want to post publicly. I think this forum should have an option for attaching files that are viewable only by the VW staff. That way problem files can be attached directly to posts but remain private. If this functionality exists, I am unaware of it. At present, it feels like it takes a substantial amount of effort to report bugs, submit files, and help resolve issues in the software. Clearly this is a persistent need and could use some improvement.
-
This feature still appears to be broken (v. 2019 service pack 2). Merged cells somehow defeat the auto row height setting and they all have to be set manually. This should be fixed.
-
You might be able to use a muntin to work as the center object (if those are available to you), or you could just set an extrude inside the window jamb. They are work-arounds (obviously), but might save you some time.
-
Is it just the roof that isn't visible, or is the whole model invisible in 3D? I've had the latter problem happen. My workaround ... keep both VW 2018 & 2019 versions active. When the file breaks in one version, (backsave as necessary and) open it in the other one. So far that has worked.
-
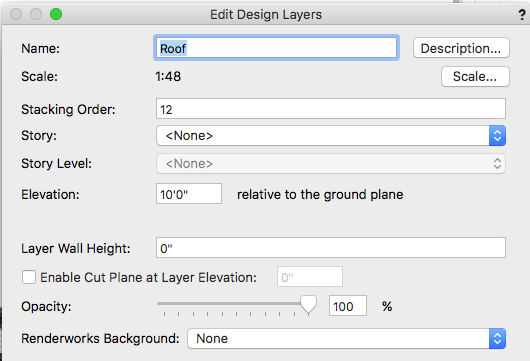
Acip79 I'm not using Stories, but the first place I would check would be the Z height of the layer that the roof is on. Control / right click on the layer, select EDIT ... then check what elevation the layer is set to. You may need to reduce it to the same as the ground level (if you have manually placed the roof to match in your 3D working view). Here's an image.

-
We tried to adopt stories a few times and ran into so many problems that we ignore that part of the workflow opting instead to manually offset components, etc. So far - I think it has been the right choice. On the other hand, I'm happy to hear that you are dedicating some time to provide habitat for the elusive unicorns. Their needs are often overlooked.
-
I can't say that I understand your question. If you are asking how to speed up data entry, you can of course copy and paste between cells.
-
Archdaly, Those two columns appear to be corrupted. I was able to solve the problem by creating two new columns and then copying and pasting your original criteria (in the database header row) to them. Attached is your test file with that update. The original two columns are shaded - you can delete them. The working columns are unshaded. Cheers. TEST2.vwx
-
If you can post the file, or copy a few doors and the schedule into a blank file, I'll take a look at it.
-
Jim, Another quirk is that if you use the eyedropper between walls, but click "cancel" when the wall component matching dialog opens textures will still be applied to the second wall. I don't think the program is intended to work this way, but I often use it as a quick method of moving textures between walls when I need to.
-
Archdaly, I assume that you tried to type directly into the worksheet. Try selecting the door and then in the OIP - click on "Settings" In the settings, select the "Data" tab at the bottom of the list and try and enter your data there. If that doesn't work, the doors may be styled - so that they all retain the same labeling ... If you post an example file with that schedule in it, we may be able to figure out what is going on.
-
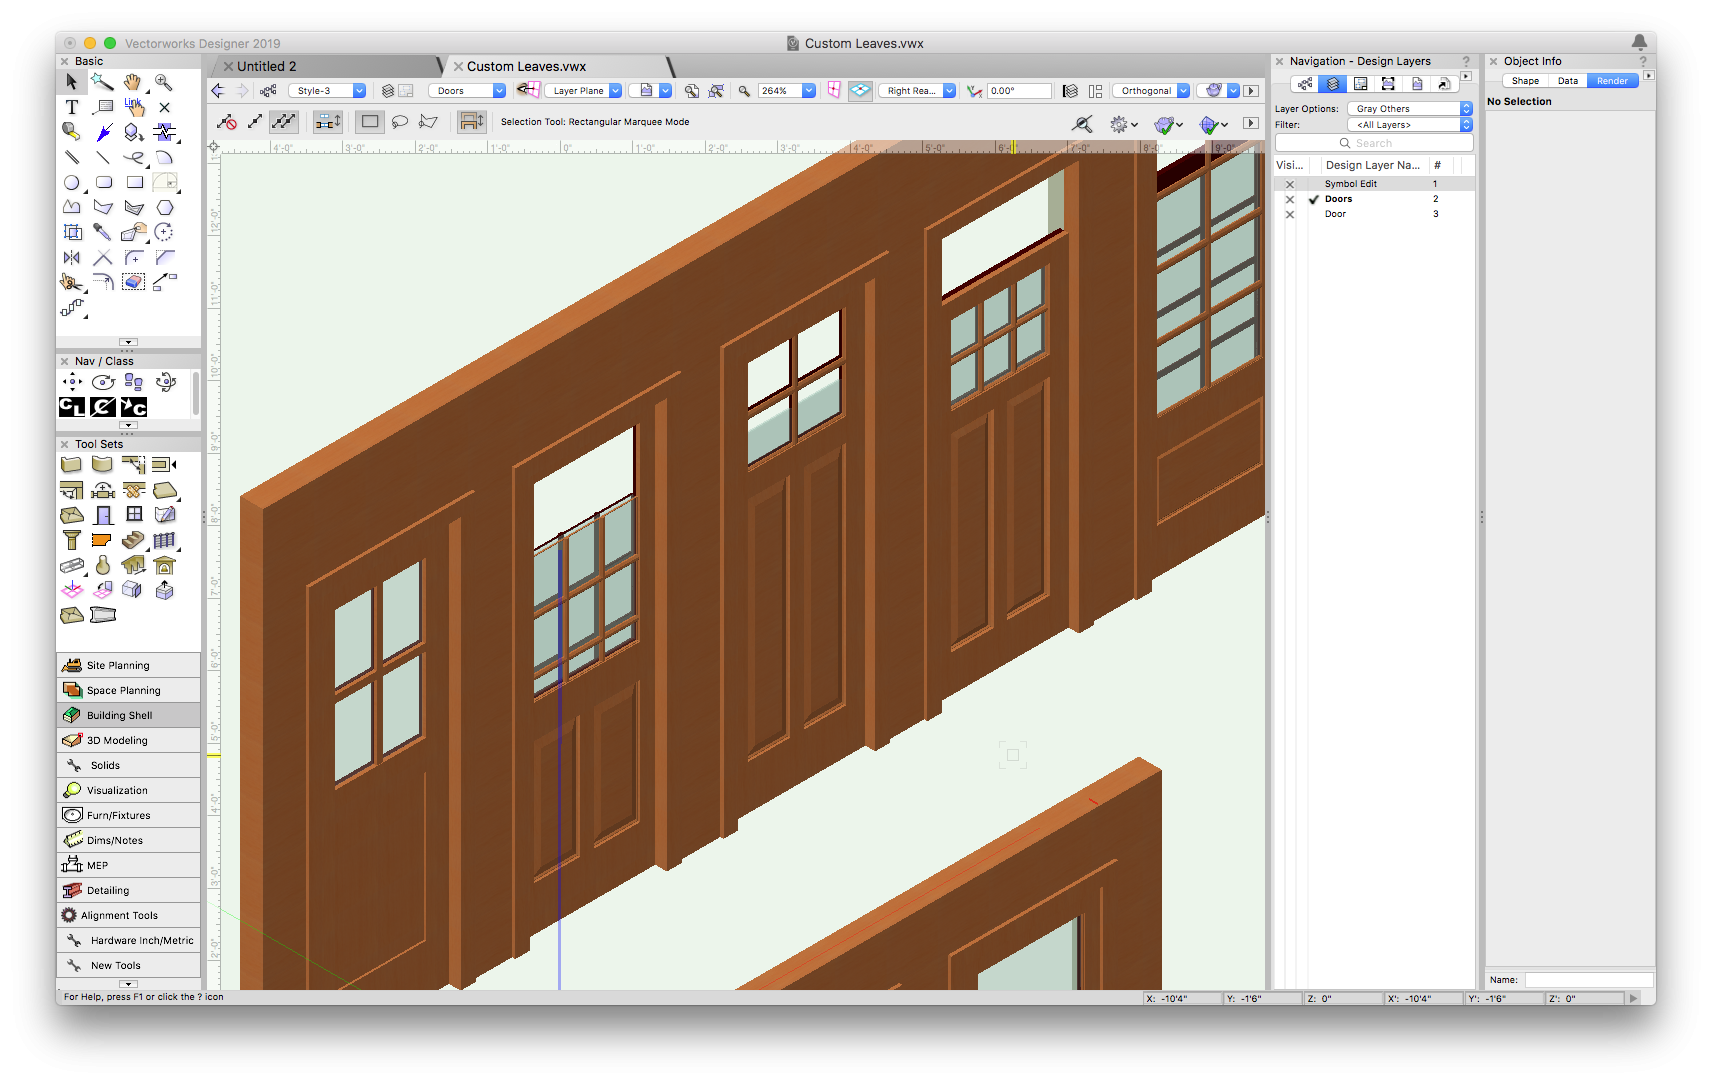
I decided to run a parallel test - dropping in the door leafs outside of a door object and then using the symbol asymmetric scaling option in the OIP. I presume that is what the tool is doing anyway... All of the leaves tested function perfectly. Therefore, my conclusion is that this is a bug.
-
How to mask out hidden line in front of image props?
Taproot replied to Christiaan's question in Troubleshooting
I haven't found one. My work-around has been to just relocate the props where they aren't in front of lines or, turn off hidden line rendering, or my favorite... Apply an aggressive sketch filter so the unwanted lines blend in. -
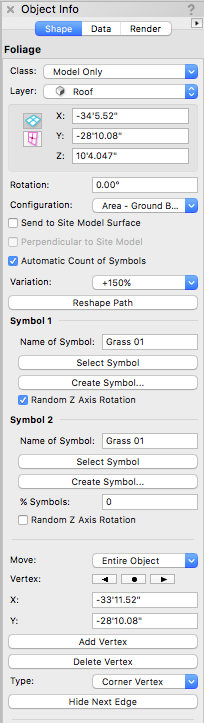
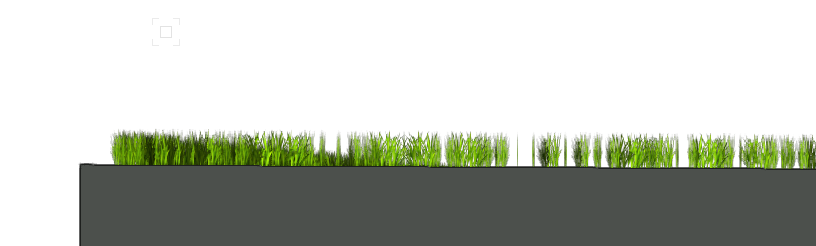
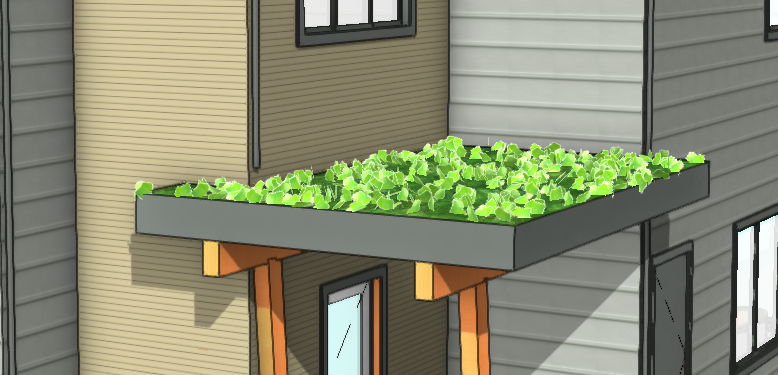
Christiaan, I don't have a texture to offer, but I have been looking into how best to render Living Roofs and have some thoughts that might be helpful. We've had good results with the FOLIAGE tool. One technique is to use a random rotation grass object around the perimeter of the roof - which adds some better dimension to elevation views. Here's an example and the settings: For surface areas, another technique is to use the same tool to add three dimensional texture to the surface of the roof. We did this using the "Area on Ground" setting of the Foliage Tool. That way, you can use a standard base texture map for the majority of the surface and add a little three-dimensional interest . It works well if used in moderation ... too large a surface and it slows things down.

- 1 reply
-
- 2
-

-
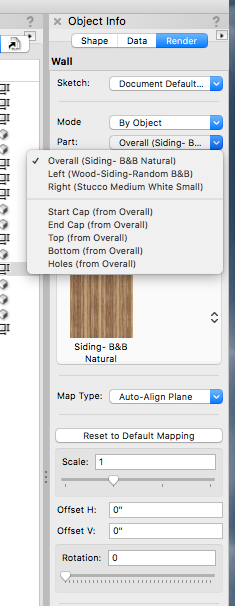
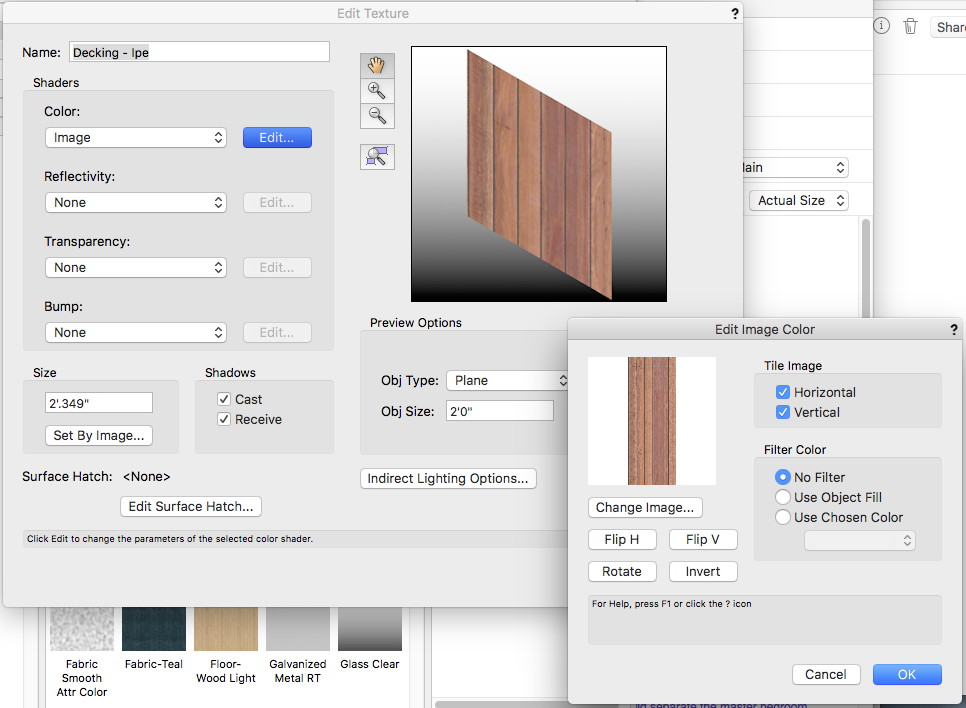
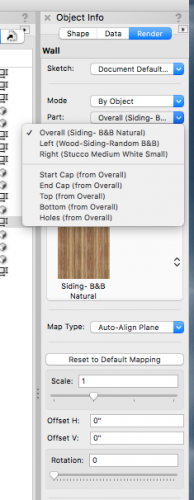
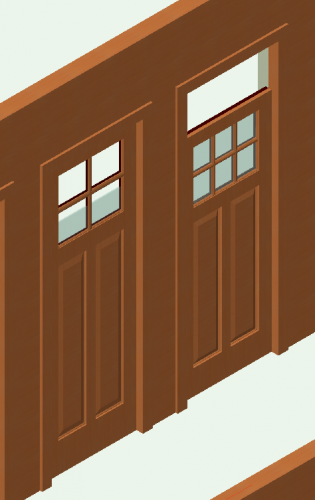
The CMU / Siding issue is probably related to which way your textures are oriented. It's pretty common to need to rotate them visually on the surface of an object. To do this: Select the object you want to modify. Then go to the render tab of the OIP. Here's a wall example. For this example, I'm using the mode "By Object." That allows you to texture each object differently. You can also use by class or by wall style for universal texturing. For maximum control, use "by object." Where it says "Part" select the face of the wall you want to change. You can pick left, right or overall. In plan you'll see an arrow and a dot at the ends of the wall when it is selected. Left or right is relative to the direction of the arrow. Once you select a face, you can control the texture and mapping upon it including rotation of the texture in degrees. The process for a roof object is similar with the parts listing "Top, Bottom, etc" If you find the texture is consistently oriented the wrong way, you can simply rotate the texture itself in the resource manager To do this, select the thumbnail of the texture in the Resource Browser. Right click or Option-click to edit the texture Which will bring up the following screen. Where it says Color>Image, click edit. In the pop up will be the option to "rotate the image". Be aware that if you do this after you have applied this texture elsewhere in your file, it will rotate the texture on all instances where it has been applied. This can be a quick way to change a texture throughout your drawing. I hope that helps.


-
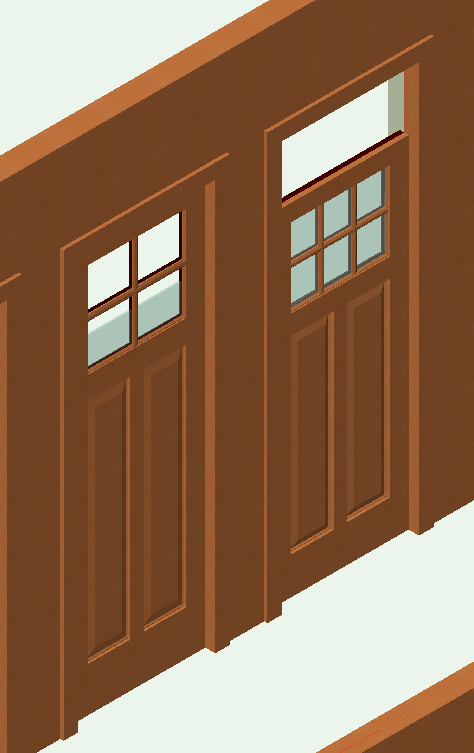
Is anyone using self-made custom door leaves? I modeled a number of them years ago in considerable detail. Around v.2017 they stopped resizing correctly. The doors were modeled as 6'-8" tall. I commonly need to adjust them to 7'-0 or 8'-0". I'm trying to fix this issue, but can't seem to figure out how. I have followed all of the "rules" i.e. generic solids, insertion point at bottom center, etc. But I'm getting weird distortions when sizing is applied to the symbols: Glass panels stay in position while the sash stretches One sash stretches (i.e. exterior or interior) while the other keeps it's original size. in some cases there are no change to the size of the object I've tried copying the geometry into new symbols and duplicating the VW custom leaf symbols and then replacing my geometry within those objects ... without consistent results. Attached are a few screenshots of the distortions plus the file. I keep thinking it shouldn't be this hard ... is it just broken and no one is using this functionality? Or, is there some fundamental shift in how VW codes solids that my older data doesn't conform to? Guesses and guidance appreciated! Custom Leaves_Taproot.vwx

-
Well done! I'm glad you were able to persevere to a solution.
-
If the roof is one plane, you can make the roof face tool work so long as you compute the actual angle of the slope of the roof relative to horizontal. With a bi-directional roof pitch the slope arrow for the roof polygon will need to be at an angle rather than perpendicular to the polygon perimeter. You can calculate the angle using trigonometry (or a lot of trial and error)...