


Taproot
-
Posts
516 -
Joined
-
Last visited
Content Type
Profiles
Forums
Events
Articles
Marionette
Store
Posts posted by Taproot
-
-
9 hours ago, Rob Books said:
it takes about a year to create the Vehicles
Wow - that is a significant task. I didn't realize the vehicles were custom built for us. They are very nice. Thank you.
-
Has it really been 12 years since the above post (incredulous voice)?
I recently needed to revise the plugins that I created from this thread and thought that they might be useful to some of you, so I'm going to include them here.
These are all point and shoot tools. Clicking on an object carries out an action. Listed in order of appearance (icons below)

- TA_Set To Active Class - In the event that an object is mis-classed. This tool lets you click on the object and move it to the active class.
- TA_Class Hide - Sometimes a class is in my way and I just want to hide it from view. Clicking on an object will hide its class.
- TA_Activate L+C-Tool - I jump around a lot in the drafting process. When clicking on an object, this tool makes the active layer and class that of the object. I've set this one to a standard hot key in the workspace editor (makes it really convenient to use).
Use at your own risk ... but works fine on my 2020 mac setup and as they are über simple and should work on most any configuration of VW.
To use: Download, move into your plugins folder (start or restart VW) and then add them to your workspace.
-
- Popular Post
1 hour ago, P Retondo said:How about some real world testing to see if things work before calling it done! And we have been living with this tool for year after year with no improvements despite the many thousands of dollars sent to NNA. Think about optimizing the workflow, and making it easy to just enter a surveyor's information and end up with a property line. Should take no more than three minutes! Instead, I am fussing with this thing for hours.
@P Retondo Excellent points.
I think this is a persistent theme that (I hope) is reaching a tipping point. The software needs one or more staff members whose sole responsibility is Quality Control and are tasked with going through the existing tools and functions and cleaning out the broken bits.
-
 6
6
-
That got a grin - I'm glad the feedback was useful. Thanks for adding some levity to the forum!
-
1
-
-
I find myself wondering if the Wish is for an Energos section or a 'Search that works'?
Both!
I agree with @Patrick Fritsch and have given up on trying to search the board directly ... Google works much better.
-
1
-
-
This tool is a good example of how polishing up the little everyday items can make a big difference in the user experience.
-
3
-
-
@Boh Like Pete, I use hybrid symbols as well. It's pretty quick if you create the 2D part of the symbol by using the 'Covert Copy to Polygons' (hidden line) command while the 3D object is selected in plan view.
I find 'hidden line' views to be slow and problematic. Wall join issues and minor errors in VW rendering create fragments that can require masking or a lot of time to fix.
I pretty much always use hidden line in combination with open GL textures for elevation views. The textures help show the geometry even if the line fails.
Also - check your Document Preferences > Mesh Smoothing with Crease Angle. I typically have mine set to 70.
While it likely doesn't apply, if you are having trouble with curves, I have found that tweaking that setting can positively (or negatively) effect the rendered result.
-
1
-
-
@Snowbunny That may be the case. Try "Set by Image" and then drag the two points of the line (you may have to zoom in to see it) to the full extent of the image and set the value to a real world approximation of its size. Then in the "Edit Texture" dialog, Set the "Object Size" to the same value. The latter setting is really a preview of what your texture is going to look like tiled, so you can set the zoom distance by how its size differs from the "Edit Image" size.
If that doesn't work, try applying the texture to an object and see if it works in the file (and at what level of zoom).
If that doesn't work, try re-importing the image source file as a different file type i.e. JPG or PNG (different from what you did the first time).
Good luck.
-
1
-
-
Yes, even those of us who studiously figure out the idiosyncrasies can't manage to make some of these tools work consistently. It shouldn't be this hard.
Given what I know now, I'm almost inclined to just insert doors as cased openings and then use symbols for my custom door leaves. That way I can maintain better control over the objects and scaling. Obviously scheduling becomes an issue, but I might give it a go anyway.
-
1
-
-
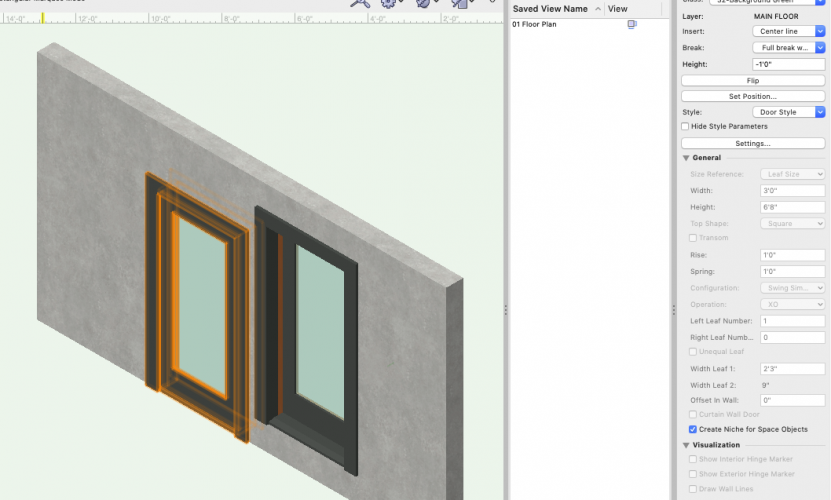
@techdef I think that would be a difficult one to plan for. Doors and windows would need to be aware of where they are relative to the finish floor. So, what happens if you have a step up in the building and the floor is now 6" taller, but the wall extends 18" below the floor level (to match with the other exterior walls)? The problem just gets kicked down the road a bit.
I often use the same technique you do - extending the base of my walls down an extra foot or so to cover the floor system. For what it's worth, in the OIP the door height will show up as an offset from the 0' datum in the following image it's -1'-0". I find it pretty easy to adjust the height to 0 (or whatever I need it to be) as part of the door insertion process. Perhaps you already use this technique, but if not, it might be helpful.
-1'
-
3 hours ago, tekbench said:
1. The Roof Tool. I'm having a tough time deciding if this is a tool that is useful for complex designs.
The existing roof is a super simple hip roof. Building is square, so no ridge. Just 4 hips, coming together at a point. In the living room, we're putting in an acoustic ceiling (recording studio style with 2x6 joists and rockwool, not a typical office drop ceiling) below the existing roof. Having a hard time integrating my roof 'parts' with the roof tool created parts. Couple questions for the group:
*If you draw custom rafters, blocking or joists, do you use extrudes, solids, Polys, lines/groups or some other item as your main go-to? this is basic US Pine/fir/hemlock 2x6 and 2x4 framing material we're using. Nothing special.
*Is there a preferred way to create custom rafters/blocks/joists that better works with the Vectorworks Roof Tool?
The roof tool is more of a helper than a tool. I usually use it for hipped roofs at the beginning and then explode it into roof faces for more detailed work. For a pyramidal roof, you could use it this way or model each roof face and then duplicate at 90° to complete the 4 sides of the roof. I prefer to work with roof "faces" rather than the roof tool. I typically model a 1" thick roof face which is equivalent to 5/8" ply + 3/8" roofing. I can then texture the top with the roofing texture and the bottom with a plywood texture.
Once you have a roof face, go to the menu: AEC>Framing>Roof Framer.
That will create rafters, purlins, etc using the framing "helper." It's not a smart command, in that there's no telling where it will start the layout from, but it will match rafters to the right pitch etc. My advice is to use it to create your basic framing components and then manually adjust the layout, overhang lengths, etc. Once you have one face done correctly, you can group and copy the members to the other 3 sides of the roof. If you need to create custom framing members. The "Framing Member" tool is versatile and allows for easy adjustment on the fly. If you want more control, you can go with an extrude, but they are harder to manipulate later.
I have my framing members set to classes for texture mapping. For wood members, I use textures with a fine enough grain where it doesn't really matter which way the texture is oriented (it's a crapshoot). For locations where grain direction IS really important, I make two different textures (one rotated 90° from the other) and apply them to the respective surfaces where they look right.
3 hours ago, tekbench said:2. Solid paneling on stud walls as a final surface feature. We're using pre-finished Birch panels as finished wall.
*I'm using .5" thick 'walls' as the panels. This method seems 'heavy' and a little bit clunky. How do others typically do this? There are a number of cutouts, subtractions and flush fit things in the panels, so it's not just a plain slab of ply oriented on the wall. The grain direction in rendering also seems to have a mind of it's own. I can sometimes get the grain to orient properly, but sometimes it wont. (select OIP, Render tab, rotation) Panels that were walls and are now 'solid subtractions' are rotating properly. Some others are not.
Why not use a multi-component wall with a stud cavity and a 1/2" thick paneling component? Or, are you modeling each stud?
3 hours ago, tekbench said:3. The door tool.
*It seems totally useful. And at the same time, well, fairly complicated to do simple things. Like paint one side of a door pine, the other grey. seems like I'm missing the boat on this one. What 'best practices' are people using for custom door skins/colors?
@fabrica explained this one. In the Door Settings > Classes you can control the appearance of panels, rails/styles, etc. separately.
3 hours ago, tekbench said:TIA. I appreciate it all. any comments are more than appreciated.
Kelly
VW can do anything you want as long as you're willing to fiddle with it long enough.
-
Make sure that in your preferences you specify a location and a saving interval time for a backup file or file(s). That way, if something goes catastrophically wrong you can go back a little ways in time rather than have to recreate a lot of work. Personally, I save version files all along the way so that I have solid backups to return to if needed.
I can't comment as to why your textures disappeared, that is a query for tech support. However, stairs are challenging as the individual elements (risers, treads, etc) are controlled by settings deep within the stair tool. So, you need to set them there.
I do find that textures sometimes need to be toggled to actually apply to an object. As in: Apply the texture and no change is evident. Then, apply a different texture and undo it and often the correct texture will show up.
-
-
- Popular Post
- Popular Post
@E|FA The learning curve with software takes a lot more up front, so if you find one that you're comfortable with then that's a big hurdle overcome and sticking with it may be the easier course.
Layer opacity in Procreate is super easy. Select the layer, then the selection wand icon (Gallery, Wrench, Wand menu at top left). The first choice in the pop up menu is "Opacity" and you just slide your finger left or right on the screen to set it to whatever looks right to you.
I also really like the layers ... you can easily add layers (hit the + button) or pinch two of them together to combine them....
If you really want a long term robust app, then it's definitely worth a second look. To do so, take the 30 minutes to view some experienced tutorials. Most of the features aren't spelled out for you, but once you start using them you see how thoughtful and intuitive they are to use on the fly.
I especially like the way in which it toggles between constrained and unconstrained modes. You can easily toggle "assisted drawing" mode on and off and if you're drawing freehand, you can just hold the pen down and it will automatically lock in a constrained mode for drawing straight lines, circles, etc...
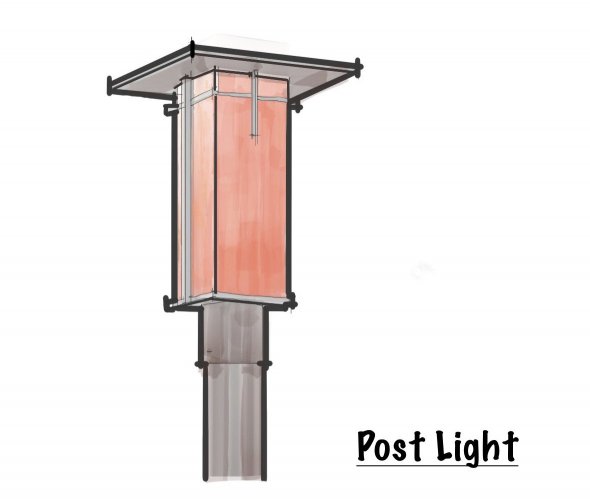
Here's a quick test where I imported a photo, reduced its opacity and then traced over it before deleting it. Just a few minutes of effort.
-
5
-
This topic comes up steadily over time, but as my texture libraries mature, I'm always on the lookout for the best available resources to add to them.
This past year, I finally went beyond DIY and free resources and made a "donation" to https://www.sketchuptextureclub.com/
It cost me about $13 USD and provided me with access to the site for the year. I have no affiliation with them, but I can definitely say that the investment was worth it. I've downloaded hundreds of high quality seamless textures and really improved the quality of my 3D renderings as a result. The other plus is that new textures are added over time, so it's not just a static set of files...
I'm not looking to be redundant to other posts on the forum, but if you've discovered other great resources please add your 2 cents.
-
2
-
-
@Christiaan I'm curious if you went that way. I tried it for a while but wasn't satisfied with it. I also tried a number of other architectural sketching apps before finally settling on Procreate. Digsketch has some videos on YouTube which showed me what was possible and convinced me to give it a go. The interface is elegant and after some use - it's hands down better than everything else that I tried.
-
1
-
-
- Popular Post
- Popular Post
@DLBurke I don't know of any. Years ago, I had translated the Simpson library into a symbol library for VW. I've back-saved it to v.2017 and attached it to this post. It's about 180mb, so not a small file.
While it's not as smart as a plugin, you can access most all of their hardware as symbols - which I've grouped into folders.
One word of caution - it's several years out of date, so newer products won't be included, but it still works for most needs.
-
6
-
@Boh From my experience, you have the right approach. One trick / tip I would offer is to create a library of standard components: Returns, extensions, uprights, etc. Instead of trying to model everything as one polyline / nurbs, simplify the operation. That way, your angled rails can be a simple EAP. Your miters won't match perfectly, as returns will be horiz. and rails will be sloped at 1:12 ±, but it's generally close enough that the error disappears in the line weights.
-
2
-
-
Make sure that Layer and Class Options (option click - context menu) are set to "Show/Snap" others or "Show/Snap/Modify Others"';
Double check that your snap constraints are turned on?
-
7 hours ago, Christiaan said:
This kind of categorisation could also be done with Tags.
I've experimented with tags, but since users specify the tags, it's really like adding keywords to a post rather than any kind of big-picture structure.
I imagine that it could work with a closed system - where the tags were selected from a pre-defined list. The trick would be in making the user interface friendly enough to use as there could be a thousand+ different tags. I would imagine an automatic search on entry so that a list of tags that matched the spelling would pop up upon entry. That assumes, however, that everyone has a detailed name recognition of all of the tools, menu commands, etc...
I don't know that I have a better answer, but I do appreciate the increased transparency with the software team and the efforts to respond to user requests ... and I feel that the existing feedback system is woefully inefficient.
@unearthed I think the users and the shareholders already have the common goal of seeing the software succeed. We're all investing significant resources in that direction. My observation is that the process of including the users in the enhancement and development of the software is under supported and under-utilized.
-
2
-
-
- Popular Post
The "lockdown" has given me the time to address a lot of the problems in our templates and workflow. It has also given me the chance to think about how to improve the Vectorworks platform as well. Toward that end, here are some thoughts:
Crowd Sourcing
For software companies, the user base is one of the most valuable resources for expanding the capacity of the platform. Vectorworks could benefit greatly from better utilizing its users in building a better platform.
Resource Sharing
The reason Sketchup has become a standard format that so many 3rd parties support is because it does an excellent job of crowdsourcing content from it's users. Vectorworks could do this as well.
- Move beyond the limited "resource sharing" of the forum and create an actual online library that users can upload to, download from and add as favorites to their libraries. Provide a clear graphical interface (like the 3D warehouse) that offers a preview and a short description of what is available. And / or just provide a server location where user libraries can be posted and made available for others to access directly from the resource manager.
- For example, I've just translated all of the Fastenmaster (ledgerLok, headLOk, timberLok) drawings into a symbol library as well as the Simpson Titen fasteners. There is no need for everyone who uses Vectorworks to do this - we can share these efforts in common. However, who would think to look on the bulletin board for every little file like this? It's far better to have an organized library where it can be filed by CSI or some other clear organizational system so that users can select it from a list - preferably right in the resource manager without having to download it. The same could be true of textures, line styles, etc.
Vectorworks Improvement Process
It's pretty challenging to get the big picture when it comes to this software. The forum offers a bunch of snapshots, but there's no place to really get a cohesive overview. I think that is one of the main problems with bridging the gap between those of us who use the software day in and day out and the team that is building and maintaining the environment.
This breakdown is readily apparent when things come up like ...Users > " the window and door tool is broken." Staff> "What features are most important to you?"... and then 10 different threads expound upon the many woes and potential solutions - some of which are contradictory, many of which are redundant. It's only because of some of the super users who spend a lot of time consolidating these threads that anything like a cohesive message comes across. I'm sure that a lot of staff time goes into trying to decipher our requests as well. The whole process seems terribly inefficient.
The Wiki Format?
A few years back, Christiaan put together a Wiki to try and and consolidate feature requests into a more coherent structure. For me, a nested hierarchical approach seemed way easier to navigate than trying to search by terms across innumerable threads. Providing a way to group feedback into categories also seems more intuitive and effective.
This is probably way too outlandish, but as a thought experiment:
What if VW created a new category on the forum with an individual thread for every single tool, menu command, or process built into the software dedicated explicitly for feedback from users on Software Improvement.
Debate could ensue about the merits and pros and cons ... and the favorite solutions within each limited area could be "upvoted." that would provide for democratic feedback that could actually work. Right now, "upvoting" seems fairly ineffective. The trick is in consolidating the feedback of the threads into a coherent whole - some moderation would be required.
That idea / format could provide a structure for crowd-sourced solutions. For instance: If I were to drill down to the "Repetitive Unit" tool I could not only complain about the symbols in the library having incorrect pitches, geometry and significant omissions, I could also just post a corrected library for the Staff and other Users to use. That way everyone can collectively contribute toward solutions rather than feeling frustrated by a lack of action.
There's much more to say, but if you've read this far, you're probably thinking that's it time to get back to some billable work ... I hope this helps kindle some discussion on this very important topic!
-
11
-
@techdef Your post gave me just enough motivation to make it through the stuck point to success. I don't know why empty folders weren't showing up before on Dropbox, but they are now. I was also flummoxed by the inability to shift between "local" and "online" locations for our files. Everything was initially setup to "local" and there was no way to switch them ... so online workgroup folders wouldn't function properly.
It turns out it was a glitch in Dropbox. After making the "smart sync" changes in the dropbox settings I had to shut everything down and restart the computer before the settings would take effect. Now - everything seems to work! So, if anyone else gets stuck ... the solution is the tried and true - turn it off and back on again.
I appreciate the collective wisdom that Dropbox is the best all-around cloud option. Thanks.
-
-
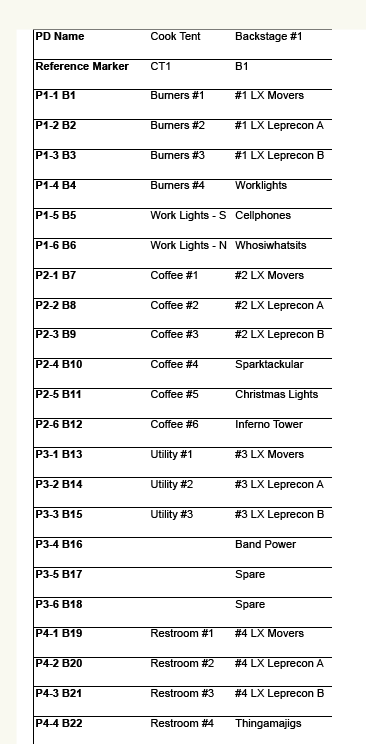
@ChollyO I think you can probably achieve what you want within worksheets. From your description, it's a little hard to visualize what your preferred solution is. Perhaps post a screen capture of a mock up of what the text would look like.
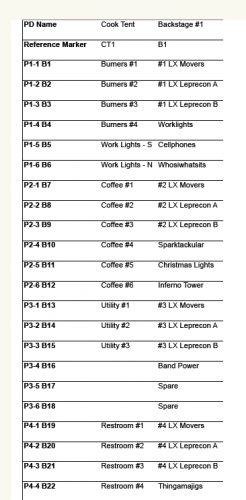
If the issue is just compactness - i.e. the long worksheet is too big to manage and read, you could just modify the cell formatting so that the text is rotated 90° and run vertically. That would make it a lot tighter.
If you wanted to take it a step further for readability, you could then rotate the worksheet on the page 90 degrees and get clever ... i.e. put the column titles at the bottom (below the database rows) and have the database row sort from bottom to top so that when viewed it appeared that the whole thing was designed left to right ... I'll attach some images to convey the idea, but you can riff off of these ideas and likely get to where you want to go.
Your worksheet with text vertical:
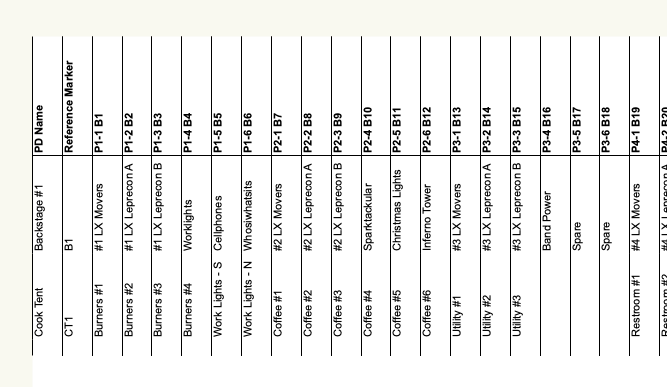
Worksheet with text vertical but worksheet is rotated 90° on the page and titles are at the bottom...


Layer Organization - Tip
in Workflows
Posted
That's a big topic, but a timely one. This spring I rebuilt our office standards around a new set of classes.
But I think that's a great topic for discussion, so rather than add it to this thread about layers, I'll start a new thread on that topic.