


Taproot
-
Posts
516 -
Joined
-
Last visited
Content Type
Profiles
Forums
Events
Articles
Marionette
Store
Posts posted by Taproot
-
-
Bypassing Bernie for a moment ... I like your convertible bed / couch idea. Probably, because I'm thinking about something similar for a family member.
One thought - rather than the exposed tabs to support the back when in a sofa position - how about shot bolts on the back side of the backrest rail? That way, you could just have a drilled hole at the head and foot of the bed. That would eliminate hitting against the protuberances while you sleep.
-
- Popular Post
- Popular Post
This short cut saves me a LOT of time and might work for you as well!
We have an extensive list of classes and long list of layers in our files.
Unlike everyone else, who drafts all of their walls at once and then all of their doors and then all of their notes in a tidy neat sequence, we constantly jump around between layers and classes as we draw.
It can be really time consuming locating the correct class and layer in the Navigation Pallet, so as our drawings develop, we usually take the shortcut of clicking on an existing object and then using the (right-click) object context menu to move us to the correct layer and class.
In VW, "Activate Class" and "Activate Layer" are two separate menu commands. So, with the built in tools you need to go through this process twice.
I do it a LOT, so I wanted the easiest (laziest) way possible.
With some help from this forum, I created a menu command that does both operations at once.
I then added it to my Workspace and applied a shortcut to it.
The shortcut code I then applied to the middle button of my mouse (my scroll wheel button)
Now, whenever I want to jump to a layer and class of an object, I just click the middle mouse button (you can use any assignable button or hot key combination) and a reticle appears - which allows me to click on any object to make it's class and layer active.
Now, migrating to the correct class and layer takes just a few seconds.
If this approach appeals to you, the tool is attached to this post. Feel free to add it to your workspace and give it a go.
-
 10
10
-
I find that it works sporadically. A long wall without any openings is more likely to work than a short wall segment with windows and doors. Overall, I would say it works for my needs about 1/3 of the time.
-
1
-
-
I've tried a variety of solutions to this issue.
- The stipple tool has a nice look, but it is very slow and memory intensive.
- I would steer clear of the linear plugin tool. I've found it to be glitchy in practice.
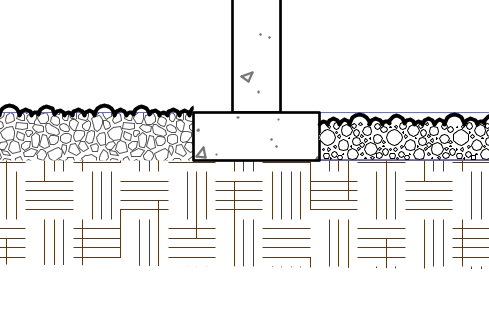
Solution #1 (preferred): Hatches
On the left side of the image below is a gravel hatch that I have set to a class. The hatch is from VW's default library. I included a solid white fill in the hatch settings to cover up the soil hatch where the two are overlaid. The hatch can be applied to a polygon of any shape. I've set the display to "page" rather than "world" so that the hatch displays correctly in both detail and section. You can override the hatch scale in the attribute pallet if you want a custom size.
In addition to a granular hatch, I also have a circular hatch (not shown) to designate drain rock.
Solution #2: Line Styles
Line styles are quite powerful and work like a linear material IF your objects conform to a fixed width along the line length.
On the right side of this graphic is a line style that I put together in a few minutes using different circles.
You could use polygons or any shape that you want repeated.
The bubble outline atop the gravel on both sides is also a custom line style - which we use for everything from redlines to tree boundaries (and yes gravel).
With line styles, you can adjust the scale per instance with the attributes, so it gives flexibility to how they can be used.
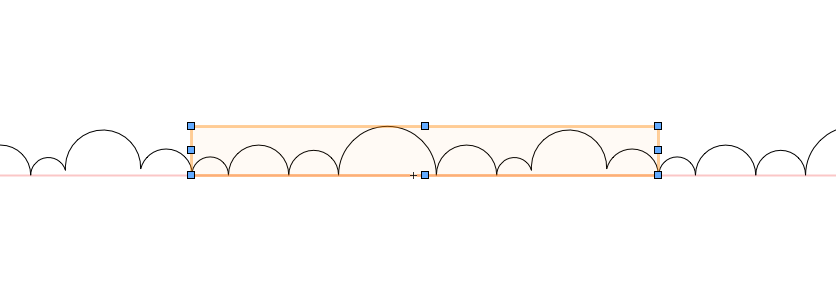
When you create a custom line and EDIT it's geometry, you'll get this view. I recommend placing your objects above or below the baseline so that you can control the display along one edge. By dragging the gray copies on either side of your geometry, you can control the repeat spacing.

-
3
-
Poking this thread - as several months later the Split Tool (by point) still does not function on walls.
VW Designer 2021 SP2.1
-
I have a G502 Logitech gaming mouse. Custom controls work in VW. The gaming software needs to be restarted each day to work.
-
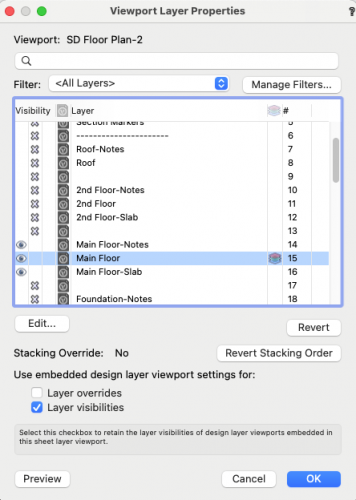
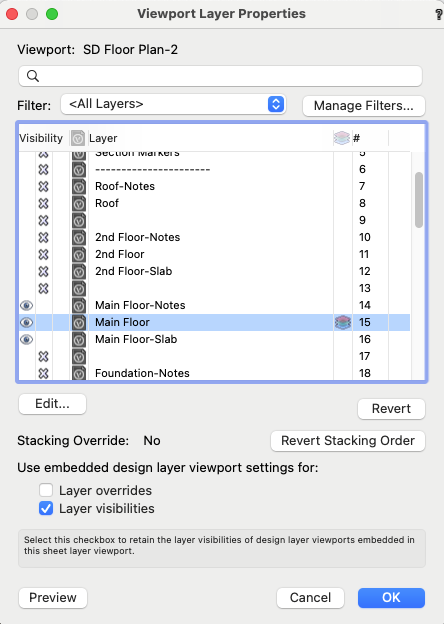
@justinekwood You can set overrides for colors in viewports either by layer or class.
Option 1:
- Move the dimensions to their own layer i.e. "Plan-1-Dimensions".
- On the sheet layers, select a viewport of your plan.
- In the OIP, hit the "Layers" button.
- The following dialog will pop up.
- Click the colored cube button for the layers you want to override the colors for (example - Main Floor) and then hit the 'Edit' button.
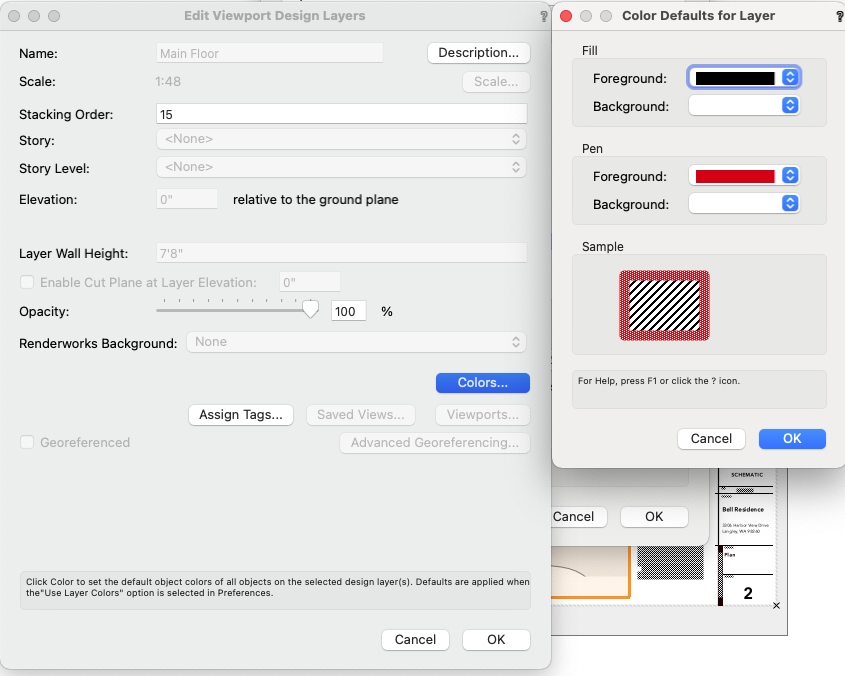
The following dialog pops up.
Override the attributes that you want i.e. pen foreground to red (for the dimensions layer).
For all of the other displayed layers, you can select them at once and override their attributes to black and white.
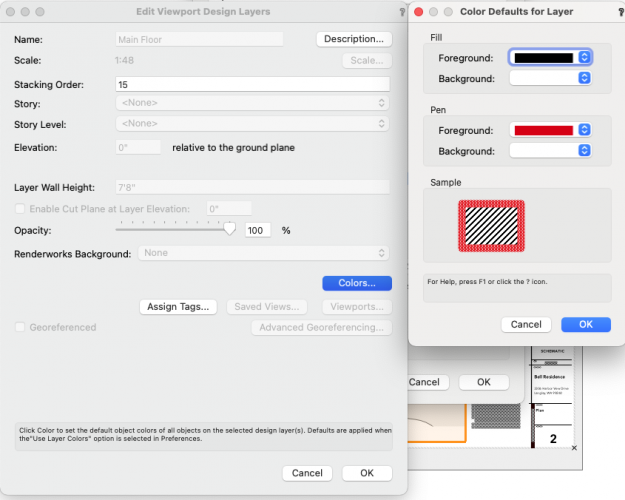
Overriding classes can be achieved in the same way in a viewport - select all of the classes, and set their attributes to some version of black and white and then just override the dimension class with red.
Most of us have MANY classes, so the layer solution is probably easier. However, if you don't want your dimensions on a separate layer, then that is likely your preferred option.
-
2
-
It works fine for me in v.2021. I even finally managed to get all of my pallets to dock on the left side of the drawing window.
The solution for me was to dock the pallets one at a time. I found that if multiple pallets were already linked up they were less likely to dock together.
Once I had the first pallet in the correct position, I was able to add pallets to it (including the attribute pallet).
-
1
-
-
Is there a simple way to add a graphic scale to the new Drawing Label?
We've just been dropping one in manually, but if this can be automated, that would be great!
-
2
-
-
On 12/5/2020 at 6:32 AM, Christian Fekete said:
@Taproot do you create a text file and then a .sta file uploaded in VW or is there a prefered process ?
great post, thanks for starting this
Christian,
I'm not sure exactly what you're asking.... as far as creating an office template, we did that in VW directly (no text file).
Our plan was to use the template as a beta for active projects and weave back in refinements to the master standard.
Instead, what we've found is that the "template" is constantly being upgraded with minor tweaks and refinements. We have a small office, so this is feasible... a larger office would likely not have this level of flexibility.
-
2
-
-
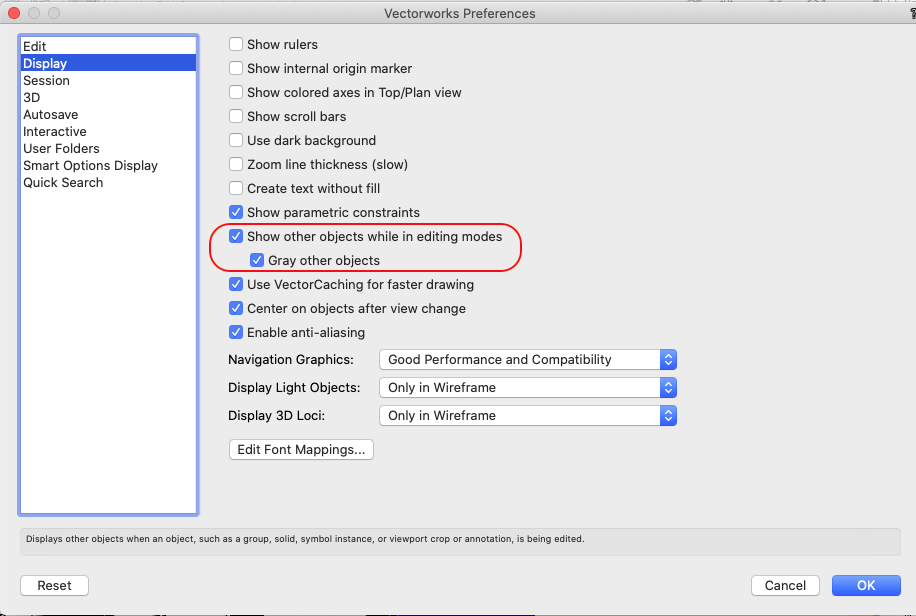
I think this is what you're looking for - Located in the Preferences:

-
1
-
-
- Popular Post
- Popular Post
One of the daily nuisances that I run into is precisely locating items along the Z-axis.
We model almost everything in our drawings, so height location is nearly as important as X & Y.
Currently VW references objects from the "bottom" - but this is often not the information that we need while we're doing the work.
----
When I select a 3D object (like a floor), I get this in the OIP:
• Bottom Z
• Thickness.
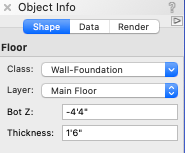
It's archaic.
Quite often, it's the top that I want to set to a specific elevation.
Sometimes it's the center.
Currently, the user is forced to calculate this on the fly for each operation.
Contrast that against the reporting and level of control for 2D objects:
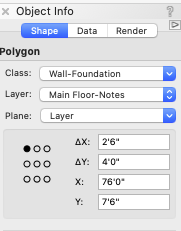
Here, you can specify what point around the object boundary to report.
I would propose:
Include a Stylized 3D cube to represent the bounding of 3D objects and allow the user to pick which point to report: (top, middle, bottom, etc) and subsequently modify.
-
9
-
13 hours ago, Kevin C said:
How come that to generate the model in Open GL in the design layer, spin it around to my hearts content, zoom in and out, switch classes on and off, take screenshots etc. only takes seconds, but to generate the same level of detail in a sheet layer can take hours??
I think Kevin's point is that the 3D working environment is working so fast now, that it's spoiled us for the slower 2D workflows. Yes, it would be great to have them faster, but in general, we haven't found it to be that much of a nuisance.
I'm not sure why it's taking 20 minutes to update a set of elevations or 'hours' for sheet layers. I push our system pretty hard (complex models) and it usually only takes a few (≤5) minutes to update a set of elevations. Perhaps it's a multi-story building with a complex DTM and lots of polygons?
One thought is to review design changes in Open GL (design layer view) utilizing standard views with a clip cube. Save each elevation as a standard view. That can allow you to review design changes without needing to render the viewport each time.
-
1
-
-
30 minutes ago, samb'ham said:
I haven't been able to get the Split Tool in the Point mode to even work on walls with VW2021. Split by Line does work on walls.
I've been experiencing this same issue and was planning to post about it. Instead - I'll just second Samb'ham's observation above.
Here's a short video:
-
1 hour ago, P Retondo said:
Or is this just a "teaser," and a more capable version is available with "InteriorCAD?
I think that is the situation.
A friend of mine uses InteriorCAD for his cabinet shop and can do pretty much anything with it, but it's a rather expensive add-on.
This lite version is limited, but still has its uses.
-
1
-
-
@MullinRJ It worked perfectly!
I deleted the Text Size substitution line (as I have different font sizes throughout the file) and it took care of it.
I appreciate the assistance.
-
1
-
-
Above and beyond Raymond!
Yes, I'm glad you didn't try and talk me through it - that's definitely 'next level' stuff.
I'll do some testing and let you know how it goes.
😃
-
10 minutes ago, MullinRJ said:
Yes,
BRB,
Raymond
Excellent.
I assume that I would need to modify this portion of the script to also limit the selection of objects based upon it's font.
On 1/6/2012 at 12:17 PM, Pat Stanford said:Begin if GetType(Hd)= 10 then begin SetTextFont(Hd, 0,len(gettext(Hd)),GetFontID(Font)); end end;
I see that Type 10 = Text Objects, but I don't know how to further limit the selection via font.
Could you assist me in that regard?
-
Is it possible to modify this script to replace a single font - rather than every font in the drawing?
i.e. if the existing Font = "Arial" then replace it with "xxx" ?
Our office formerly used a font that no longer functions properly. It was everywhere, inside symbols, etc.
Rather than trying to replace every object one by one, we opted to re-map the font to a new one. (This was before Text Styles)
This basically solved our problem. However, exported files revert back to the offending font, so the display goes wonky. It would be better to replace all instances of the corrupt font and scripting looks like the best way to do it.
-
17 hours ago, Pat Stanford said:
Unlikely, but have you checked Font Mapping for the file?
Pat you nailed it... I did a deep dive and determined that was the problem. Inadvertently, a font map had changed - so a simple fix for us and it's great to know that the 2021v. wasn't the issue.
-
2
-
-
@Art V Avenir came installed in my Mac system, so in terms of loaded versus installed I would go with the latter.
Here's a snipit from FontBook (apple's built in font-manager).
The font is listed as both Open Type and True Type.

Here's a few screen shots of just one instance in the file.
The first screen shot is from our file in v.2020, the second is from the file loaded in v.2021. (sorry different zoom levels)
The heading font has changed ... this happens everywhere in the file.


I can't imagine that it's a system issue - as the font still performs correctly in v.2020 (we have both releases running side by side). It definitely has to do with the translation to the v.2021 file. I'll send tech support the two files and see if they can determine where the problem lies.
-
We moved a sample project into v2021.
I thought the transition was very smooth - this go around.
I'm still a little amused that every year we need to update all of last years files to the new file format, thereby requiring us to 'batch convert' all of our libraries and pre-existing files.
It would be nice if on the roadmap, the file type could stabilize so that the same format could be used between different releases of the software.
OK - back to the topic - FONTS
We use 'Avenir Next Regular' as our standard font.
I favor a hierarchical look, so headings, titles etc. are in the 'Demi-Bold' version of that font.
In translating the file from v2020 to v2021, all instances of Demi-Bold were wiped out.
What a nuisance!! Keynotes, Worksheets, General Notes, Drawing Markers, Text Styles ... you name it.
It took A LONG time to restore everything within that file, and It looks like I'll need to do this manually to my Default Template as well.
But ... now I worry that any file I convert to the new format is going to lose this aspect of the text formatting and so ... a disincentive to upgrading.
If you use specialty fonts, check them carefully when converting.
-
1
-
-
I've taken to making my own colored icons as well.
Here's how:
On a mac: Select the VW app > Get Info > Select the tiny icon in the top left corner of the "Get Info" window > Copy
Open Preview: Select "New from Clipboard" > Export as a PNG with the Alpha channel checked
Open in a photo editor and change the colors > Save as a PNG
Open the PNG - copy the image > Open the VW App "Get Info" and paste the image into the same top icon location
Or just borrow the one posted above...
-
1
-
-
6 hours ago, PLENZEN said:
With the CSI Masterspec Division approach, I like the grouping. How do you handle phases? Existing, demo, new?
We have the Existing, Demo, etc. classed within Div. 02 - which coincides with the "Existing Conditions" section of CSI.
@Boh 's tips are great.
One more that I would add is to set up a custom magic wand selection (add your own parameters as makes sense).
Then when you add a bunch of say Room Names and realize that they are in the NOTES class instead of the ROOM NAME class, you can just grab them all and move them over.
-
1
-


"Do You Always Want to Do IT This Way?"
in Wishlist - Feature and Content Requests
Posted
There are so many pop ups that ask - "Do you always want to do it this way" and provide the user with a little check box in the pop-up dialog.
This seems like a poor approach.
As a User, I think "We'll, I'd like to do it this way 90% of the time, but if I need to do it differently, how can I change it?"
Could all of those settings be put somewhere accessible? i.e. In the Preferences or in a Worksheet where they can be accessed and set en masse?