


Stoli
-
Posts
7 -
Joined
-
Last visited
-
This is all very helpful, thanks all! @Sam Jones, I am a big fan of autoplot (label legend copying is my favorite!), haven't used those dimension utilities yet though! (I've had autoplot on my personal computer for years). I have been trying to find company budget to purchase autoplot and savy section on our office computer, but as of now, it's looking like a next year purchase.
-
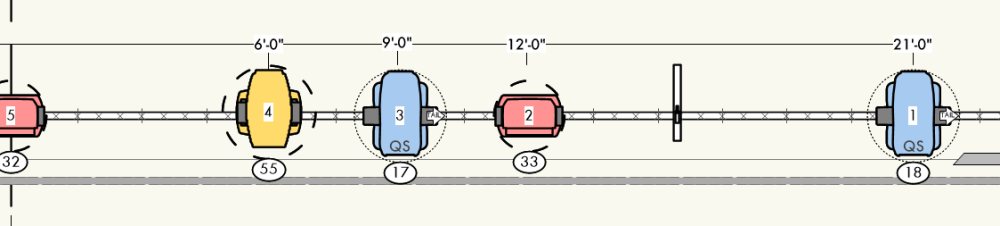
Attached is an example of the desired look. Pat, the issue is that with hundreds of dimensions, moving the dimensions to where I want them to land (which is at the unit in the drawing) would take significant time, versus having it land there with the click (such as with the ordinate mode). As of now, using ordinate mode and adding a line and grouping does the desired effect, but it would be better to have it be "chained" so that I can move or add dimensions easily. I realize that I'm probably asking for a new dimension mode that doesn't exist currently.
-
Hi all, I am looking for a way to create chained dimensions, that dimension from the first click point, land the dimension at the far point of the dimension, and be a singular chained dimension line. So, it is similar to chained dimensions, except instead of distance from each other, I want it to be distance from first click, and land the dimension at each click point instead of centered. It is similar to baseline, but I need it all to be in one line and not center the dimension between the first click and each point. It is very similar to the ordiante mode, but I want it to result in one chained dimension along a line, instead of a bunch of individual objects with no connecting line. Any way to achieve this, or should I just use ordinate mode, add a line behind it, and group things as needed (as we have been doing)?
-
Updated to SP4, didn't help, still having the same issue. Example just to be clear: pages 12 and 13 of my document both have the same low opacity shapes. When I export only those two pages to PDF, page 12 is correct while page 13 is not. If I export all pages, nothing shows up with low opacity because the first page does not have any low opacity shapes. Edit: Trying other things: exporting as image file (JPEG) works correctly. However I would prefer to export as PDF instead of converting image files around. I can also export each as a single page and combine, but once again, I would rather see if its possible to fix this issue, instead of using work arounds. I have also tried printing to PDF using CutePDF writer, did not work.
-
VW 2015, service pack 2, Windows 7. I'll try updating and see if that helps.
-
I'm exporting to PDF, not printing to PDF. Your example is exactly what I need - I'm not sure why it isn't working for me. ...And I just tried it and it worked fine, when I export a single page. When I export all pages, it does not show the correct opacity. Edit: After trying a few things: I'm exporting a sheet layer with 22 pages (each page a different viewport). When I export multiple pages, using the "Export pages x through x, only the first page exported has the correct opacity. All remaining pages (whether it's one or 21) do not have correct opactiy, they have the objects as full opacity.
-
I'm currently having issues getting low opacity to render in PDF. I read somewhere that PDFs can't take opacity changes from VW, so I then tried putting the objects on a separate class and graying it, and exporting like that, but the fill then doesn't show up, it's just the grayed lines. Is there a way to create a PDF that has a translucent shape on it? Something else I should try? Can I select part of a sheet layer and tell it to render as an image in the PDF? VW 2015
