

EAlexander
-
Posts
542 -
Joined
-
Last visited
Content Type
Profiles
Forums
Events
Articles
Marionette
Store
Posts posted by EAlexander
-
-
- Popular Post
- Popular Post
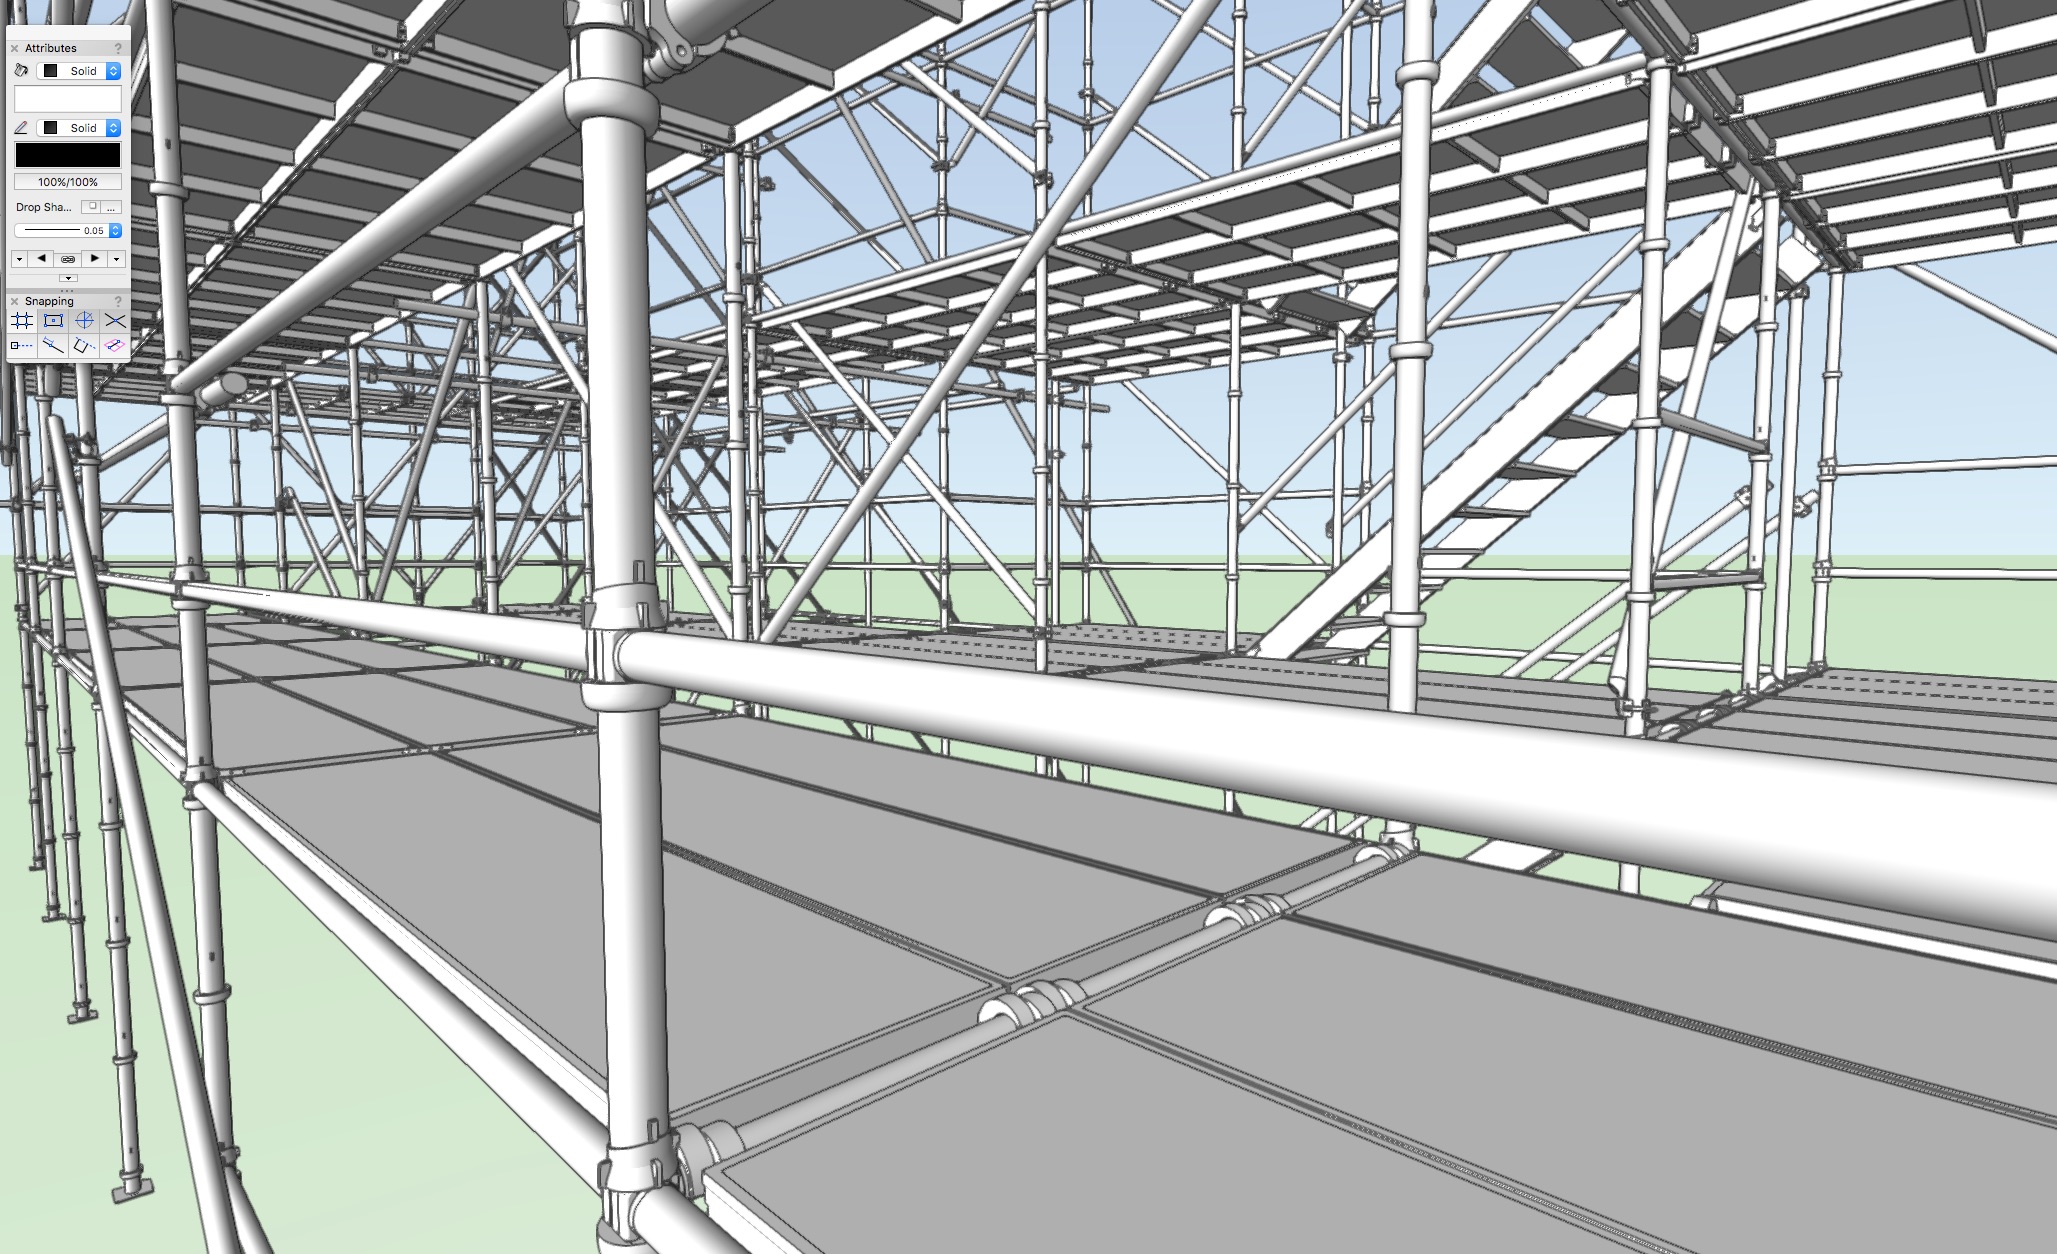
Yes - Paul is right - the Clip Cube is what you want here. It's like a live sectioning tool and you can use it in Orthographic views or perspective views. You'll find it under the VIEW menu to turn it on and a box will appear around your whole model. Click on the box to activate the clip cube and then mouse over the plane/side of the box you want to move. As you drag this, it will create a live section for you with your cut surfaces showing in Red.
Pro tip - suspending snapping while dragging the clip cube side makes things much easier. Try that out.
You can also move more then one plane, so you can cut from the side and also then move the top. You can even rotate the clip cube using the control diamonds at its center.
And finally, if you right click on a active clip cube face and choose CREATE SECTION VIEWPORT you can make a Section and send it to a sheet layer. More info here:
General Clip Cube usage:
Rotate the clip Cube:
-
 5
5
-
I can't replicate that behavior with the partial selection, so not sure what is going on there - though it is orange and not yellow, so it looks like maybe its selection previewing?
Usually, you have to have the whole object selected to grab it. If you hold ALT while drawing your marquee, anything that the marquee partially touches becomes selected too. L to R or R to L is meaningless in VW.
-
1
-
-
I know nothing about this other then it keeps showing up in my Instagram feed. Looks basic, but maybe of interest?
-
1
-
-
I'd love if bike rack and crash barricades could work like the stanchion tool does.
Great list overall Andrew!
-
1
-
-
Hi,
For taper to work only on the catwalks from the stage and not on the downstage left to right connector, you will need to break your thrust apart into three piece: the left catwalk, the right catwalk and the downstage connector. The level downstage connector part is just a simple extrude. The catwalks are extruded to the highest height (to match the mainstage) and then taper down to the front thrust connector height. Since it is symmetrical, you can just build one catwalk and mirror it over centerline for the other side. You can keep the thrust as three objects, group them together if you like, or select all parts and run the Add solids command to fuse them together. I usually break my geometry at any height change, ramp, or slope change, much like the staging company will.
Will the lowest and highest rectangles be the beginning and end of the ramp with the distance I want in the middle?
Yes, that is correct. You draw each endcap and run multiple extrude and the extrude height in this case is the length of the catwalk.
For the second ramp you want (the double green lines) - You could extrude the rectangle to its full height and again use taper face to slope it, or, even easier, just go into a side view and draw the triangle of its profile and extrude that to the width of your ramp.
Hope that helps some. Takes a bit to get used to it, but you're doing great. Keep going!
-
2
-
-
+1 I don't always want to sort by object or attribute type. Sometimes I want to organize by department, or designer, or revision number, or.....
I want more control and the ability to mix and match object types within a folder.
-
4
-
-
You can also use Groups to temporarily isolate an object or collection of objects so you can work on them "soloed". Once you are done, exit the group and ungroup and you are back to normal. There is an option in your Quick Preference settings to "Show other objects while in Edit mode" - this lets you toggle between ghosting in other objects or not seeing them at all while inside a group, symbol, or any other editing envelope. Can be handy.
-
3
-
-
5 minutes ago, Payne Chang said:
Hi @EAlexander,
Vectorworks 2024 hides the snapping section in the status bar when there is no document open. After opening at least one document, you should see the snapping section. Please let me know if this is not the case on your computer. Thank you!
@Payne Chang Haha - I feel so dumb. Yes, thank you Payne - that totally resolves it. Never occurred to me that it would behave that way, but you are correct. Thank you!
-
2
-
-
On 1/15/2024 at 6:11 PM, Stephan Moenninghoff said:
Hmm, that's interesting. I just tried on Windows and I am seeing the snaps.

Are you able to file a bug for this?
Done.
-
2
-
-
5 hours ago, Stephan Moenninghoff said:
Did you mean the scaling?
@Stephan Moenninghoff Hi! No, I did mean snapping. Two users have suggested unpinning snapping from the view bar and they have it returning to the lower right corner of the viewport window like previous versions. I cannot replicate that - if I unpin, snapping menu simply goes away all together. I wondered if that was because I was on windows and they are on Mac, but I realize that is an assumption.
-
38 minutes ago, Kevin McAllister said:
Curious about your NUMPAD. My keyboard has one on the right, and I've tried to use it for views in the past, but I try not to be constantly removing my hand from the mouse (I'm right handed). In the end I've found using the mouse more efficient since my hand is already on it.
Kevin
I dunno - I guess taking my hand off the mouse doesn't bother me. I use a Logi Vertical mouse and I guess I'd rather pull my hand and hit the 1 or 6 key to change views then mouse all the way to the top of the screen. I think it comes down to personal preference and muscle memory. Been doing so long I don't even think about it anymore and I can orbit around the whole object or scene in ortho views quickly.
-
3
-
-
1 hour ago, E|FA said:
Feel free to vote on the related Wishlist item:
Done
-
1
-
-
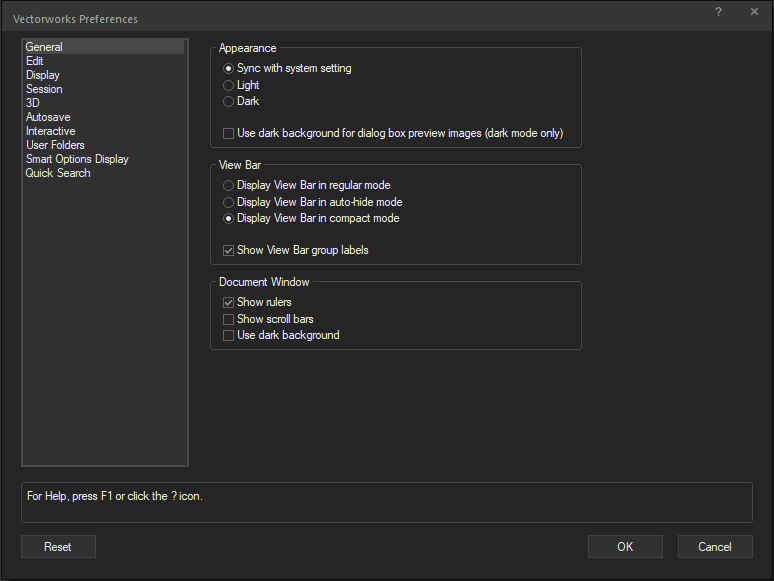
Thanks Wes - I am running Compact mode, but it doesn't fill in the space. See attached.
I assume the snapping thing is a mac vs windows thing as both people suggesting it are on Mac and I'm on Windows.
Also - there is no CONTROL SIZES options in my preferences. See attached.

-
1
-
-
12 hours ago, Kevin McAllister said:
The placement of views way over to the left is difficult. I've added it to my right click menu and I'm trying to learn to use that instead. Now I wish there was an abbreviated view menu chunk that excluded isometric views....
Kevin
To be fair - I use the NUMPAD for 99% of my navigation, but others in my studio rely on that drop down. My students all have laptops, so they don't have a NUMPAD.
-
18 hours ago, Tom W. said:
If you unpin Snapping in the View Bar Settings it will go back to the bottom right corner
When I unpin Snapping, it just disappears and doesn't show up on the bottom.
-
I just downloaded 2024 as a client is using it. Soooo much empty real estate on the right side of the view bar and yet, everything on the left is squashed in there. It's maddening! It would be great to have the ability to pull the vertical lines between the view bar groups and space things out as needed.
View and Visualizations - the things we go to most in my studio are now all the way to the left and snapping and scale - the things we use the lest are all the way to the right. I was so happy when the snapping palette went to a locked function in the lower right corner - feels like a real regression to move it back to the top. The icons I can deal with, but the general layout stuff is frustrating.
-
4
-
-
If you're both on 2024 - use that. If 2025 comes out while you are still working on the project - keep the project on 2024. You can download multiple versions and use whatever you like, so you could get 2025 when it launches, but still keep using 2024 for this project until completion.
How can delivered software advance without new versions? My office stays a year behind since there are historically lots of bugs an issue at release time. It's getting better, but not bulletproof, so we appreciate the option to test the latest version and wait for some service packs before putting it into production. Onshape and Fusion 360 are a different animal.
-
1
-
-
I agree - I have never in 10+ years used this and just want it to go away.
-
2
-
-
I would certainly add a ground plane so they aren't just floating in the void. The thing that stands out the most to me is the lasck of shadows and contrast. You could go into LIGHTING OPTIONS and turn on Ambient Occlusion - that would help a bit. If you wanted to go further, you could add some basic lighting to get a few shadows in there - just make sure you turn on shadows in Shaded View Options.
-
2
-
 1
1
-
-
11 hours ago, Bruce Kieffer said:
Darn it, Vectorworks fooled me! The clip cube can only be shown in the VP with Shaded or RW rendering. I'm told there's a way to do what I need. I'll report back if I find out how.
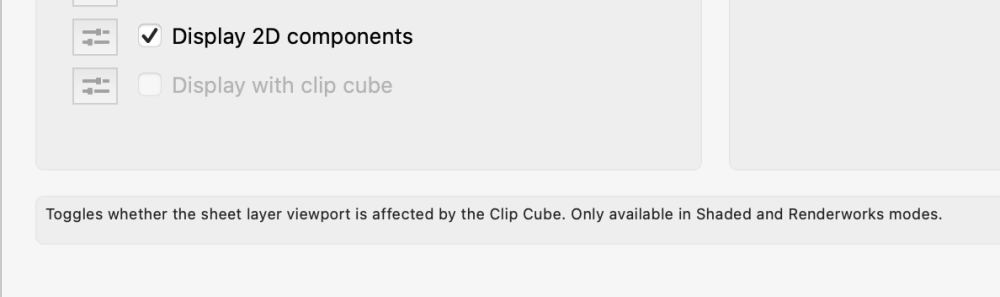
I set up the clip cube where I want it - Right click on the Clip cube and choose Create section viewport and then the viewport is just like any other Section viewport i.e. I can set any viewport render modes I want - are you not seeing that behavior? I do this all day long on 3d models when I'm drafting.
-
There is a move and a 3D move command - no copying involved. Also the move by points has a move without duplicating option.
What behavior are you getting/doing?
-
3
-
-
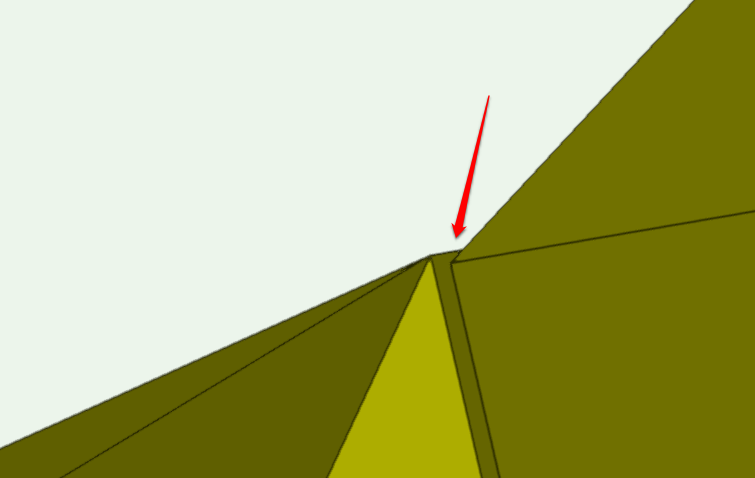
I think he drew that as a 2D example of what it could/should/would look like if you could control how it displayed. Kind of like how we used to draw those things with a pencil.
I agree with your original post/thought - It would be nice to have better graphic control over this. I do my filleting as late as possible or not at all to avoid this kind of problem and keep the lines crisp. Once I move to CInema4d, I round over edges there. Corona renderer lets you round over edges via material which is great, but I digress.... It would be great for hidden line to average the radius if under XX" or to space evenly for larger curves.
-
1
-
-
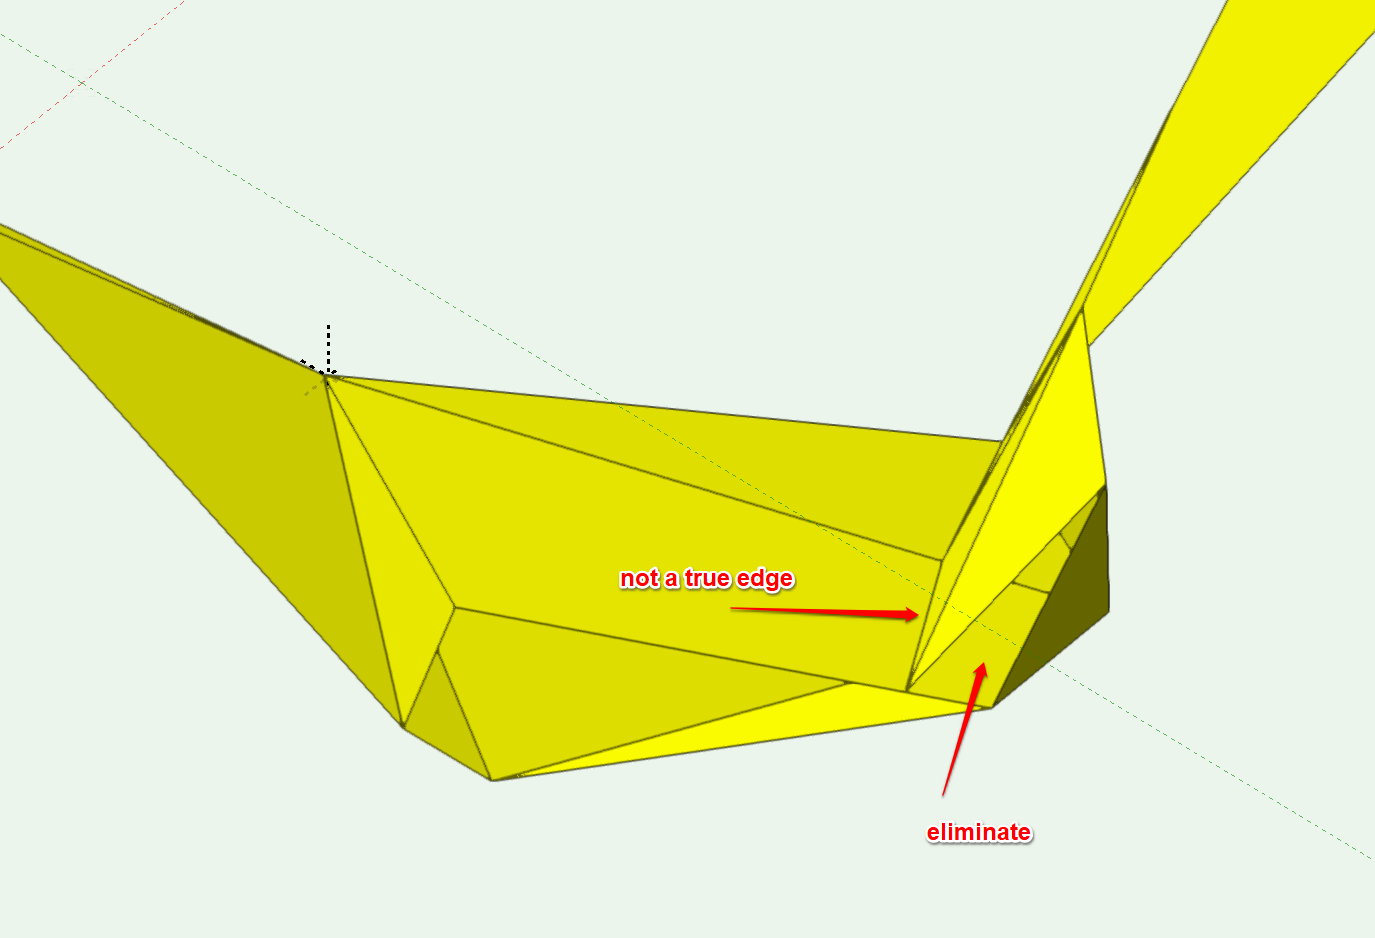
Hi Suz,
You've got a mass of 3D polys here to make up your design, but they don't all cleanly meet in the corners in some areas and you've got some plains that overlap behind others that met up mid point, causing corners that aren't true edges. Because of these minor errors, you can't ADD SOLID this together into one clean piece of geometry, which is what you need to be able to add thickness to it. So you need to do some clean up - use what you have as a template and redraw the surfaces with the 3d poly tool, making sure everything is clean and all points are snapped together - has to be watertight. Once you have this, as just the outer visible shell of the design, no overlaps, and no hidden internal plains, then you can use the SHELL SOLID too l to thicken it up cleanly.
As for elevations - once you draw each plain cleanly - before you fuse it all together, save a copy of each and then rotate them around so they all lay flat on the same plane. I would make viewports of the assembled object from front, side, top and various sections to give the fabricators the overall "footprint" of the design and then I would give them true flattened views of each panel (might be good to name each one on the 3d and the 2d layouts) so they can figure out each panel individually.
Hope that helps.
e.

-
3
-
-
Are you looking at it in Shaded Mode? If so - go to Shaded View Options and up the resolution from LOW to medium or high. These are found under the teapot menu once you have activated Shaded mode.
-
1
-


Distribution and Alignment in Circular Truss
in General Discussion
Posted
Actually, what you want for this is circular array and you can set the angle to give you what you want. It's under duplicate array from the top menu and set it to circular mode. I'm not at a Computer,so wording is slightly off but you can set distribution to 360/ number of fixtures and check rotate objects to match angle.