


line-weight
-
Posts
3,743 -
Joined
-
Last visited
Content Type
Profiles
Forums
Events
Articles
Marionette
Store
Everything posted by line-weight
-

Problem with controlling wall texture by class in VW 2024
line-weight replied to EliM's question in Troubleshooting
This doesn't answer your question and may not be a helpful comment, but is there a reason you control texture by the class of the wall object rather than the classes of the wall's components? Most walls have a different texture each side - presumably you don't want the shingles appearing on your internal wall surfaces. -
It might be different in other places but in the UK it's the convention (at least, the convention I learned) to draw stud walls with the studs drawn in GA floor plans which might be at 1:50 (when I'd say you'd always draw individual studs) or 1:100 (I think you still would). In these cases they aren't trying to tell the contractor exactly where the studs should be, it's more a visual indication that this is as timber (or metal) framed wall rather than a solid one. When I was still drawing in 2d this tended to involve some tedious duplicating of symbols along the relevant walls, and frustratingly that remains the case drawing in 3d. In fact recently I've started not to bother, quite often, which is a compromise solution - it saves some drawing time but leaves me a little dissatisfied with the quality of the drawing. In fact in 3d it's worse than in 2d because you have to draw in those studs in the annotation space of the GA plan, which means that if you later make a new viewport say at 1:20 (when I'd definitely prefer to draw the individual studs) they aren't there already drawn - you have to draw or copy-paste them into the annotation space of that viewport. And then if you change the wall you have to go and edit annotations in multiple viewports. This is why, even if it was only a 2d representation that got drawn automatically, it would save quite a lot of drawing time. This is in the same category as the Xs in rough timber sections not being drawn automatically...things that you have to resort to drawing in annotation space that surely the computer should be able to do for me, in the 3rd decade of the 21st century.
-
It's very common to have a timber framed component as part of a multi component wall though, so I'm not sure what the benefit would be in making it something separate. What a wall object lets you do is build up and edit a multilayered construction without having to draw the different layers manually - most timber framed walls would still fall within that category. For me, as a starting point, if the timber frame layer in a wall was simply made with a timber member around the edges and then vertical members at X spacing and another material inbetween - that doesn't seem difficult to generate in a geometric sense but would instantly save a lot of drawing work that's currently necessary to make things easily legible. You'd have to make clear that the tool wasn't offering you some kind of structural solution or proposal of course but that's no different to the curtain wall tool or various other things.
-
I was actually referring to your more general comment about whether a way of setting out framing should be tied into to the wall tool.
-
(haven't tried tile fills for that purpose by the way; I should investigate)
-
Seems to me like it would be quite important that if you changed the line of your wall, the framing would update along with it. And the wall object already defines the plane and thickness and so on.
-
Unfortunately VW currently can't even automatically draw the "X" in sections through rough timber members at the moment. It would be nice to have some kind of automated 2d representation (in plan and section) of timber framing within any component of a wall object that is in fact timber studs plus infill rather than a continuous material. Having managed to do both of the above, it would certainly then be nice if those components of wall objects contained actual 3d geometry that represented the real layout of the framing.
-
Just directly/manually, usually either with the 3d move command to shunt them up and down the Z axis, or snapping to already existing objects. Generally I tend not to need to be too precise down at fondation level because any important dimensions will be taken from the SE's drawings rather than mine.
-
Because most of my projects are rather fiddly I usually end up making the foundations themselves as directly modelled solids which get edited with the push-pull tool. This feels like it matches their real life existence as imprecisely cast lumps of concrete. Then I often use wall objects for the foundation walls built from them up to ground level. I usually put all this in its own "foundations" layer to make it easier to edit in isolation from the rest of the building. The top of the foundation walls (and the bottom of the main walls) are often set to a storey level which can then be quite easily adjusted without manual intervention. If we had proper "stacked elements" walls then I'd probably do it differently, but we don't. As it is, if the walls have different materials or thicknesses above & below ground, you have to build them as manually stacked things anyway.
-
Detail Viewport Tags not showing up in Sheet Viewport
line-weight replied to CAD Cadet's question in Troubleshooting
There are a few caveats/hazards to watch out for with section line instances though ... For example all instances have to be the same style and the same length, and trying to edit the instances (adjusting end marker positions and so on) has the potential to mess up the section viewports they correspond to. Can't remember if detail callouts have similar problems? -
Surely foundations ought to be designed by a structural engineer, and for the specific site conditions & local building regulations/codes... rather than by a plugin?
-
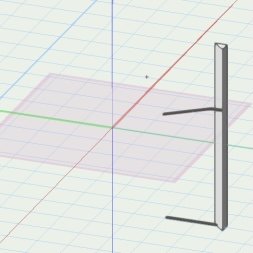
It doesn't look like we are "inside" an extrude here though. If we were editing the extrude surely we'd be looking at a 2d shape.
-
To be honest it's rather hard to understand your original post. Part of the problem is that you mention images 001, 002 and 003 but the images you have posted aren't numbered and I think they might be in reverse order. Also, I don't understand what you mean by "part" and "sketch". This might be a language/translation problem. At least in the English language version of Vectorworks there is no such thing as a "part" or "sketch" as far as I know. If you can't share the file, then sharing a screen recording of you doing what you describe might help.
-
Is it just an extruded polyline, or is it an extrude-along-path? If it's just an extruded polyline then you should be able to edit it in-place but if it's an extrude-along-path then it's always a bit of a problem that it is difficult to edit the geometry relative to the "outside world". If it's an extrude-along-path, is it the "path" or the "profile" that you are trying to edit?
-
Display Symbol instead of Layers in Viewport
line-weight replied to Kevin McAllister's question in Wishlist - Feature and Content Requests
Yes, this can be the case even with normal viewports - it would be good if a viewport's crop & annotations could somehow be tied to an element within the geometry it's looking at. -
Display Symbol instead of Layers in Viewport
line-weight replied to Kevin McAllister's question in Wishlist - Feature and Content Requests
This would definitely be useful. Like the OP, I sometimes want to produce drawings that show a symbol isolated from the rest of the model and currently this means setting up special layers or classes in addition to the symbol itself. Plus, the instance of the symbol that the viewports are looking at has to remain at a certain location in space in order for things like crops & annotations not to get messed up. It would be good to have viewports onto a symbol that were relative to the symbol's own internal co-ordinates not those of the outside world. -
Creating a viewport from design layers
line-weight replied to Monique Freese's topic in Architecture
Didn't know that either! -
A Master 2d Detail Library & 3d Model
line-weight replied to digitalcarbon's topic in General Discussion
I can see that the extent to which the person making the drawing is involved in the design (and the overall drawing strategy) is significant. I have the luxury of being a one-person operation. It would be difficult to have a team of people working on my drawings, the way I currently set them up. -
A Master 2d Detail Library & 3d Model
line-weight replied to digitalcarbon's topic in General Discussion
Yeah, the reality is that I to resort to 2d in annotations, for things like membranes and (sometimes but not always) thin sheet materials. I don't have a pure 3d workflow by any means. However... over the course of several projects where I've tried to reduce the 2d content each time, I've found that it's more feasible than you might expect, to try and draw "nearly everything" in 3d. There are of course pros and cons but some of the pros are significant. For example I find it's also very helpful in actually working stuff out design-wise, and highlighting things that aren't going to work. -
Creating a viewport from design layers
line-weight replied to Monique Freese's topic in Architecture
Didn't know that was possible - thanks for the tip. Does that also work for changing the crop, if there's already one present? -
A Master 2d Detail Library & 3d Model
line-weight replied to digitalcarbon's topic in General Discussion
This will be a controversial viewpoint but why mess about with all these 2d details and remain stuck in 2d thinking when you could just draw them in 3d instead (in an intelligent way). All of these details are extracted directly from the 3d model with minimal additions in annotation space. I don't have to model the geometry individually for each window, because of the way I have built the window frames (they all use extrusions of 2d profiles which can be edited in such a way that I can change them all at once) and they also make full use of wall closures. It's possible to set up a model in such a way that you can extract all of your details directly from it - without actually having to draw every single part of the building in full detail. There may be a scale at which this approach starts to break down, but at least for the kind of small projects I do, it works better than you might think.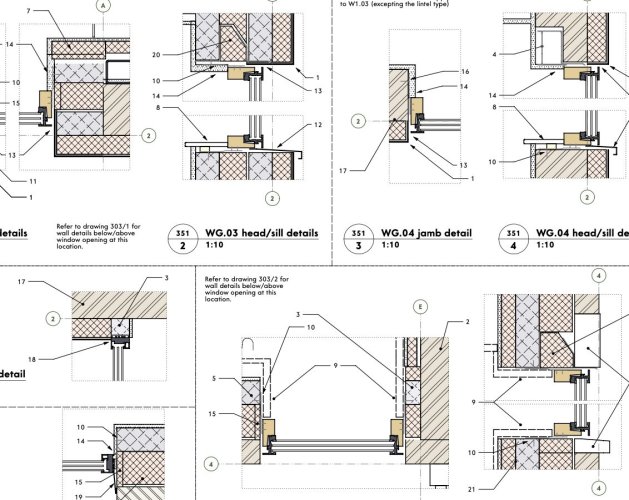
-
Creating a viewport from design layers
line-weight replied to Monique Freese's topic in Architecture
I always crop viewports after the event. Once you've created the viewport on the design layer, you can double-click on it and then choose the option to edit the crop. Or you can right-click and choose "edit crop". Then you can draw whatever shape you like and this will become the crop object. -
The subdivision tool is mainly intended for freeform modelling but you can also use it for more rectilinear shapes. https://app-help.vectorworks.net/2023/eng/VW2023_Guide/Shapes3/Subdivision_modeling.htm
-
See the original mobius thread (this one is a kind of spin off). I had some success with the subd tool there: https://forum.vectorworks.net/index.php?/topic/104317-modelling-challenge-möbius-strip-model-this-as-a-seamless-solid-with-no-visible-joins/
-
@apswoodwork the issue you describe is a common one. I come up against the same problems modelling windows where i want to be able to change the overall size without distorting the frame profile. In theory the EAP tool lets you do it but frankly it's one of the most horrible tools in vectorworks. Check out plugins like the one jeff prince suggests, to make your life easier. Actually at the moment I'm helping test another similar plugin, that improves on EAP, but it's not been properly released yet. One of the issues with EAPs is that it's very difficult to adjust the "path" geometry relative to surrounding objects. Plus it's just generally prone to failing and not telling you why. Once you get into the swing of doing things in 3d I think you'll find it's better and more satisfying. I made the transition from 2d to 3d a few years ago and wouldn't go back. It can be less work to revise a 3d drawing than a 2d set, because you just adjust the model and then all the plans elevations and sections update themselves (in theory at least). Plus you have the opportunity to visualise the thing in 3d of course, which can sometimes help you to spot things that might be difficult construction-wise in the real world.

