timmysmith
-
Posts
35 -
Joined
-
Last visited
-
Thanks for your tips Peter. I'll test the "camera effects" you directed me to. T
-
Hello Herbie, I tried the first few steps of this advice today and I can see a vast improvement as soon as I used the HDRI at %500. That has given me the starting point that I need. From here on I am OK. I tried that before when I was doing my testing but I must have had other sources on which clouded (ha ha) the results. An increased intensity HDRI is giving me the attractive natural light I wanted. Thanks for your help.
-
Thanks Herbie, I will use the suggestions tomorrow and see how it goes. The instructions look clear and informative. All the best, Tim
-
Dear Members, I am having a hard time finding a consistent or predictable work flow for lighting an interior render, I've researched as much as I can, watched all the videos but I am still struggling to arrive at consistent control or predictability. I have modelled a hotel Lobby with marble floor and four slim mirrored pillars running through the space with revolving glass entrance doors. My camera is set up at the back of the space looking towards the entrance. I am trying to render a daylight interior, I have limited window access for a bright render. I wanted to use natural light and create a good quality presentable render with soft shadows. I have set up my workflow to use C4D directly from the design layer to try and limit the render time in returning useable results. I tried a Heliodon which partly fulfils my need but I can't control the intensity. Point lights make the interior look grey and flat. I tried to alter the exposure on the camera but that had zero effect, as far as I can see it just doesn't work, even doing an external test on an untitled test file, I coudln't get camera exposure to have an effect on brightness. I am trying to use directional light, one outside and one placed inside but I can't get control of the intensity in fact the results are wildly unpredictable. Sometimes I get very little light, sometimes the scene is completely bleached out. I can edit the directional light through the O.Info palette if I select my light as an object in the model, or I can edit the direcitonal light properties by double clicking on the light in the visualisation palette and thirdly I can edit the directional light(s) in the "send to C4D>custom renderworks>lighting options" palette, all three editing options have slightly different layouts and between them I feel like a dog chasing it's tail. I still fail to see any effect when I choose "use emitter" in fact between "use emitter"(%) "brightness" (%) "brightness value" (lux) "dimmer" (%) I am going blind. I can't get consistent enough results to actually see what each of these settings actually does. Needless to say I am frustrated. I am really looking for some sane lighting option advice that might give me a sense of solid understanding when it comes to lighting, particularly interior natural light scenes. Thanks, this board is very helpful.
-
Render Resolution
timmysmith replied to timmysmith's question in Wishlist - Feature and Content Requests
Hello Frank, Yes of course that is the case. I was a bit confused because of all the other render settings available in Vectorworks which are prior to export to C4D and there are a few places to set ppi in Vectorworks but only for using renderworks to render an image. I thought the exported C4d file would also contain resolution instructions from Vectorworks for the render. So now I'll do my image ppi render setting in C4D before doing my final rendering. Sometimes it's all a bit mind boggling, thanks for setting me straight. Enjoy your day. T -
Dear Members, I am using Vectorworks2019 export to C4D (3D Only) as my basic render path. So I can keep rendering out of Vectorworks altogether. I want to increase my resolution in my final rendered image. As far as I can see there is no resolution setting in Vectorworks that effects the exported C4D file and the resulting render settings in C4D. It looks like the only way I can increase my resolution is by getting into the complicated render settings of C4D which are confusing. As far as I can see Vectorworks always exports .C4D files (3D only) for rendering at resolution of 72 DPI and the only way to increase resolution is by increasing it within the render settings in C4D. I wanted to set all the parameters in Vectorworks and not get sucked into too much C4D work it can get really confusing. Is there something I'm missing? Thanks for listening.
-
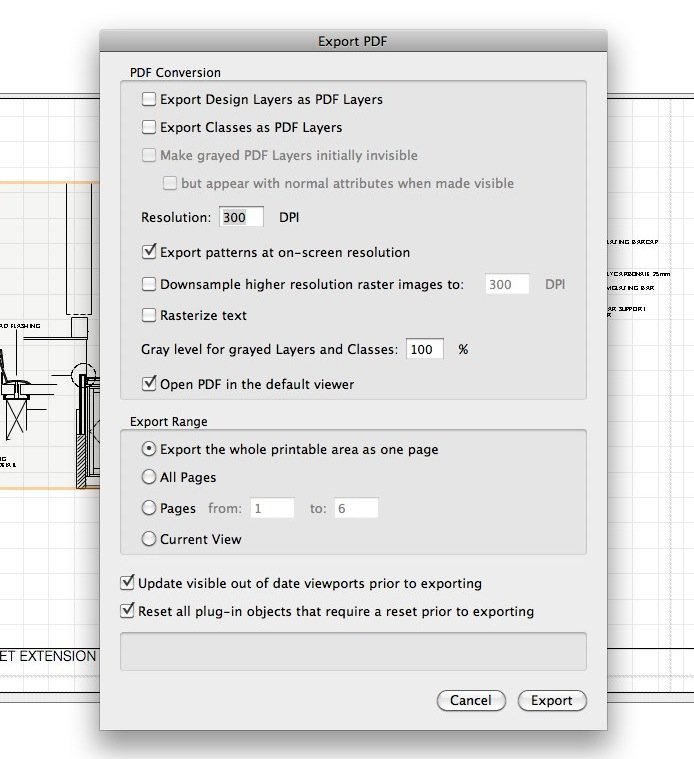
Hello JMR, My export PDF dialogue has all your options except the PDF/A one! Anyway I'm out of troube for today since I managed to get my file size down. Have a good day. T
-
Hello JMR, I'm using Vectorworks 2013 I'm not sure if I have a pdf type option. I couldn't find it. T
-
Dear Vectorworks Users, I had this problem and I solved the issue. For me it was a Hatch problem. I had two hatches one on top of each other with different hatch settings. One was at a different resolution to the other . One was on my design layer and the other on top of it in the annotations of my viewport. I played around with my hatches and reduced a 2.5Mb slow loading file to 45k fast loading no problem file ! I had two hatches on top of each other one on the design layer and one in annotations in a viewport space. I changed all hatches to viewport annotations space and even with altered scale settings it all exported with no more file size problems. Look into your Hatches and Tiles and patterns it may be the problem there. All the best TIm
-
I can also use the model you have posted! thanks again.
-
Thanks for checking that for me Benson, you must be right I will update and see if it comes in then, it occurred to me that I am just getting some kind of shell imported and no content, all the class names and order are there and all the text but no content. I can import the sketch up version of the file so I can still use that in my model. Thanks for your help. Have a good day.
-
Dear Benson, Thank you for your prompt reply, I checked and tried all your suggestions. Still no joy. It may be that my version of Vectorwroks isn't updated enough, here is the link : http://www.hermanmiller.com/products/seating/multi-use-guest-chairs/eames-molded-plywood-chairs.html In the red box titled "Eames Molded Plywood Chairs" I clicked 3d Models/Revit and clicked "AutoCAD 3D file (140 KB)" of the top left of four chair models the "Eames Dining-Metal Legs" It's a .dwg file, I info'd the file but I couldn't see what version of autocad it came form if it did come from autocad. I thought it might have come from a more recent version of autocad since I have read this does make a difference. It is coming through, I just can't see it! Could you see if you can import it? Best regards Tim
-
I have imported a .dwg file into Vectorworks 2013. It's a model of an Eames chair that I want to use in my project. I have followed all the correct instructions from Thamsin Slater and all other tutorials I can find. I am sure I am following the correct procedure but when I have finished importing I can't see anything except a couple of text blocks. In my classes in the Obj Info palette I can see a list of what I have imported and i have a new layer in my layers palette but all I can see is a couple of text blocks on my new layer other than that I have nothing. Have I overlooked something really simple? or is there and issue here ? Thank you
-
Dear Tamsin, Thank you for your advice. How frustrating it is to discover a crossed line in my render after a 10 hour render! This problem did not show in any of my previous renders at slightly lower resolutions, it only appeared in the final quality render. In the real world this sort of delay can lose me the job. Mine were'nt tree objects just simple image props with a one colour transparent background. It seems that simply turning on crossed planes gives me this problem. Now I will have to re edit in photoshop ( quicker ) or go through my image props and try and get rid of the lines that way and then re-render everything (approximately 1 day delay) surely this can be fixed ? I hope so. Tim Vectorworks 2013 w/ Renderworks Cinema 4D R13 Studio Mac OSX 10.6.8, 22" imac, 2 GHz Intel Core 2 duo, 8 GB RAM
-
I had a hidden line render problem that I solved. I was drawing a balcony and I had a lot of spindles arrayed along a path. I forgot to delete the path and when I rendered the view in hidden line I had a mysterious line appear on the exterior wall. I gave up on trying to find the cause and deleted the line in Illustrator. After much frustration I later discovered that it was a path line showing up where it shouldn't. If you do not delete your path line after making an array (in this case a nurbs curve) it can give problems when rendering the view in hidden line render mode.