


MullinRJ
-
Posts
1,992 -
Joined
-
Last visited
Content Type
Profiles
Forums
Events
Articles
Marionette
Store
Posts posted by MullinRJ
-
-
For VW 2018:
Text PLAIN.vsm Text OUTLINE.vsm Toggle Text OUTLINE .vsm
@Janvin Lowe, since I know you are using VW on a PC, would you please report back how these work for you? The only oddity I see is the text shifts right when it is converted to Outline, but it shifts back when it is reset to Plain. I'm curious if this is because my PC is still running Windows 7. Also report your OS.
Thank you,
Raymond
-
19 hours ago, Janvin Lowe said:
If I may ask those of you using MacOS, what is the letter to activate Outline in the menubar approach
Hello @Janvin Lowe,
In the standard UI, there is no assigned hotkey for that menu item, nor for any other of the Text Styles (Bold, Italic, etc.) to the best of my knowledge. If you do find a hotkey combination that makes text Outline, I'd like to know what it is. I've not run into it before, but that doesn't mean it doesn't exist.
If you want the capability to make text objects Outline on the PC (or Mac) via a hotkey, add the three menu command plug-ins below to your workspace. In the Workspace Editor you can add them to one of your menus, or to a new Custom menu. You can then assign hotkeys to them. They can be found in the TEXT category in the Workspace Editor. These plug-ins were compiled in VW 2020. If anyone needs them in an earlier version, please write back.
One shortcoming is that these scripts do not address individual character editing. It's all, or nothing, but the scripts are unlocked, so have at it.
Text PLAIN.vsm – Remove all Text Style formatting (Bold, Italic, etc.) from the selected text objects.
Text OUTLINE.vsm – Make all characters OUTLINE in the selected text objects. All other formatting is cleared first.
Toggle Text OUTLINE.vsm – Switch each character's Outline attribute (ON or OFF), on a character-by-character basis. Existing formatting will remain. Only the Outline attribute will change.
Text PLAIN.vsm Text OUTLINE.vsm Toggle Text OUTLINE.vsm
HTH,
Raymond
-
 1
1
-
-
Hello @Janvin Lowe,
There are several ways to convert text to outline. The most obvious is to select the "Outline" text attribute in the OIP, assuming it's available. Another way is to convert the text to poly lines with the menu item Text > Convert Text to Polylines. A third way is to use the Format Text dialog and select the Outline attribute or click its hotkey (Cmd/Ctrl-O) (MAC Only), but you also have to click OK. Lastly, a script can change the text to Outline or to Polylines. Scripts can exist in the document, or in the Plug-in library. A Menu Command Plug-in loaded in your workspace can set the text attribute to OUTLINE, and a Plug-in can have a hotkey. If you didn't put it there, this is unlikely.
I just verified that text CAN show as outline in VW on a PC, but you have to access it via script. The OIP and Text menu items do not show the Outline option on a PC.
It may be too late to ask, but once you had outlined text, was the object showing as Text in the OIP, or showing as a Group? Or if you didn't look at the OIP, did you still see the little "x" on the object indicating the Insertion Point? This would indicate that the Text object had the OUTLINE attribute assigned. If there was no "x" or the OIP said Group, then the text was converted to Polylines.
If you converted the text with a keystroke, check the menus under the TEXT menu for hotkeys that may be assigned to Convert Text to Polylines or Font Style > Outline. Unless you (or someone you know) edited your workspace, these menus typically do not have hotkeys, but you can add hotkeys to them with the Workspace Editor. Then check any custom menus you may have loaded for a plug-in that sets the text attribute to outline, and does it have a hotkey assigned? This is a long shot, but it is possible.
If this ever happens again, before you hit Undo, check the Type of the selected object(s) in the OIP for Text or Group. After you Undo, look in the lower right of the VW window, as a message will display showing what action was undone. You can Redo (Cmd/Ctrl-Y) then Undo (Cmd/Ctrl-Z) to see the message again.
I doubt this explains what happened, but if it ever happens again you should be able to track down the cause.
Raymond
-
7 hours ago, Jesse Cogswell said:
There's something weird with the forum's code box, it won't let me type in the code for setting the character, so remove the spaces in between C h r in the code.
@Pat Stanford ran into that a week or so ago. You’re in good company. 😋Raymond
-
3
-
-
Peter,
Do you still have the file in question? You can send it this way if you want.
Raymond
-
Hello, @bbrown6.
I just saw this post. How many files are you talking about? I have the old software and Ye Olde Systems needed to do conversions. Please send me a PM if you still need help.
Raymond
-
-
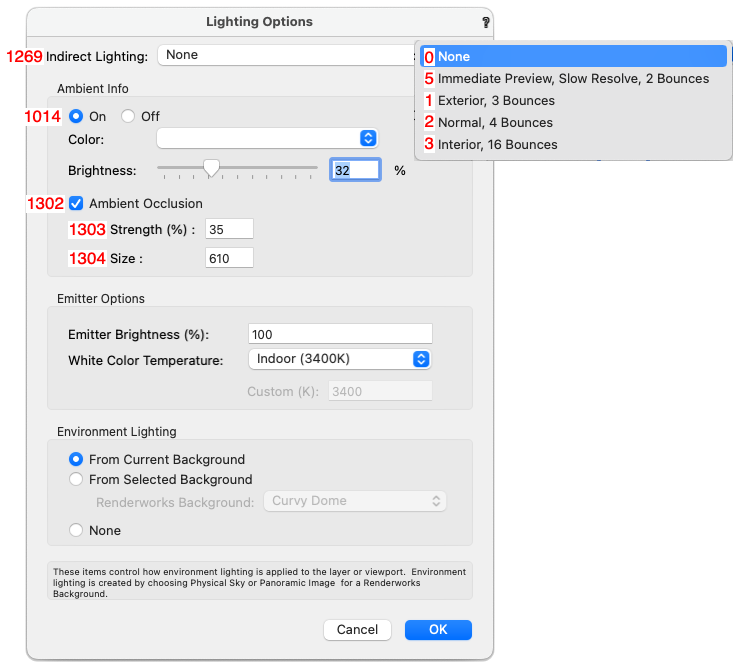
Here's a partial map of the Object Variable numbers for the Viewport Lighting Options dialog.
ObjVars 1014 and 1302-1304 are described above. ObjVar 1269 is clear as mud.
ObjVar 1269 is another object variable that you can read, but cannot set. Or at least I have not found a successful way to set it. If you read it with GetObjectVariableInt(), or GetObjectVariableLong(), you will get the numbers 0-3, or 5 which correspond to the settings shown below. If you try to set the object variable, the values and the menu don't change. I assume the inability to write to variables 1269, 1303, and 1304 is a bug and I'll report it in the morning. If I find out it's WAD, I'll post back so you know, otherwise I'll post back when it gets fixed.
Sorry this didn't turn out better.
Raymond
-
@Fuge, REDO... Now that I have played with it a little, I'm going to revise my previous guess.
With ObjectVariables 1014 and 1015, I can read and write to both Viewport variables:
VP_Amb := GetObjectVariableBoolean(VPhand, 1014); { Viewport Ambient }
VP_Amb_Bright := GetObjectVariableReal(VPhand, 1015); { Viewport Ambient Brightness }SetObjectVariableBoolean(VPhand, 1014, True/False); { Viewport Ambient On/Off }
SetObjectVariableReal(VPhand, 1015, 0.37); { Viewport Ambient Brightness - 0.0-1.0 }However, I can read and write to ObjectVariable 1302.
AO_On := GetObjectVariableBoolean(VPhand, 1302); { Ambient Occlusion }
SetObjectVariableBoolean(VPhand, 1302, True/False); { Ambient Occlusion On/Off }But, I can only read ObjectVariables 1303, and 1304.
AOStrength := GetObjectVariableReal(VPhand, 1303); { Ambient Occlusion Strength - 0-100 }
AOSize := GetObjectVariableReal(VPhand, 1304); { Ambient Occlusion Size }If I change the values for "Ambient Occlusion Strength" and "Ambient Occlusion Size" in the Lighting Options dialog box, I can read my manual changes, but if I try to set the values by script, the settings do not take.
More on the "Indirect Lighting" setting in the next post.
HTH,
Raymond
-
Dave,
I haven't tried these, but give them a whirl. They look promising.
SetObjectVariableBoolean(LYRhand, 150, True/False); { Layer Ambient On/Off }
SetObjectVariableReal(LYRhand, 151, ###); { Layer Ambient Brightness - 0-100?; you'll have to figure out the range. }
SetObjectVariableBoolean(VPhand, 1302, True/False); { Ambient Occlusion On/Off }
SetObjectVariableReal(VPhand, 1303, ###); { AO Strength - 0.0-1.0? or 0-100?; you'll have to figure out the range. }
SetObjectVariableReal(VPhand, 1304, ###); { AO Size - you'll have to figure out the values. }
HTH,
Raymond
-
1
-
-
Use:
SetObjectVariableBoolean(LNewObj, 1160, False);
after you create the text to place it on the Layer Plane.
I’ll post an example when my internet comes back.
Raymond
-
Hello @Evert Vandeberg,
Try this:
OBJECTS = []

def collect(handle):
    OBJECTS.append(handle)

vs.ForEachObject(collect, 'VSEL & (T=LOCUS3D)')
vs.AlrtDialog('Num selected objects: {}'.format(len(OBJECTS)))
Raymond
-
In adding to what @C. Andrew Dunning just posted. Look at the Num2StrF() function. It will format a dimension value to the current document units. So, if you work a problem in inches, but your document units are mm, then Message(Num2StrF(1")); will show '25.4 mm'. This may help your dialogs present document units, not calculation values.
ValidNumStr() works in the opposite direction, converting formatted string data and returning dimensioned numeric data.
Bottom line, there are several ways to skin this cat. (Apologies to all cats for that last remark.)
Raymond
-
1
-
-
1 hour ago, SamIWas said:
Are you in the Atlanta area? I have a bunch of friends who have lost power after a storm rolled through a few hours ago
No, North Texas. About 25 miles north of Dallas. No storms! Just heat. The good news is that it didn't take until midnight to come back on. Only about 90 minutes down. Next week is forecast to be up to 10°F hotter. If you don't hear from me, you'll know why.
Raymond
-
I just checked the DevWiki. My memory’s not shot yet. 152 is the upi Pref Index. 😁
Raymond
-
There’s also a VW Preference, 152? (I’m guessing because power is out and won’t be back until after midnight) that returns Units Per Inch.
upi := GetPrefReal(152);You can scale dimensions by that value. Check the number, though.
Raymond -
Hi @grant_PD,
Thank you. At the moment you can PM me and I will send you instructions on how to try Reshaper for 30 days or pay for a license.
All the best,
Raymond
-
1
-
-
46 minutes ago, Pat Stanford said:
@MullinRJ
Did I hear my name? It is something that Reshaper can do. In Front view, with one of the BOTTOM anchor points selected, and the Next Click mode selected, the user can click on the top of any 3D object in the drawing and click the OK button. That will move the selected object to sit atop the clicked-on object.
As far as an existing script goes, I don't know of any, but it wouldn't be too difficult to write. Get the 3D-BBox of both objects, calculate the ∆Z between the bottom of one object and the top of the other, then move the one object up or down by that amount.
Raymond
-
2
-
-
@Jesse Cogswell, I'm glad I could help, and I thank you for your "BIG thanks", but really?!?, no Simpson's Yellow Thumb of Approval, 👍? I'm never going to catch @Pat Stanford at this rate. ☹️
Raymond
-
16 minutes ago, Jesse Cogswell said:
Any idea how to use custom images for buttons outside of the standard Vectorworks icons?
Hi @Jesse Cogswell,
Place your images in a folder. Select the folder and ZIP the folder. With the resulting ZIP file, change the .zip extension to .vwr and you now have a VW Resource file.
I believe the commands you referenced can use the path of the .vwr file as your path input. I haven't tried it, so please let me/us know how it turns out.
Thanks,
Raymond
-
1
-
-
it's actually inside the VW Application, in a resource file.
-
-
Using your code on a Mac I get :
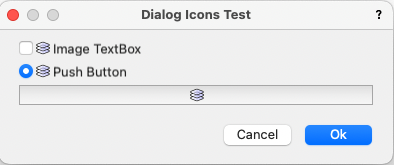
but I used: vs.CreateRadioButton2(dialog_id, 6, 'Push Button', layer_icon_path)
instead of: vs.CreatePushButton(dialog_id, 6, 'Push Button')
Perhaps it's a Mac/PC thing. I'll try on a PC, but it may take a while.
Raymond
-
1
-
-
Event 41 is kObjOnWidgetPrep
Raymond
Text is in outline
in Troubleshooting
Posted
@Janvin Lowe,
I am glad the plug-ins work for you.
What you are showing above looks similar to what I see when I say the outline text is shifted (on a PC.)
This shows two nearly identical text blocks, except for color and position. In the first image, the red one is shifted slightly down to show that they are aligned horizontally.
After moving the red text directly atop the blue one, I converted the red one to Outline then selected both text blocks again before taking the screen shot. Notice how the outline characters shift to the right. The text insertion points are still coincident, and the bounding box grips are still perfectly aligned, but the red outline text extends beyond its bounding box to the right.
When I edit the red text, the edit cursor lines up between the blue characters, just like you describe. Likewise, if I apply the Underline attribute to the red block, the underlines line up under the blue characters, again like you describe. My guess is that this is just how VW displays Outline Text on a PC. Technically, it is not supported, so we can't really complain. You can always post a WISH item on the Forum, but be prepared to wait. If the shift doesn't bother you then you should be good to go.
Raymond
PS - You didn't report your OS. I am still curious what system you are using. If you would, please create a signature for this forum in your User Account Settings - Signature. At the very least, include your VW version, and your OS. It will save a lot of back and forth every time you post a question or problem, as the two most frequent questions will have already been answered. Thanks.