


MullinRJ
-
Posts
1,993 -
Joined
-
Last visited
Content Type
Profiles
Forums
Events
Articles
Marionette
Store
Everything posted by MullinRJ
-
Difference between vsoGetPluginStyleSym and GetPluginStyleSymbol
MullinRJ replied to Gregi's topic in Python Scripting
Hello @Gregi, Though I haven't used either command it appears the first, vs.vsoGetPluginStyleSym(), is used to reference itself and return the Symbol Definition linked to its STYLE definition. Its description says: "Allow an object to use its own implementation in creating and maintaining a plugin style." It must be used inside the PIO code, as indicated by the first three letters in the command name "vso". The second command, vs.GetPluginStyleSymbol(), appears to be used outside a PIO, as in a script that queries PIO objects, and it will return TRUE if the object is STYLED, and FALSE if it isn't. If it returns TRUE, it will also return a handle to the symbol that's used to define its STYLE. The best way to see what they do is to try them in simple scripts. Place a STYLED PIO in a drawing and write a short script with: Boo, SymHnd = vs.GetPluginStyleSymbol(FSActLayer) to see what it returns. Message out the boolean result, and the object type and symbol name of the returned handle. The vso command will require more setup to test its functionality, but if you are developing a STYLED PIO, place vs.GetPluginStyleSym() in your PIO script and set an AlrtDialog() with the object type and symbol name of the returned handle to see what comes out. You may have to move the command around so that it executes in the proper event and at the proper time. If this is not clear, wait for better answers. I'm sure they are out there. Raymond -
@bsalee, If you only want assign a static class name, the script is easy. But if you want to be able to redefine a new Class Name often, the script will need to be more complicated. You can edit this script, or have multiple copies of it in your file, each with a different class name to set commonly used class names. If the class name in this script does not exist in your file, it will be created so you won't have to create it ahead of time. For starters, place the following script in one of your files by adding it to a Script Palette (new or existing). Duplicate it if you want a choice of class names. If you like how it works, you can add this script(s) to your template files so it(they) will always be there when you start new work; or make a Menu Command plug-in, where you can assign a HotKey to it; or make a Tool plug-in, which can also have an assigned HotKey. More on the second and third options when you get that far. Here's the simple script: PROCEDURE ChangeDimClassName; { Click on Dimension objects to change their class to the class name defined in "kNewClass". } { Change constant "kNewClass" to suit your needs. } { If the object you select is not a Dimension object, nothing happens and program continues. } { To STOP, click in empty drawing space, or press any key on keyboard. } { 9 Apr 2023 - Raymond Mullin } CONST kNewClass = 'New Dim Class'; kDimType = 63; VAR H :Handle; X, Y :Real; BEGIN H := FObject; { dummy handle } while (H <> nil) do begin GetPt(X, Y); H := PickObject(X, Y); if (GetTypeN(H) = kDimType) then SetClass(H, kNewClass); end; { while } END; Run(ChangeDimClassName); HTH, Raymond
-
@bsalee, Could you please explain in a little more detail what you want to happen? Are you referring to this setting in the Document Preferences, as the dimension class name you want to assign? Or, are you wanting to assign another class to dimensions that you click on? Or, do you want to toggle that Document Preference ON and OFF? It is possible to set it up as either a TOOL, or a SCRIPT, but there are some nuances in the way each functions. More detail will help. If you could clarify your request a bit, I or someone else might be able to help. Thank you, Raymond

-
Populating a dropdown based on another dropdown.
MullinRJ replied to Jayme McColgan's topic in Python Scripting
@Jayme McColgan, LOL – Love the enthusiasm of your reply! A note at this point would only benefit other people. I'm pretty sure you will never need that example again 😉, but I'll add a note soon. If you are using the HTML version of the script reference, a user's note will not show up. I can only add one to the online Developer WIKI. FYI Glad I could help, Raymond -
Populating a dropdown based on another dropdown.
MullinRJ replied to Jayme McColgan's topic in Python Scripting
Hi @Jayme McColgan, The easiest way is to delete the first (0th) element N times. Your code is moving up the list as your list is shrinking, so yes, there will be residual entries left over. Try: for i in range(vs.GetChoiceCount(dialog1, 36)): vs.RemoveChoice(dialog1, 36, 0) Raymond -
Vectorworks Operating System Compatibility List
MullinRJ commented on PVA - Admin's article in Knowledgebase
@RobinS, I seriously doubt this answer is timely enough to help you, but maybe it will help another. Last year (2022) I bought a new Mac to be able to upgrade the OS past OS 10.15, which enables me to run VW 2023. Currently, I'm using a macMINI (M1, 2020) with OS 12.6.4. VW 2015 seems to run well. I do have problems with VW 2019 needing manual screen redraws to update the display, and VW 2016 does not load anymore. These are the only two versions that are giving me problems. VW 2015, '17, '18, & '20 all work without noticeable problems. This does not mean they will work without any issues, just that my workflow does not suffer from them being unsupported. Additionally, VW 2015 worked for me when I had OS 10.11 - OS 10.15 (macMINI 2012), and OS 11 (macMINI M1 2020) loaded. I was very surprised and elated with these results. Still am. HTH, Raymond -
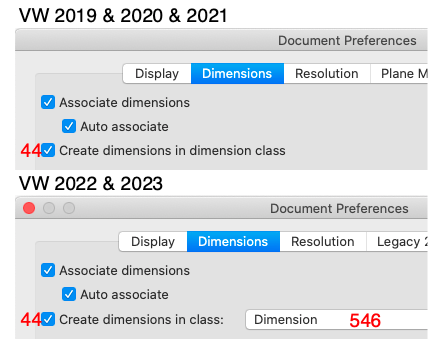
Pref 44 is shorthand for VW Application Preference 44. It is a boolean flag, meaning it has a value of True or False. Use Boo := GetPref(44); to read the value into boolean variable "Boo", SetPref(44, True); to set the flag, and SetPref(44, False); to clear the flag. The results of these commands can be seen in the Document Preferences dialog. The checkbox will change states with this Pref 44 value, or vice versa. Pref 546 is in the newer versions of VW and you would use L := GetPrefLongint(546); to read it into variable "L", which you define as a LONGINT. Poof – You are now in the Cult. Drink the KoolAid and Smile 😁 Next Week we'll explore Toggle Scripts. Raymond
-
@Jiajing, I can confirm that @Pat Stanford is correct, in that the options for all of the FEOIL commands can be added together to give you combined attributes. In this case your Layer Options = 3 does in fact mean All Layers AND Visible Layers, which reduces to All Layers. Often, I'll use 3 in the Object Options to get me Visible AND Selected objects. It is possible to make ForEachObjectInLayer() act like FSActLayer if you return True from your "todo" function. When True is returned, processing stops. Returning nothing defaults to False, and all objects within the scope of the command get processed. Here's a variation of your script that shows all of the pertinent information in one Alert Dialog, including the object type number. I would recommend changing the last option to a 4, to only work on Editable layers. This avoids grabbing objects on Gray or Hidden layers. import vs CR = chr(13) # Carriage Return char def todo(h): p = vs.GetBBox(h) vs.AlrtDialog('BBox for Obj Type: ', vs.GetTypeN(h), CR, 'TL: ', p[0][0], ', ', p[0][1], CR, 'BR: ', p[1][0], ', ', p[1][1]) return True vs.ForEachObjectInLayer(todo,2,0,3) # Selected, Shallow, All & Visible layers And here's a simpler version of the same script, using vs.FSActLayer() (as Pat recommended.) This style of script is primarily used when you are working only on the Active Layer. import vs CR = chr(13) # Carriage Return char h = vs.FSActLayer() p = vs.GetBBox(h) vs.AlrtDialog('BBox for Obj Type: ', vs.GetTypeN(h), CR, 'TL: ', p[0][0], ', ', p[0][1], CR, 'BR: ', p[1][0], ', ', p[1][1]) Note: I always place a comment after the FEOIL commands to spell out the numeric meanings of the options. Unless your memory is perfect, this will save you tons of time in the future when you revisit your scripts so you don't have to relook up the command to find out what the numbers mean — again. HTH, Raymond
-
I'm not sure we're saying the same thing, but we may be. If Pref 44 is FALSE, dimensions go into the ACTIVE CLASS. Else, when Pref 44 is TRUE, dimensions go into the class defined by Pref 546, i.e. the Default Dimension Class. So, if you want to toggle between the "Dimension" class and the Active Class, you only need to toggle Pref 44. However, if you want to toggle between "ClassA" , and "ClassB" then a script like yours will work, but to be sure it does, you should also check and set Pref 44, because if it is ever FALSE, your script will mysteriously fail to work. I know, that's unlikely, but not impossible. Raymond
-
Additionally, Pref 44 has to be TRUE for that change to take effect. If Pref 44 is FALSE, the dimension objects will be placed it the Active Class. Raymond
-
@Pat Stanford, You are Soooooo close. Pref 546 is the one you want. The Script Reference Appendix is wrong. Message( GetPrefLongint(546), ' ', Index2Name(GetPrefLongint(546)) ); { Show the default dimension class } Raymond
-
Hi Sam, You have the 1st five correct. Short is an integer, so use Get/SetObjectVariableInt. Sint32 is a Longint, so use Get/SetObjectVariableLongInt. The "RefNumber" shown above are type Sint32 (Longint) - see previous line. I'm guess on the "void write" entries, but judging from their ovNames, they may be BOOLEAN, but you can only write to then, and not read them. Not sure how to read or write a transform matrix from VS.
-
Oh, Pat, you are crazy ...rational AND crazy... but you know what they say, it takes one to know one. 😉 Here ya' go. Here's my Secret Sauce recipe. Cut and Paste to your heart's delight. Procedure ListHiddenRecordFormats; CONST CR = chr(13); VAR S1 :DynArray of Char; Procedure HiddenRecordNames(var S1 :Dynarray of Char); { Append the names of all Hidden Records to text block S1. } { 25 Mar 2023 - Raymond J Mullin } Const RecordType = 47; DummyRec = 'DummyRec'; DummyFld = 'DummyFld'; Var hndDummyRec, RecHnd :Handle; Begin NewField(DummyRec, DummyFld, '1', 3, 0); { create dummy record } hndDummyRec := GetObject(DummyRec); { get handle to new record } SetObjectVariableBoolean(hndDummyRec, 900, False); { hide it } RecHnd := NextObj(hndDummyRec); { get handle to next object on list } DelObject(hndDummyRec); { not needed any more } while (RecHnd <> nil) do begin { traverse the Hidden Record list } if (GetType(RecHnd) = RecordType) then S1 := concat(S1, GetName(RecHnd), CR); RecHnd := NextObj(RecHnd); { Next Object on list } end; { while } End; { HiddenRecordNames } BEGIN S1:='The file contains the following hidden record formats:'; S1:=Concat(S1, CR, CR); HiddenRecordNames(S1); { append Hidden Record Names to text block } S1:=Concat(S1,'*****'); AlrtDialog(S1); END; Run(ListHiddenRecordFormats); Raymond
-
Hey Pat, Hmmmmm, the secret sauce? I don't know why BuildResourceList() does not see Hidden Records, but judging from your example, it obviously doesn't. That said, I vaguely remember (meaning some old code I wrote shows) that Hidden Records are kept in a different list from the other records. The only way I can think of right now is to search that other list and use AddResourceToList() to place the Hidden Records into your list. Are you wanting your Resource List to contain only Hidden Records, All Records, or a mixture (Visible, PIO, Hidden)? I don't have a code sample to cut and paste right now because I wasn't using Resource Lists at the time, but I can mock one up shortly. Raymond
-
Hi Peter (@Elite Exhibits), Do you need to see the symbol thumbnails, or just the symbol names, in a list when you are making your choices? Your request is doable, but not necessarily easy. Viewing the thumbnails would be more difficult than just viewing the names. Raymond
-
@WhoCanDo, I just placed your script into a Menu Command, placed that command in my Custom Menu, and assigned Cmd-Shift-9 to it. It works without the extra overhead of having to click in the drawing. I think that initial click is a built in penalty required when using tools vs. menu commands. You have to click in the drawing for the script to run. If using a hotkey for a menu command instead of a tool does not rail against the tenets of your core beliefs, may I recommend giving it a try to see if it will work for you? HTH, Raymond
-
SP3 or SP4? I just remembered there was a bug in SP3 where the ALT keys for tools did not work. It seems to be fixed in SP4. If you're still on SP3, I recommend you upgrade to SP4. I'm using SP4 with OPT-9 set to your New Round Wall tool. When I press OPT-9 it almost sets the tool up, as the name shows in the Tool Bar, but none of the button icons appear. After I click once in the drawing, then the tool's mode buttons appear. When I click the second time I can draw with the New Round Wall tool. I'm on a Mac, so the behavior may be different on your PC, but it's still not working the way I expected to. Can you describe in more detail what's happening your end? Raymond
-
@WhoCanDo, I just found out the cutoff for the tool numbers is VW 2022 and older use -318 for the Round Wall, while VW 2023 uses -208 for the Wall tool, but the second mode is now the Round Wall tool. Now my question is, what version of VW are you running? The same command SetToolWithMode() can be used in any version of VW from 2016 onward, but the tool number and the mode buttons you set will change in VW 2023 and beyond, compared to the ones you would use before VW 2023. If your signature is correct, then you will want to use: SetTool(-318); { Round Wall Tool } SetToolWithMode(-318, 1, 1); { Group 1, Selection 1; ie Left Control Line Mode } In VW 2023, and presumably newer, use: SetToolWithMode(-208, 1, 2); { Group 1, Selection 2; ie Round Wall Mode } SetToolWithMode(-208, 2, 1); { Group 2, Selection 1; ie Left Control Line Mode } Raymond
-
Appendix E, after the color palette. Raymond
-
I got them from the VS Func Reference Appendix -> SetTool - CallTool Selectors. I used the HTML version that ships with the software, but it is also online in the Developers Wiki. Raymond
-
Sum multiple wildcard worksheets
MullinRJ replied to kinglevel's topic in Resource Share - Worksheets
I believe it could be done with a worksheet script. Build a Resource List of all worksheets in your drawing; step through each list element and filter the names to match your criteria; if a WS passes the filter, extract the value from cell A1 and sum it; return the sum from your function. What say ye, @michaelk? Raymond -
In older versions of VW use : SetTool(-318); { Round Wall } In newer versions use : SetToolWithMode(-208, 1, 2); { Round Wall mode of the Wall Tool } I believe you can set other mode buttons of the Wall Tool by changing the middle number to select the button group, and the last number to select the button within that group. I don't know what VW version is the cutoff version. One of these should work for you. Raymond
-
Getting handle to symbol in symbol definition
MullinRJ replied to David Poiron's topic in Vectorscript
Hi @Jiajing, It seems to work on all container objects, as best I can tell. As you can see, it even works on symbol definitions. I think I saw @Julian Carr use it once in an unexpected way a couple of decades ago, and I've been using it ubiquitously ever since. It's never caused a problem, so I keep using it. It's my magic can opener. Raymond PS - Thanks, Julian. -
Rotating 2D Line Vertically for Mirror Ball Marionette
MullinRJ replied to Alex Talbot's topic in Marionette
Follow up. I just figured out you don't need the Layer Plane node if you don't use Enable Legacy 2D features (starting VW 2022), or you use Working plane only. If you mix Screen and Working Plane objects in the most recent VW versions, then the Layer Plane node makes sure the line draws on the Layer Plane. If there's an easier way to force Layer Plane drawing, please let me know. Raymond -
Rotating 2D Line Vertically for Mirror Ball Marionette
MullinRJ replied to Alex Talbot's topic in Marionette
@Alex Talbot, I think @Marissa Farrell's way is the way to go, but if you want to see how to draw a 2D Line on a vertical plane (YZ plane in this case), I cobbled together a few Marionette nodes to draw a Planar 2D Line that runs from the Origin (0, 0, 0) down along the Z_axis. This is not guaranteed to be the smallest node, but it works. Suggestions for improvement are welcome. You can change the Line's length by editing the Y_value of the 2D point (pEnd) on the Create Line node. You can also change the Start Point by adding a 3D Point to the vOffset input of the Set Entity Matrix node and giving it any 3D XYZ value. NOTE: All unassigned input nodes use the value (0, 0) or (0, 0, 0). The attached VW file is v2018, so more people can read it. Vectorworks file: 2D Line on 3D Plane v2018.vwx Raymond
