
Andy Broomell
-
Posts
3,173 -
Joined
-
Last visited
Content Type
Profiles
Forums
Events
Articles
Marionette
Store
Everything posted by Andy Broomell
-

Copy tool and move tool
Andy Broomell replied to litesauce's question in Wishlist - Feature and Content Requests
Here's one way: https://forum.vectorworks.net/index.php?/topic/54078-move-functions/#comment-271637 Alternatively, I'd personally love for the Move command to have a "Create copy" checkbox, because I like the simplicity of typing in coordinates with this command: https://forum.vectorworks.net/index.php?/topic/40263-move-command-duplicate/ (Of course you can always duplicate the objects in place first, then do the move command, as suggested in the above thread.) As yet another approach, you can use the Duplicate Array function to do what you want, using the Linear Array mode. [I usually don't use this because I like to leave my Duplicate Array settings configured for Circular Arrays which I use quite often]. I think one of the great things about VW is that there can be multiple ways to approach simple things like this. -
I've been wondering this too. I really want all the thicknesses to be 3/4" instead of the default .787" It makes this tool fairly useless to me outside of rough concept renderings.
-
This confuses my students quite often, and I would love to see this issue fixed. I really hope a programmer didn't one day decide "let's make these classes invisible by default" - rather, I'm guessing it's more of an oversight/fluke that's just never been addressed. It happens to me all the time not only with auto-generated classes, but also when I import or copy/paste things in from other files. If new classes are brought in with these objects, the classes are always automatically OFF in viewports and saved views, which often leads to things missing in views that are already set up. This is of course fixable by right clicking the new classes and adjusting "Visibilities" - but the issue is moreso even realizing this needs to be done in the first place. It would be much safer to include these extra classes as visible, which we can then turn off in viewports as desired.
-
Navigation Saved Views
Andy Broomell replied to Grethe Connerth's question in Wishlist - Feature and Content Requests
I would venture to guess that the reason this isn't already the case is that you're never really "in" a Saved View. It is merely a script that changes class & layer visibility, pan & zoom etc. Once the script executes, the Saved View is no longer relevant until you decide to again run it. I agree that it might be handy to have some way of knowing which Saved View was most recently used... but it'd have to be very clear that it is not the "active" Saved View, since that's not how they work. So checkmarks would be a no-no, though I'm not sure what to suggest alternatively which wouldn't also give the wrong idea about how Saved Views work. -
Reposition the Editing Modes Button
Andy Broomell replied to bcd's question in Wishlist - Feature and Content Requests
Interesting idea! I like it. Having breadcrumb navigation would be a great addition. Upvote this topic as well, perhaps?: -
I tried creating a panorama for the first time a few days ago and had this same issue. I had no idea it was related to not having any lights in the scene, and gave up after a few tries. It would be great if panoramas worked with the default lighting, and in the meantime, the help topic on panoramas needs to explain that lights are needed.
-
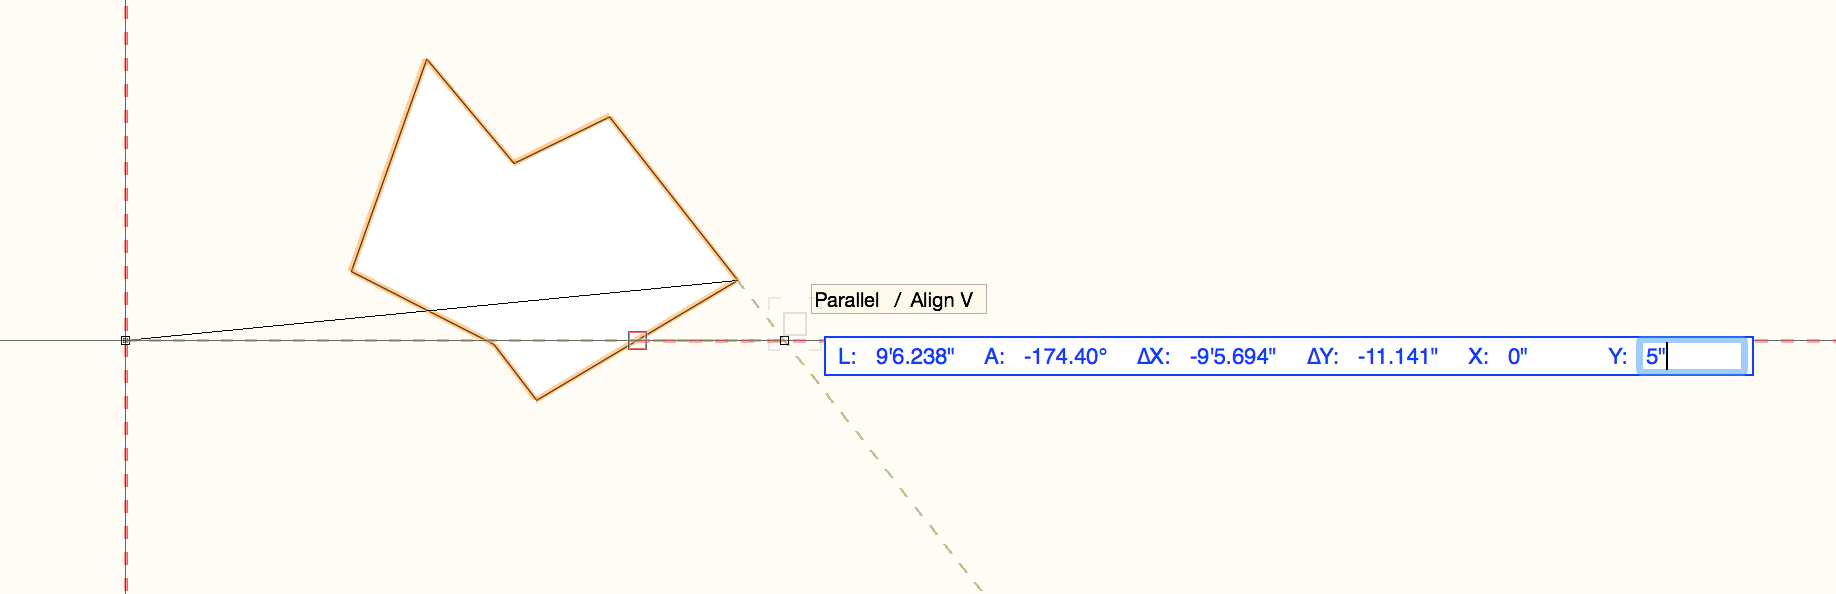
While not immediately apparent, this can currently be done with the Move By Points tool from the Basic tool palette. Make sure you're in Move mode, and that Retain Original Object is turned off. Have the object you wish to move selected. With the Move By Points tool, click the reference point on your object that you want to move, then hit tab 5 times until you're in the X field of the floating data palette, type in your X coordinate, then hit tab again to enter the Y coordinate. Then hit enter twice. (You can ignore the acquisition hints and cursor position; the tool will just move you reference point to the coordinates you typed in.)

-
Red 'X' appears in Top/Plan view and attached to hardscape area
Andy Broomell replied to skeyshubber's question in Troubleshooting
Is there a reason the Hardscape tool doesn't auto-assign these loci to a class such as "NonPlot" or "NonPlot-Loci" as most other tools do? -
Symbol Thumbnail Rendering Issue
Andy Broomell replied to Haydenovative's topic in General Discussion
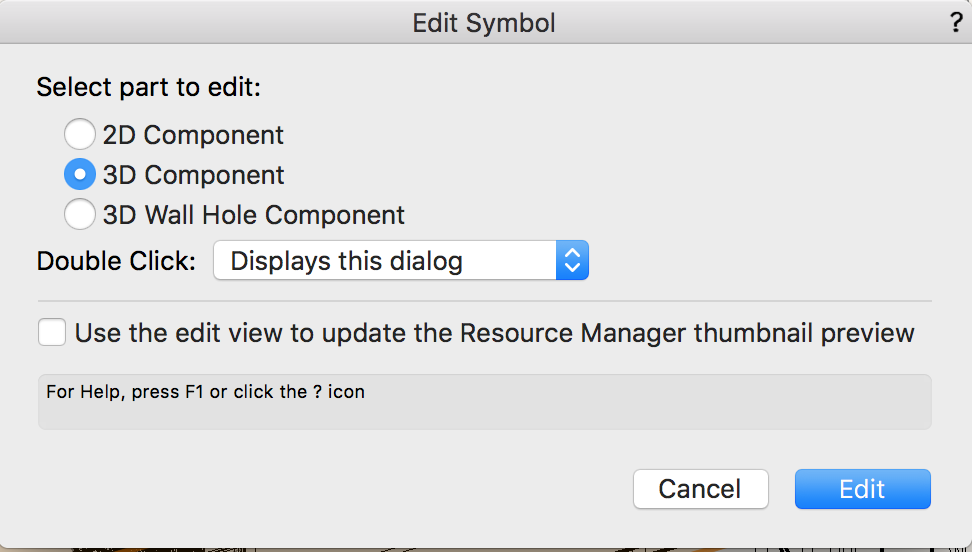
Perhaps when you go to edit the Symbol, you have "Use the edit view to update the Resource Manager thumbnail preview" checked?
-
@digitalcarbon I don't have to hold down the mouse button when using Move By Points. I wonder if you have click-drag drawing turned on, which would cause that? I prefer click-click drawing, but it's just a personal preference.
-
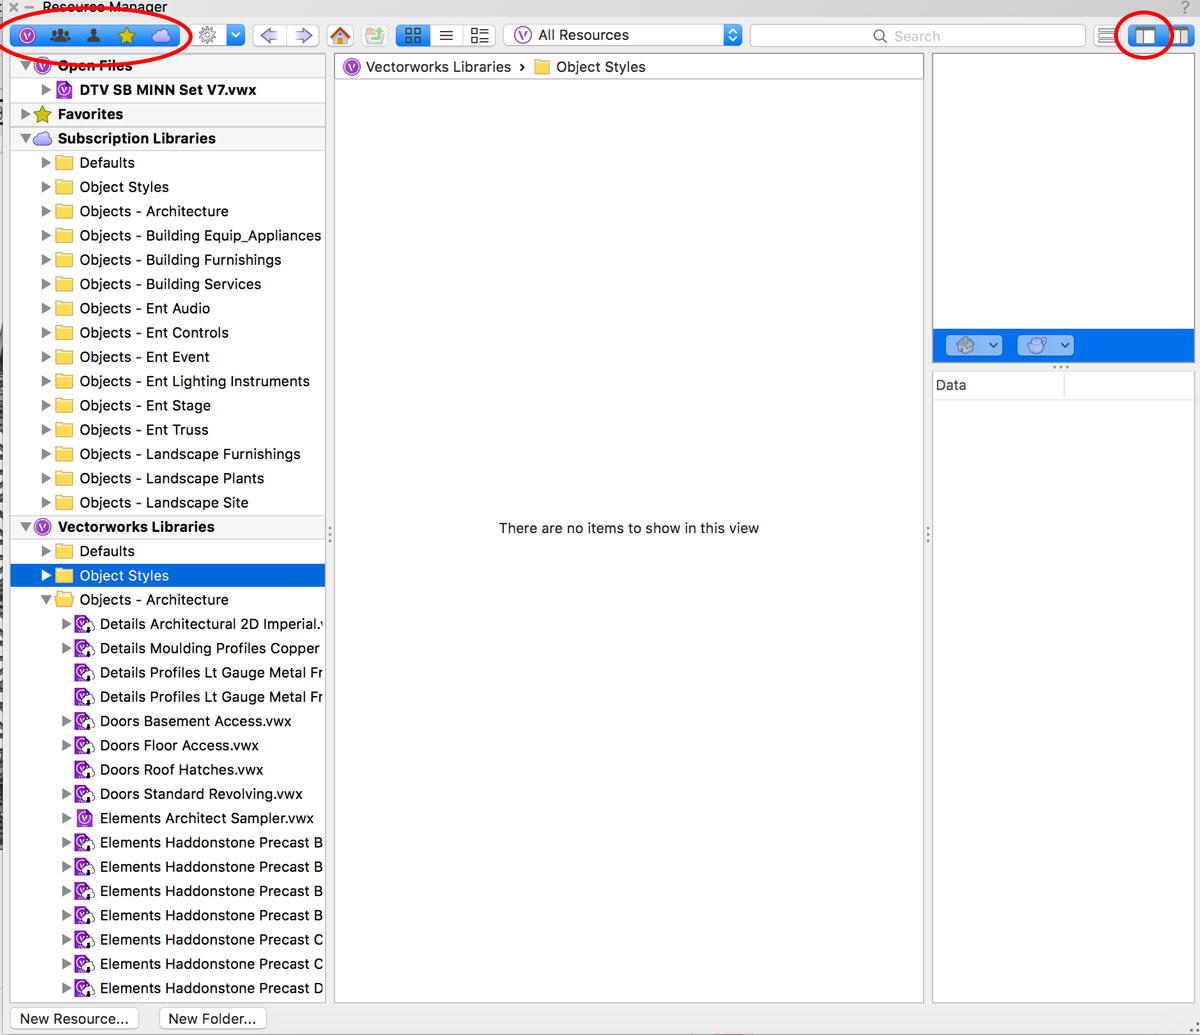
Do you have the side panel in the RM turned on? This is where they should show up. See the button in upper right. Also make sure all the libraries are turned on with the buttons in the upper left.

-
Do not snap to self!
Andy Broomell replied to Kaare Baekgaard's question in Wishlist - Feature and Content Requests
Yes please! This would be useful across the board. Even making a simple rectangle slightly wider is difficult because it snaps to its own edge. (Why would you ever want to modify something to be the exact size it already was?) Of course you can always hold the tilde key (~) to temporarily disable snaps, but not everyone knows this and it can sometimes be clunky. Having the option to always prevent self-snapping would be an awesome improvement. -
I've never heard of such a functionality (locus "lines"), but I started using VW around 2009, which according to this thread is perhaps when this functionality went away? I'd be curious to learn more about it!
-
The thing that's a bit mystifying is whenever two solids intersect - which lineweight does Vectorworks choose to use for the resulting line? That of object A or object B? For example if you look at your dormer window, it looks like some of the lines took on the lineweight of the dormer's walls, while some took on the lineweight of the window or of the roof object. This is what leads to the scattered, unintentional look. I coincidentally just employed this workaround minutes ago for a project. It's very manual, but at least reliable (Also, if you're getting way too many lines, check that the 3D conversion resolution under VW preferences isn't set to Very High. This particularly affects curved objects).
-
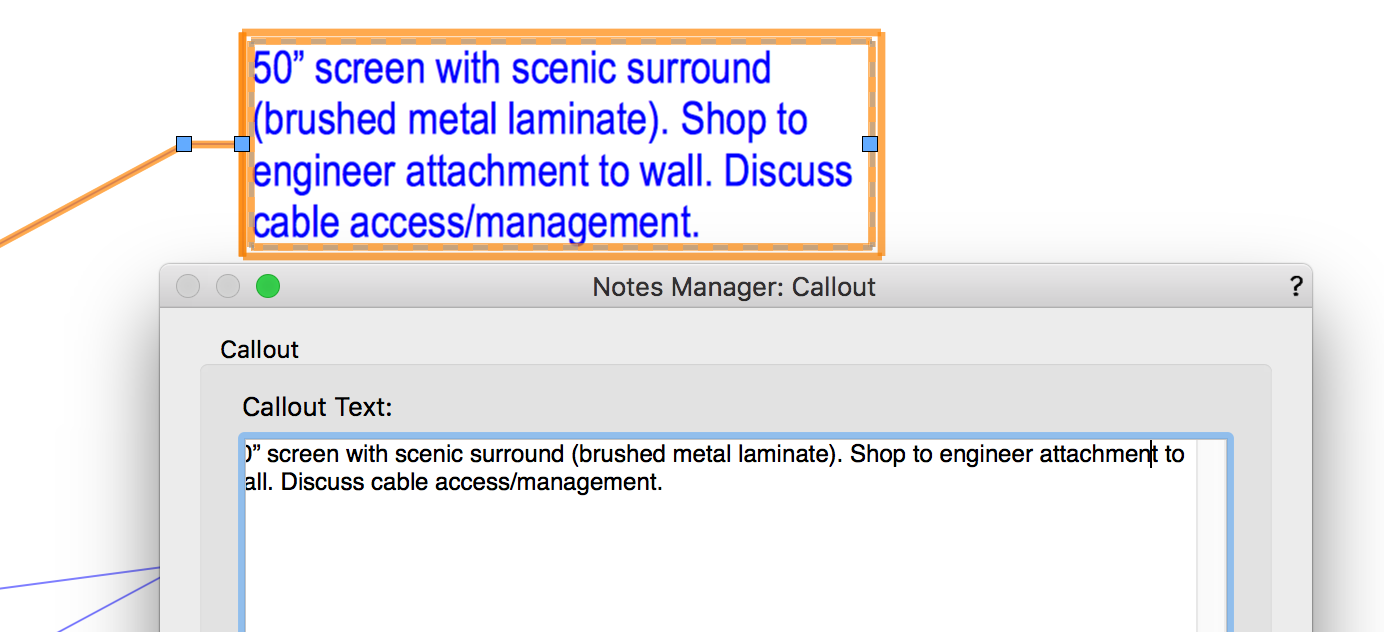
I've noticed a small but annoying bug ever since starting to use 2018 full-time. When editing the text of callouts that are more than one line, the editor sometimes "scrolls" over a bit, thus cutting off the first letter or two of each line: It resets itself by exiting and re-entering the editor, but will re-occur later. It's always related to multiple lines/word wrapping, but it doesn't happen every single time.
-
Sheet viewport class overrides revert to design
Andy Broomell replied to Allen Brown's topic in General Discussion
Oh that's actually a good idea! I was actually wondering whether you had perhaps been using the Eyedropper to transfer some other properties and were inadvertently also transferring class override settings. Not sure what else could be causing it... Good luck! -
Asymmetric Symbol Scaling Issues
Andy Broomell replied to Andy Broomell's question in Troubleshooting
I feel problems often arise with circle- and arc-based shapes... FunkyFrames.vwx
-
The line thickness in Hidden Line render mode is pulled from the actual 3D objects on the Design Layers. If there are any hybrid symbols, the lineweight is pulled from the 3D side of the symbol. I've run into very similar issues as you where all the different lineweights make a Hidden Line elevation look not great. (And you often don't want to change all of the objects' lineweights because they're important for the Plan representation). Unfortunately I don't know of any way of dealing with this outside of manually changing the 3D objects' lineweights, or using a complicated system of viewport Class Overrides. I think it'd be a GREAT wishlist item to have the functionality with Hidden Line to suppress ALL lines to a chosen lineweight, easily solving issues like the one you posted. You could always then add back in some thicker outlines where desired by tracing in the viewport's Annotations.
-
Sheet viewport class overrides revert to design
Andy Broomell replied to Allen Brown's topic in General Discussion
Are you ever using the Eyedropper tool on Viewports? Just one thought... -
I figured I'd post a specific example of asymmetric symbol scaling going haywire, in case it's helpful to VW engineers as they work to improve this functionality. VW file is attached. I run into symbol scaling issues all the time, but this one seemed fairly repeatable/predictable. I have a symbol containing only normal extrudes, which I'm reusing in a bunch of places at different sizes (a perfect time to use symbol scaling). When I use asymmetric scaling it gets wonky like in the screenshot. The only workaround I could figure out was to make the contents of the symbol Generic Solids: SymbolScalingKnob.vwx

-
In the OIP find the parameter "Arrow Angle" and type in the angle there. If you think this isn't as intuitive as it could be, upvote this wishlist item:
-
Separation Lines in ClipCube
Andy Broomell replied to Andy Broomell's question in Wishlist - Feature and Content Requests
Adding to this request, I wish the red Clip Cube fill didn't disappear where two objects overlap. Or there should be a setting for this.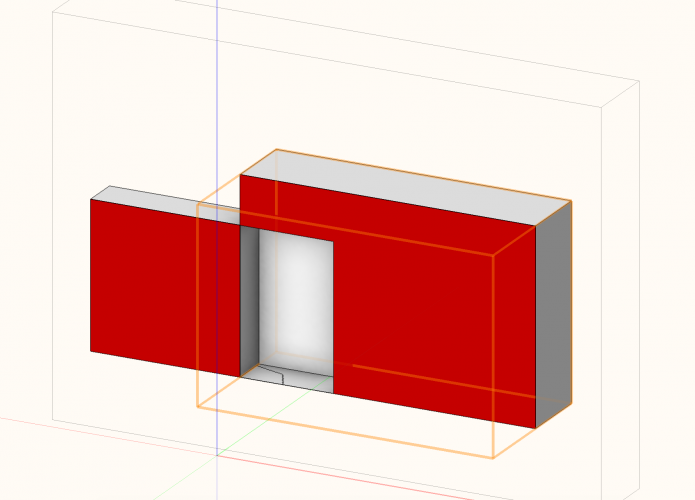
-
Softgoods Custom Texture - Match Height
Andy Broomell posted a question in Wishlist - Feature and Content Requests
I love that you can add a custom texture to the Softgoods tool. It would be awesome if there were an option to have the texture expand to match the HEIGHT of the curtain, rather than the current default WIDTH. For example, I have a black drape texture that I like to use on curtains (its image allows it to tile horizontally, but not vertically). When I throw it onto a bunch of differently sized curtains it looks like this: Because each curtain panel is a different width it tiles weirdly. If there were an option to "Match Height of Softgood" then it would tile beautifully on all the different curtains. Note that the current workaround is to make a differently-sized texture for each height of curtain, assigning the appropriate texture to each different curtain, and turning off "Scale and Adjust Texture" - but this is clunky and doesn't allow for quick adjustments. Having one self-adjusting texture for everything would be ideal. @C. Andrew Dunning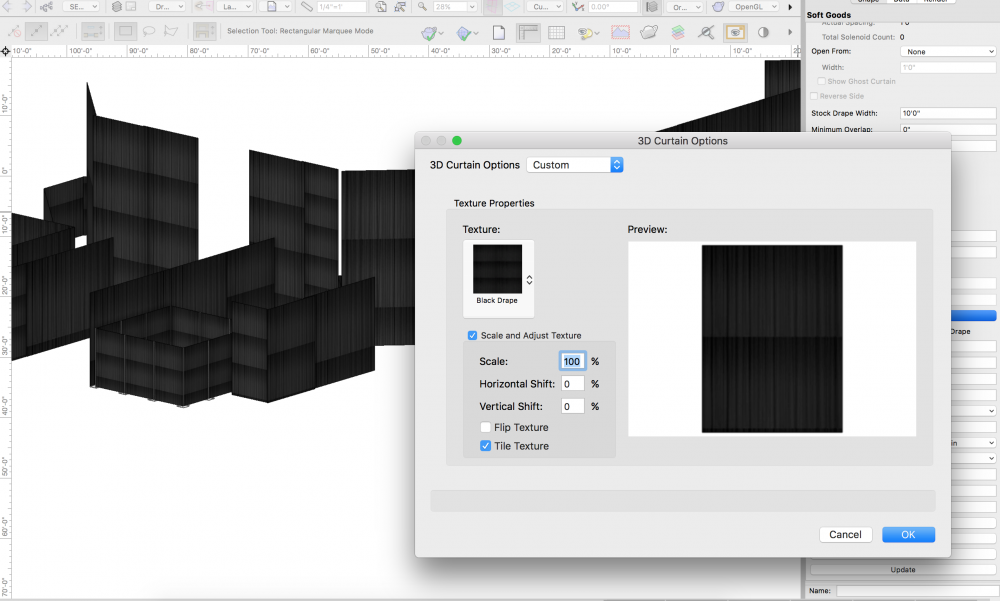
-
The second one from Stephan is definitely the library I was remembering. Thank you! I think there's yet another example I'm picturing, though I was combining it in my head with the images above. I seem to remember the other example perhaps being a video or webinar that walked through all the steps to create what's seen above. I remember it being a clearly explained tutorial, so I'd like to send it to an acquaintance who's looking to learn how to create the effect, since I'm unable to walk through the steps with her in person. (Maybe I dreamed the whole thing, haha)
-
Hi all, I'm trying to find a specific example I once saw of a great rendering someone made where there was a window on the camera left side of the space, with lit fog coming in through the window. The light was also broken up with foliage. I seem to remember it being a living room type space or perhaps a library. I can't remember if it was a forum post, a tutorial, a YouTube video or what... Anyone know what I'm talking about? @Luis M Ruiz @JimW Just looking for that one specific example, not other tutorials on the subject... Thanks!