
Andy Broomell
-
Posts
3,173 -
Joined
-
Last visited
Content Type
Profiles
Forums
Events
Articles
Marionette
Store
Everything posted by Andy Broomell
-

Red Truss Appears When Using Straight Truss
Andy Broomell replied to yoyoyo's question in Troubleshooting
Uncheck "Highlight" in the OIP and the red section will no longer be red. -
There is one too many Visualization Palettes
Andy Broomell replied to MGuilfoile's topic in General Discussion
Indeed, I checked that "Lock tabs" option the second they added it! But presumably you can just separate some tabs into a separate palette, then lock everything. Set it and forget it. -
There is one too many Visualization Palettes
Andy Broomell replied to MGuilfoile's topic in General Discussion
You would still be able to pull the Lights tab off into its own 'palette' - this ability was added a few versions ago. It could still feel like a separate palette if you want it to. And yes, there's also some complication with the fact that selected viewports interact differently with the Lights tab, but this could be improved as well since it's currently a bit esoteric. I like your line of thinking where this functionality would be transferred to the OIP to better align with how Class & Layer visibilities work. -
There is one too many Visualization Palettes
Andy Broomell replied to MGuilfoile's topic in General Discussion
I agree that this is confusing. I've separately wished that the Lights and Cameras tabs could be docked into the Navigation Palette. Now I'm thinking they should just get rid of the "Visualization" palette name completely and make Lights and Cameras part of the Navigation Palette directly. There's no disadvantage to this, since these days you can rearrange, dock, and undock individual tabs at will. The problem with the current setup is that I often turn off my visualization palette to gain screen real estate, since it can only exist as its own palette. I would much rather just be able to dock the two tabs into the Navigation Palette. That way they'd be out of the way, but still be accessible if/when needed. -
Wall direction in 3D
Andy Broomell replied to Tom W.'s question in Wishlist - Feature and Content Requests
Yes please! Already in the wishlist system as VE-102554 and VE-103993.- 1 reply
-
- 3
-

-
It's a shame that Perimeter mapping was removed, because it was literally the ONLY way to do backdrops for film sets. Now it's an absolute pain in the butt to accomplish anything remotely similar, while it used to be a breeze. I'm talking 15 minutes vs 15 seconds. I should probably make a post or VE about it, because Perimeter should be restored as an option.
-
Shaded Renderworks Style
Andy Broomell replied to Josh Schulman's question in Wishlist - Feature and Content Requests
I agree that it'd be great to be able to save Shaded render settings as a Style so that they can more easily be applied to viewports. In the meantime, once you have one viewport set up with the settings you like, you can use the Eyedropper tool to pick up those settings and apply them to other viewports en masse. Just make sure that only "Render Settings" is checked for the tool settings. This will pick up the render modes set for foreground & background, the settings for each, plus the Lighting Options (brightness, Ambient Occlusion settings, etc). You could also check Image Effects under the Viewport category if you want. I have this eyedropper configuration saved as one of my presets so it's available directly in the mode bar without having to open the tool preferences. -
How do I set 'New Classes' default attribute?
Andy Broomell replied to hollister design Studio's question in Troubleshooting
I wish Vectorworks would make it clearer that there are "default attributes" which are the attributes in the palette with nothing selected, then there are also the "Default Attributes" which are a mysteriously stored set of attributes that you can save and recall at any point by using the little flyout menu. (I find this ability to be a bit esoteric and rarely used). I would vote for changing it so that new classes use the current default attributes in the palette, rather than the "Default Attributes" which are often unknown to the user. -
Attribute mapping box really far away.
Andy Broomell replied to DSmith2300's question in Troubleshooting
You could also use the Attributes Palette. Click the three dots to the right of the hatch, then uncheck and re-check "Use Local Mapping" -or- set the two Offsets to 0.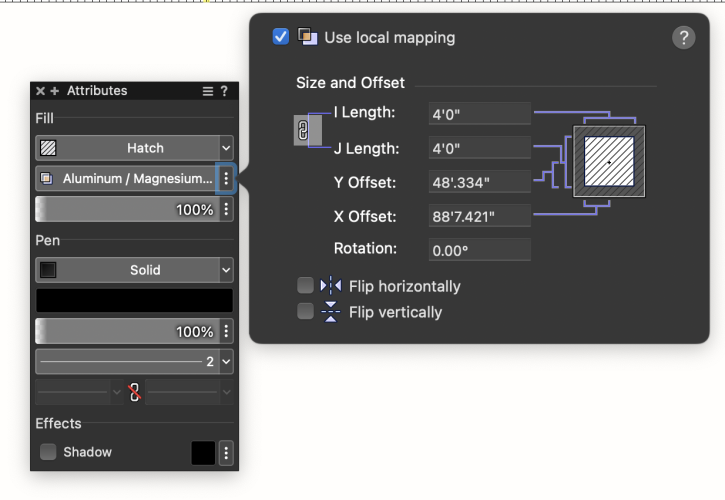
-
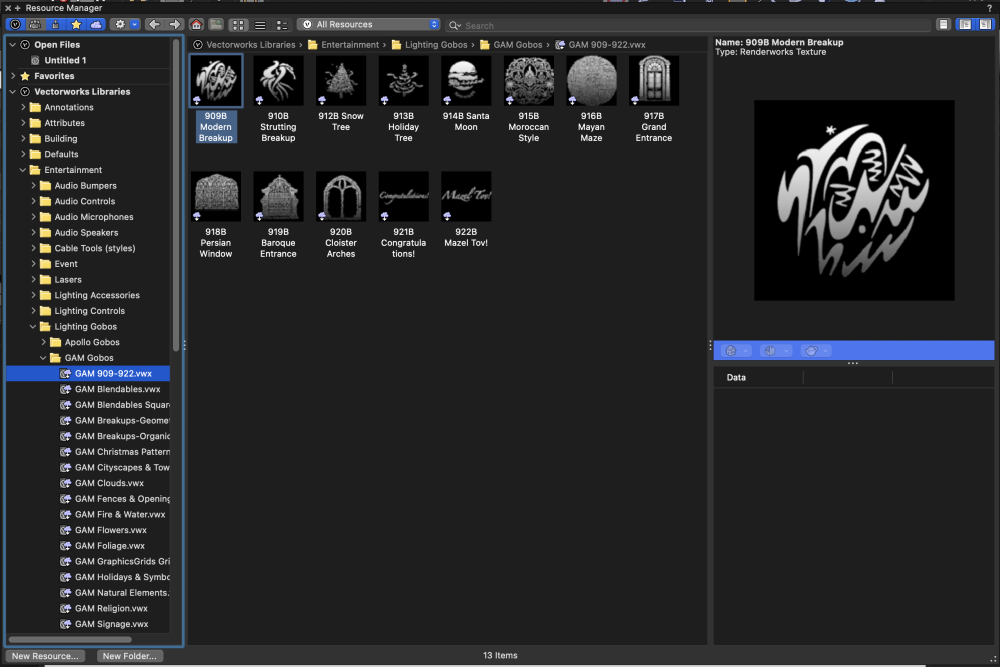
Why can't I search for or even navigate to any gobo texture libraries directly in the Render tab Resource Selector? Here's the full Resource Manager: And here's the Render tab Resource Selector: If you search for "gobo" in the Resource Selector, there are no results. So you have to switch to the full Resource Manager, search for Gobo, Import the one you want, then switch back to the Light to apply it.

-
Sweet. Is this new to 2023? I don't remember learning about this in any of the beta videos, though I may have missed it.
-
I definitely have a wish list on file to rename Shaded "Details" to "Curved Geometry" since its the only thing this setting affects, and then it would match the corresponding setting that's already named "Curved Geometry" in Renderworks Styles.
-
-
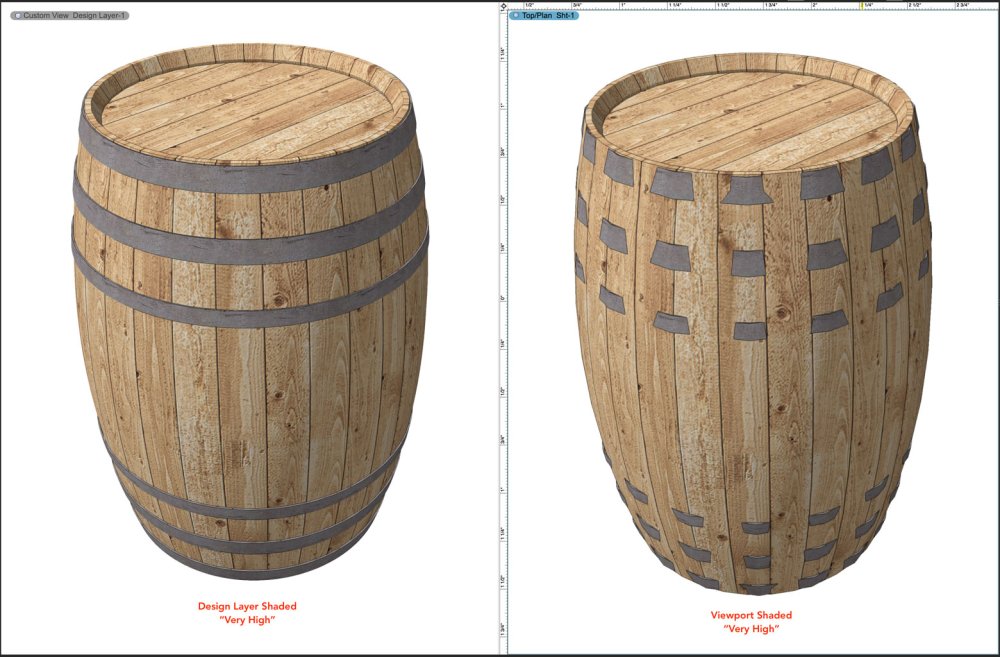
I think you're referring to the OIP dropdown called "Detail Level," while (I assume) @tsw is referring to the Shaded render setting called "Details." The latter is indeed supposed to control the geometry LOD in regards to curved surfaces. Faceting should NOT be affected by Sheet Layer DPI, at least historically. (And in the barrel example, notice the straps are still weirdly faceted at 300 dpi). Notice how the barrel looks good in the Design Layer when "Details" is set to Very High, but this can't be replicated in the Viewport with the exact same settings. I think that T02353 needs to be reexamined because these uncontrollable changes to what's being rendered are HIGHLY disconcerting to me. @Kyle Sutton @Josh Loy
-
How can you use filters when the other person's class and layer names are sorts of a mess? I could see filtering out their classes and layers if they all used a common prefix, but that's pretty rare.
-
Yes and it’s super annoying 😞
-
Did you just update to SP4? I have a suspicion that it might be related to T02353 – Sheet Layer Viewport Imaging Optimizations. There's some Auto-LOD happening for Shaded render now, and I think the optimization algorithm isn't working correctly for your scenario. I had similar issues while beta testing, though the bugs I submitted were fixed. You should probably submit as a bug so they can examine the file.
-
Are Classes set to Show/Snap/Modify Others?
-
Hm. They generally are, although I've just realised that my "none" class isn't. Have changed that. I personally don't check "Use at Creation" for the None class, because that means that even if you wanted to draw red rectangles with no fill (for example) and set up the Attributes Palette that way, you could never draw with those specified attributes since "Use at Creation" will override them upon object creation, using the black/white colors from the None class instead. So to your original point, it would be nice to figure out when & why the Attributes Palette is changing itself. That way you can check "Use at Creation" only for the classes where you truly want that (which for me is about 60% of them). And I'll just say that I too have had issues with the Attributes Palette resetting itself, though it feels like it used to happen more frequently than it has lately. I seem to remember hypothesizing that Saved Views were the culprit, or perhaps navigating into and out of symbols? I'm 100% certain that I've experienced the palette resetting itself, but I never once observed the moment it happened.
-
If setting the Attributes Palette Fill to None doesn't fix it, the second thing to check is that the Viewport doesn't have a RW Background applied in the OIP. For example, the background called "HDRI White" might look the same as a white fill, but the solid white would be coming from the background, which would have to be removed (set to 'None') to get the alpha transparency back.
-
VW 2023 - Shaded w/ no colors display some textures in color
Andy Broomell replied to drelARCH's question in Troubleshooting
Yes, I've noticed this issue too. I believe it only occurs with textures that had a Bump shader applied. If the bump isn't important for other renderings, you could remove it from the texture and that'll hopefully fix the issue for this viewport. -
Support for OSL textures / Shaderbox
Andy Broomell replied to Kaare Baekgaard's question in Wishlist - Feature and Content Requests
If anyone has a PlayStation 5 or Xbox Series X/S, download the free "Matrix Awakens" Unreal 5 demo and fly around the city. It makes heavy use of this kind of '3D texture' (though I'm not sure whether they're from this company or not). Regardless, it's a really beautiful demo and fun to explore. -
Layer Scale question - why not just 1:1?
Andy Broomell replied to yasin2ray's topic in General Discussion
My SpaceMouse has been working fine in 2023 but I also don't really use the buttons at all... -
Rendorworks Camera without a lens
Andy Broomell replied to Andrew Cass's question in Troubleshooting
Oh, you're not using a "Renderworks Camera" object you're using a "Video Camera" object. The Renderworks Camera tool is used to get accurate perspective views, and would allow you to get a view that matches what the PTZ camera would see. But it doesn't create any actual 3D geometry. The Video Camera tool on the other hand creates 3D geometry, and has a Renderworks Camera sort of embedded within the tool which allows you to also see the perspective camera view as well. Since you're using the latter, I'm going to assume that the 3D portion of your PTZ camera is currently part of the Video Camera (i.e. selected in the OIP, not just a separate object). To get rid of the extra lens, one way would be to go into the Resource Manager, activate the current file, then delete the geometry out of the 2D and 3D components for camera lens symbol. Sort of a workaround since there's no way to uncheck it completely in the OIP. Then you'd still be left with the stand and camera body. Let us know if this gets you where you want. -
Rendorworks Camera without a lens
Andy Broomell replied to Andrew Cass's question in Troubleshooting
I'm not sure what you mean by "without a lens," but a quick Google of the product shows that it has an equivalent focal length range of 25mm to 600mm, so set the Renderworks Camera to 35mm (default), switch the Aspect Ratio to 16:9, then click the "Fine Tune Camera View" button and enter a focal length such as 25 in appropriate field, then click OK (yes it's dumb that Focal Length isn't a field directly in the OIP). This should give a good approximation of what the real camera will see. In regards to focal length you'll hit an upper limit of 196mm in Vectorworks, but I doubt you'll want to zoom in that much anyways. Let us know if you meant something else.