-
Posts
3,168 -
Joined
-
Last visited
Content Type
Profiles
Forums
Events
Articles
Marionette
Store
Everything posted by Andy Broomell
-

Custom Linetypes disappear in Rotated Viewports or Rotated Top/Plan
Andy Broomell replied to ericjhberg's question in Troubleshooting
Yup, itll be back shortly. Speaking of the bottom of the page.... 2018 All Rights Rederved. 😉- 12 replies
-
- bug
- visibility
-
(and 1 more)
Tagged with:
-
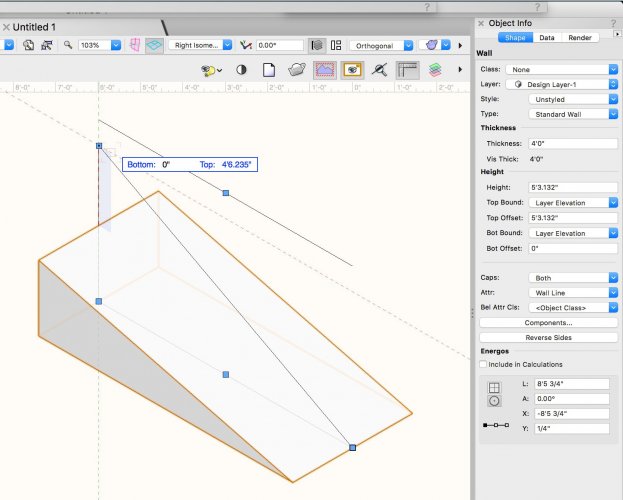
Actually... if you like the wall peaks editing mode, perhaps just use a Wall but make it super think and short? Then you can edit the wall peaks to interactively adjust the ramp:
-
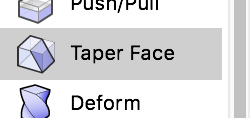
Perhaps the Taper Face tool in the 3D modeling toolset? It can take a minute to get used to, but it's the only 'interactive' tool I can think of for this purpose.
-
Wondering the same thing. It's a catastrophic bug and we've heard of no progress for months. It's currently midnight on a Saturday and I would prefer to just get this rendering done instead of restarting the program every three minutes. Combined with the bug where Lights disappear unless they're selected, I'm starting to consider Vectorworks practically unusable for renderings.
-

Automatic PDF Links from Linked Markers
Andy Broomell replied to Tom Klaber's question in Wishlist - Feature and Content Requests
That would be so nifty 🙂 -

Nudging should be single operation
Andy Broomell replied to Andy Broomell's question in Wishlist - Feature and Content Requests
I find that sometimes Undo will group nudges as one operation and sometimes it will treat each pixel move separately. More consistency on that would be nice as well. -
Whoops, I misread Workgroup Folder as User Folder in my previous post, but either way I'm glad you got it working!
-
A quick way to learn the location of your user folder is to go to Vectorworks Preferences < User Folder tab < Reveal in Finder button.
-
Additionally, in order for the "emit light" option to have any effect, make sure that Indirect Lighting is turned on in your Render Style.
-

Nudging should be single operation
Andy Broomell posted a question in Wishlist - Feature and Content Requests
I have my autosave backup settings set to “30 operations" - however, whenever I nudge something, each pixel of movement seems to be considered an operation, so VW tries to autosave every few seconds. This is incredibly annoying. It would be wonderful if nudging were counted as only one operation (assuming you're continuously holding down the nudge keys). -

Title Block Border - Custom Field Types
Andy Broomell replied to Kevin McAllister's question in Troubleshooting
I should also mention that on many Macbook pros you can hit fn+return in order to get "enter." I've started utilizing this even for Text Objects since it commits the change instead of adding a carriage return. -

Title Block Border - Custom Field Types
Andy Broomell replied to Kevin McAllister's question in Troubleshooting
To reiterate your question, because I realize am wondering as well, HOW do you generally specify whether a field is single line or multi-line? It used to be you added a "#" symbol to the end of the field name. One would assume that you could click Edit and choose single line or multi-line. But there is no such setting. @Nikolay Zhelyazkov Do you know the answer to this? [In the meantime Kevin, if your keyboard has a numpad "Enter" this will register as clicking OK instead of a carriage return. But I realize most laptops don't have this, plus it doesn't address the fact that you still have to remember to do it in the first place.] -
Does the tile texture have Displacement Mapping turned on? That could make the surface 'appear' to shift, though this might not be the issue here...
-

3d Locus not visible in wireframe Orthogonal view
Andy Broomell replied to Dubman's question in Known Issues
This bug seems to come and go randomly for me. It reappeared this morning, and I realized that when 3D loci aren't showing up, neither are RW Lights (which makes sense as they're both glyph-based objects whose display size is relative to your screen and not your zoom factor). It seems to mainly affect Loci and Lights within Symbols, while you're editing within the container. -

Video Screen Tool - show Screen Support but not the Screen in 3D
Andy Broomell replied to gfearon's topic in Entertainment
No problem! Keep in mind you can manually assign the "Borders" and "Frames" to the same class as the "Screens" - which will save some clicks 🙂 -

Video Screen Tool - show Screen Support but not the Screen in 3D
Andy Broomell replied to gfearon's topic in Entertainment
Perhaps I'm misunderstanding, but employing the classing method I mentioned above should accomplish what you're looking for? -Click "Classes" button in the Video Screen OIP. -Click "Use Standard Classes" button in pop-up. -Go to Navigation Palette and turn off the classes: "Video-Frames" "Video-Border" and "Video-Screens". -You're left with the Roll Case visible and editable, and you can show the screen again later by turning on the appropriate classes. -

Video Screen Tool - show Screen Support but not the Screen in 3D
Andy Broomell replied to gfearon's topic in Entertainment
Since the "Hide Screen" tickbox hides both the screen and the roll case, you'll have to scroll down in the OIP to the "Classes" button and set it up so that you can turn off "Screens," "Frames," and "Borders" separately from "Roll Cases". (You can click the "Use Standard Classes" button to have it auto-assign classes, though it may give you more than you need). Hope this helps! -

Can a glowing object be invisible but still emit light?
Andy Broomell replied to hobick's topic in General Discussion
I don't think it's possible, no. If you can't get an area light to render more smoothly after playing with quality settings, as another approach, what about making the blue texture itself glow? You could make it a blue gradient image instead of flat blue to help the effect. Even if it's not what would be happening in real life, it's often smart to fake things in renderings to get the desired look. -

Symbols "Draw 3D Only"
Andy Broomell replied to markdd's question in Wishlist - Feature and Content Requests
Agreed! -
One of the main issues with RW Cameras: currently there is no way to link a viewport to a Design Layer camera. WHAT CURRENTLY HAPPENS: You place a RW camera on a design layer and adjust it to the preferred POV. If you have the camera Activated when you create a Sheet Layer viewport, the camera is removed from the Design Layer and becomes embedded in the new viewport. If you don’t have the camera Activated, the RW Camera remains on the Design Layer and the viewport is created with the same POV (but with no embedded camera). IN EITHER CASE, the viewport’s POV is never linked to a camera on the Design Layer. This is currently impossible. Examples of why this doesn’t work in actual workflows: SCENARIO 1: MULTIPLE VIEWPORTS WITH SAME POV Let’s say you have a set design and you create a viewport to render the design. You then duplicate this viewport 15 more times to show different design variations via class visibilities and class overrides. Perhaps each viewport shows different textures or furniture options or lighting. Or perhaps it's a theatrical play with different scenes. Then for whatever reason the POV for these renders needs to change (which is not uncommon). There is no easy way to change the POV once and have all 16 viewports match. The only way to do this currently is very manual: First you adjust the POV for one viewport, then you move all of the existing viewports off to side so that you can duplicate this viewport 15 times like you did before and place each one where it goes, then you re-apply all of the class overrides by using the eyedropper tool and sampling from the old viewports, then you delete the old viewports, then you update all the new ones and hope you didn't mess something up. (I should note that all my rendering viewports are on one sheet layer in my workflow). This is a VERY tedious process, and especially annoying when the POV keeps on changing. THE PROPOSED SOLUTION: You place a RW camera on a Design Layer and adjust it to the preferred POV. When you create a viewport there should be the following options: Leave camera on the Design Layer and LINK the viewport’s POV to this camera. Leave camera on the Design Layer and create a duplicate camera to be embedded into the viewport. Embed existing camera in the viewport (just like the current functionality). The key here is option 1. This leaves the camera right where it is in the Design Layer, and would allow you to have multiple viewports linked to this one camera. In the scenario above, when you want to change the POV for all of your renderings, you simply move the camera’s position in the Design Layer and then update all of your existing viewports. Done. SCENARIO 2: THE ENTIRE SET CHANGES POSITION. Let’s say you have a design for an outdoor music concert stage and you’ve set up 8 renderings showing the stage from different points of view in the audience. Now for whatever reason the entire stage is changing position on the site and needs to rotate to the left. You need the renderings to following along with the new position. While you're not completely screwed, the current way of dealing with a rotation like this is quite laborious (which I won’t type out here). It’s possible, but realistically takes about 20 minutes to change all the viewports and make sure you haven’t messed anything up. With the proposed functionality, since the cameras still live on the Design Layer, you'd simply rotate the camaras along with the other geometry, then update your viewports. Nice and simple. SCENARIO 3: CAMERA PLOT In general it would just be nice to be able see the points of view for your renderings while working in a design layer. Say for example you’re creating a camera plot for a tv show and want to see the camera positions for all the shots simultaneously, and you want to be able to move them around and have the linked viewports adjust accordingly. This would be possible with this new functionality: what you see in your Design Layers will always match what you get in your Sheet Layers. (All of the above scenarios have arisen for me in the last few months, and each time I quickly realize the shortcomings of the camera tool.) ADDITIONAL CONSIDERATIONS: The OIP for a viewport would indicate that the viewport is linked to a Design Layer camera, and it would display the camera name. There would be a button for a pop-up that would allow you to choose a different camera to link the viewport to. There would also be a button to unlink the viewport from the DL camera (leaving you with the same POV but no longer connected to anything). Existing viewports that are currently unlinked should be linkable to an existing camera via the viewport's OIP. If you double click a viewport with a linked camera and choose Edit Camera, there would be a pop-up warning you that the viewport's camera is a Design Layer camera, and adjusting it will also affect other viewports linked to the same camera. There would be a secondary option to “create a duplicate camera" so that the changes you make only apply to the one viewport, leaving the original camera intact. The OIP for a DL Camera with linked viewports would indicate what viewports are linked to it. This dialogue box would list all linked viewports, with an "unlink" button next to each one and a button to "Navigate to Viewport". When you try to adjust the camera, VW would warn you that the adjustments will affect all linked viewports. If you try to delete the camera, VW will warn you that all linked viewports will then become independent unlinked viewports. As suggested elsewhere on these forums, another functionality that would be nice (and tie in well to the above considerations) is the ability to lock the POSITION of a RW camera, but have it still be selectable. Currently if you Lock a camera, you can’t even activate it to see its POV. And there’s no other way to prevent accidental changes to the camera (especially because if you have the camera Active and use the flyover tool, you’re actually moving the camera, which often trips up novice users). I know this was a long post, but I think this is one of the most important changes VW could make in order to improve the rendering workflow. It would also be immensely helpful in the TV/film/theatre industries. I'd love to hear other people's thoughts!
- 15 replies
-
- 16
-

-

-

Never default to Screen Aligned Plane
Andy Broomell replied to michaelk's question in Wishlist - Feature and Content Requests
By the way... the worst thing ever is when you go to an orthographic view and try to use either the measuring tape or dimension tool to quickly measure something... but you're accidentally set to Screen Aligned Plane but don't realize it, and since this takes into account the (invisible) axis perpendicular to the screen, you're guaranteed to get an incorrect measurement. Happens all the time. Both tools should always default to Screen Plane when in orthographic views. -

Never default to Screen Aligned Plane
Andy Broomell replied to michaelk's question in Wishlist - Feature and Content Requests
Not that I completely agree with its nomenclature or implementation, but I can begin to explain why it exists: Screen Plane: 2D objects stay "stuck" perpendicular to your screen, and don't move around in 3-dimensional space. You can draw screen plane objects when in any type of view (Top/Plan, isometric, orthographic views, etc). Layer Plane: 2D objects live in the 3D world, and are drawn on the ground plane of the current Layer (i.e. on the XY plane, +0" on Z axis). But now, pretend you're looking at an orthographic "Front" view. You can't really draw a 2D object onto the "Layer Plane" because you are looking perpendicular to that plane, and it would therefore be invisible. So then we need something else: Screen Aligned Plane: 2D objects are drawn in 3D space (just like Layer Plane), except on the XZ or YZ plane. But otherwise it's the equivalent of "Layer Plane". Note that once you draw an object, its OIP states "3D" for the plane (which makes it more confusing since its yet another pane name). So that's why all three exist. But I find VW automatically switches to Screen Align Plane when I don't want it to. There needs to be better control over planes beyond the current three options under Document Settings, which are too all-or-nothing. Essentially I want it to always default to Screen Plane, but I still want the option to switch the Layer Plane when I want it. But it should never automatically switch me away from Screen Plane without me telling it to. Then of course there's also "Automatic" plane which is very similar to Layer Plane and Screen Aligned Plane, with the difference being that it automatically finds surfaces to draw on (as seen with the blue highlighting as you hover). It's actually creating a temporary "Working Plane" (which is yet another type of plane). Objects drawn on an Automatic Plane or Working Plane both end up having an OIP which says "3D". So to keep it simple, I imagine that it's either Screen Plane or Not Screen Plane (since anything that's not Screen Plane results in the object living in 3D space). -
No worries, you're definitely not the first! Which is why I see it as an opportunity for user interface improvement. 🙂
- 5 replies
-
- 1
-

-
- resouece browser
- content
-
(and 1 more)
Tagged with:
-
Try clicking the dropdown at the top where it says "Hatches" and switch it to "All Resources". Then also upvote this topic:
- 5 replies
-
- 1
-

-
- resouece browser
- content
-
(and 1 more)
Tagged with:


