


SCParker
-
Posts
592 -
Joined
Content Type
Profiles
Forums
Events
Articles
Marionette
Store
Posts posted by SCParker
-
-
I believe what's happening is that you're actually doing two things when you're adjusting via grabbing the point on the truss in order to adjust the length.
1. you're grabbing the point. that's fine. This point is located at the bottom of the truss, at the zero plane.2. you're dragging it to change the length, also fine.
3. when you reach the shorter length location and click/release to set the new length, what's happening is that you've 'snapped' to a point on the top (+12") of the "3d Detail". Thus, you've changed both the length -and- Z-height location of the point you moved.
When you turn off the 3D Detail, you're hiding that top Z height point to which you were snapping to. Thus, the truss stays flat on the floor.If you -edit- the length in the OIP, you shouldn't have the issue.
If you edit the length in an iso view, you also shouldn't have the issue. Though this method can bring about other interesting results.
If you turn off snaps, you also shouldn't have the issue.
-
 1
1
-
-
Sam Jones' Autoplot tools does this.
http://autoplotvw.com/APSL_Download.asp
It's the best $35 you'll ever spend.
Joshua Benghiat also has a fantastic truss tag tool.
https://www.benghiatlighting.com/software/products/pl
-
2 hours ago, scottmoore said:
All seats become number 1. That does not happen if you move a section by a prescribed distance. Does that seem to be the case for you?
Yes, it does happen on occasion. I think my fix was to uncheck and check almost any box in the OIP and the section would do a recount/renumber.
Agreed on the editing of multiple sections at once. Still trying to figure out a workaround for that.
Thanks for watching.
Best, Scott
-
Hi Ryan,
I happen to be in the middle of making a series of how-to videos on just this topic. Here's a rough edit covering exactly this. I'll be posting the series soon.
hth, Scott
-
4
-
-
Thank you Mark, I'll give these a try.
-
Greetings all,
Anyone have a Mirror Ball? Or a workflow to pre-viz a mirror ball?
Thanks, Scott
-
Hi All,
I've just discovered the VW has posted the Braceworks presentation I did at the Design Summit back in 2018. It's a follow along type thing so there are questions and answers being done live. The working files for the session are also posted. 90% of the stuff shown can be done without the Braceworks add-on.
You'll need to log in to see the course.
Some items are a little out of date as I did the session using VW 2019 and there have been improvements in 2020. I'm looking forward to see what fixes await in 2021.
Best, Scott
-
Here are a few of my cable tools tutorials I've been working on. Most of the steps will work with both the VW and at AP versions of the tools.
-
1
-
-
@Daniel Dickman Did you edit the VW version or Sam's Autoplot Cable Tools version? How did you edit?
-
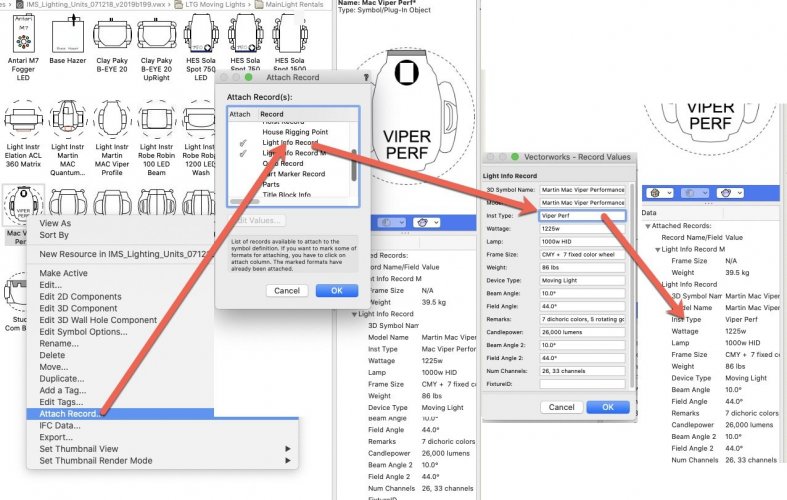
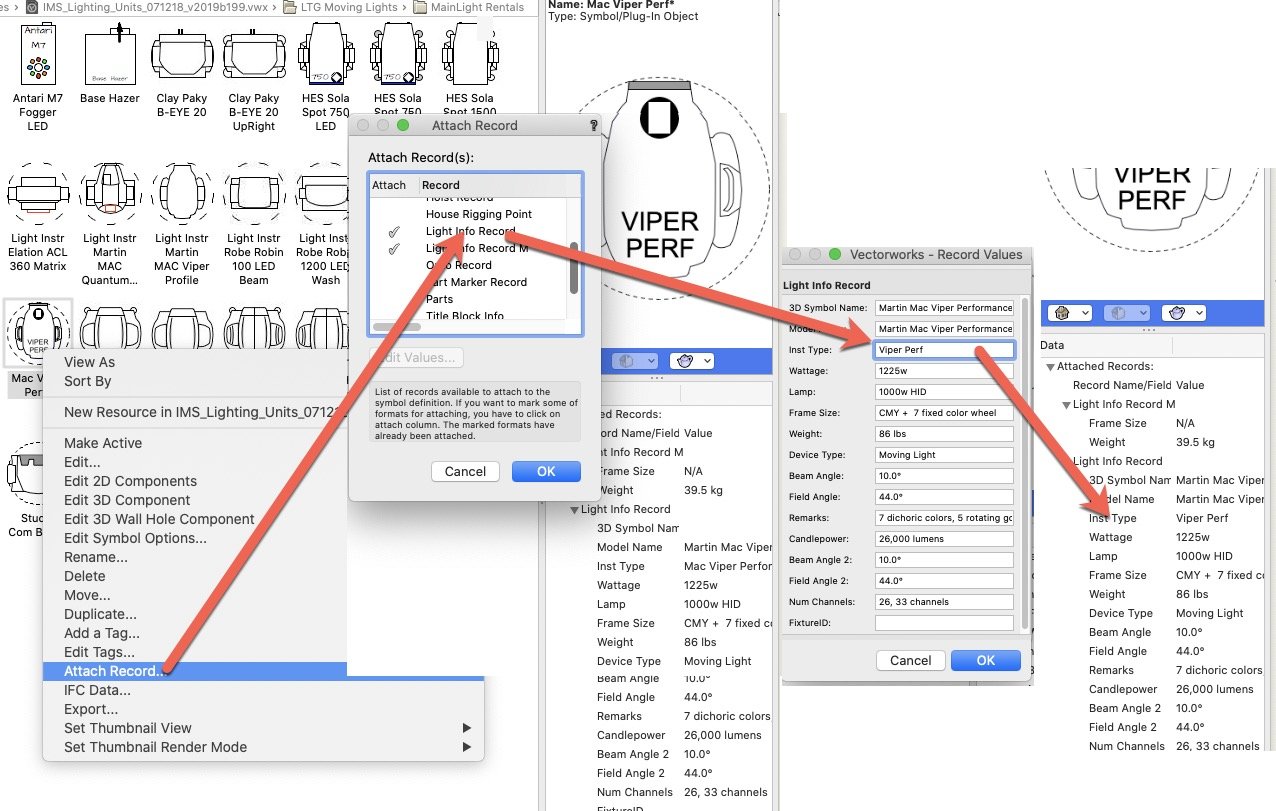
@Mii147 Since you use this symbol likely across drawings, you can update the symbol record itself.
- Right click the symbol in the RM and choose Attach Record.
- choose the Light Info Record
- Edit the Inst Type as you need
- Click OK
- Ignore the error and click OK
- Check the record that's attached to the light in the RM. It should now be updated.
- You can update all the items for the unit this way for future use.
Hth, Best, Scott
-
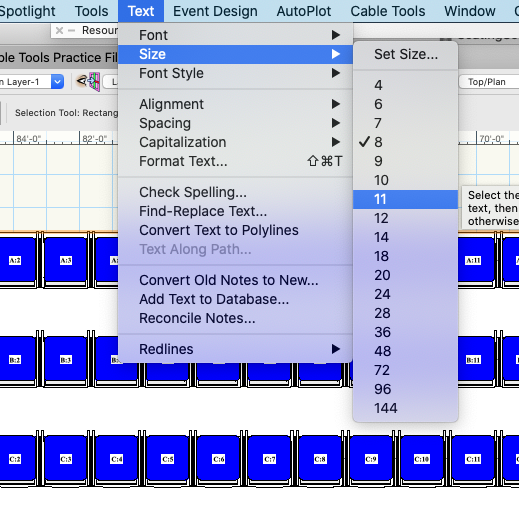
With the seating section selected, choose Text/Size and then a size.
If this doesn't work as planned, check the scale of the layer your seats are on.

-
3
-
-
@danm01 Thanks for this. Yes, it took me this long to come back around to this. Sorry for the delay in reply.
-
While I have very limited experience with scripting, when I create a Top Baseline line type manually, the loci appears at the same spot as the one your script creates. So, I'd say it's an issue with the Top Baseline rather than your script. This is assuming one expects the loco to align somewhere near the top of the letters.
Best, Scott
-
51 minutes ago, trashcan said:
sneak peak on the features - does that exist somewhere
Funny you should mention. I'm working on some video tutorials for my team on this. I'll post when I have some for you to see.
-
2
-
-
@trashcan You're welcome. Now, if you want to take cable tools to the next level, check out the AutoPlot version of cable tools. http://autoplotvw.com/
If you want to see them all in action, Sam did a four hour webinar showing just about every one. https://www.dropbox.com/s/peyn55413q0x8cp/Cable Tools Webinar.mp4?dl=0
His tools are the base for the VW version. He then continued his add on development. Best $35 you'll ever spend.
Best, Scott
-
2
-
-
-
Email your sales rep. Vision paid has a cost from year to year for the extra universes. Unfortunately, the Service Select people do not seem to speak with the Vision people when renewal time rolls around. My sales rep usually gets it fixed in a matter of hours.
-
My four extra buttons go to:
X
ESC
Fit to Object(s)
Top/Plan
-
3
-
-
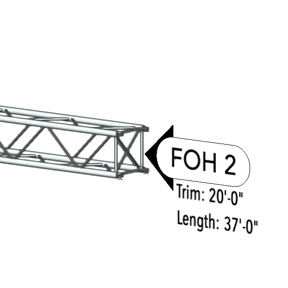
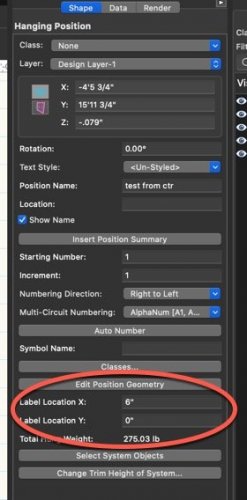
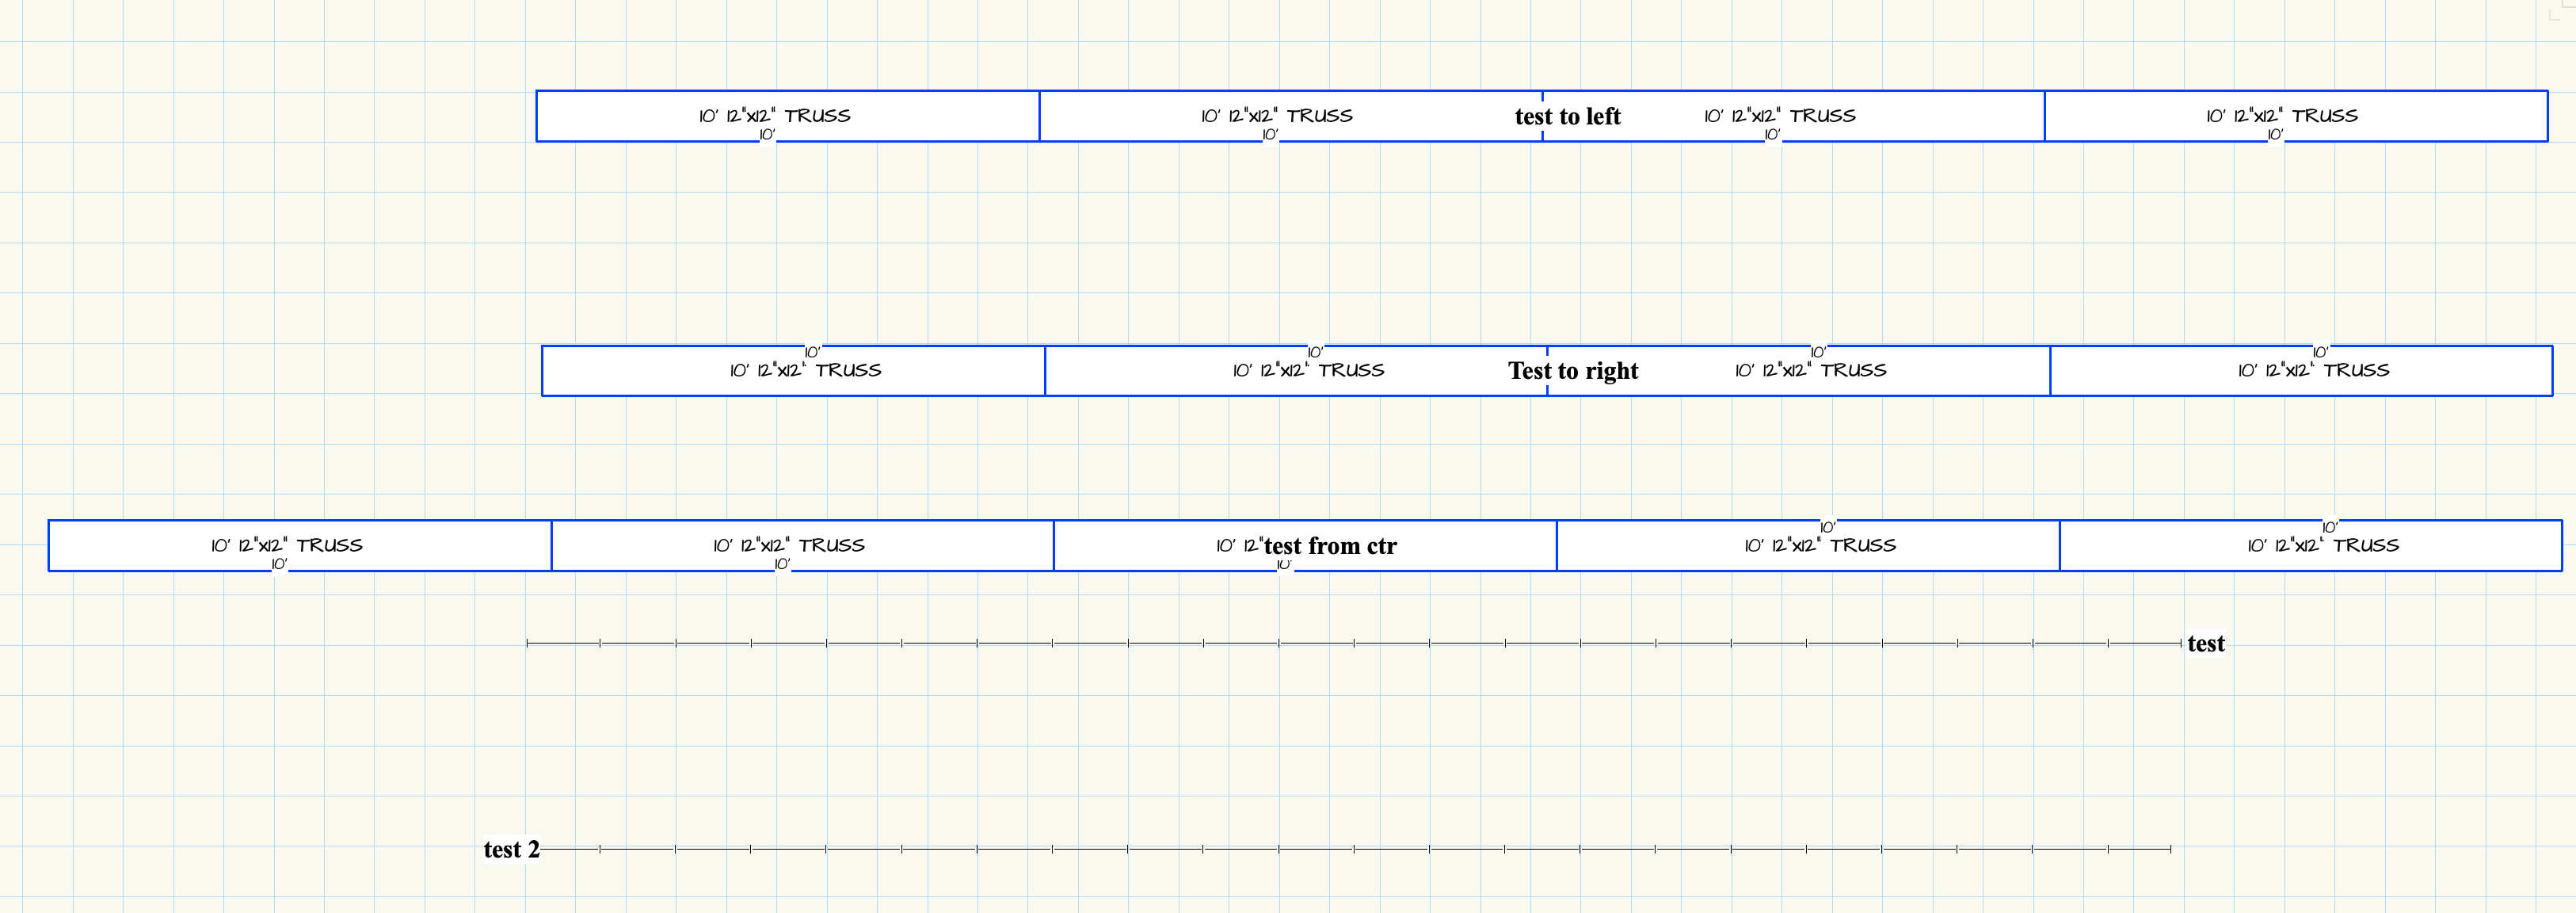
How are you creating your hanging position?
If you draw a line from one direction to the other and then convert to a hanging position, the label is placed at the ending point.
If you place a bunch of items, like truss, and then convert, the label doesn't know where the end point is and the label is placed at the center.
To make life easier to edit the location of the label, you can copy/paste distances for the label in the OIP (Object Info Palette). The catch is that the measurement number is based on the insertion point of the position. So, in my pasted examples, the longer truss label wouldn't line up if all three had the same measurement.
hth, Scott

-
1
-
-
What happens when you insert the base by itself? I've had some issues solved via starting from the bottom up..
For goal posts, aka, truss-U, I do the verticals from the floor up and then connect with horizontals at the end.
-
2
-
-
Solved. Turned out is was the virus detection software our tech dept. added to our technician's laptops. It has a "secure keyboard entry" setting that was getting in the way. When the setting is "paused" the V key worked.
-
2 hours ago, Pat Stanford said:
Custom workspace with V remapped to something else?
The V activates the tool itself, so we assume it's mapped properly.
We did check as well.
-
Greetings,
One of my colleagues is having an issue with the V key not revealing hidden class items. He's on Windows. I'm on Mac and it's working fine for me.
SP3.1
Pressing V does activate the View command and clicking on items to hide the given class does hide the class. Any ideas?
Thanks, Scott
-
Autoplotvw.com also has a lineset tool.


New Cable Suite - Preview
in Entertainment
Posted
To clarify, These are from the legacy cable tools. For users who are adding the legacy cable tools back into their workspaces, these other breakout tags are very useful.