


SeanOSkea
-
Posts
170 -
Joined
-
Last visited
Content Type
Profiles
Forums
Events
Articles
Marionette
Store
Posts posted by SeanOSkea
-
-
I am considering buying a Glowforge laser cutter for our studio but as it's a $5000 investment I want to make sure we are going to be able to use it with VW. There was another thread on this topic that seemed somewhat inconclusive as to how well VW works with cutters. Some said they had no problem, some said 'can't do it' and some had long workarounds via Illustrator or other software. Ideally what we'd like to do is build our digital 3d models, create viewports like we are doing for ink. but then convert those viewports to vector lines that the Glowforge can read and cut. No problem converting, changing attributes, and exporting in some other file format, but I don't want to spend hours in some other software preping files and crossing my fingers.
So where is the conversation on direct or semi-direct export from VW to laser cutters? Or for 3D printers for that matter--something else we are considering.
Love to get some official word.
Sean O'Skea
WW 18 Designer Windows 10
Various but capable PCs.
-
Keven
Success! I had done everything you did--EXCEPT that last sentence. I just created a helper any-old-where by extruding a rectangle rotating it and using a side. As soon as I used the 2D poly in side view on yz, it worked no problem. How odd.
I had no problem with my randomly positioned helper cube if I was curving on the 90s but as soon as I tried to change the angle--chime of doom.
Thanks for all the help on a Sunday morning. And Thanks Mark and mjm too.
Sean
-
mjm
Thanks that's great. I was playing with that and that is a viable solution, but we're after a curve that goes beyond 90degs. Shes's trying to create a giant piece of paper that curls back on itself like a wave.
I think this could work with some added effort.
Thanks
Sean
-
So you drew the rec. Rotated and extruded. Created another cube on the x/y and switched to side view. Then selected the "floor" and used the protractor snapped to the side of the cube.
I forgot I had my snapping off cause I was playing with SubSurfaces-- embarrassed emoji.
Anyway. It still failed.Is that your steps above?
-
Kevin
I can't get the protractor to snap to another object in the side view...
-
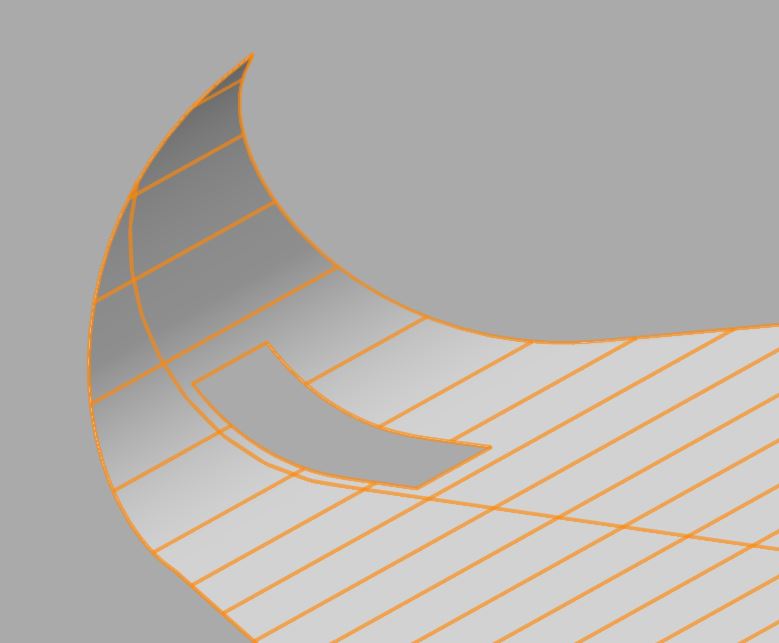
Interesting... As I suspected, it doesn't want to bend against the grid of polys. So as an experiment I made a giant rectangle. Made a 2nd rectangle the size of our curved floor. Rotated that in 2D on top of the big rectangle and did Clip. Then I extruded the smaller 45deg rectangle cut out of the bigger one and I could use the bend on the angle. You can see the rotated mesh in the highlight. I was even able to cut a further solid subtraction out of it with no problem. And to further confirm, a regular 90deg bend failed.
So I guess this will work but I'd love to learn a more elegant solution. With all the amazingly crazy shapes you can get out of the deform tool, curling up a corner doesn't seem too complicated. The preview in the bend mode even shows exactly what I'm after, but you click and a second or two later you get the dreaded "Failed" chime.

-
How zen like...
-
Yeah, but that's like half an hour of work instead of 60 seconds with the bend tool.
-
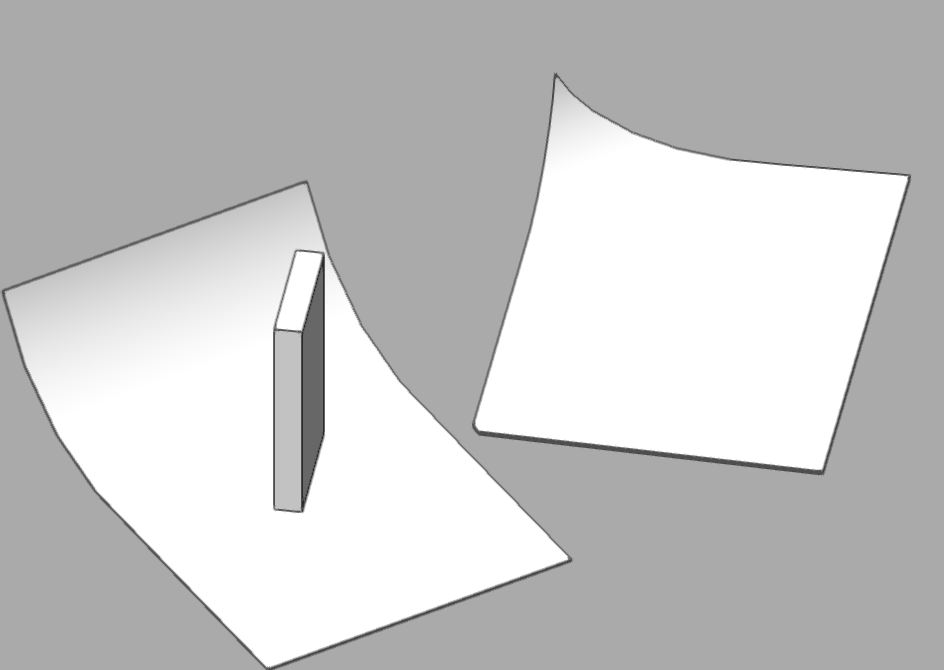
One of my students is trying to curve a large rectangular surface for the deck of a set she's working on. I knowingly brought her over to a computer and with an air of "prepare yourself to be amazed!" I selected the Deform tool and Bend finite limit mode and tried to curl up one corner of an extruded rectangle as she had hoped and embarrassed myself when it failed. I tried all kinds of different objects but could not get a bend on the bias.
In the attached image you can see the extrusion curled on the 90 and the block I stuck in to be a snapping guide to the bend protractor. So you can see the direction of the curve we are after.
The only thing I could get to work was to create a much larger surface than required and perform a solid subtraction but that seems like a clumsy option. You can see the result in on the right. I suppose a mesh or Subsurface would work too but that seems like a slow and tedious option compared to the Bend tool.
I assume it has something to do with the poly mesh aligned to the corners and not wanting to bend on the bias. So is there a way to rotate the mesh on the object? Or some other trick that will allow for what we're trying to do?
Thanks,
Sean

-
I'm still using 16 but I wonder if the ability to use radial and angle dimensions in a view port annotation has been addressed? The only thing I could find in the KB was some old posts from 2009 asking this same question--ah 2009...such and innocent time.
I've been working around it for years like we all have by drawing arcs and lines on top of the object in the viewport. Why do linear dims snap but not the others? As 98% of my (our?) dimensioning is happening in the annotations these days, it seems odd that these tools only work in the design layers.
I'm I missing something? Has this been addressed in 17 or 18?
Sean
-
-
Hi:
I'm an experienced user, running VW 16 and increasingly VW is running unbelievably sluggish. My last few projects have been incredibly frustrating. I'm working with regular objects, on medium sized projects not messing with sub surfaces, or complex curves--the same kind of stuff I've been doing for years all the way back to VW 10. But now things like maneuvering around a sheet layer, creating a new class--just opening the org palette--updating a viewport just routine stuff its like molasses. Were talking 6 or 8 seconds to open a palette. 60 or 90 seconds to update a viewport. Even just panning around the sheet layer is frustratingly laggy.
Is there something I can do to refresh? I never used to have this problem but both 15 and 16 have been increasingly slow. I'm not noticing any lost of performance in any other software I'm using.
My PC is not a monster workstation but its no toy and the same machine I've used in the past without any trouble. Is it a Windows 10 thing? Do I have some setting wrong?
Looking for hope.
Sean
VW 16 Win 10 1607
Dell XPS 8700 Intel Core i7-4770 3.4GHz 64-bit 16 RAM
-
Tim:
First question, how are you embedding your images into the body of your posts like that? That's great.
I've played with both settings but I've kept Ambient on at about 10% just to keep Occlusion on.
I do have the settings just about how you have it. As it's for a set design, the effect I'm going for is small pools of light on an otherwise dark black stage.
Looks like you are doing here close what I ended up with. I put the light slightly above the shade and set it to realistic falloff so I could get the short throw glow that I need. I could see putting the light obj low for a higher shade like your floor lamps here.
I think this is going to work for me it's just taken a lot of fussing to get everything balanced.
Thanks,
Sean
-
Thanks for the reply. Sorry I never answered. Yeah I never figured out what caused it. It must have been a faulty power supply as it started happening outside of VW. Even doing low impact stuff. It did it instantly when loading a transparency map.
I ended up sending the computer back. It was a disaster in many ways.
I've put the Quadro into my old Dell XPS and everything is fine. Even with just the 4 cores it renders almost as fast as the HP without all the other headaches. Renderworks is really the only time when I look at the clock. Everything 2D, wireframe, even Open GL is instantaneous with the old XPS. It's only when I add a few displacement maps and a couple of lights that I dream about a faster processor while watching the teapot clock.
Thanks
Sean
-
Yeah I got excited for a moment. I know you can hide objects from the render camera in C4D and others with the tick of a box. I thought is that possible in VW too and I've missed it all these years!?
That would be awesomely powerful. create a 1-sided NURBS ring with the normals on the outside and then apply a glow texture to it. Put the ring around the lamp shade, hide it from the camera and bam! That would be perfect.
Oh well, another one for the new features wish list.
Sean
-
Well I'm still not totally happy but this one looks a bet more like what I was after. This has a point light just above the shade with soft shadows and Realistic falloff. It has a slightly yellow color and is set to 160% Brightness.
The shade has backlight set to 80%.
I couldn't get a transparency setting with a glow texture that didn't look odd.
I'll keep playing.
Sean
-
Well in practice its still not what I need. Tim's low-powered backlight-only version makes the shade look good but doesn't emit anywhere near enough light to suggest that the lamp is actually lighting the scene. My settings were already close to what Alan had with the glow texture on bulb and a transparency to let the light out. But Alan's scene is lit by the HDRI. The lamp looks great but again the suggestion of the source of the light coming from the lamp itself is not there. I've played with point lights inside or just above the lamp like in the video Zoomer attached but it drastically increased render times with only slight improvements in the result.
So I'm kind of back to where I started. Thank you all for the quick replies I'll post whatever I end up with.
Sean
-
Thanks Alan. This is close to what I was doing but your settings are better. Thanks. I'm curious about what you meant by "You can turn off the render for the light bulb so you don't see the solid"
Sean
-
Thank you everybody. I'm eager to give these a go.
Sean
-
Hello all:
I'm working an a new show with a lot of onstage practicals--various lamps and such. I'm trying hard to match the quality of light in the attached reference photo. The other attachment is where I'm at. I've been messing with: Glow or back light on the shade, a point light inside the shade with various levels of transparency on the shade's texture. I've tried Fresnel on the shade. Just about everything. In this snap I have an overhead spotlight to cast the light on the floor.
When the Shade looks good, everything around it is dark and dingy. It looks like the lamp has a 20w bulb in it. But when enough light is being generated to look like the lamp is giving off a normal amount of light the shade is just blown out all to heck like it is here. I'm at the point of just doing multiple renders and patching then together in PS.
But before I do has anyone come up with a good lampshade solution?
Curious to hear.
Sean
-
I just purchased an HP z800 workstation.
Xeon X5570 2.93 48 RAM 64-bit Windows 10 Pro
It came with an FirePro V5800 GPU that wasn't playing well with Sketchup and a few other things. I've ordered a Quadro K2200, and in the meantime the retailer loaned me a Quadro 3800.
I thought the problem was the GPU but the same issue has occurred on both cards.
When I try to make an image prop or a texture with any kind of mask, clicking on any option on "Create Source for Mask" i.e. "grey scale" or "transparent Color" shuts down the computer. Not a freeze or a crash, a power outage. The first time it happened I thought the power had gone out. It also did the same crash once outside of VW while uploading a large file to Google Drive.
But without fail, every time I click "transparent color" while making a mask--boom instant power outage. Does anybody have any idea what is going on?
--Sean
-
What are the rules for modifying an interpolated surface. When modifying the mesh with the Reshape tool sometimes the tiniest vertex move will cause the mesh to fail. Other times it's fine with a crazy twisted shape that defy the laws of time and space.
Is there any documentation or tutorials or general guidelines about reshaping a NURBS mesh? It's like playing minesweeper waiting for the "Create NURBS surface Filed" pop up.
Anybody know?
Sean
-
Thanks Andrew:
Your sample on the thread you included is basically what I came up with it just feels so sketchy. I'll check out that webinar too. Thanks
Sean
-
I had a Canadian guy call me at 8:00am on a holiday (not post a comment or email--but a phone call!) asking me to do a tutorial on Vertical lighting positions. So I start messing around with Plot/Model view thinking I can pull something together in a few minutes. Yikes what a nightmare. So I go to the help--as usual no help. Next the WWW trying to find some documentation on what is a very common thing on a light plot and I can find next to nothing.
I mean I can get it to work with Plot/Model but it is so confusing and tricky I must be missing something. How can something this common be so difficult?
Mr Earlybird wants to hang lights on a vertical truss and generate 3D light info--not just a 2D plot. A perfectly reasonable request.
I want to help this guy but I'd like to know what I'm talking about more before I make a vid. There must be something somewhere for this extremely reasonable question.
Can anybody point me (us) toward any resources that can shed some light on vertical lighting positions.
Thanks Sean
Rendering Viewport turns everything black
in Rendering
Posted
Still having this issue in 2018. And its a lot more than Jim's 1 in 50 times. More like 1 in 5 for me. Restart works, but often it takes 2 restarts as Rnderworks will not load on the first restart.