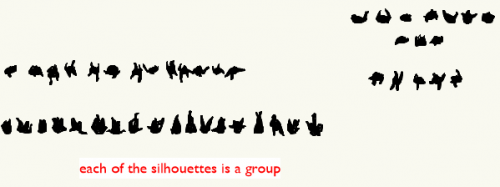
Marionette - Networks
70 files
-
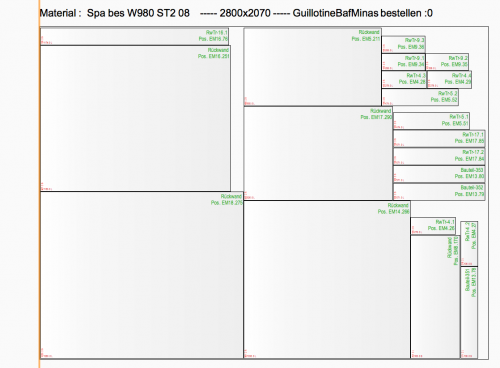
Rectangle Packing
By DomC
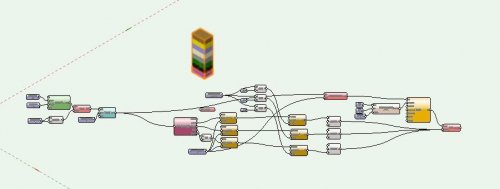
The heart of this Marionette example is the RectPack node. A node with over 2600 lines of code!
It supports dozens of packing algorithm to pack rectangles on another rectangular area in a space and time-saving way.
The right combination of packing and bin algo gives the ability to pack rectangles in a way you want to have them on your machines (as close as possible, always cut complete board, less cuts etc.)
Actually not even myself know, which packing algo ist right for which use case.
Also for professional use case, usually there is a machine dedicated software, which packs the port in a way which match best for the machine.
So I see the main use case to pack parts on a board for milling them on a cnc-machine as example for model-making. Workflows which uses a guillotine-workflow (always cut the whole board) often have special requirements which maybe could be reached with the choice of packing algorithm or maybe can not.
The Marionette Example based on foundational work:
http://www.secnot.com/ Python code for packing algorithm
Jukka Jylang - A Thousand Ways to Pack the Bin - A Practical Approach to Two-Dimensional Rectangle Bin Packing (2010)
Huang, E. Korf - Optimal Rectangle Packing: An Absolute Placement Approach (2013)
General Features:
- Input of basic data like length and width
- Input of additional data
- object input (node detects if part input are objects and process them like rectangles)
- sort by material
- use a list of stock materials
....
Not all input combinations works at the moment. Recommended to use the existing examples to get correct input values.
German Movie
https://youtu.be/yyZGvazL7Ik
948 downloads
-
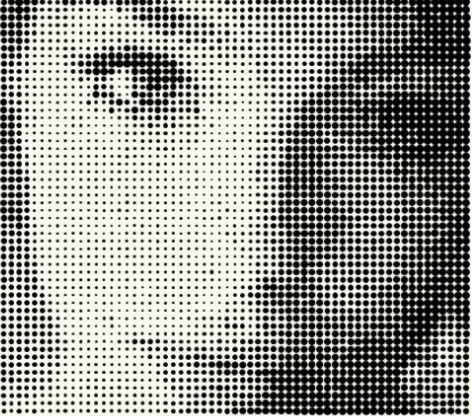
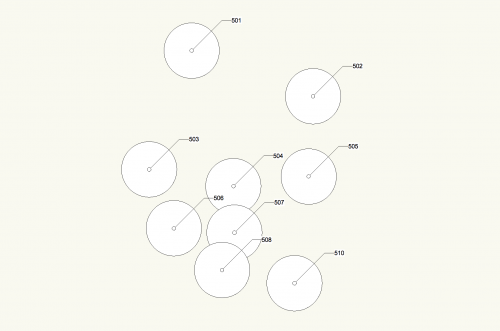
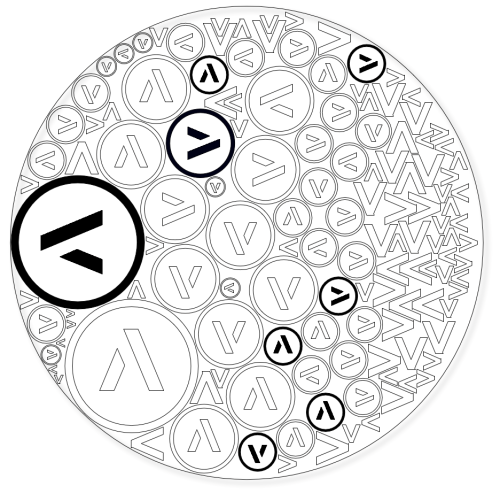
Halftone
By Bertf
This is my first marionette and it's based on @Marissa Farrell's image processing!
It takes an image and creates a Halftone object of it with black circles:
IMPROVEMENTS:
Final objective is that I'll add cnc DXF milling information to this marionette so that it can be milled on a CNC machine.
(We've milled Halftone parts in the past using Jason Dorie's Halftone program http://jasondorie.com/page_cnc.html)
Result:
Detail:
Maybe add a line milling. The image below is milled by us in the past with Jason's program.
Be able to change the dimensions of the final halftone image. Now it takes the pixel width and height of the image, but I would like this to be some adjustable parameters. Changing the height and width with Set Height and Set Width has no effect. Somebody has a suggestion on how to do this?
Now the marionette looks at the color of each pixel on a grid with step "Distance between Circle Centers". Related to that color, it creates a circle with according radius on the position of that pixel:
The problem with this method is that that single pixel on the grid has total control on the radius and the one pixel just next to the chosen one has no relevance. A better mechanisme would be that the size of the circle is related to the average color of all the pixels in the area of the square "Distance between Circle Centers"x"Distance between Circle Centers". Anyone with some advice on handeling this? I got some little progress on it:
Here we have 2 lists. One with all the pixels. X,Y coordinates of the pixel, Z is the radius of the circle according to the color. The other list has the X,Y values of the centers of where the final circles have to be placed.
Following this we need to check the distance of all the image points to the center points. If this is smaller than a condition, then that point's radius had to be taken into account for calculating the average radius of that centerpoint. Any one has a quick hint on how to create this in marionette?
217 downloads
-
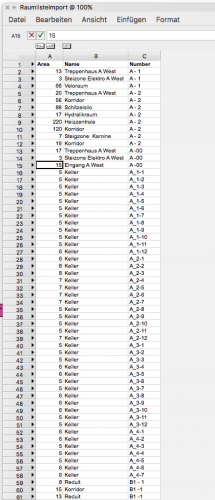
SpacesfromList.vwx
By DomC
This Marionette Script creates multiple space objects from worksheet data.
A very nice and time saving Marionette script to automate a routine peace of work.
Please consider, that the the script takes the area column and calculate the square with that. If you have a language settings with comma instead of points for decimal seperator, the calculation will fail. Use points as decimal character or eliminate decimal places in your list
845 downloads
-
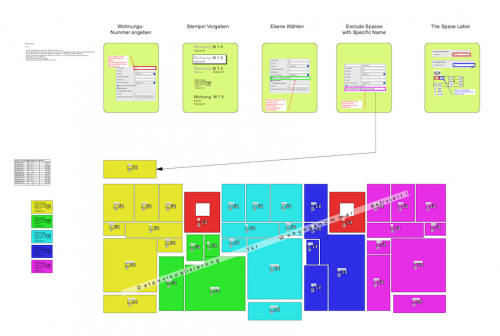
Apartment Tag / Wohnungsstempel
By DomC
About this File
This tool is available in english ("Apartment Tag") and german ("Wohnungsstempel"). The contents are nearly the same just translated.
This Marionette Tool summarize all Space-Areas, which are part of the same Appartement Number and shows the result in a symbol based Marionette stamp. Alternatively we can pull out sum of apartment area with a worksheet. But this Marionette is also a nice method to do this.
Instructions:
1. The Marionette Objects access to the field "11_Room ID" of the space object. Every other field can be used if necessary by editing script.
2. With the Marionette PIOs field "ApartmentID" you can tell the stamp, which apartment should be displayed
3. With the Checkbox "Layer from Apartment Tag". You can make the Tag collecting spaces of the tag's layer. Otherwise it will collect areas from the layer of the layer popup
4. You can exclude Spaces with specified keywords. Delimiter for Keywords is "$"
5. To use the Marionette PIO on the Target Document, copy/paste the PIO and then import the Symbol definitions from the Folder "ApartmentStamps" on the Target Document.
Über diese Datei
Dieses Werkzeug ist auf Deutsch ("Wohnungsstempel") und auf Englisch ("Apartment Tag") verfügbar. Die Inhalte sind bis auf die übersetzten Bezeichnungen nahezu gleich.
Der Marionette Wohnungsstempel fasst Wohnungsflächen zusammen und zeigt diese in einem Symbolbasierten Marionette-Stempel an. Raumflächen können auch mittels Tabellen ausgezogen werden. Der Wohungsstempel ist eine komfortable alternative.
Anleitung:
1. Räume welche zur gleichen Wohung gehören, werden mit dem Standardfeld "Raum ID" identifiziert. Auch andere Kriterien für die Wohungszugehörigkeit können festgelegt werden, dazu muss das Script geändert werden.
2. Im Feld "WohnungsID" wird eingestellt, welche Wohung angezeigt werden soll.
3. Mit der Checkbox "Ebene von Wohungsstempel" lassen sich explizit die Räume auf die Ebene des Wohungsstempels eingrenzen. Ist die Checkbox deaktiviert, gilt die Einstellung "Räume von Ebene:"
4. Räume mit bestimmten Namen, können hier ausgeschlossen werden. Trennung der Namen erfolgt mit "$"
5. Um den Wohnungsstempel auf einem anderen Projekt zu verwenden, zuerst das PlugIn mit copy/paste übertragen, dann die Symbolressourcen im Ordner "Wohnungsstempel" auf das Zieldokument importieren.
679 downloads
-
Image Processing
This network will read the data in an image existing in your file, for example, the color of each of the pixels, and create rectangles/extrusions with the same fill color. The extrusions are created at a height correlating to their brightness. The data extracted from the image could be used in many additional ways.
Please look at the different version options to locate a file for the Vectorworks version you are running.
332 downloads
-
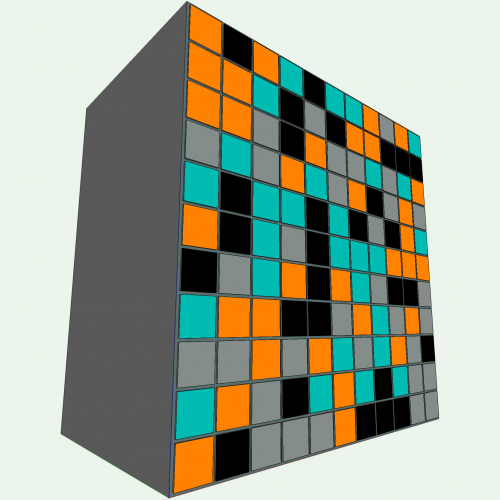
Tiles / Verlegewerkzeug
This tool is available in English ("Tiles") and in German ("Verlegewerkzeug"). The contents are the same only translated.
Dieses Werkzeug ist auf Deutsch ("Verlegewerkzeug") und auf Englisch ("Tiles") verfügbar. Die Inhalte sind die gleichen; nur übersetzt.
Tiles will help you when planning patterns of tiled sections, brick bonds, laying patterns, ceiling or fassade panels and evaluate it through datavisualization and worksheet.
For extensive information on usage of the tool, please consult the manual.
Das Verlegewerkzeug hilft Ihnen in der Planung von Fliesenspiegeln, Fassadenelementen, Mauerwerksverbänden und der Auswertung als Datenvisualisierung und Tabelle.
Für umfangreiche Informationen über die Bedienung des Werkzeugs, lesen Sie bitte die Anleitung durch.
Created by / erstellt von ComputerWorks GmbH.
Compatibility / Kompatibilität: Vectorworks 2019 +.
1,975 downloads
-
Component Wall from Surface
Here is a script that converts a NURBS surface to a wall with components that can be exported to IFC. The wall is an Auto Hybrid object made up of 3D Solids that match the thicknesses and attributes of the components of a referenced wall style. CWS_1212_IFC.vwx
A couple caveats: Make sure that wall style names do not have a single or double quotation symbol in the name - it will get misinterpreted by the String Node. Also, if your base surface is an Interpolated Surface, use the tool in the 3D Power Pack - Rebuild NURBS... - to convert it to a standard NURBS surface.
149 downloads
-
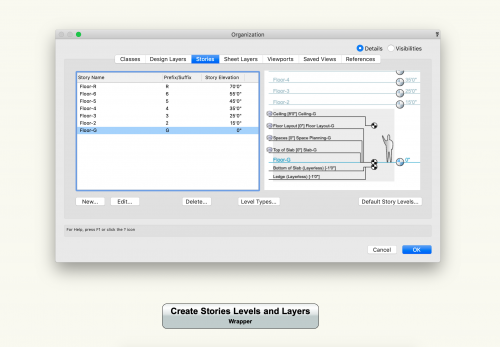
Create Stories
Creating stories, levels, and layers can be a tedious process, especially for tall, multistory projects. This wrapper allows you to automate that process based on an overall building height, typical floor heights, and default levels. You can create up to 4 Layer Levels and 2 Layerless Levels. To create fewer Levels, leave any of the Layer 1, Layer 2, Layer 3, Layer 4, Layerless Level 5, and/or Layerless Level 6 fields blank.
To use this script in a new file, simply import the wrapper into the file, place it in the drawing, and run the script. The settings of the script are very similar to the levels and layers created in the Vectorworks template, but you can customize them in the OIP of the wrapper. To change the Story suffixes and Story names, double click on the wrapper and the select the Get Story Names node. There are settings that you can change in the OIP of this node as well.
NOTE: Existing stories and story-associated layers that match the names of the new stories and layers will be deleted every time you run this script. Existing stories that DO NOT match the names of the new stories will not be deleted but may interfere with the creation of new stories. It is recommended that this script is run in a file without existing stories, levels, or story-associated layers.
142 downloads
-
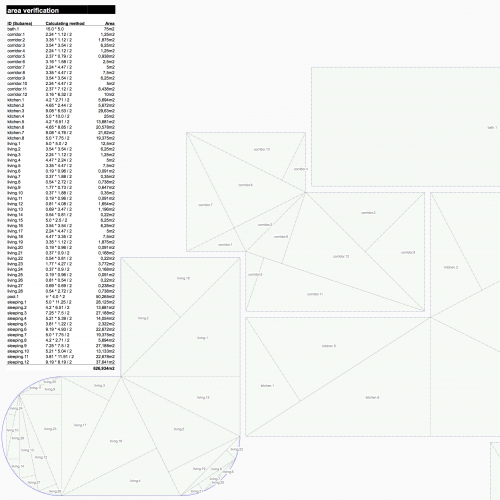
Area Verification
This tool was
commissioned by ComputerWorks GmbH
edited by: Markus Graf and Pascal Völz
supervised by: Antonio Landsberger
Compatibility: Vectorworks 2019 and higher.
Area Verification is a Marionette tool used to graphicallly and tabularly verify the surface area of spaces/rooms (circle, rectangle, poly line & polygon) in the class "Rooms". To do that the Marionette network divides the areas into calculatable subareas: circles, rectangles, triangles.
The graphical area verification using subareas is often required when applying for permits (building construction, landscaping).
For easier usage a wrapper node is provided.
How to use:
a) Place the geometries (spaces/rooms) in the class "Rooms".
b) Run the wrapper node.
c) Update table.
To do:
- update table when running script
- implement an add-on to turn spaces into polygons (soon)
114 downloads
- surface area
- verification
- (and 2 more)
-
Class Legend Attributes
By DomC
This Network ist not very flexible (world based values, just one row) but still useful.
You can insert and and ungroup for individual layout etc.
Note!
1. First delete all classes and replace to "none" or "keine"
2. copy the object on your file
3. If you do not delete classes on the original, you will paste the classes from the example in your file
101 downloads
-
Automatically convert groups (or other objects) into symbol
By Nico_be
Imagine: You have just received a file containing a large number of objects that need to be transformed into symbols. This typically happens when I buy a file containing objects that are not symbols after import.
This tool transforms the objects that meet the chosen criteria into symbols in OIP and places them in a new folder whose name you specify.
In OIP Choose : The symbol préfix; the name for the symbol folder and the criteria configuration.
Very handy!
Automatically convert groups V2019.vwx
57 downloads
-
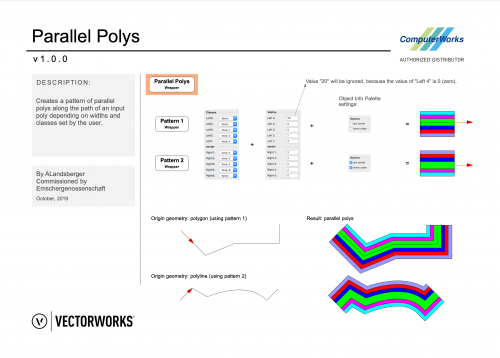
Parallel Polys
Creates a pattern of parallel polys along the path of an input poly depending on widths and classes set by the user.
Erzeugt ein Muster paralleler Polys entlang eines Polys in Abhängigkeit der vom Nutzer festgelegten Breiten und Klassen.
By ComputerWorks GmbH.
Compatibility: Vectorworks 2020 and higher.
84 downloads
-
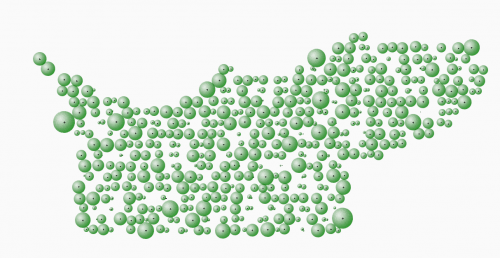
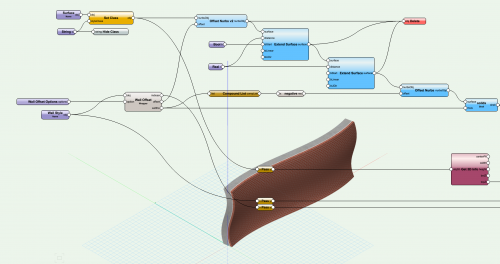
Circular Growing and Filling
By DomC
During my last Marionette-Project, I produced some simple geometry nodes. Which maybe can be useful to can make geometrical constructions instead of mathematical (trigonometry) calculations.
The Nodes:
"Perpendicular from Point to Line", "Parallel from Line through Point", "Circle-Circle Intersection", "Line-Circle Intersection", "Line-Line Intersection", "2 Circle Middleline" and some more.
Also the more Complicated Nodes "Circle tangent to 2 Circle", "Point or Circle tangent to 3 Circles"
666 downloads
-
Panel Arrays
In Vectorworks, there is a command that allows the user to build a surface array, i.e. to array a symbol across a NURBS surface. This is a powerful tool, but creating patterns with multiple symbols is currently missing as an option in the software.
With this in mind, these two Marionette scripts are meant to help create panel patterns on a wall with existing 3D symbols:
· The wrapper “Panelization with Rotation” arrays a single symbol across a surface, but can apply a rotation to that symbol in either a user-defined pattern or randomly.
· The wrapper “Panelization with Multiple Panels” arrays multiple symbols across a surface in either a user-defined pattern or randomly.
For both scripts, the horizontal and vertical reveals between panels can be set separately, allowing for quick visualization of multiple paneling design options.
These scripts only work when the NURBS surface is flat and the face is rectangular — the symbols will not follow a curved surface. This is meant to be used for panelized walls, which are much more likely to be flat. (The surface however does not have to be vertical; it can be slanted or horizontal.)
The panels are distributed from left to right, top to bottom across the surface — if the pattern does not fit exactly across the surface, there will be extra room left at the right and/or bottom edge of the surface. When paneling a wall, it is more likely that the full surface or the reveals will be resized to fit the appropriate number of panels versus trimming the panels along one side.
205 downloads
-

Extrude Rails by rectangle / custom profile by name
Multiple experiments of profiles created from a nurbs surface in order to create multiple rails with dozens or hundreds of nurbs profiles simultaneously. This Marionnette is based off of Freeform truss objects, so all credit goes to @Marissa Farrell. Thank you!
70 downloads
- extrude along path
- rails
- (and 1 more)
-
Convert text to 3D Locus
By Nico_be
In French :
Parfois un plan de mesurage ne contient que les textes des niveaux sans aucun symbole ou point 3D. Il n'est donc pas possible de créer un terrain 3D.
Ce script permet de créer pour l'ensemble des points des points 3D ayant pour valeur Z le texte lui même, sur une autre couche .
In English :
Sometimes a measurement plan contains only the texts of the levels without any symbol or 3D point. It is therefore not possible to create a 3D terrain.
This script makes it possible to create 3D points for the set of points having the value Z the text itself, on another layer.
180 downloads
-
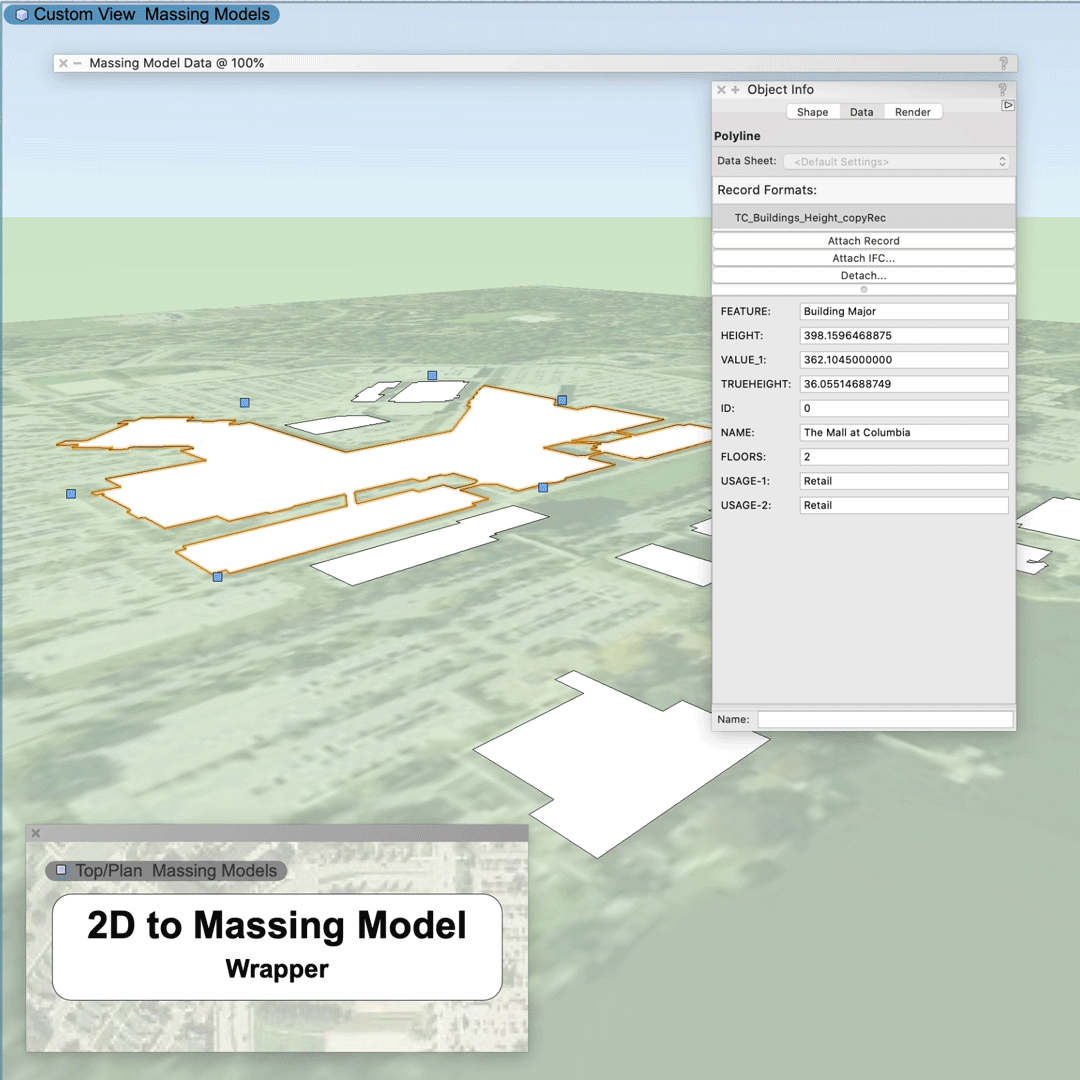
2D to Massing Model
This file contains a Marionette network that converts 2D polys into Massing Models. It reads the Record Format info attached to the poly and uses that information to create the Massing Model. It also transfers all attached Records to the Massing Model. This network is useful for converting shapefile data into Massing Models. To use the network, select the wrapper and make sure that all the fields in the Object Info palette correspond correctly to the objects that you want to convert. All of the info that you want to use to create the Massing Model must be in a single record, but all attached records will be transferred over by the script.
Also included in the file is a worksheet that allows you to calculate Floor Usage Data for each floor of a multistory building. If you have one type of usage on the first floor, and a different type of usage on the upper floors, you can calculate that in the worksheet. (If you have more than two types of usage, it can only calculate the first two types.) To change the usage type in the worksheet, just type the name of the usage type, like "Retail" or "Residential" into the top row of one of the Area by Usage Type Columns. The lower rows will adjust appropriately.
180 downloads
-
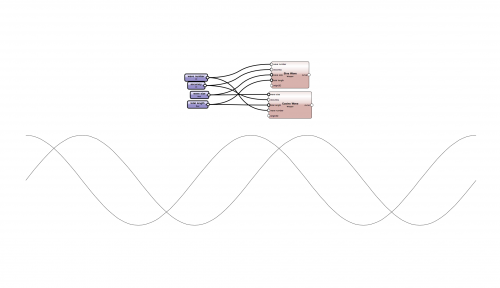
Sine Wave
Here are a couple wrappers that output sine and cosine waves. I thought the math enthusiasts might find these useful.
62 downloads
-
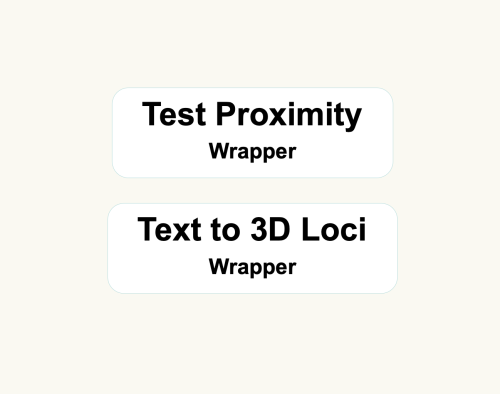
Test Proximity and Text to 3D Loci
These scripts are similar to networks I posted in January of 2019. Here is the link to the previous post.
The Test Proximity script is the same one as in the older post, but has been updated to Vectorworks 2023. These scripts are primarily for Landmark users - they can be used to convert a file that contains 2D geometry with unassociated text labels to 3D loci (if the text is a number value representing an elevation). To use these wrappers, first group the geometry and text labels you want to convert and give the group a name in the Name field of the OIP. Then copy/paste the wrappers into the file and set the parameter "Group Name" in the two wrappers to the name you gave your group. Next, run the Test Proximity wrapper. Lines between text and geometry will appear. If there is a line between each geometry and label pair, you can run the next wrapper. If there are multiple lines from a single piece of geometry to more than one text label, adjust the text labels in your group, placing these particular labels closer to their respective geometries and rerun the Test Proximity wrapper until there is a single line for each text and geometry pair. Finally, run the Text to 3D Loci wrapper to create 3D loci at the same location as the 2D geometry with a z-height that matches the text value.
84 downloads
-
Extrude & Array
By AlanW
Hi just a file that may assist in the learning of Marionette.
I have a lot of files that i feel should be out there that may assist. Hope this is the right location to place them.
Alan
124 downloads
-
Create Individual Property Lines from Survey Data
This is a pretty basic Marionette object to help me build property lines without having to use and troubleshoot the existing Vectorworks Property Lines tool.
It builds a single line based on the entry of survey data (ie: 125.5' N 40° 35' 19" W). This works one at a time and does not build arcs. I've tested it on a few particularly messy plats and it seems to work well enough.
After producing a single property line, ungroup and arrange it where you want it (Marionette will place the line at 0,0), then repeat until you're finished, easy! If you're super into the Property Line tool, you can gather all the lines together, compose them into one poly, and Create Objects From Shapes the whole thing into an official Property Line.
I hope you find this helpful.
5 downloads
(0 reviews)0 comments
Submitted
-
Create classes - create design layers - create sheet layers with viewports
By sjm_htc
This file automatically creates classes and design layers. Then after these are created it can generate sheet layers with title blocks and viewports.
57 downloads
(0 reviews)0 comments
Submitted
-
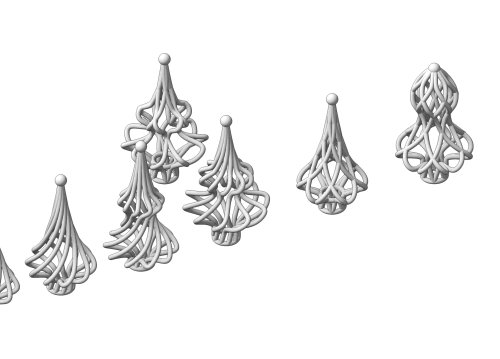
Xmas-tree top generator
Hi,
If you're still looking for Chrismas decorations, why not create them by yourself. This network creates Christmas tree top based on any profile. User can specify number of extrusions and how much they should be twisted around along the base shape. It can also be used for generating baubles with some small changes.
For 3D prints it is better to add solids after running the network, so the network creates separates objects.
28 downloads
(0 reviews)0 comments
Submitted
-
Test Proximity and Associate Existing Trees
This file is most useful for Landmark users but could be adapted to other plugin objects (PIOs). The purpose of these scripts are to take surveys of existing trees that consist of "dumb" data - pieces of geometry and text to label trees on a survey - and convert it into Existing Trees with the relevant text data associated.
The first network, "Test Proximity," runs a check to make sure that each piece of text is closest to its associated piece of geometry. This is necessary to make sure that the second script will work properly.
The second network takes the center of each piece of geometry and places an Existing Tree there. It will use the saved red symbol in the Resource Manager as a template, so if you use particular default settings for your Existing Trees, you can edit the red symbol. (Some day maybe there will be an Existing Tree Style!) The network will also transfer the text data to your chosen field of the Existing Tree PIO. In this network, it is set to transfer to the Tree No data field.
This network could be adapted to other PIOs if needed.
130 downloads
- landmark
- existing tree pio
- (and 1 more)
(1 review)0 comments
Submitted
-
Vectorworks to SVGnest direct connection
By DomC
This Marionette can be interesting for Laser and cutting jobs. But Mainly it is Study how to use the Vectorworks Web-Dialog to access a Web-Application. The Date is send and reveived over (REST) API. The Exchanged Data is an SVG which is parsed over JSON Formats. Used Engine for Nesting is www.svgnest.com
for rectangular shapes, use this one:
This Marionette Network is sending all shapes on a layer (or by custom criteria)
to a Web-App which contains a SVGnest installation and a custom API for Vectorworks
1. Draw a BIN on which you want to NEST the other shapes. Place it topleft of the BIN on your Origin
2. Tested with Layer Scale 1:50, 1:20 mm and BINs of ca. 1-2 meters. It works with all
Units, sizes and scales but the very first Preview may be very small, cropped or too big.
3. No Holes in polys are supported directly (you can have but nothing would be placed inside)
But if you draw a smaller shape inside another it is taken as a hole.
4. If ready run the Marionette (You will have to cancel by not saving the result or cancel in
the dialog after the nesting process)
5. If you have multiple CPU cores it will go much faster. It uses one worker for every core.
6. Click on your BIN, choose the settings button (twice).
If you define an offset between the parts reduce the curve-tolerance smaller than one. 0.5
as Example or lower if you see any issues.
7. Press START and wait till parts are placed on the BIN. The Process will calculate infinite and
try to optimize the result till you click STOP.
8. Press SAVE, wait a sec and then just exit the VW WebBrowser by close or press the Button
Bottom right to close.
9. Choose Option to move your original shapes on the BIN(s) or a copy
Known Limitations:
- Some shapes are not converted correctly to SVG maybe. Which is not a big accident because the Application do not import some geometry it keep the original geometry.
- Complex geometry could take (too) long to nest.
- I take took no control on the nesting process which is processes the NESTING the process
is powered by https://svgnest.com
Notes:
You can also use an alternative way:
1. Export DXF to inkscape and export SVG
2. Or directly export SVG by https://forum.vectorworks.net/index.php?/topic/78280-export-to-svg-menu-command/
(The exported SVG from the Marionette is not directly accessable and also the quality and compatibility is just fitted to that one usecase so quality of the Marionette SVG is maybe low compared to the above professional Export-PlugIn)
3. Import it to SVGnest.com or use their new project DeepNest
As I mentioned. Primary a study how connect to an even bigger world out from a Marionette. BTW such a connection can be a task nearly as big as the nesting-part itself.
52 downloads
(0 reviews)0 comments
Updated
-
Top Downloads
-
-
Topics
-