

NNA Technical Support Note: Allocating More RAM to 32-bit Windows Systems
By default, Windows 32-bit systems allocate up to 2 GB to applications, even when 4 GB of RAM is installed. Vectorworks 2009 can take advantage of a setting in Windows Vista and XP (SP2 and later) systems that allocates more RAM (up to 3 GB) to the application; this can prevent system crashes for complex Vectorworks files that require significant virtual memory. The remaining 1 GB is reserved for system functions.
Administrator privileges are required to change these Windows settings. Follow these procedures at your own risk. Nemetschek North America is not responsible for any damages, including direct, indirect, incidental, and consequential, or the loss of data that may occur as a result of implementing these procedures. Changing the RAM Allocation in Windows Vista
To allocate up to 3 GB of RAM in Windows Vista/Windows 7:
1. Right-click on Accessories > Command Prompt from the Start Menu, and select Run as administrator.
The Command Prompt window opens.
2. Type bcdedit/set IncreaseUserVA 3072 at the command line.
3. Press Enter.
4. Type Exit or press the “x” at the top right corner of the Command Prompt window to close the Command Prompt window.
5. Restart the computer.
Note: To revert to the original RAM allocation and undo this change, repeat the above procedure, but type BCDedit/deletevalue IncreaseUserVA at the command line.
Changing the RAM Allocation in Windows XP
Optimizing the Paging File Size
Before changing the RAM allocation in Windows XP, verify that the system’s paging file size is optimal.
1. Select Settings > Control Panel from the Start menu.
2. Open the System settings. In the System Properties dialog box, click the Advanced tab.
3. Click Settings under the Performance area.
4. In the Performance Options dialog box, click the Advanced tab.
5. Click Change under the Virtual Memory area.
6. In the Virtual Memory dialog box, change the Initial Size and Maximum Size values to 4092 (in this case, double the amount of installed RAM).
7. Click Set.
8. Click OK until the Settings dialog box is closed.
Changing the RAM Allocation in Windows XP
1. Right-click on My Computer, and click Properties.
2. Click the Advanced tab in the System Properties dialog box.
3. Click Settings under the Startup and Recovery area.
4. The Startup and Recovery dialog box opens.
5. Click Edit to open the boot.ini file in Notepad.
6. Save a copy of the boot.ini file elsewhere, in case you need to revert your changes.
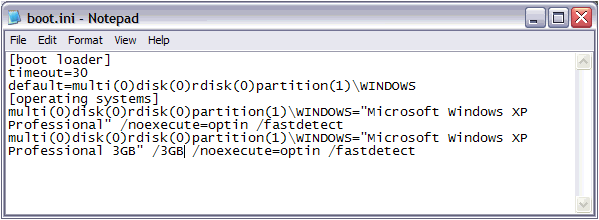
7. Highlight the last text line within your boot file. The exact wording may be different on your computer.
8. Copy the selected text from your boot file (Ctrl+C) and paste it below the line (Ctrl+V).
9. In the copy of the pasted text, add 3GB after the Windows version name, and /3GB as shown below. Do not delete any existing text.
10. Select File > Save to save the boot file changes.
11. Click OK until the System Properties box closes.
12. Restart the computer. During startup, select the 3GB option.
Note: If problems occur at startup, drivers may need updating on the computer. To revert to the original RAM allocation and undo this change, restore the boot.ini file contents and restart the computer.
Edited by JimW
Report Article
There are no comments to display.
Join the conversation
You can post now and register later. If you have an account, sign in now to post with your account.
Note: Your post will require moderator approval before it will be visible.